Converting TVAnytime XML to Impala and Parquet
In this example we will use Flexter to convert an XML file to parquet. We then query and analyse the output with Impala (using Cloudera VM).
Flexter can generate a target schema from an XML file or a combination of XML and XML schema (XSD) files. In our example we process ContentCS.xml file from the TVA data (https://tech.ebu.ch/tvanytime). “TV-Anytime” (TVA) is a full and synchronized set of specifications established by the TV-Anytime Forum. TVA features enable the search, selection, acquisition and rightful use of content on local and/or remote personal storage systems from both broadcast and online services.
The XML file looks like the one below
Table of Contents
|
1 2 3 4 5 6 7 8 9 10 11 12 13 14 15 16 |
<Name xml:lang="en">Arts</Name> <Term termID="3.1.4.1"> <Name xml:lang="en">Music</Name> <Definition xml:lang="en">musical subject</Definition> </Term> <Term termID="3.1.4.2"> <Name xml:lang="en">Dance</Name> <Definition xml:lang="en">including ballet</Definition> </Term> <Term termID="3.1.4.3"> <Name xml:lang="en">Theatre</Name> <Definition xml:lang="en">theatre review</Definition> </Term> <Term termID="3.1.4.4"> <Name xml:lang="en">Opera</Name> </Term> |
Parsing XML using Flexter to generate Parquet output
Both the XML files and the XSD are available for the data and we will use the information from both files to generate the target schema.
|
1 2 3 4 5 6 7 8 9 10 11 12 13 |
# We first test that the XML file is well formatted by simulating the execution the skip switch (-s) $ xml2er -s ContentCS.xml # Next we extract the statistics from data.xml. Statistics are used to generate the target schema. We use the xml2er command line tool without the skip (-s) switch. $ xml2er ContentCS.xml … # The result of this operation is an ID (origin: 5). We will use this ID in subsequent steps origin: 5 job: 6 # Some useful execution statistics startup: 3717 ms parse: 752 ms stats: 6403 m Map: 3 ms |
Now that we have gathered statistics from our XML sample we can generate the logical target schema with the xsd2er command line tool using the -k switch (-k is shortcut for –use-stats)
|
1 |
-k, --use-stats <ID[,ID2..]> Use the stats to generate the new schema |
Let’s go through the steps
|
1 2 3 4 5 6 7 8 9 10 11 12 13 14 15 16 17 18 19 |
# Template $ xsd2er -s -k<XML Schema ID> -g<Optimization Level> INPUTPATH # We first simulate generating the target schema with -s skip switch $ xsd2er -s -k5 -g3 ContentCS.xsd # everything worked. Now running the command for real without skip $ xsd2er -k5 -g3 ContentCS.xsd … # schema origin: 6 logical: 4 job: 8 # statistics startup: 444 ms stats: 53 ms parse: 670 ms build: 229 ms write: 47 ms map: 334 ms xpaths: 207 |
Now we use the Logical Schema ID (origin: 6) to convert the XML data to Parquet
|
1 2 |
# First simulating the conversion process $ xml2er -s -l4 ContentCS.xml |
When the command is ready, removing –skip or -s, allows us to process the data. We direct the parquet output to the output directory for the data.xml file. Let’s first create a folder “output_for_impala” as the location to extract the generated output. The location is given by -o parameter when extracting data using xml2er command.
|
1 2 3 4 5 6 7 8 9 10 11 12 13 14 15 |
$ mkdir output_for_impala $ xml2er -l4 -o root/output_for_impala/ -f parquet -S o ContentCS.xml … 17:16:24.110 INFO Finished successfully in 17701 milliseconds # schema origin: 7 logical: 4 job: 9 # statistics startup: 2899 ms load: 7549 ms parse: 179 ms write: 5470 ms stats: 1083 ms xpaths: 207 |
We can find the extracted parquet files in the output folder. It is a directory structure, which you can find in the current directory. We can ‘ls’ to see the contents of the .parquet folder as shown below.
|
1 2 3 4 5 6 7 8 9 10 11 |
# Looking at the parquet files generated $ ls -l total 12 drwxr-xr-x 2 root root 8192 Jan 25 8:11 ClassificationScheme.parquet drwxr-xr-x 2 root root 8192 Jan 25 8:11 ClassificationScheme_Term.parquet drwxr-xr-x 2 root root 8192 Jan 25 8:11 Term.parquet … # Looking inside a parquet folder $ cd Term.parquet $ ls part-00000-d66f8705-eced-44db-9ef5-5d0d76548176.snappy.parquet _SUCCESS |
Loading and Querying the XML output with Impala
Next, we load the parquet files into Impala and use the Impala-shell to query the parquet files. Impala is an open-source add-on to the Cloudera Enterprise Core that returns rapid responses to queries. We start with the installation of Cloudera QuickStart VM. Cloudera QuickStart virtual machines (VMs) includes Impala as well as other essentials like CDH, Cloudera Manager and Cloudera Search.
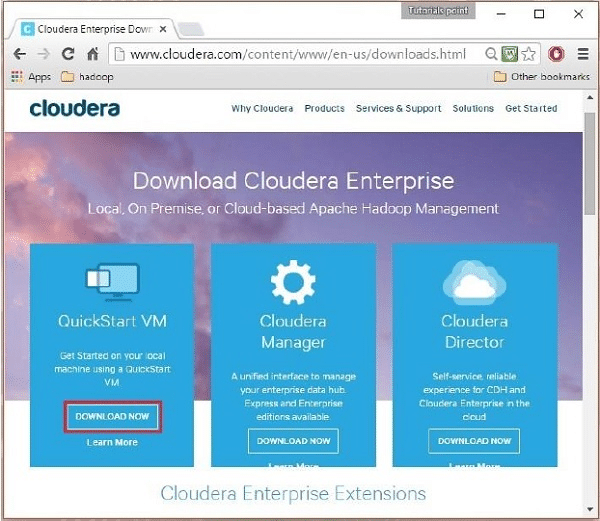
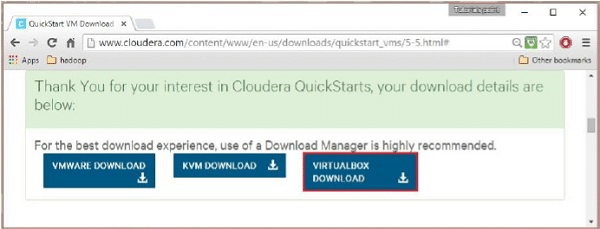
We can also install without Cloudera Manager. Before installing Impala manually, make sure all applicable nodes have the appropriate hardware configuration, levels of operating system and CDH, and any other software prerequisites here. We will start with downloading the latest version of Cloudera QuickStartVM from the cloudera website. Next, we download the QuickStartVM as shown below

Cloudera provides its VM compatible VMware, KVM and VirtualBox. We can go ahead with any version as per our requirements (For the sake of this example we will go ahead using the VirtualBox version ). There is also a docker version of Cloudera VM which is available on the Cloudera website. After downloading the cloudera-quickstart-vm-5.5.0-0-virtualbox.ovf file, we need to import it using VirtualBox.

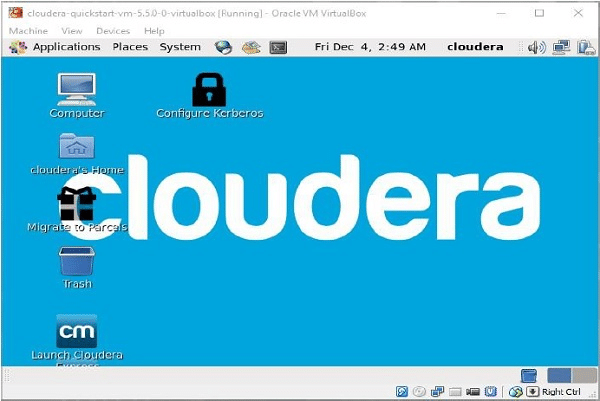
After importing Cloudera QuickStartVM image, start the virtual machine. This virtual machine has Hadoop, cloudera Impala, and all the required software installed. The snapshot of the VM is shown below.

Once we have Cloudera VM running on the VirtualBox, we can fire up the impala-shell on the terminal as shown below. We login as a super user
|
1 2 3 4 5 6 7 8 9 10 11 12 13 14 |
# Login as a Super User using the password ‘cloudera’ [cloudera@quickstart ~]$ su Password: cloudera # Initiate the impala shell using the following command [root@quickstart cloudera]# impala-shell Starting Impala Shell without Kerberos authentication Connected to quickstart.cloudera:21000 Server version: impalad version 2.9.0-cdh5.12.0 RELEASE (build 03c6ddbdcec39238be4f5b14a300d5c4f576097e) ******************************************************************************** Welcome to the Impala shell. (Impala Shell v2.9.0-cdh5.12.0 (03c6ddb) built on Thu Jun 29 04:17:31 PDT 2017) The HISTORY command lists all shell commands in chronological order. ******************************************************************************** [quickstart.cloudera:21000] > |
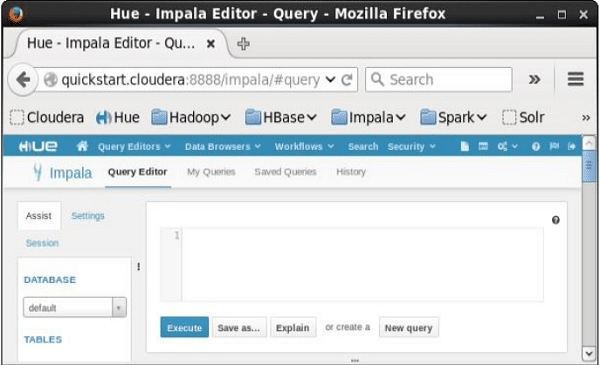
In addition to Impala shell, you can communicate with Impala using the Hue browser as shown below.

Firstly, we need to share the output of Flexter with the Cloudera Virtual Machine. As shown above we can place all the files generated into a shared folder in the Cloudera VM and then copy the folder into ‘hdfs’. Let’s say the .parquet files are placed in the folder ‘/home/cloudera/flexter_output/’ then we need to copy the output files to a new folder in hdfs say ‘hdfs/parquet_imapala_input’
Alternatively, we could have installed Flexter on the Cloudera VM and generated the XML output there directly.
|
1 2 3 4 5 6 7 8 9 10 11 12 13 |
# Creating a hdfs path and copying the Flexter output there # Creating a folder /hdfs/input $ hdfs dfs -mkdir /hdfs/parquet_input $ hdfs dfs -ls /hdfs/ Found 1 item drwxr-xr-x - cloudera supergroup 0 2018-01-29 08:34 /hdfs/parquet_input’ # Copying the Flexter output to the directory created above in order to read it from the impala-shell $ hdfs dfs -copyFromLocal /home/cloudera//flexter_output/* /hdfs/parquet_input/ $ hdfs dfs -ls /hdfs/parquet_input Found 3 items drwxr-xr-x - cloudera supergroup 0 2018-01-29 08:34 /hdfs/parquet_input/ClassificationScheme.parquet drwxr-xr-x - cloudera supergroup 0 2018-01-29 08:34 /hdfs/parquet_input/ClassificationScheme_Term.parquet drwxr-xr-x - cloudera supergroup 0 2018-01-29 08:34 /hdfs/parquet_input/Term.parquet |
We have the three parquet files in hdfs and the files are ready to be read into impala. Then we launch impala using the impala-shell in a terminal and create a database to work in
|
1 2 3 4 5 6 7 8 |
# Fire up the impala shell $ impala-shell … impala-cloudera> CREATE DATABASE IF NOT EXISTS parquet_db; Query: create DATABASE IF NOT EXISTS parquet_db Fetched 0 row(s) in 0.41s impala-cloudera> USE parquet_db; Query: use parquet_db |
After we have created the database we use the created database and load the parquet files generated using impala as below
|
1 2 3 4 5 6 7 8 9 10 |
# Creating tables for the parquet files generated from Flexter # Template impala-cloudera> CREATE EXTERNAL TABLE <Table-name> LIKE PARQUET '/path/to/flexter/output/output.parquet/part-...snappy.parquet' STORED AS PARQUET LOCATION '/path/to/flexter/output/output.parquet/'; … # Creating external tables for the Flexter output generated above impala-cloudera> CREATE EXTERNAL TABLE Classification LIKE PARQUET '/hdfs/parquet_input/ClassificationScheme.parquet/part-00000-50056314-f4e4-4abf-a9a7-303c4e51f521.snappy.parquet' STORED AS PARQUET LOCATION '/hdfs/parquet_input/ClassificationScheme.parquet/'; impala-cloudera> CREATE EXTERNAL TABLE Class_term LIKE PARQUET '/hdfs/parquet_input/ClassificationScheme_Term.parquet/part-00000-89756314-f3e9-4abf-a9a7-a3c45e51f521.snappy.parquet' STORED AS PARQUET LOCATION '/hdfs/parquet_input/ClassificationScheme_Term.parquet/'; … impala-cloudera> CREATE EXTERNAL TABLE Term LIKE PARQUET '/hdfs/parquet_input/Term.parquett/part-00000-9a35000c-535c-4bf3-af4e-abcad4d61ef3.snappy.parquet' STORED AS PARQUET LOCATION '/hdfs/parquet_input/Term.parquet/'; … |
We can take a look at the various tables in the database which we are using by using the ‘show tables’ command and also describe tables which we have created using Flexter. We can see that the schema is inferred directly from the parquet files which we have provided.
As an alternative we can use the Flexter metadata database to automatically generate the table scripts and schema.
|
1 2 3 4 5 6 7 8 9 10 11 12 13 14 15 16 17 18 19 20 21 22 23 |
# Listing and describing tables impala-cloudera> show tables; Query: show tables +-----------------+ | name | +-----------------+ | classification | | class_term | | term | +-----------------+ # Describing the tables created impala-cloudera> desc term; Query: describe term +-------------------+---------------+-----------------------------+ | name | type | comment | +-------------------+---------------+-----------------------------+ | pk_term_id | decimal(38,0) | Inferred from Parquet file. | | fk_term | decimal(38,0) | Inferred from Parquet file. | | definition | string | Inferred from Parquet file. | | definition_lang | string | Inferred from Parquet file. | | name | string | Inferred from Parquet file. | | name_lang | string | Inferred from Parquet file. | +-------------------+---------------+-----------------------------+ |
Let’s take the Table ‘Term’ created using the Term.parquet file and look inside the table by displaying the first 3 row of the table.
|
1 2 3 4 5 6 7 8 9 10 11 12 |
# Displaying initial 3 rows of the Table created impala-cloudera> select * from term limit 3; Query submitted at: 2018-01-28 00:28:34 (Coordinator: http://quickstart.cloudera:25000) Query progress can be monitored at: http://quickstart.cloudera:25000/query_plan?query_id=c64e07584dc6a7d8:c5d5369900000000 Prettytable cannot resolve string columns values that have embedded tabs. Reverting to tab delimited text output +----+------+---------------------+-----------+----------------------+--------+ | pk | fk | defn | defn_lang | name | name_lang | +----+------+---------------------+-----------+----------------------+--------+ | 62 | 7001 | news events | en | Special news/edition | en | 63 | 7001 | news worthy events | en | Special Report | en | 63 | 7001 | news worthy events | en | Special Report | en +----+------+---------------------+-----------+----------------------+--------+ |


