How to Store & Load JSON in Snowflake (File Format Guide)

If you’re working with data today, your pipelines are almost certainly pumping JSON.
From API payloads to IoT event streams and microservice logs, JSON is the lingua franca of modern data architectures.
Snowflake solved the problem of storing semi-structured data using the VARIANT type, its core Snowflake JSON data type, which provides flexible support for semi-structured content.
But loading massive volumes of messy, real-world JSON into a query-optimised state in Snowflake? That’s where things get tricky.
It’s not enough to just point a COPY INTO command at a file and hope for the best when you want to Snowflake query JSON reliably.
You need to master the subtle science of staging, error handling, and the critical performance trade-offs that happen inside Snowflake’s micro-partitions.
In this definitive guide, I’ll walk you through several workflows for ingesting JSON into Snowflake at any scale and show you how to build a resilient and future-proof pipeline with the right tools.
TL;DR (for the Data Engineer in a Hurry):
- Foundation is Everything: We start by mastering Stages and File Formats, specifically using STRIP_OUTER_ARRAY and IGNORE_UTF8_ERRORS.
- Storage Matters: You’ll learn how VARIANT type sub-columnarizes your JSON for query speed, and why simple data problems like mixed types or JSON “null” values can break these internal optimisations and undermine powerful Snowflake JSON functions you might rely on.
- We’ll discuss common loading options and their caveats: These include batch loading, Snowpipe for real-time ingestion, and the manual coding approach.
- The Oversized JSON Challenge: We’ll discuss options and workarounds for when your JSON files get too big for Snowflake’s options.
- Automation: I’ll give you an automated tool that’ll get your JSON in Snowflake in a normalised schema in no time.
Use Flexter to turn XML and JSON into Valuable Insights
- 100% Automation
- 0% Coding
Storing JSON Data in Snowflake (VARIANT JSON Data Type)
Before we dive into the complex world of batch loading and real-time streams, we need to cover how Snowflake actually stores your JSON.
Understanding this foundational concept is critical to better plan your loading choices later on, like those fancy File Format options.
The VARIANT Type: Flexible Storage for Snowflake JSON Data
In Snowflake, semi-structured formats like JSON are not stored in a regular text column but in a dedicated Snowflake JSON column backed by the VARIANT type. If you are also working with JSON on Databricks, see our Databricks JSON Guide Read Parse Query and Flatten Data for how to read, parse, query and flatten JSON in that platform.
In this way, Snowflake fully supports JSON as a first-class semi-structured format, alongside CSV and Parquet.
Here are the main things you should know about VARIANT columns:
- Capacity: A VARIANT column is flexible enough to store any supported data type, including nested objects and arrays, with an upper limit of 128 MB of uncompressed data per row.
- Binary Parsing: When JSON data reaches the VARIANT column, it’s immediately parsed and converted into Snowflake’s internal, compressed, columnar binary format. This is powerful because the native data type of each element (e.g., integer, string) is preserved.
- Because the type information is saved at the element level, Snowflake can perform Automatic Casting in many queries, allowing you to compare a JSON numeric field directly to an integer literal without manual conversion.
- Here’s the real magic: Snowflake internally sub-columnarizes your JSON. This means popular JSON paths (like user.id or metrics.clicks) are split into their own hidden columnar segments inside micro-partitions. This is how the database can use standard performance boosters, like min/max statistics, Bloom filters, and columnar scanning, on your semi-structured data.
So, although Snowflake does not have a “Snowflake JSON column”, it offers all these benefits through the VARIANT type column.
In practice, all you need to do to store JSON data in Snowflake is to create a table with a column and define that “Snowflake JSON column” as a VARIANT type.
The Three Rules That Break Performance
Snowflake tries its best to apply columnar optimisation to your JSON, but sometimes the data structure makes it impossible.
If any of these “rules” are violated, Snowflake is forced to scan the entire VARIANT structure in the micro-partition, which significantly slows down your queries.
You need to know these three common pitfalls to keep your pipelines fast:
- Non-Uniform Data Types: For an element to be extracted, all its values across the partition must share a single native data type. If the “foo” element is a number in one row ({“foo”: 1}) but a string in another ({“foo”: “1”}), it won’t be extracted, and performance suffers.
- Explicit JSON Nulls: An element will not be extracted if it contains even a single JSON null value (“null”). Snowflake does this to maintain the distinction between an explicit JSON null and a missing value (which is stored as a SQL NULL and is fine).
- Non-Native Types and Arrays: Arrays, along with dates, timestamps, and other non-native data types in JSON, are often stored internally as strings. Queries against these fields are typically less efficient and take up more storage space.
Best Practice: The solution to these bottlenecks is to apply Schema on Write techniques (like when we use Flexter) or to manually Snowflake flatten JSON into columns.
Pro tip
Flattening (whether manual or automated) is not a silver bullet.
It’s a technique for simplifying nested data.
Still, if you flatten too aggressively, especially when your JSON has multiple independent arrays (branches), you risk creating a Cartesian Product.
This results in huge data redundancy and false, meaningless relationships that you’ll pay for later in storage and slower queries.
For nulls, if JSON nulls have no special meaning, simply set STRIP_NULL_VALUES = TRUE in your File Format to remove them before the load, allowing other fields to be sub-columnarized.
With this basic information about storing now in place, and before giving you the various options for loading JSON to Snowflake, let’s go through the key concepts for data loading to Snowflake.
Key Concepts for Data Loading in Snowflake JSON Pipelines
Before you even think about writing a COPY INTO command, you need to get your foundation right.
So many data engineers skip this part and pay for it later with failed loads, corrupted data, and performance nightmares.
In this section, I’ll show you how loading JSON isn’t just about pointing Snowflake at a file; it’s about building a robust landing zone.
Here are two key concepts you must be aware of: Stages and File Formats.
What are Stages? (Core to Any Snowflake Load JSON Process)
A Stage is just a named landing zone for your files. Think of it as a virtual loading dock for your data warehouse. It’s where you put files before loading them.
This “loading dock” abstraction is critical because it gives you a central point of control for your JSON. You can:
- Secure it: Attach credentials and encryption, and manage access with Snowflake roles.
- Test your files: Preview file contents and even run a “test load” using VALIDATION_MODE to find errors before you commit anything to your final table.
- Orchestrate pipelines: It’s the core component for running COPY INTO commands and automating ingestion.
Pro tip
Snowflake supports formats such as CSV, JSON, Parquet, Avro, and ORC via FILE FORMAT objects.
JSON is far better for semi-structured data than CSV (which loses hierarchy) and XML (which is more verbose and slower to parse), making it the most practical choice for modern event or API payloads.
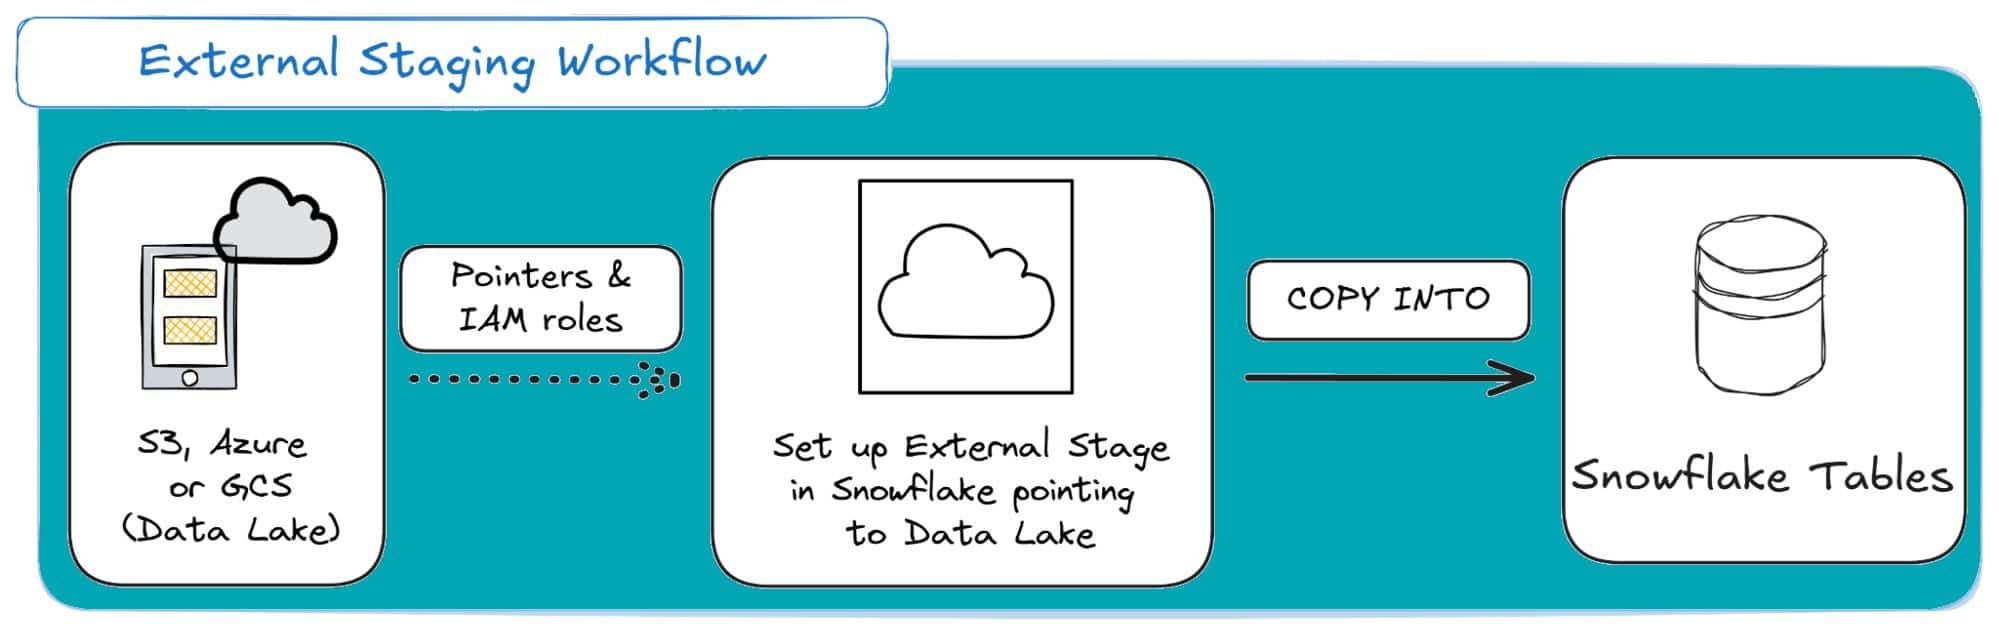
Internal vs. External Stages for Snowflake JSON Parsing
You’ve got two flavours of Stages to choose from.
Internal Stages: These are fully managed by Snowflake. You use the PUT command (via SnowSQL or the UI) to upload files from your local machine. Storage costs are included in your regular Snowflake bill.
Here’s how it looks from a high-level:
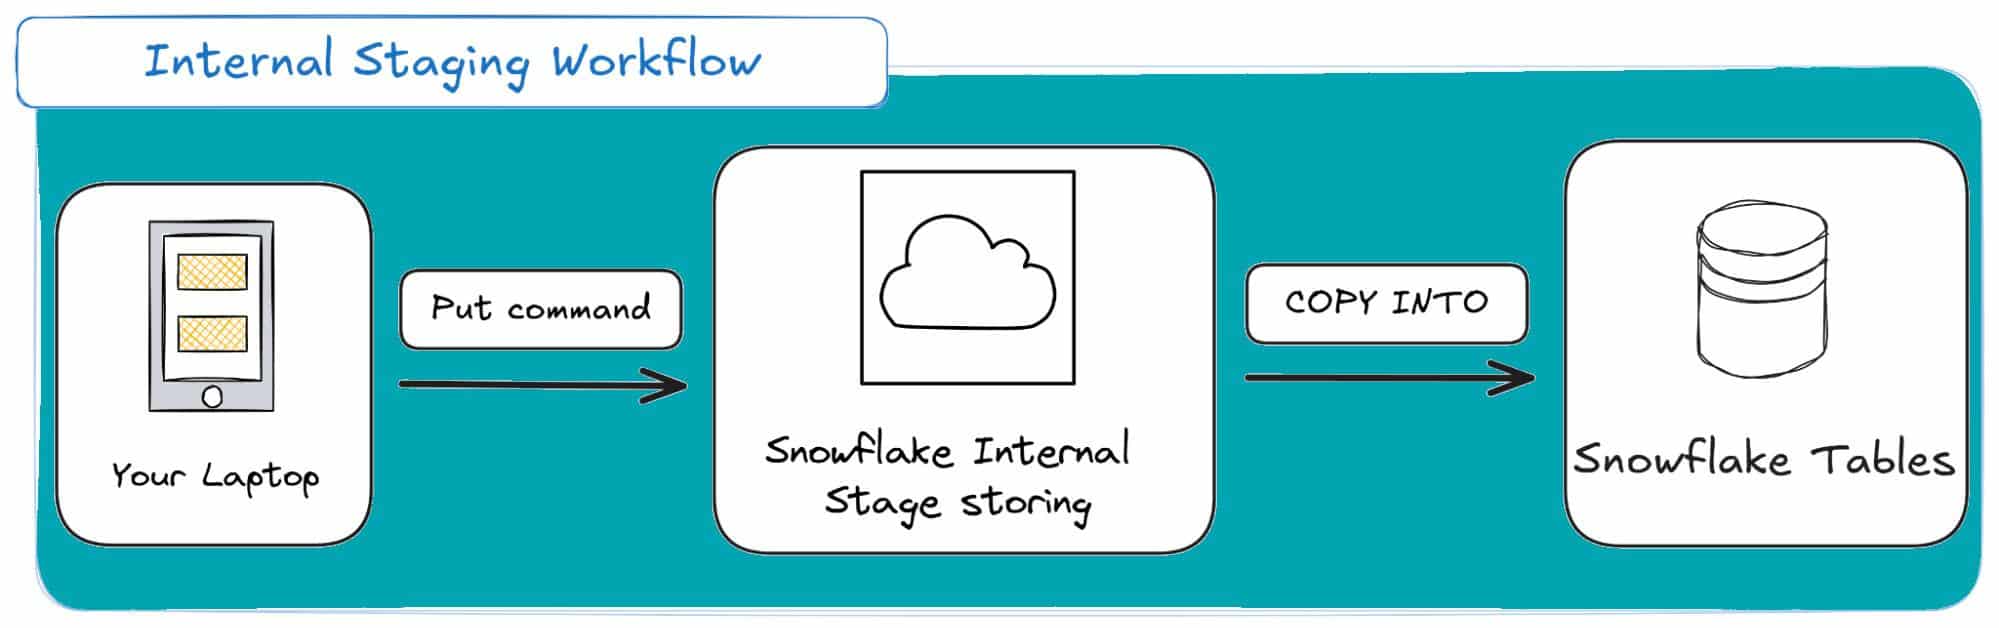
Internal Stages are mostly suited for development, testing and ad-hoc analysis. They are my go-to tool for experimenting with Snowflake JSON parsing on small sample files to test my file format logic before building a production pipeline.
External Stages: This is the production standard. The stage points to your own cloud storage bucket (AWS S3, Azure Blob, or GCS).
Mostly suited for Production data pipelines: This is often the case when your JSON data already lives in a data lake (e.g., S3, GCS, or Azure Blob Storage), which avoids costly data duplication.
It’s also the foundation for Snowpipe auto-ingestion and External Tables, which let you query JSON without loading it (more on those later).
Here’s a visual for external staging in Snowflake:
Here’s a detailed comparison table for Internal vs. External Stages when compared across common dimensions:
|
Feature |
Internal Stage (Snowflake-managed) |
External Stage (Your cloud storage) |
|---|---|---|
|
Location |
Inside Snowflake. |
AWS S3, Azure Blob, or GCS. |
|
How to load files | PUT command into the Stage. |
Reference storage patd & integration. |
|
Storage costs |
Incur Snowflake storage charges. | You pay the cloud provider’s storage cost. |
|
Performance |
Fast for small/medium uploads. |
Highly efficient for large, cloud-native datasets. |
|
Ease of use |
Simple, no external setup. |
Requires cloud storage setup + integration. |
|
Best for |
Ad-hoc/local uploads, testing JSON parsing. |
Enterprise-scale data lakes, automated JSON pipelines. |
|
Extra option |
Fully managed by Snowflake. |
Can use External Tables for direct schema-on-read querying of raw JSON. |
Pro Tip: JSON Loading Isn’t Identical Across Clouds
Snowflake supports JSON loading from S3, Azure Blob, and GCS, but their integrations aren’t equally smooth:
- S3: Easiest setup and the most mature Snowpipe auto-ingest (SNS + SQS).
- Azure Blob: Works well but requires more setup (Event Grid + SAS tokens).
- GCS: Fully supported, but uses Pub/Sub for Snowpipe notifications.
If you’re starting from scratch, S3 generally offers the simplest, most battle-tested JSON ingestion workflow.
JSON File Format in Snowflake: The Key to Not Breaking Your Loads
This is the part everyone gets wrong.
You can’t just point Snowflake at a JSON file and hope for the best.
You have to include an instruction manual on how to parse that file, especially given all the quirks of semi-structured data.
A Snowflake JSON File Format object is exactly that: a reusable set of rules that you attach to your stage or COPY command.
Getting this right is what separates a robust pipeline from a fragile one that breaks every Tuesday.
While specifying that your file format is JSON, there are a few extra options that you’ll need to specify to get your File Format object right.
Let’s explore the most critical options you’ll need.
Option STRIP_OUTER_ARRAY
STRIP_OUTER_ARRAY is arguably the most important option for JSON when you need to Snowflake parse JSON array structures into separate rows.
Many JSON files are just a giant list of objects, starting with [ and ending with ].
- If set to TRUE, Snowflake strips that outer array and treats each object inside as a separate row. This is almost always what you want.
- If set to FALSE (the default), Snowflake loads the entire giant array as a single row into one VARIANT column. This is a performance nightmare that forces you to use FLATTEN just to unpack the data.
Here’s an example of how that would look. Let’s assume the following JSON test case:
|
1 2 3 4 |
[ {"id": 1, "amount": 50.0}, {"id": 2, "amount": 19.99} ] |
Here’s how the results would look if you decide to parse the JSON with STRIP_OUTER_ARRAY equal to TRUE or FALSE:
|
STRIP_OUTER_ARRAY = TRUE (2 rows) |
STRIP_OUTER_ARRAY = FALSE (1 row) |
|---|---|
|
| SRC | | :– | | { “amount”: 50, “id”: 1 } | | { “amount”: 19.99, “id”: 2 } | |
| SRC | | :– | | [ { “amount”: 50, “id”: 1 }, { “amount”: 19.99, “id”: 2 } ]| |
Option STRIP_NULL_VALUES
Source JSON is often sparse and full of keys with NULL values. Setting STRIP_NULL_VALUES to TRUE tells Snowflake to just remove those key-value pairs entirely during ingest.
It’s a simple way to clean your data and reduce storage. Here’s an example:
- Example JSON: {“id”: 1, “name”: “Rohan”, “city”: null}
- Result when STRIP_NULL_VALUES is TRUE: {“id”: 1, “name”: “Rohan”}
Option ALLOW_DUPLICATE
By default, if a JSON object has duplicate keys like {“key”: “first”, “key”: “second”}. With ALLOW DUPLICATE set to FALSE, Snowflake’s parser just keeps the last one.
When set to TRUE, it’ll just preserve all instances, which will require more complex path notation when querying.
Honestly, for 99% of use cases, this is the sane behaviour. Stick with the default (FALSE).
Option IGNORE_UTF8_ERRORS
Ever had a 10GB load fail at 99% because of one invalid character? This is your fix.
By default, a bad UTF-8 sequence will cause your COPY command to fail.
Setting IGNORE_UTF8_ERRORS to TRUE tells Snowflake to just replace the bad character with the Unicode replacement character () and keep the pipeline moving. A total lifesaver.
Pro Tip: Build for Resilience, Not Perfection
Your production pipeline will get a file with a bad character. It’s not “if,” it’s “when”.
Always set IGNORE_UTF8_ERRORS = TRUE in your production file formats.
It’s infinitely better to load 99.99% of your data with one replaced character than to have your entire pipeline halt at 3 AM for a single stray emoji.
Walkthrough: From Messy JSON to a Clean Table
Let’s get started with actual examples. In this sub-section, I’ll tie all the information I gave you above into a single hands-on test case.
For this walkthrough, we’ll assume that a JSON file has been uploaded from a local machine to a Snowflake internal stage named @my_internal_stage using the PUT command.
Here’s the messy source file with all the common problems that I’ll use.
(Notice the outer array [], the null values, the duplicateKey, and the broken_utf8 string. A real nightmare.)
|
1 2 3 4 5 6 7 8 9 10 11 12 13 14 15 16 17 18 19 20 21 22 23 24 25 26 27 28 29 30 31 32 33 |
[ { "id": 101, "name": "Alice Johnson", "email": null, "phone": null, "address": { "street": "123 Maple Street", "city": null, "state": "CA" }, "isActive": true, "lastLogin": null, "duplicateKey": "first value", "duplicateKey": "second value", "utf8_field": "Valid text", "broken_utf8": "invalid-\ud83d-char" }, { "id": 102, "name": "Bob Smith", "phone": "555-0102", "address": { "street": "456 Oak Avenue", "city": "Los Angeles", "state": "CA", "zip": "90001" }, "isActive": false, "lastLogin": "2025-08-01T10:15:00Z" } ] |
Step 1: Create the “Hero” File Format
First, we create a File Format to solve most of these problems.
|
1 2 3 4 5 6 |
CREATE OR REPLACE FILE FORMAT user_profile_format TYPE = 'JSON' STRIP_OUTER_ARRAY = TRUE -- Solves the outer array `[]` STRIP_NULL_VALUES = TRUE -- Removes email, phone, city, lastLogin ALLOW_DUPLICATE = FALSE -- Keeps only "second value" for duplicateKey IGNORE_UTF8_ERRORS = TRUE; -- Fixes the broken UTF-8 string |
Step 2: Create the Target Table and Load the Data
We’ll use a simple landing table with a single VARIANT column.
|
1 2 3 4 5 6 7 8 9 |
-- Create a table to land the JSON data CREATE OR REPLACE TABLE user_profiles_raw ( src VARIANT ); -- Load the data COPY INTO user_profiles_raw FROM @my_internal_stage/user_profiles.json FILE_FORMAT = (FORMAT_NAME = 'user_profile_format'); |
Step 3: Verify the Results (snowflake query JSON)
Now, query the table to have Snowflake extract JSON data, and validate that the data landed in the expected structure.
There should be no errors, no manual cleanup. Just two clean, separate rows, ready for analysis.
|
1 |
SELECT src FROM user_profiles_raw; |
Which should result in the following output:
|
1 2 |
{ "address": { "state": "CA", "street": "123 Maple Street" }, "broken_utf8": "invalid--char", "duplicateKey": "second value", "id": 101, "isActive": true, "name": "Alice Johnson", "utf8_field": "Valid text" } { "address": { "city": "Los Angeles", "state": "CA", "street": "456 Oak Avenue", "zip": "90001" }, "email": "[email protected]", "id": 102, "isActive": false, "lastLogin": "2025-08-01T10:15:00Z", "name": "Bob Smith", "phone": "555-0102" } |
By spending two minutes defining a proper file format, you’ve automated your data cleaning and built a resilient pipeline.
Pro Tip
I can’t stress this enough: always test your File Format on an internal stage.
PUT a small sample of your JSON (one with nulls, bad characters, and a tricky array structure) and run your COPY command.
It’s the only way to know for sure that your STRIP_OUTER_ARRAY is working and you’re handling errors before you point your pipeline at 50GB of data in a production S3 bucket.
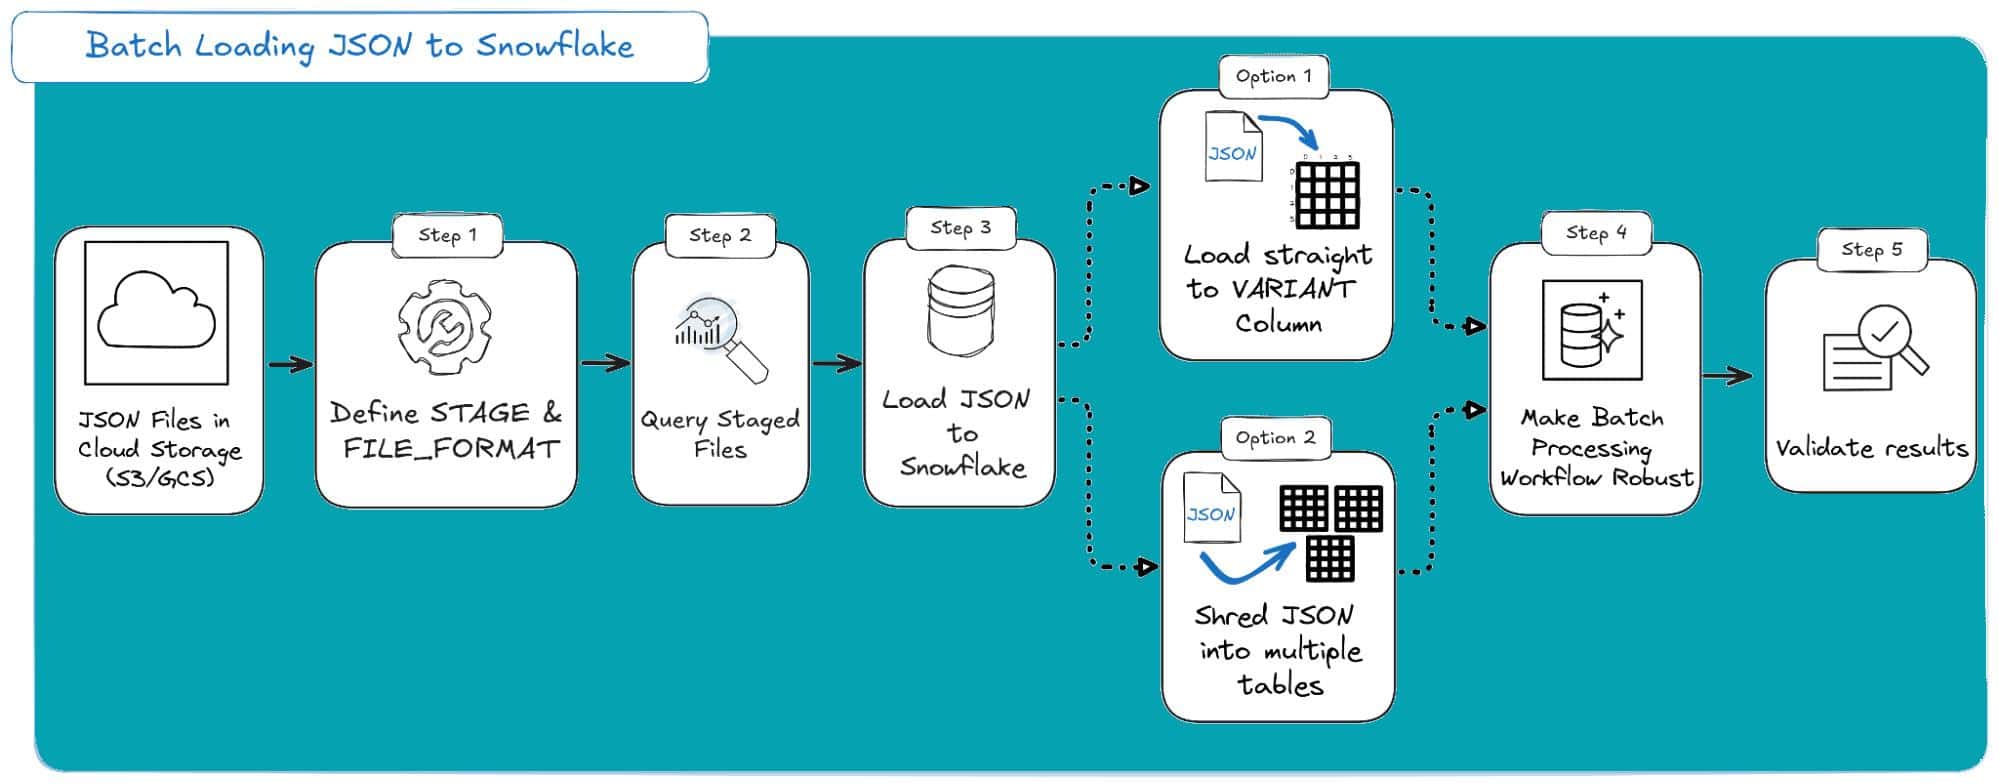
Batch Loading JSON into Snowflake with COPY INTO
I’ve shown you the basic steps on how to load a single JSON file into Snowflake.
But what happens when you want to scale to loading batches of JSON?
This is where we move from a simple test to building a robust pipeline using the COPY INTO command.
COPY INTO is the main way to import JSON into Snowflake tables from stages.
In this section, I’ll show you how to load JSON files into Snowflake with a batch loading workflow, which includes:
- Configuring Stages: The landing zones (internal or external) where your files are stored.
- Defining File Formats: The rulebook that tells Snowflake how to parse your JSON (i.e. the Snowflake parse JSON process).
- The COPY INTO Command: Mastering the options, especially ON_ERROR, to handle bad data.
- Validation and Auditing: How to query files before loading and check for errors after a job runs.
Best Practice: Load the Raw JSON into a VARIANT Column
When dealing with batch loading, keep in mind that you technically have two options:
- Loading the raw JSON into a VARIANT column, or,
- “Shredding” the JSON into separate columns during the load.
The recommended best practice is always to load the raw JSON into a VARIANT column first.
We only mention shredding on load for completeness, as it’s generally not recommended for primary ingestion due to pipeline limitations.
Loading the JSON to the variant column adopts a typical Extract-Load-Transform (ETL) philosophy and offers significant advantages:
- Data Fidelity and Future-Proofing: By storing the raw, unaltered JSON, you maintain a complete and accurate historical record of the data as it was received. This is crucial for data lineage, troubleshooting, and compliance. If the source system sends bad data, you have an unshredded audit trail to reference.
- Increased Flexibility and Agility: Loading the full JSON allows you to choose between schema-on-read and schema-on-write approaches. This means that different users can create multiple transformations and views downstream without being locked into an upfront structure.
- Improved Pipeline Resilience and Efficiency: Landing the raw JSON decouples the ingestion process from the transformation process. This means that if a downstream transformation job fails (e.g., due to a breaking schema change), data ingestion is not halted. Or, if you need to fix a bug in your transformation logic, you can simply re-run the transformation on the raw data in the landing table, avoiding the time-consuming task of re-fetching the data from the source system.
The only time it generally makes sense to shred the JSON directly into columns upon load is if you are certain you are keeping a separate, permanent copy of the raw JSON document in a data lake on object storage (like S3 or Azure Blob) as your ultimate source of truth.
I’ll show you both options (in Step 3 of the workflow) so that you can choose either one.
Step 1: Set Up Your Landing Zone (Stage) and Rules (File Format)
Before you can run a single COPY command, you have to answer two basic questions:
- Where are the JSON files? (The Stage)
- How should Snowflake read them? (The File Format)
Get this foundation right, and your batch-loading process will be reliable and scalable.
Step 1.1: The Stage: Your “Landing Zone” for Files
A stage is simply a location where Snowflake can read files from when you Snowflake load JSON from internal or external storage (i.e. cloud storage).
(You probably already know that if you’ve read my previous section.)
You may choose either type of stage for this step. If you decide to go with an internal Snowflake-managed stage, then you can create it with:
|
1 2 3 |
-- Create a simple internal stage and attach our format to it CREATE OR REPLACE STAGE my_internal_json_stage FILE_FORMAT = my_json_batch_format; |
You would then use PUT file://path/to/my_data.json @my_internal_json_stage; from your command line.
If you decide to go with the external stage, you’ll have to configure it so that it points towards your own cloud storage bucket, like AWS S3, Azure Blob, or Google Cloud Storage.
In this way, your data doesn’t have to be “uploaded” to Snowflake; Snowflake reads it directly from your bucket.
Here’s an example of how you could achieve that storage integration for a GCS bucket. First, create an integration object in Snowflake:
(of course, you’ll need to know your own GCS bucket location and replace it below)
|
1 2 3 4 5 |
CREATE OR REPLACE STORAGE INTEGRATION gcs_storage_int TYPE = EXTERNAL_STAGE STORAGE_PROVIDER = 'GCS' ENABLED = TRUE STORAGE_ALLOWED_LOCATIONS = ('gcs://my-production-json-bucket/data/'); |
After you create the integration, do not forget to grant permissions on your cloud provider and then finalise by creating the external stage based on the integration object:
|
1 2 3 4 |
CREATE OR REPLACE STAGE ext_stage URL = 'gcs://semi_json_bucket/' STORAGE_INTEGRATION = gcp_storage FILE_FORMAT = USER_PROFILE_FORMAT; |
Step 1.2: The File Format: Your JSON “Rulebook”
As we’ve discussed, you can’t simply point Snowflake at a JSON file and expect the best.
You need to give it a “rulebook”, which is the File Format object.
The best practice here is to create this object once and reuse it for all your COPY commands.
Here’s my go-to file format setup for batch loading:
|
1 2 3 4 5 6 |
CREATE OR REPLACE FILE FORMAT my_json_batch_format TYPE = 'JSON' -- Tell Snowflake it's JSON COMPRESSION = 'AUTO' -- Automatically detects .gz, .bz2, etc. STRIP_OUTER_ARRAY = TRUE STRIP_NULL_VALUES = TRUE IGNORE_UTF8_ERRORS = TRUE; -- Prevents a single bad character from failing the entire batch |
Pro tip
Don’t forget STRIP_OUTER_ARRAY. It is the most important option.
If your JSON files are a list of objects (starting with [ and ending with ]), setting STRIP_OUTER_ARRAY = TRUE tells Snowflake to treat each object inside that array as a new row.
If you forget this, Snowflake will load the entire massive array into a single VARIANT row, which is almost never what you want.
Step 2: Look Before You Load (Query Your Staged Files)
Here’s a powerful feature many people overlook: you can run SELECT queries directly on your staged files before you load a single row into a table.
So as a second step, I’ll show you my go-to method for validating a new JSON feed.
It lets me inspect the structure, test my parsing logic, and spot potential data quality issues before they break my pipeline.
How it works: The $1 Column
When you query a stage, Snowflake doesn’t know about id, name, or address. It just sees a collection of JSON objects.
It presents this data to you as a single VARIANT column named $1.
You can select this column directly to see the raw JSON objects as they’ll be loaded:
|
1 2 3 4 |
-- See the first 10 raw JSON objects from the stage SELECT $1 FROM @my_external_json_stage LIMIT 10; |
(Assuming STRIP_OUTER_ARRAY = TRUE in your file format, this will give you one JSON object per row)
Test-Driving Your JSON Parsing
This is where it gets really useful. You can practice “shredding” the JSON live from the staged file to make sure your key names and data types are correct.
This is the exact same logic you’ll use when you build your COPY command.
Here’s how you can test this:
|
1 2 3 4 5 6 7 8 9 10 |
-- Test your parsing logic directly on the staged file SELECT $1:id::INT AS ID, $1:name::VARCHAR AS NAME, $1:email::VARCHAR AS EMAIL, $1:lastLogin::TIMESTAMP AS LAST_LOGIN, $1:isActive::BOOLEAN AS IS_ACTIVE, $1:address::OBJECT AS ADDRESS FROM @my_external_json_stage LIMIT 10; |
If this query runs, you know your parsing logic is sound for how you Snowflake parse JSON example data before moving to production.
If it fails or returns all NULLs, you know you have a mismatch between your query and the JSON structure (without the mess of loading, dropping, and reloading a table).
Don’t forget your metadata
You can also query metadata from the files themselves. This is incredibly useful for logging and auditing your batch loads later on.
The most important columns are:
- METADATA$FILENAME: The full path to the file.
- METADATA$FILE_ROW_NUMBER: The row number within that file.
You can query the, just like the $1 column:
|
1 2 3 4 5 6 |
SELECT METADATA$FILENAME, METADATA$FILE_ROW_NUMBER, $1:id::INT AS ID FROM @my_external_json_stage LIMIT 10; |
We’ll use these exact columns in the next step when we build our final COPY command.
Pro tip
Querying your stage is a key part of building a solid batch-loading pipeline.
While these SELECT statements show you the technical aspect of the load, it’s equally important to understand the strategic side.
I’ve written a separate guide on the various methods for importing JSON into a database, including a more detailed examination of high-throughput batch ingestion and its comparison to other approaches, such as streaming.
Step 3: Load the Data (The COPY INTO Command)
You’ve set up your stage and your file format in Step 1, and you’ve even run a few SELECT queries to validate your files in Step 2 of this workflow.
It’s now time for the main event, which involves actually loading the data into a Snowflake table.
This is where you face your most important decision in any Snowflake JSON to table pipeline:
- Option 1 (Recommended): Load the raw JSON into a single VARIANT column.
- Option 2 (The Alternative): “Shred” the JSON into structured columns during the load.
I’ll walk you through both, but I strongly recommend Option 1. Let me explain why.
Pro tip
Keep in mind that in both approaches, you’ll need to use the COPY INTO command.
In practice, COPY INTO is the recommended way to insert JSON data into a Snowflake table, especially when you’re loading from JSON files into a VARIANT column.
The Recommended Approach: Load Raw JSON into a VARIANT Column
This “schema on read” approach means you just dump the raw JSON object into one flexible VARIANT column.
If your source data suddenly adds a new field, removes an old one, or renames something, your load pipeline will not fail. It simply loads the new structure as is.
Pro tip
If you’re not sure what schema on read is, then I’d suggest that you take a look at my other blog post, where I explain it (and its counterpart, schema on write) in detail.
Here’s a simple, two-step SQL to load your data into a VARIANT column.
First, create a landing table with a single VARIANT column:
|
1 2 3 |
CREATE OR REPLACE TABLE user_profiles_raw ( raw_json VARIANT ); |
Then copy the data from your stage into the table:
|
1 2 3 |
COPY INTO USER_PROFILES FROM @new_stage FILE_FORMAT = USER_PROFILE_FORMAT; |
And if you want, you may query the raw JSON now stored in the table.
|
1 |
SELECT * FROM USER_PROFILES; |
That’s it. The data is now in Snowflake.
A better approach: Include metadata for lineage
A simple VARIANT load is good, but a production-grade load is auditable. For data lineage, I always capture file metadata alongside the JSON.
This allows you to trace every single record back to the exact file and row it originated from.
Here’s how you would go about it: first, create a table with columns for the data AND the metadata.
|
1 2 3 4 5 6 |
CREATE OR REPLACE TABLE user_profiles_raw_audited ( raw_json VARIANT, source_filename VARCHAR, source_row_number INT, load_timestamp TIMESTAMP_LTZ ); |
And then, as a second step, you may use a SELECT statement in your COPY command to capture the metadata.
|
1 2 3 4 5 6 7 8 9 |
COPY INTO user_profiles_raw_audited (raw_json, source_filename, source_row_number, load_timestamp) FROM ( SELECT $1, -- The raw JSON object METADATA$FILENAME, METADATA$FILE_ROW_NUMBER, CURRENT_TIMESTAMP() FROM @my_external_json_stage ); |
What you do after this (The ELT Pattern)
Now that your data is safely in the user_profiles_raw_audited table, you can transform it into a clean, structured table for your analysts. This is the “T” in ELT (Extract-Load-Transform).
You can run this as a separate step to create a structured table from the raw data:
|
1 2 3 4 5 6 7 8 9 10 11 |
CREATE OR REPLACE TABLE user_profiles_structured AS SELECT raw_json:id::INT AS ID, raw_json:name::VARCHAR AS NAME, raw_json:email::VARCHAR AS EMAIL, raw_json:lastLogin::TIMESTAMP AS LAST_LOGIN, raw_json:isActive::BOOLEAN AS IS_ACTIVE, raw_json:address::OBJECT AS ADDRESS, source_filename, -- Carry the lineage info through load_timestamp FROM user_profiles_raw_audited; |
By separating the load from the transform, you’ve built a robust pipeline.
If the transform step fails (e.g., a name field changes to full_name), your data is still loaded, and you can fix the transform logic without losing data.
This pattern effectively creates a Snowflake table from JSON; you land JSON in VARIANT first, then build a structured table from it with CTAS.
The Alternative: “Shred” JSON During the Load
An alternative approach exists that skips the raw VARIANT table and loads data directly into a structured table by using a SELECT statement in the COPY command.
However, it is more fragile than the first approach I gave you for loading JSON to SF.
It couples your load process directly to the source schema. If a name field is missing from a single file, that load will fail.
|
1 2 3 4 5 6 7 8 9 10 11 12 13 |
-- (Assumes 'user_profiles_structured' table already exists) COPY INTO user_profiles_structured (ID, NAME, EMAIL, ADDRESS, IS_ACTIVE, LAST_LOGIN) FROM ( SELECT $1:id::INT, $1:name::VARCHAR, $1:email::VARCHAR, $1:address::OBJECT, $1:isActive::BOOLEAN, $1:lastLogin::TIMESTAMP FROM @my_external_json_stage ); |
This second approach is closer to what I call a “schema on write” approach.
However, with Snowflake’s tools, it will be hard to create an efficient target schema, and you will end up with a flattened table, which will be hard to maintain in the long term.
Pro tip
Well, maintenance is only one of the limitations that flattened schemas bring to your project.
I’ve written a more detailed guide about the limitations of flattening elsewhere in this blog.
And if you want to dive deeper into flattening and the most appropriate approach of normalisation, I’d suggest you check out our other blog post on “Denormalisation and Flattening versus Normalisation”.
Step 4: Make Your Batch Load Robust (Key COPY Options)
In a batch load of thousands of files, you can’t let one bad row or one corrupt file stop the entire job.
This is why you need to master the options for the COPY INTO command. Here are the most important ones so that you can bulletproof your loading.
Error Handling: The ON_ERROR Option
This is, by far, the most critical option for any batch process. It tells Snowflake what to do when it hits a file it can’t parse or a row that’s malformed. Here are the options you have:
- ON_ERROR = ABORT_STATEMENT: This is the default for bulk loads. The moment Snowflake finds a single error, the entire COPY operation stops, and nothing is loaded. This is fine for testing, but terrible for production.
- ON_ERROR = CONTINUE: This is my go-to for most jobs. It skips any erroneous rows it finds and just keeps on loading. When the command finishes, it gives you a summary of how many rows were skipped. This ensures that one bad record doesn’t stop the other 99,000.
- ON_ERROR = SKIP_FILE: This is a safer alternative. If any error is found in a file, Snowflake skips that entire file and moves to the next one. You can even set a threshold, like ON_ERROR = SKIP_FILE_10%, which tells Snowflake to skip the file only if more than 10% of its rows are bad.
Column Mapping: MATCH_BY_COLUMN_NAME
This option instructs the COPY command to map data from the source file to columns in the target table by matching their names, rather than their position.
It is mostly relevant if you’re using the “shredding” approach from Step 3.
You can set it to CASE_SENSITIVE or CASE_INSENSITIVE.
Here’s how an example would look:
|
1 2 3 4 |
COPY INTO user_profiles FROM @new_stage FILE_FORMAT = user_profile_format MATCH_BY_COLUMN_NAME = CASE_INSENSITIVE; |
Other useful Options
- PURGE = TRUE: This is for “set it and forget it” pipelines. It tells Snowflake to automatically delete the JSON files from your stage after they are successfully loaded. This keeps your landing zone clean.
- FORCE = TRUE: Snowflake is smart and tracks which files it has already loaded to prevent duplicates. FORCE = TRUE tells Snowflake to reload all the files, even if it has loaded them before. Be careful with this, as it can easily create duplicate data.
Pro tip
For any real production pipeline, you should never use the default ABORT_STATEMENT.
My standard setup is ON_ERROR = CONTINUE (or SKIP_FILE for sensitive jobs).
But just letting it run isn’t enough. The real professional workflow is to run your COPY command with one of these error-handling options, and then, as a final step, audit the load history to see exactly what failed and why. I’ll show you how to do that next.
Step 5: Validate and Audit Your Snowflake JSON Loads
Don’t fly blind. As I mentioned in the previous step, simply setting ON_ERROR = CONTINUE and hoping for the best isn’t a viable strategy.
That’s a “fire and forget” pipeline, and it’s a great way to lose data silently.
A professional pipeline always checks its work. You need to know what failed, where it failed, and why.
Snowflake gives you the perfect tools for this, both before and after you run your COPY command.
Pre-Load Validation (VALIDATION_MODE)
Think of this as a “dry run” for your COPY command. You can run your load in VALIDATION_MODE to check for any parsing errors without actually loading any data.
This is how I would test a new file format against a big batch of files to see what might break.
|
1 2 3 4 |
-- This will return a list of errors, not load data COPY INTO user_profiles_raw FROM @my_external_json_stage VALIDATION_MODE = RETURN_ERRORS; |
This query will tell you exactly which files and rows are corrupt before you’ve committed anything, letting you fix your files or your file format.
Post-Load Auditing (The VALIDATE function)
This is what you run after your COPY command finishes, especially one that used ON_ERROR = CONTINUE.
|
1 2 |
-- Run this right after your COPY command SELECT * FROM TABLE(VALIDATE(user_profiles_raw_audited, JOB_ID => '_last')); |
This will return a table of all the errors, the file they came from, the exact row number, and the error message. Now you can actually go and fix the bad data or log it for review.
Historical Auditing (COPY_HISTORY)
Finally, you need a high-level view of all your load jobs. Snowflake provides two main views for this:
- INFORMATION_SCHEMA.COPY_HISTORY: This is for operational, real-time checks. It gives you the load history for the last 14 days, and the results appear almost immediately.
- SNOWFLAKE.ACCOUNT_USAGE.COPY_HISTORY: This is the long-term, account-level view. It holds history for up to one year, but be aware that the data can have a latency of a few hours.
I use the INFORMATION_SCHEMA view for quick, day-to-day monitoring.
Pro tip
Snowflake’s INFER_SCHEMA can automatically suggest structures for your JSON, but it’s best used as a helper, not the final answer.
Generally, in my past projects, I’ve had limited success with schema inference features on big platforms such as Redshift’s Crawlers feature and Spark’s inferSchema option.
Workflow Overview and Takeaways
So, let’s put it all together. I’ve walked you through the five key steps for building a production-ready batch loading pipeline for your JSON data.
This isn’t just a one-off query; it’s a repeatable, auditable workflow.
The most important lesson in all of this is separating your Load (EL) from your Transform (T).
Your goal for the load should be one thing: get the data into Snowflake reliably. This is why I emphasise the choice you make in Step 3, which involves deciding between shredding your JSON and loading it directly into a VARIANT column.
Given this debate, this is how this workflow looks as a diagram:
Here are the main takeaways you should remember:
Loading to VARIANT first is the preferred option: Resilience is more important than a one-step load. This provides a complete, raw data archive in Snowflake, separating ingestion (a data engineering concern) from modelling (a data analytics concern).
Never use the default ON_ERROR: For any real job, ON_ERROR = ABORT_STATEMENT is a non-starter. Your default should be CONTINUE or SKIP_FILE to ensure one bad file doesn’t halt your entire batch.
Your pipeline is only as good as your audit: Don’t just “fire and forget.” Your workflow must include a final step to run VALIDATE(JOB_ID => ‘_last’) and log any errors. Flying blind is how you silently lose data.
Pro tip
Once you’ve mastered this 5-step batch workflow, you’ve built the foundation for all data ingestion in Snowflake. The best part? You can automate this entire process.
You can wrap this logic in a Snowflake Task to run your COPY step on a schedule.
Or, if you need data in near real-time, you can take this exact COPY command and put it inside a Snowpipe.
I’ll cover that in the next section.
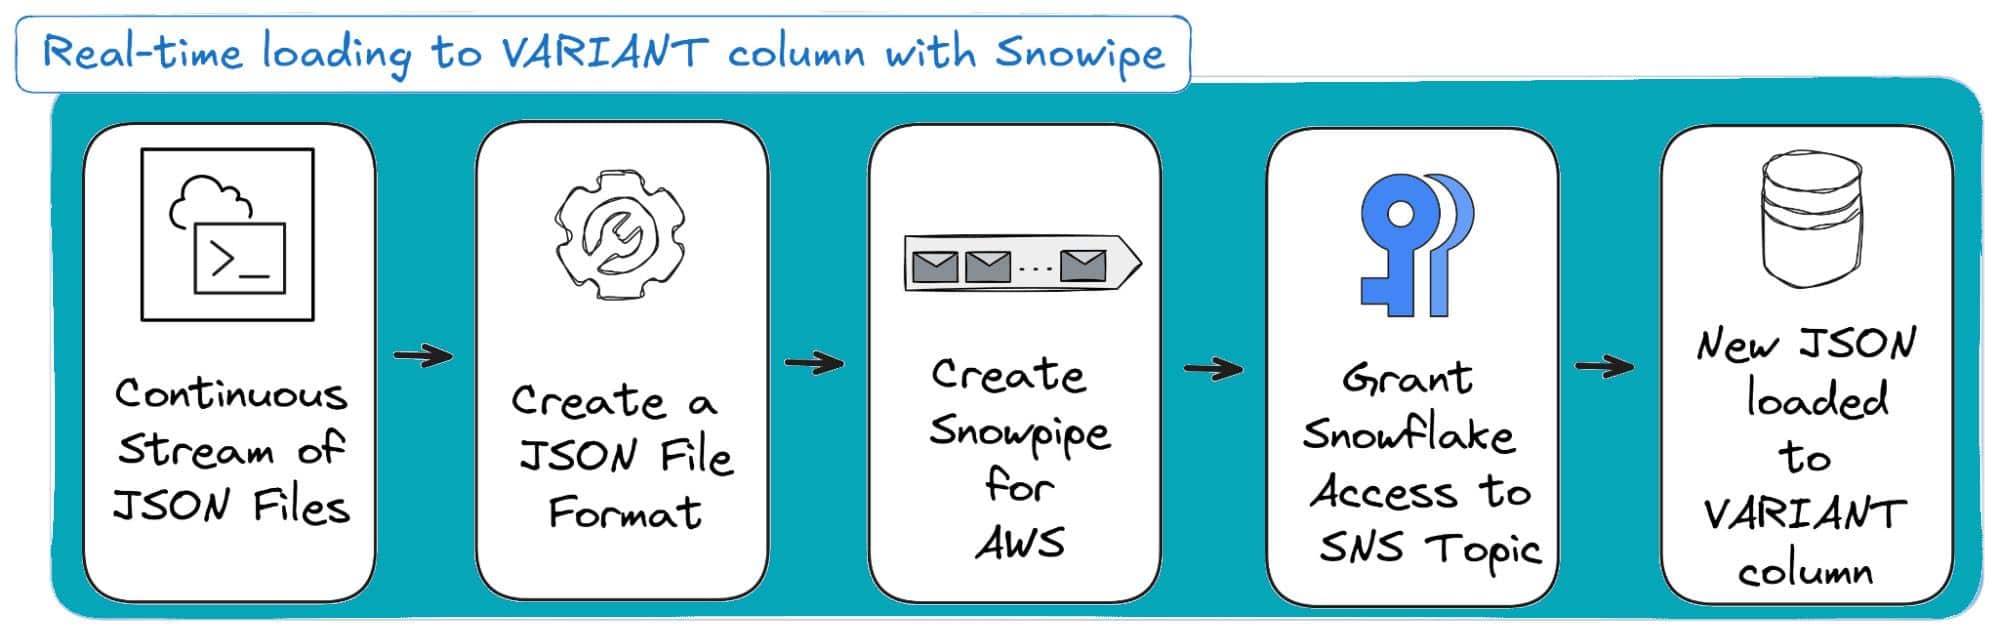
Loading JSON into Snowflake in Real Time with Snowpipe
If you’re moving beyond scheduled bulk imports and need to keep pace with event-driven data streams (think logs, IoT, or real-time application events), Snowpipe is your answer.
It’s Snowflake’s elegant solution for continuous, near real-time ingestion of semi-structured data like JSON, moving files as soon as they land in your cloud stage (like an AWS S3 bucket).
The genius here is that Snowpipe is a serverless, Snowflake-managed service. It eliminates the need for you to run manual COPY commands or manage virtual warehouse schedules.
Instead, it runs on a push model, automatically queuing the files for loading. The data typically lands in a VARIANT column, making it immediately available for querying.
Snowpipe Triggering Methods
You get two main ways to tell Snowpipe a new file is ready to load:
- Auto-Ingest (via Cloud Messaging): This is the fully automated, hands-off approach. You configure an S3 event notification to send a message to an SNS topic when a new file lands, and Snowflake automatically handles the rest. This only works with external stages.
- REST Endpoints: If cloud messaging isn’t an option, a client application can manually call the Snowpipe insertFiles REST API after uploading files. This gives you programmatic control and works with both internal and external stages.
Batch Loading (COPY) vs. Continuous Loading (Snowpipe)
You might be asking, “Why use a pipe when COPY INTO already loads data?”
It all comes down to scale, latency, and operational overhead. One is for bulk jobs; the other is for continuous flow.
Here’s a comparison table to make it clearer for you.
|
Source JSON Root |
STRIP_OUTER_ARRAY Result |
Effective Limit Handled |
|---|---|---|
|
[ {obj1}, {obj2}, … ] |
Loads N rows (one per object). | Massive Increase: Splits the big file into N smaller objects, each under the 128 MB limit. |
|
{ “data”: [ … ] } or { “obj”: “…” } | Fails: Loads the entire object as one row. | No Change: the single object is still likely > 128 MB. |
Pro tip: Looking to zoom out and master the entire JSON to SQL workflow?
This post focuses on specific ways and workflows for loading JSON data into Snowflake.
If you need an overview of all four JSON ingestion methods to SQL, the critical difference between Textual vs. Binary storage, and a deep dive into Schema on Write vs. Schema on Read, then check out my definitive guide:
Example: Setting Up Auto-Ingest for JSON Files from AWS S3
Let’s walk through the process of setting up Snowpipe auto-ingest for JSON data coming from an S3 bucket.
Prerequisites:
- You have already created an S3 bucket and an SNS topic in your AWS account.
- Critically, you must also configure an S3 event notification on your bucket to publish s3:ObjectCreated:* events to that SNS topic.
Step 1: Create a JSON File Format
First, you need to define a file format. This is the script that tells Snowpipe how to handle the incoming JSON.
Since many real-world JSON files are an outer array of objects, we use STRIP_OUTER_ARRAY = TRUE to get separate rows from each object.
|
1 2 3 |
CREATE OR REPLACE FILE FORMAT my_json_format TYPE = 'JSON' STRIP_OUTER_ARRAY = TRUE; -- Use if JSON files are `[ {...}, {...} ]` |
Step 2: Create the Snowpipe for AWS S3
This is the core DDL statement. It ties your stage, target table, file format, and AWS SNS topic together.
|
1 2 3 4 5 6 7 8 9 10 |
CREATE OR REPLACE PIPE my_aws_pipe AUTO_INGEST = TRUE AWS_SNS_TOPIC = 'arn:aws:sns:us-east-1:123456789012:my-s3-events' AS COPY INTO RAW_TRANSACTIONS (json_payload) FROM ( SELECT $1 FROM @my_s3_stage ) FILE_FORMAT = (FORMAT_NAME = 'my_json_format') ON_ERROR = 'CONTINUE'; |
Code breakdown:
- AUTO_INGEST = TRUE: This is what activates the automatic, event-driven loading.
- AWS_SNS_TOPIC = ‘…’: The key parameter for AWS S3. You provide the ARN (Amazon Resource Name) of the SNS topic receiving your S3 file creation events.
- COPY INTO RAW_TRANSACTIONS (json_payload): Specifies the target table and the single VARIANT column where the raw JSON will be loaded.
- ON_ERROR = ‘CONTINUE’: A streaming best practice. It tells Snowpipe to skip any malformed JSON records within a file and keep loading the valid ones, rather than discarding the entire file for a single error.
Step 3: Grant Snowflake Access to the SNS Topic
After creating the pipe, you must complete a critical security step: grant Snowflake’s service user permission to subscribe to your SNS topic.
- Run DESCRIBE PIPE my_aws_pipe; and copy the ARN from the notification_channel column. This ARN belongs to the SQS queue Snowflake created for your pipe.
- In your AWS Console, go to your SNS topic, edit its Access Policy, and add a statement that allows the SQS queue (the ARN from step 1) to sns:Subscribe to this topic.
That’s it: once the pipe is configured, new JSON files landing in S3 will be automatically loaded into your table, giving you the near real-time data flow you need!
And here’s a visual on how this three-step process looks:
Pro tip: Navigating the VARIANT Size Limit
Snowflake’s VARIANT column is incredibly flexible for semi-structured data, but it isn’t unlimited.
A single VARIANT field has an uncompressed upper size limit of about 128 MB (an 8x increase from the old 16 MB limit).
If a single JSON document in your stream exceeds this size, your load will fail with an error like, “Error parsing JSON: document is too large…”.
To ensure the successful ingestion of such large files, you must implement specialised workarounds to split the monolithic JSON into multiple smaller, loadable records.
Or you can just have the right tools. Keep reading to find out.
Overcoming the Snowflake VARIANT JSON Size Limit
Let’s talk about the Snowflake elephant in the room: the VARIANT data type limit.
Snowflake VARIANT JSON column is your landing spot for semi-structured data like JSON, and it’s a powerful tool.
Thanks to recent increases, a single VARIANT value can now comfortably hold a whopping 128 MB of uncompressed data per row.
That’s an OK capacity, but when you’re dealing with enterprise-scale streams, massive API exports, or complex industry documents, 128 MB is a ceiling you will hit.
If a single JSON object in your file exceeds that size, Snowflake won’t just struggle; it’ll throw a hard error. You’ll see a message like: “Error parsing JSON: document is too large…”.
The solution isn’t to buy a bigger bucket; it’s to stop treating one giant JSON file as a single row.
You need an effective strategy to break the document into manageable, row-sized chunks before Snowflake tries (and fails) to load it all at once.
Option 1: The Magic of STRIP_OUTER_ARRAY
The easiest trick in the book relies on how your JSON is structured at the root.
If your file is a big list of smaller JSON objects, wrapped in an outer array ([…]), Snowflake gives you a simple declarative fix: the STRIP_OUTER_ARRAY file format option.
Setting STRIP_OUTER_ARRAY = TRUE tells the parser: “Hey, don’t load this whole file as one row. Instead, treat every object inside this root array as its own separate row”.
| Source JSON Root | STRIP_OUTER_ARRAY Result | Effective Limit Handled |
|---|---|---|
| [ {obj1}, {obj2}, … ] | Loads N rows (one per object). | Massive Increase: Splits the big file into N smaller objects, each under the 128 MB limit. |
| { “data”: [ … ] } or { “obj”: “…” } | Fails: Loads the entire object as one row. | No Change: The single object is still likely > 128 MB. |
The Catch: This only works if your outermost layer is a clean array.
For complex API responses or large documents that start with a root object (like { “metadata”: {…}, “records”: [ … ] } ), this simple fix won’t apply.
That’s when you have to roll up your sleeves with manual code (or a life-saving tool).
Option 2: The Manual Code Route (Snowpark Python)
If the STRIP_OUTER_ARRAY trick fails, your only native option is to write manual code to read the file, parse the JSON, locate the array of records, and load them individually.
The core idea here is to stream or chunk the JSON parsing within a User-Defined Function (UDF/UDTF) or a Stored Procedure so you avoid shoving the entire oversized document into one VARIANT column at once.
We’ll focus on the Snowpark Python Stored Procedure route, which lets you leverage the familiar Python ecosystem (like the standard json library) within Snowflake’s engine to read, split, and load the data.
The Python Split-and-Load Strategy
Suppose we have a file like this:

If we try to ingest this file directly, with the following code (based on COPY INTO):
|
1 2 3 4 5 6 7 8 9 10 11 12 13 |
--- CREATE TABLE ---- CREATE OR REPLACE TABLE ADVERSE_RESULTS(RESULTS VARIANT); --- CREATE FILE FORMAT ---- CREATE OR REPLACE FILE FORMAT USER_PROFILE_FORMAT TYPE='JSON' STRIP_OUTER_ARRAY=TRUE STRIP_NULL_VALUES=TRUE COMPRESSION='AUTO'; COPY INTO ADVERSE_RESULTS FROM @fda_stage FILE_FORMAT=USER_PROFILE_FORMAT'; |
We get the error:
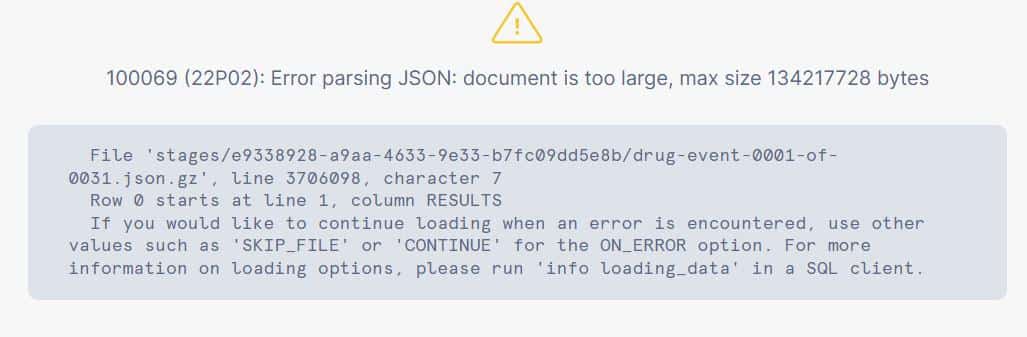
This happens because the single operation attempts to read the entire document into a single VARIANT.
The solution is the stored procedure below, which reads the file, navigates to the array of individual records (e.g., a key named “results”), and loads them one by one.
Here is the code structure for a Snowpark Python Stored Procedure designed to handle oversized JSON by splitting the records:
|
1 2 3 4 5 6 7 8 9 10 11 12 13 14 15 16 17 18 19 20 21 22 23 24 25 26 27 28 29 30 31 32 33 34 35 36 37 38 39 40 41 42 43 44 45 46 47 48 49 50 51 52 53 |
CREATE OR REPLACE PROCEDURE READ_AND_SPLIT_FILE(FILE_NAME STRING) RETURNS STRING LANGUAGE PYTHON RUNTIME_VERSION = '3.9' PACKAGES=('snowflake-snowpark-python', 'pandas') IMPORTS=('@fda_stage/drug-event-0001-of-0031.json') HANDLER = 'read_file' AS $$ import sys import json # Import the correct function: parse_json from snowflake.snowpark.functions import parse_json from snowflake.snowpark.types import StringType, StructType, StructField def read_file(session, filename:str): IMPORT_DIRECTORY_NAME = "snowflake_import_directory" import_dir = sys._xoptions[IMPORT_DIRECTORY_NAME] imported_file_name = filename.split('/')[-1] file_path = f"{import_dir}/{imported_file_name}" with open(file_path, 'r') as f: data = json.load(f) records = data["results"] # We will explicitly create a list of single-column tuples, # where each element is the stringified JSON object. data_to_insert = [(json.dumps(rec),) for rec in records] # Define a simple schema with a single String column. schema = StructType([StructField("raw_json", StringType())]) # Create a Snowpark DataFrame from the list of stringified JSON objects. df = session.create_dataframe(data_to_insert, schema=schema) # Use the parse_json function to explicitly convert the string column # into a VARIANT column. We also name the column 'RESULTS' to match # the target table's column name. final_df = df.select(parse_json(df.raw_json).as_("RESULTS")) # Use the DataFrame's write method to perform the bulk insert. # The data types and column names now match, so this will succeed. final_df.write.save_as_table("ADVERSE_RESULTS", mode="append") return f"Inserted {len(records)} records from {imported_file_name}" $$; -- Make sure the ADVERSE_RESULTS table is created with a VARIANT column named RESULTS. -- CREATE TABLE ADVERSE_RESULTS (RESULTS VARIANT); CALL READ_AND_SPLIT_FILE('drug-event-0001-of-0031.json'); |
Which will result in:

Finally, your table now contains the individual JSON objects as separate VARIANT rows, correctly loaded and ready for query.
It should look like this:
Option 3: Skip the Manual Pain with Flexter
Suppose you’ve wrestled with the manual limitations of Snowflake’s native tools.
Be it the fragility of array stripping (Option 2) or the maintenance nightmare of Snowpark Stored Procedures (Option 3), you already know they aren’t built for scale.
They demand endless re-coding when your schema shifts.
What’s missing is true, end-to-end automation to generate the schema, map the data, and handle bulk volume without custom code.
That is exactly where Flexter Enterprise shines.
It takes the pain points of manual JSON parsing and solves them automatically, directly targeting an optimised Snowflake output.
Why Automation is the Only Way Forward
The two native workarounds (Option 2 & 3) we discussed earlier may get small jobs done, but they crumble under real-world data:
|
Manual Limitation |
Option 2: STRIP_OUTER_ARRAY |
Option 3: Snowpark Python SP |
|---|---|---|
|
Data Volume Limit |
Limited by the 128 MB VARIANT size if the root isn’t a clean array. |
Requires cumbersome manual file reading and chunking inside Python, taxing memory. |
|
Complexity & Schema |
Fails entirely on JSON with a root object or complex, nested structures. |
Requires manual code to locate, extract, and flatten nested arrays, breaking with every schema change. |
|
Sustainability |
A brittle, one-time fix. |
High maintenance; a “quick script” that quickly becomes a full-time liability. |
Flexter, by contrast, eliminates these bottlenecks: It can perform the transformation before loading to Snowflake, so the 128 MB VARIANT limit is irrelevant.
Flexter is designed to work with JSON of any size, easily handling multi-gigabyte or terabyte volumes, and supporting enterprise-level ingestion.
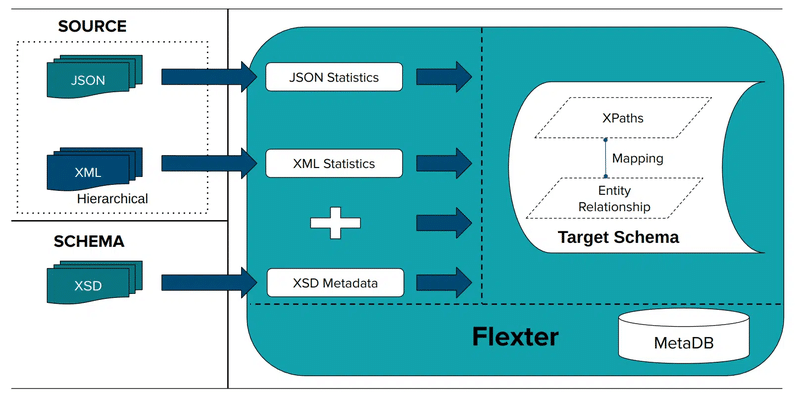
Flexter’s Automated 4-Step Workflow
Flexter automates the entire Schema-on-Write process, from inspecting your JSON source to inserting normalised data into Snowflake tables, all through simple commands.
Step 1: Download & Install Flexter
You install the JSON processing module (json2er) and the required utilities from the repository.
|
1 |
$ sudo yum --enablerepo=sonra-flexter install xml2er xsd2er json2er merge2er flexchma flexter-ui |
Step 2: Configure the Metadata Catalogue
You establish the internal metadata database (MetaDB).
This is your command centre, which automatically stores all generated Entity Relationship Diagrams (ERD), Source-to-Target mappings, and Schema evolution history.
Pro tip
Flexter doesn’t rely on brittle JSON Schema definitions.
It infers the structure directly from the data itself, making it perfect for real-world, constantly evolving API payloads and data streams.
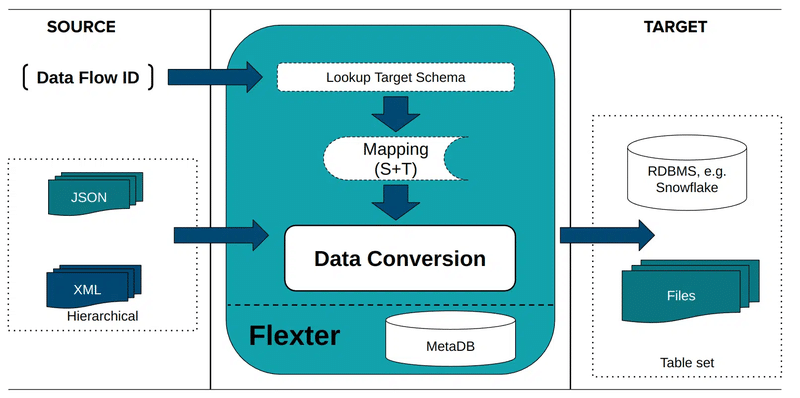
Step 3: Create the Data Flow
The Data Flow is simply the configuration that tells Flexter what JSON to convert and what optimal relational schema to generate.
You can point Flexter to a single JSON file, a directory, an incoming data stream, or even data inside a column in a database table, e.g. the Snowflake VARIANT.
Flexter then automatically analyses the source JSON to capture all parent-child relationships, array hierarchies, and native data types.
Using advanced algorithms, it generates an optimised SQL table design that is perfectly normalised for Snowflake.
As shown in our documentation, you just run this command:
|
1 |
json2er -g1 /path/to/jsonfile.json |
Flexter stores the complete generated schema and all conversion metadata under a unique Data Flow ID, which becomes your reference point for the final conversion in Step 4.
Here is what that automated data flow creation process looks like:
Step 4: Convert JSON to Snowflake Tables
With the Data Flow ID, you execute the conversion. Flexter reads the JSON, applies the inferred schema, and writes clean, normalised data directly to Snowflake.
It handles complex nesting, repeated elements, and key generation automatically; no manual joins or key definitions are required.
Here’s an example command, where you just specify parameters related to your system:
|
1 |
json2er -x<DataFlowID> -o jdbc:sqlserver://yourServer;databaseName=myDB -u myUser -p myPassword /path/to/jsonfile.json |
After running this, Flexter will automatically create all required tables in Snowflake.
Here’s what the conversion process with Flexter looks like:
And voila! Your JSON is now in Snowflake.
Pro Tip: Your data journey doesn’t end here!
- Want the Full Story? Get the deep dive and all the technical insights in my extended blog post on converting JSON to Snowflake.
- Ready to Act? Skip the reading and jump straight to the hands-on experience. Try the online version of Flexter now and witness your JSON effortlessly converted in your own Snowflake instance!
Already looking to expand? Book a call with us and see Flexter Enterprise in action.
Make the right choice: Manual Pain vs. Automated Power
If you’ve followed this post up to this point and replicated my example workflows, you’ve mastered the intricacies of JSON loading: from battling the 128 MB VARIANT limit and fragile STRIP_OUTER_ARRAY logic to stitching together manual ELT transformations in Snowflake.
You also know one truth: manual workarounds, whether writing custom Snowpark procedures or fighting schema drift, don’t scale.
They are brittle, time-consuming liabilities that break the moment your source JSON changes.
Your time is too valuable to spend debugging JSON paths.
Flexter Enterprise is the dedicated, no-code platform built to eliminate that manual pain.
With its Schema-on-Write process, it offers several differentiators: it infers your schema, perfectly normalises complex JSON structures, and inserts clean, query-ready data directly into Snowflake tables.
It handles JSON of any size and volume, automatically bypassing the maintenance nightmares and limits of native tools.
Ready to stop wasting resources on manual maintenance and start getting optimised data in Snowflake?
- Try the Flexter magic: Experience the no-code conversion for free. Drag and drop your JSON into our Online JSON to Snowflake Converter and see the clean, normalised tables appear in your own temporary Snowflake instance.
- Scale Up: Dealing with petabytes, complex APIs, or hundreds of files? Book a call with Flexter Enterprise and see how it can transform your large-scale JSON to Snowflake workflow.
FAQ: Loading & Working with JSON in Snowflake
- What’s the best way to store JSON in Snowflake?
Store the raw document in a VARIANT column first. This preserves fidelity, protects you from schema drift, and lets you apply transformations later without re-ingestion. - Should I flatten JSON before or during loading it?
Generally, no. Flatten only after the raw load; flattening too early can create Cartesian products, performance issues, and maintenance headaches. Use flattening intentionally, not by default. - What’s the most important file format setting for JSON?
STRIP_OUTER_ARRAY = TRUE. It converts a list of objects into separate rows instead of one giant VARIANT blob. This avoids performance disasters. - Should I worry about bad UTF-8 characters breaking my load?
Yes, unless you set IGNORE_UTF8_ERRORS = TRUE. This prevents one malformed character from stopping an entire batch or Snowpipe load. - Is COPY INTO or Snowpipe better for JSON ingestion?
The answer here depends on your use case. Use COPY INTO for bulk/batch loads and Snowpipe for near real-time JSON ingestion. COPY INTO gives you more options and validation tools; Snowpipe gives you automation and low latency. - How do I avoid hitting the 128 MB VARIANT size limit?
If the JSON is a clean array, use STRIP_OUTER_ARRAY. If not (which is more common in production pipelines), you must split the document manually (e.g., via a manual coding approach) or use a tool like Flexter to handle the parsing and loading process automatically. - What if my JSON has deeply nested structures, shifting schemas, or unpredictable arrays?
Snowflake alone struggles with evolving or highly nested JSON, especially when arrays shift shape or new fields appear.
Flexter automatically detects schema changes, generates the optimal relational model, and loads clean tables without manual coding or maintenance. - Can Flexter help with huge JSON files that break Snowflake’s 128 MB VARIANT limit?
Yes, this is where Flexter shines. Instead of writing fragile Snowpark Python procedures or manually splitting oversized documents, Flexter automatically shreds large JSON into normalised tables before loading, bypassing Snowflake’s VARIANT size ceiling entirely.
Want to scale your data engine? Dive into these related reads for mastering speed and scale in JSON to Snowflake conversion and designing JSON to database architectures:
- JSON to SQL & Database – Load, Query, Convert (Guide)
- Flexter FAQ & Guide – Automate XML & JSON Conversions
- Snowflake vs. Redshift – Support for Handling JSON
- How to Use the Flexter Online JSON to Snowflake Converter
- Converting XML and JSON to a Data Lake
- Working with JSON in Redshift. Options, limitations, and alternatives
- Converting and analysing Rugby JSON data to Oracle Data Visualization Desktop
- CSV vs JSON vs XML – The Best Comparison Guide 2026
- Master Snowflake Data Lineage – Features, Tools & Tips
- XSD to Database Schema Guide – Create SQL Tables Easily
- How to Insert XML Data into SQL Table?
Uli Bethke
Uli has been rocking the data world since 2001. As the Co-founder of Sonra, the data liberation company, he’s on a mission to set data free. Uli doesn’t just talk the talk—he writes the books, leads the communities, and takes the stage as a conference speaker.
Any questions or comments for Uli? Connect with him on LinkedIn.
Follow Uli Bethke: