How to convert XML to Parquet with Spark
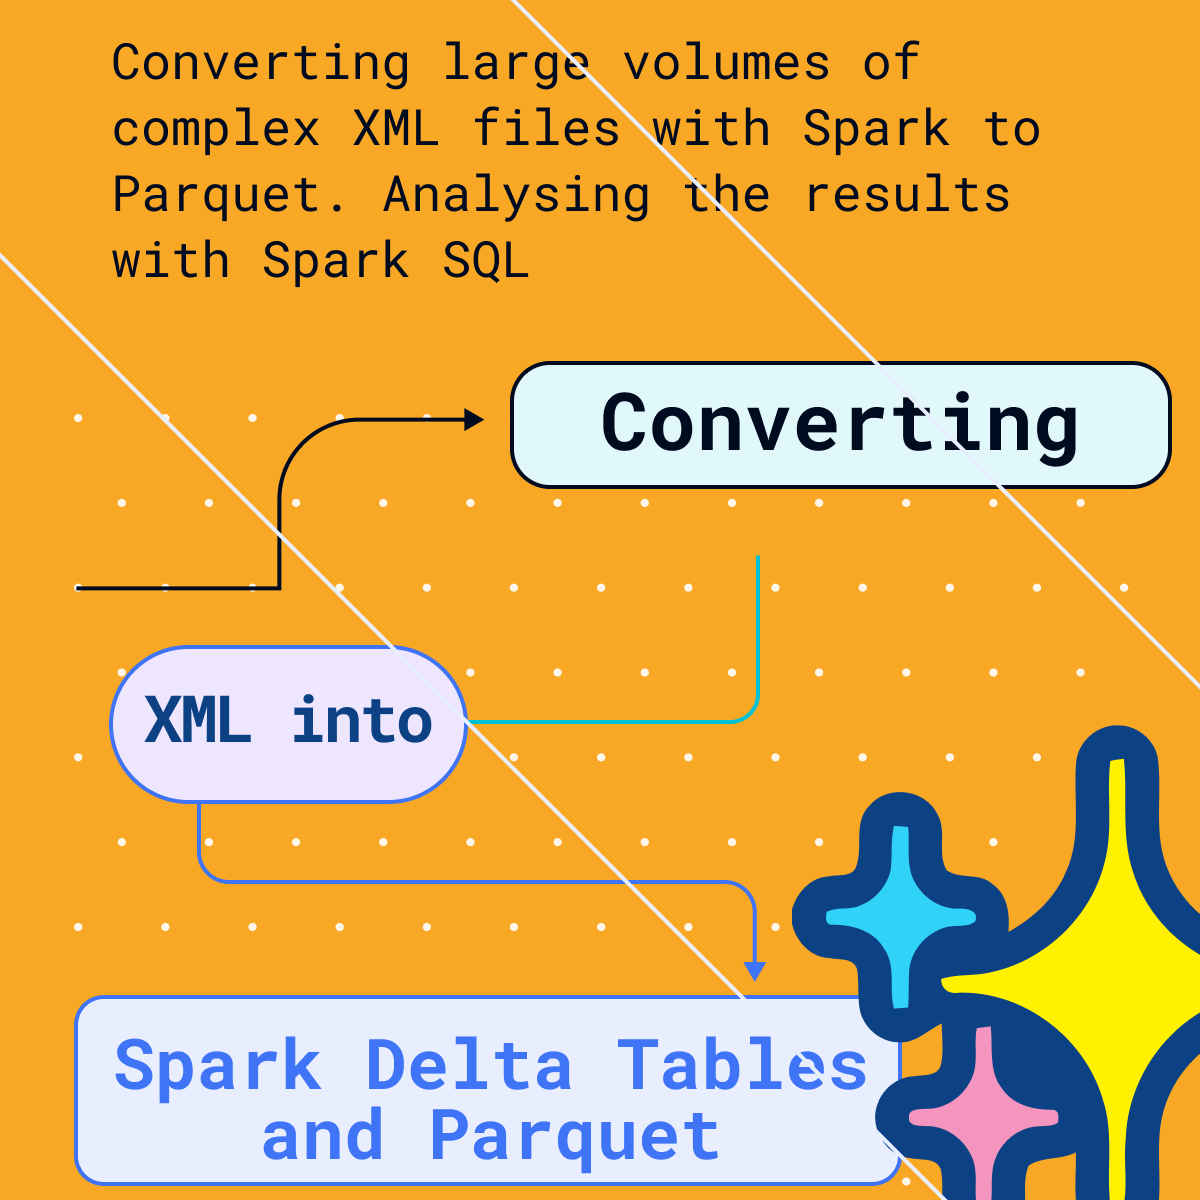

Converting XML to Parquet on Spark might seem straightforward, until you dive in.
For years, the go-to approach has been the external spark-xml library: functional, flexible… and a bit hands-on.
While Spark 4.0 and Databricks Runtime 14.3+ now ship with spark-xml built in, the core experience remains mostly the same. You’re still dealing with a substantial amount of manual coding and transformation quirks.
In this post, we’ll unpack the often-overlooked challenges of the manual XML to Parquet in Spark.
More importantly, we’ll introduce a fully automated alternative, highlight its advantages, and help you decide when to use the manual route versus opting for automation.
For a broader overview of XML parsing and conversion in both Apache Spark and Databricks, including converting to Delta Tables, check out our companion post.
Spark-XML is not integrated directly with Databricks either. It is a separate install.
There are plans to ship the Spark XML library inside Spark 4.0.
We will present an alternative approach that is fully automated, outline its benefits and explain when to use the manual versus the automated approach.
The XML conversion life cycle
The process of converting XML data to Parquet or Delta Tables involves several key steps, many of which can be automated to streamline the process:
Use Flexter to turn XML and JSON into Valuable Insights
- 100% Automation
- 0% Coding
Analysis of XML Structure and XSD: Initially, a data analyst examines the structure of various XML documents. For more complex projects, an XML Schema Definition (XSD) is often available to guide this analysis. If these documents adhere to an industry data standard, relevant documentation, which can span several hundred pages, will also be reviewed.
Data Modeling: The next step involves creating a relational target model.
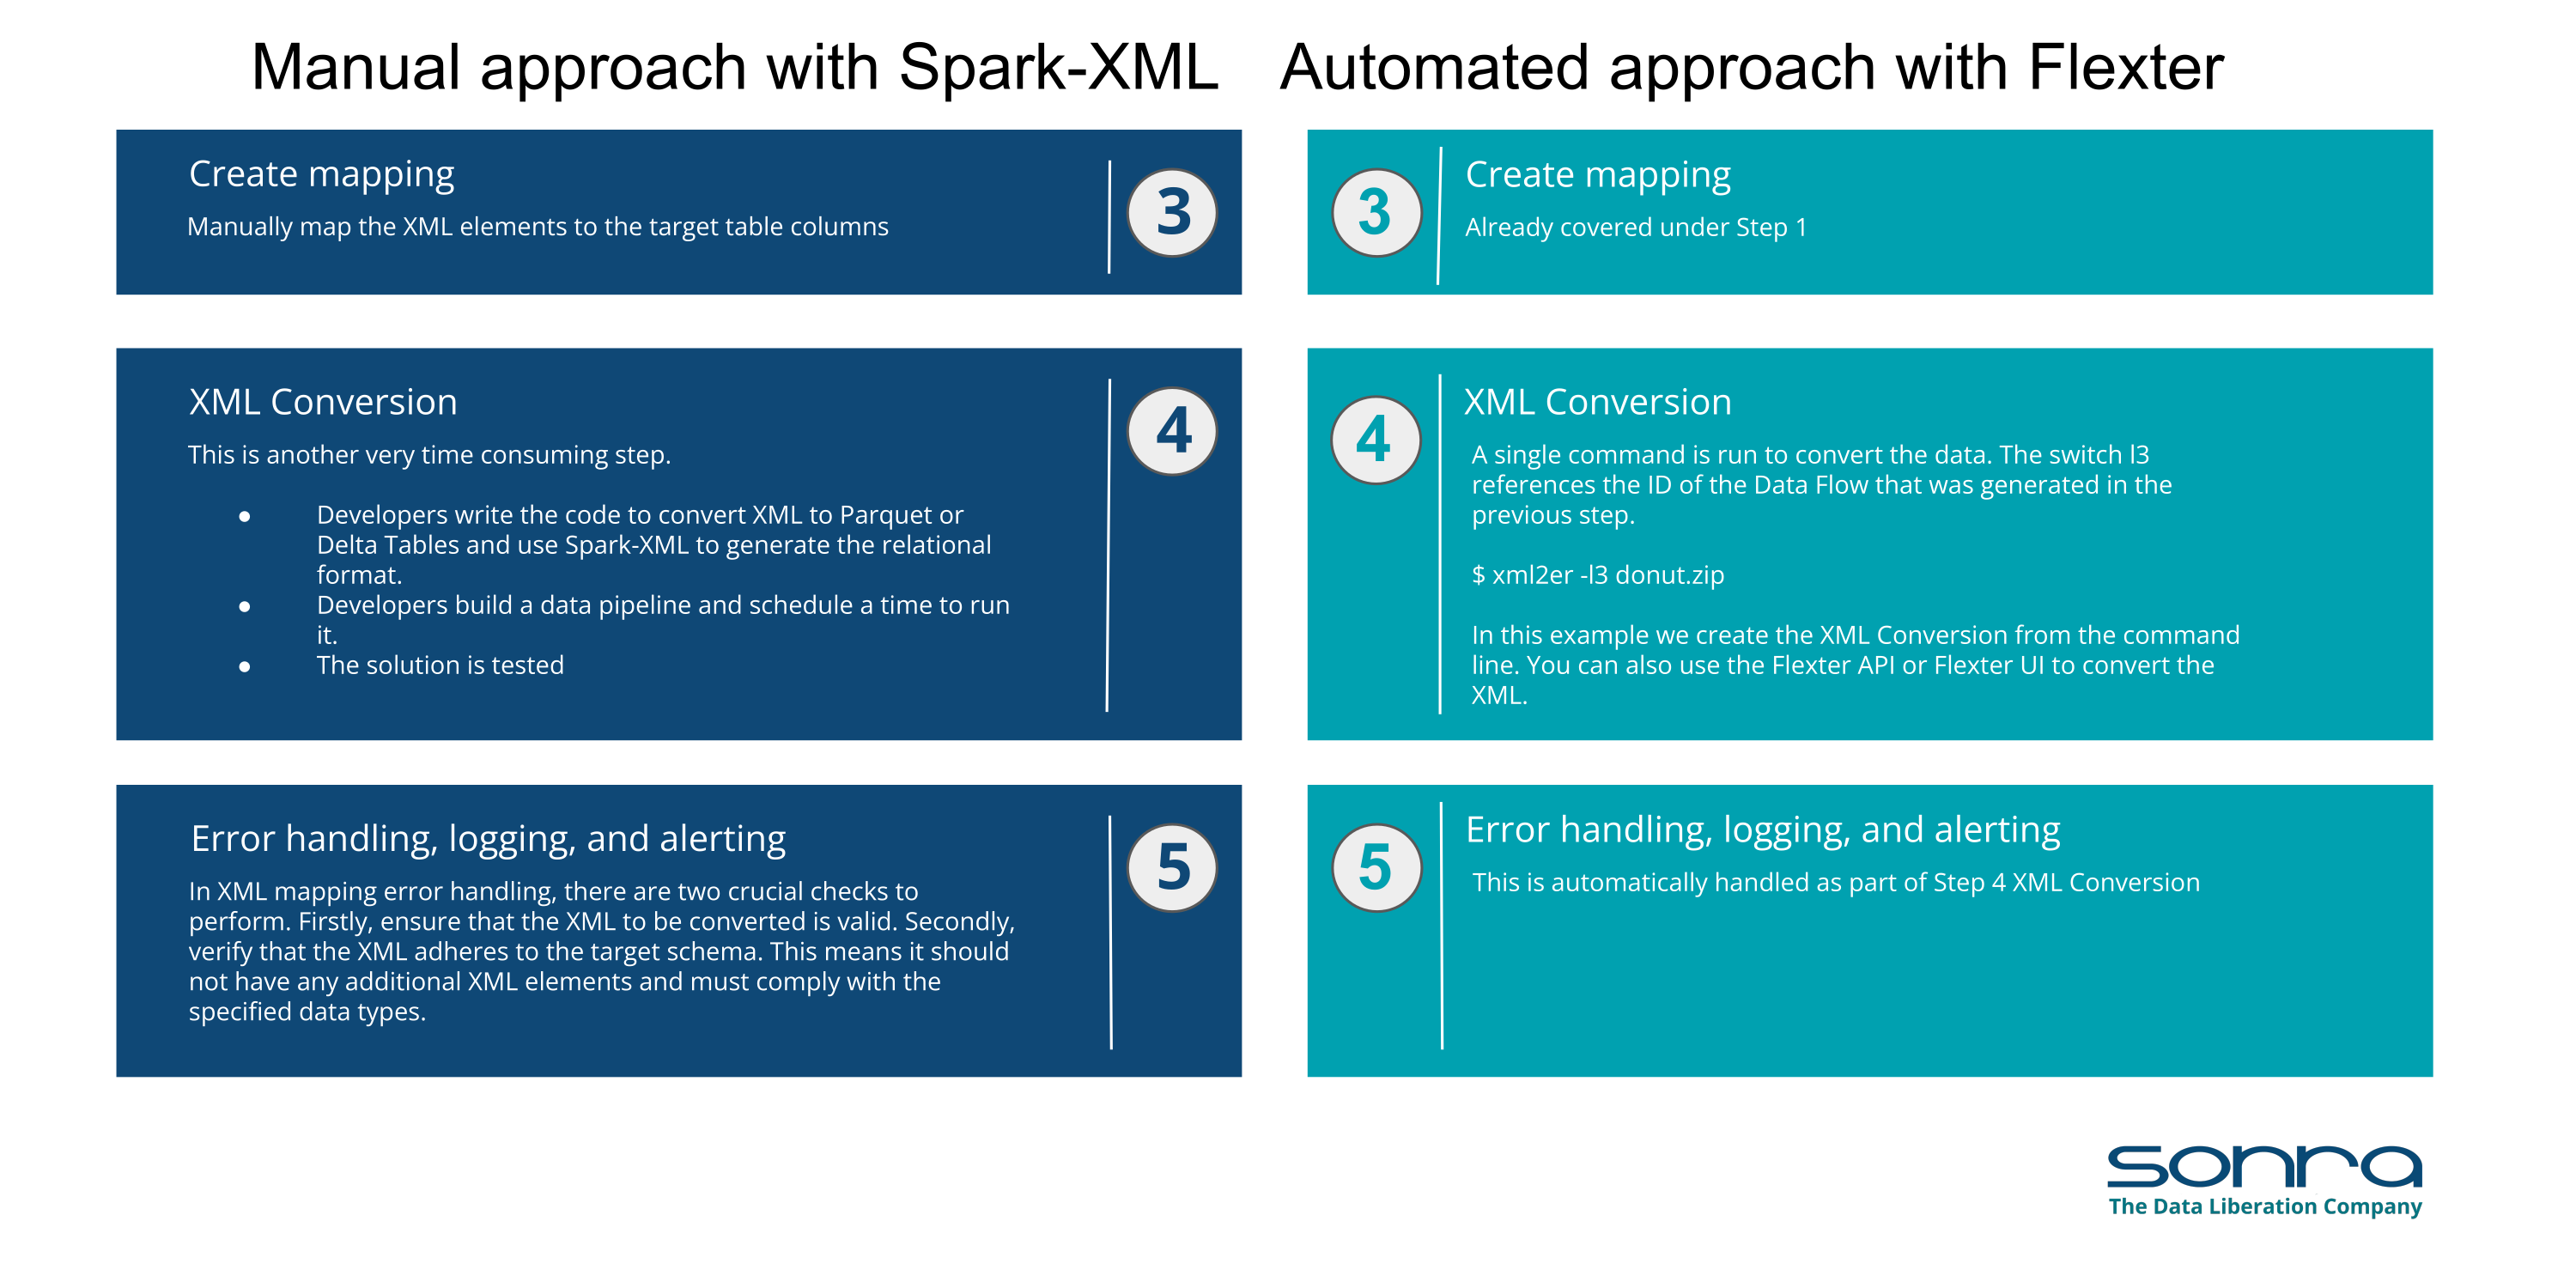
Mapping XML to Data Model: This phase requires mapping individual XML elements to the corresponding relational schema to Spark Parquet files or Delta Tables, ensuring that XML data can be accurately transformed and stored.
XML Conversion: Using tools and methods provided by the Spark XML-Library, the actual conversion of XML data to the target schema on SQL Server is performed. This step transforms the XML data into a format suitable for storage and analysis in a relational database.
Error Handling and Logging: It’s essential to implement mechanisms for identifying and logging invalid XML documents. Additionally, setting up alerting for such errors ensures that any issues can be promptly addressed.
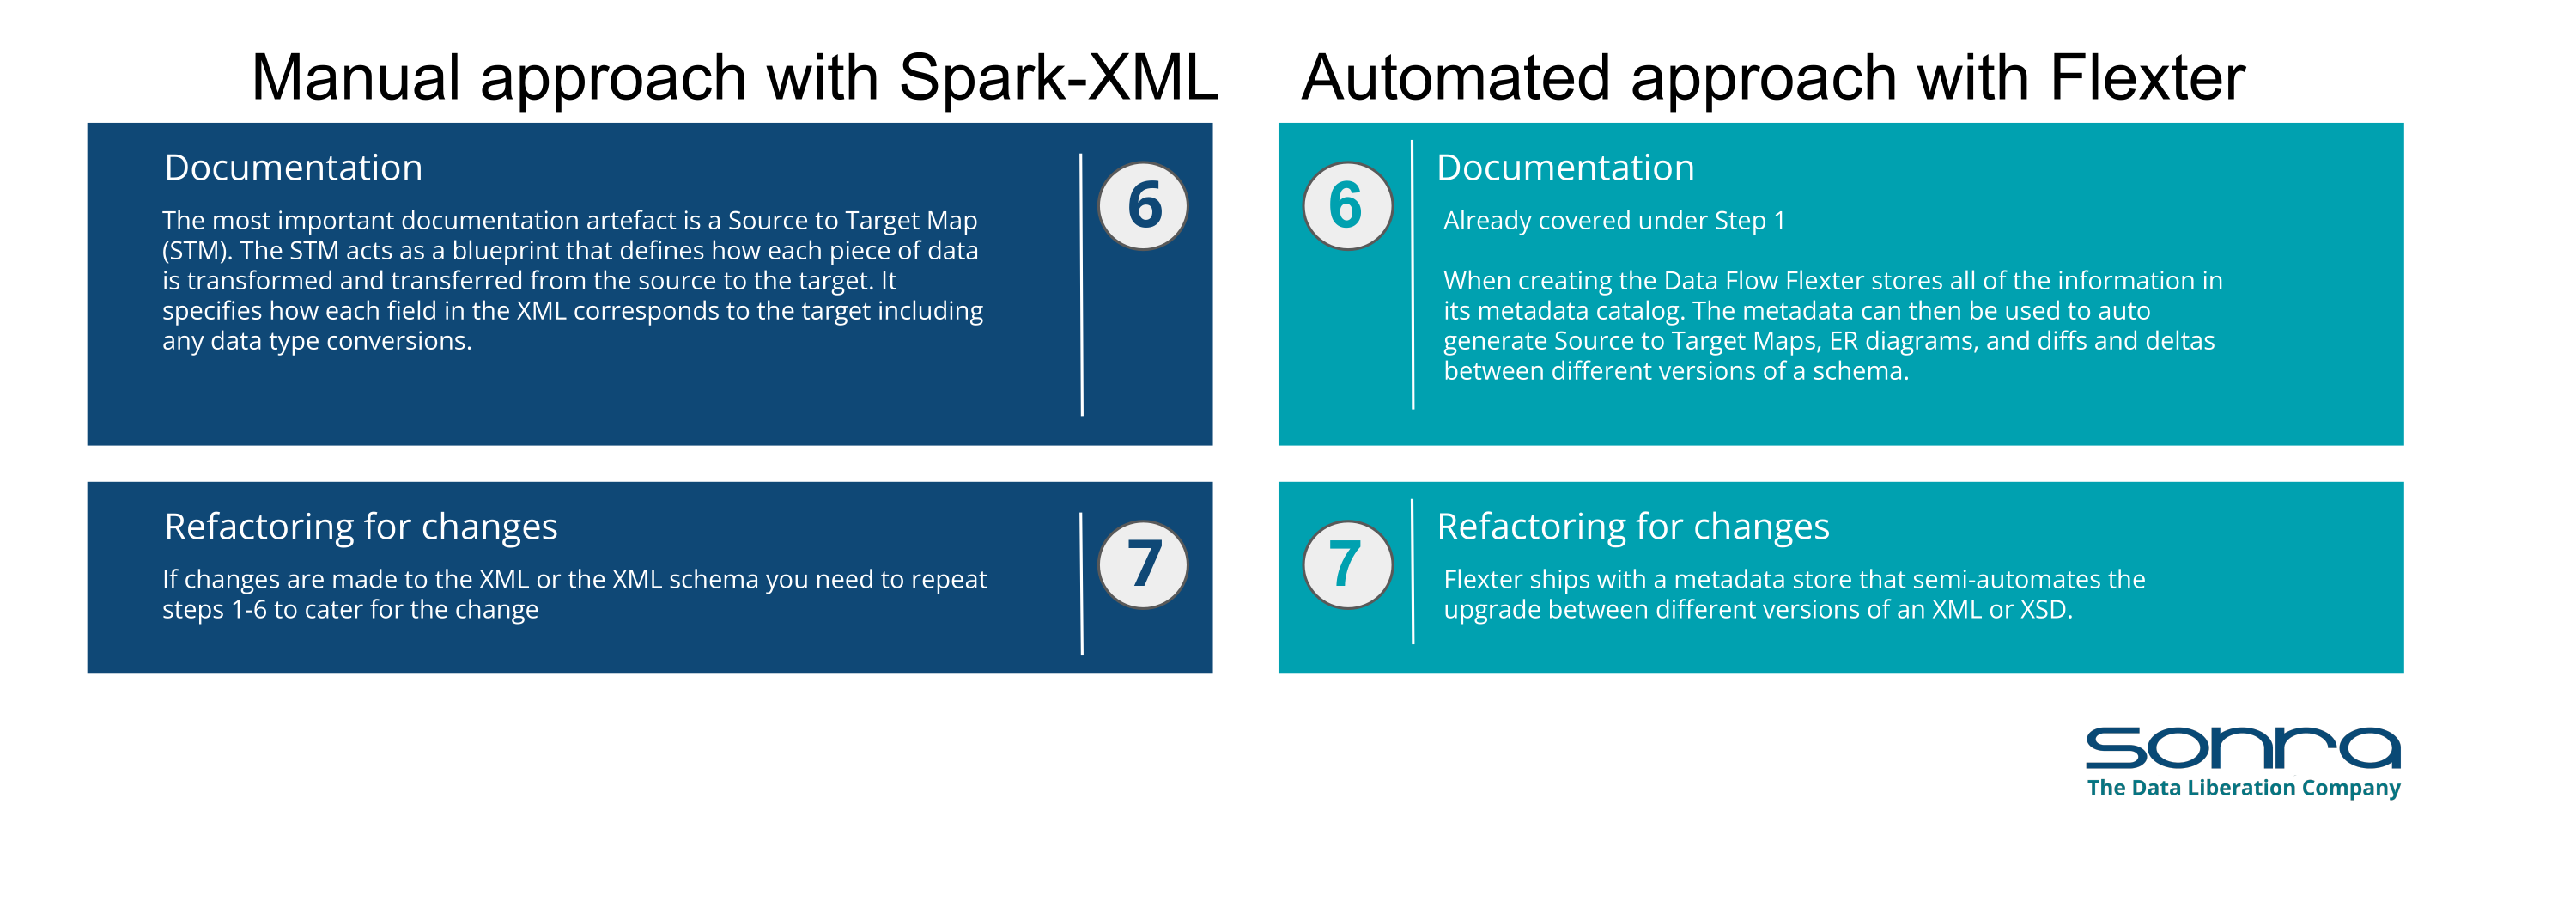
Documentation: Finally, documenting the entire process, including the code used, mappings between XML elements and database schema, the target data model, and any other relevant information, is critical. This documentation supports future maintenance and scalability of the conversion process.
By following these steps, organisations can effectively manage the transition from complex XML documents to a structured relational database system, making the data more accessible and usable for analysis and reporting purposes.
Pro tip
Before committing to a spark-xml-based workflow (including workflows with native XML support in Spark 4.0), make sure you’re aware of its limitations, especially if you’re working with highly nested XML or large volumes of data.
I’ve outlined the key limitations of spark-xml-based approaches in another section of the blog.
Automated versus manual XML conversion on Spark
Let’s have a look at how these steps compare between a manual XML conversion approach using coding and an automated approach using an XML conversion tool. For this comparison we use Flexter to illustrate the hands on steps.

You also have the option to download a PDF that provides this side-by-side comparison of manual versus automated XML conversion.
The benefits of automated XML conversion on Spark
There are some clear benefits of using an automated conversion approach on Spark. The same benefits apply to the case when comparing to a manual XML to Parquet conversion on Databricks, by the way.
Complexity? No problem. An automated setup zips through all kinds of XML and XSD complexities in no time.
Speedy Start: With automated XML parsing, all those steps like analysing, creating schemas, and mapping are done for you. This means data gets to decision-makers super fast.
Less Risky: Automating the XML parsing slashes the chances of projects going over budget or belly-up, especially those tricky ones based on industry standards.
Surefire Consistency and Spot-On Accuracy: Automation keeps the XML parsing spotless and consistent, minimising the risk of human mistakes.
Top-Notch Performance: Need to ramp up for big XML data volumes or tight SLAs? An XML automation tool has your back, scaling up and out as needed.
Easy-Peasy: Automated tools come with user-friendly interfaces, making the whole process a breeze. Plus, you won’t have to scramble for folks with hard-to-find XML skills like XPath, XQuery, XSLT, dodging potential project failures.
Ralph Kimball, the pioneer behind dimensional modelling, made his insightful observations for very good reasons.
“Because of such inherent complexity, never plan on writing your own XML processing interface to parse XML documents.
The structure of an XML document is quite involved, and the construction of an XML parser is a project in itself—not to be attempted by the data warehouse team.”
Kimball, Ralph: The Data Warehouse ETL Toolkit. Practical Techniques for Extracting, Cleaning, Conforming, and Delivering Data
How Flexter can help
Flexter is an enterprise XML conversion software.Flexter automatically converts complex XML to big data file formats (Delta Table, Parquet, Avro, ORC), Text (CSV, TSV etc.), or a database (Oracle, SQL Server, PostgreSQL etc.). You don’t have to write a single line of code. Everything happens automagically and you will be up and running in a day or two. It scales up on multiple CPUs and out on multiple servers..
If you want to find out more about Flexter visit the product pages or try automated XML conversion for free.
Let’s get started
In this example we will use Flexter to convert an XML file to parquet. We then query and analyse the output with Spark.
Also, you can check this video on how Flexter can help you to convert XML to SQL / Database.
How does Flexter generate the target schema?
We generate the target schema based on the information from the XML, the XSD, or a combination of the two. If you can’t provide an XSD we generate the target schema from a statistically significant sample of the XML files. In summary you have three options to generate the target: (1) XML only (2) XSD only (3) Combination of XML and XSD.
When we generate the target schema we also provide various optional optimisations, e.g. we can influence the level of denormalisation of the target schema and we may optionally eliminate redundant reference data and merge it into one and the same entity.
Flexter can generate a target schema from an XML file or a combination of XML and XML schema (XSD) files. In our example we process airline data based on the OTA standard. Both the XML files and the XSD are available and we use the information from both files to generate the target schema.
|
1 2 3 4 5 6 7 8 9 10 11 12 13 |
# We first test that the XML file is well formatted by simulating the execution the skip switch (-s) $ xml2er -s data.xml # Next we extract the statistics from data.xml. Statistics are used to generate the target schema. We use the xml2er command line tool without the skip (-s) switch. $ xml2er data.xml … # The result of this operation is an ID (origin: 5). We will use this ID in subsequent steps origin: 5 job: 6 # Some useful execution statistics startup: 3717 ms parse: 752 ms stats: 6403 m Map: 3 ms |
Now that we have gathered statistics from our XML sample we can generate the logical target schema with the xsd2er command line tool using the -k switch (-k is shortcut for –use-stats)
|
1 |
-k, --use-stats <ID[,ID2..]> Use the stats to generate the new schema |
Let’s go through the steps
|
1 2 3 4 5 6 7 8 9 10 11 12 13 14 15 16 17 18 19 |
# Template $ xsd2er -s -k<XML Schema ID> -g<Optimization Level> INPUTPATH # We first simulate generating the target schema with -s skip switch $ xsd2er -s -k5 -g3 schema.xsd # everything worked. Now running the command for real without skip $ xsd2er -k5 -g3 schema.xsd … # schema origin: 6 logical: 4 job: 8 # statistics startup: 444 ms stats: 53 ms parse: 670 ms build: 229 ms write: 47 ms map: 334 ms xpaths: 207 |
Happy days. Now we use the Logical Schema ID (origin: 6) to convert the XML data to Parquet
|
1 2 |
# First simulating the conversion process $ xml2er -s -l4 data.xml |
When the command is ready, removing –skip or -s, allows us to process the data. We direct the parquet output to the output directory for the data.xml file. Let’s first create a folder “output_dir” as the location to extract the generated output. The location is given by -o parameter when extracting data using xml2er command.
|
1 2 3 4 5 6 7 8 9 10 11 12 13 14 15 |
$ mkdir output_dir $ xml2er -l4 -o root/output_dir/ -f parquet -z none -S o data.xml … 17:16:24.110 INFO Finished successfully in 17701 milliseconds # schema origin: 7 logical: 4 job: 9 # statistics startup: 2899 ms load: 7549 ms parse: 179 ms write: 5470 ms stats: 1083 ms xpaths: 207 |
We can find the extracted parquet files in the output folder. It is a directory structure, which you can find in the current directory. We can ‘ls’ to see the contents of the .parquet folder as shown below.
|
1 2 3 4 5 6 7 8 9 10 11 12 13 |
# Looking at the parquet files generated $ ls -l total 92 drwxr-xr-x 2 root root 4096 Jan 7 18:39 AirTraveler.parquet drwxr-xr-x 2 root root 4096 Jan 7 18:38 Tax.parquet drwxr-xr-x 2 root root 4096 Jan 7 18:39 Telephone.parquet drwxr-xr-x 2 root root 4096 Jan 7 18:39 Ticketing.parquet drwxr-xr-x 2 root root 4096 Jan 7 18:39 TravelerRefNumber.parquet … # Looking inside a parquet folder $ cd Ticketing.parquet $ ls part-00000-6e378cb3-bf61-41cc-ab1a-92cb12e0368f.parquet _SUCCESS |
In order to look inside the parquet files, let’s initiate the spark-shell and create a dataframe to load the parquet tables parsed using Flexter
|
1 2 3 4 5 6 7 8 9 10 11 12 13 14 |
$ spark-shell Spark context Web UI available at http://172.17.0.2:4041 Spark context available as 'sc' (master = local[*], app id = local-1515355322712). Spark session available as 'spark'. Welcome to ____ __ / __/__ ___ _____/ /__ _\ \/ _ \/ _ `/ __/ '_/ /___/ .__/\_,_/_/ /_/\_\ version 2.1.1 /_/ Using Scala version 2.11.8 (OpenJDK 64-Bit Server VM, Java 1.8.0_151) Type in expressions to have them evaluated. Type :help for more information. scala> |
Once we have initiated the spark-shell, we can proceed with reading the parquet files generated and import them as dataframes in spark.
|
1 2 3 4 5 6 7 |
# Creating the dataframes using the parquet files scala> val df1 = spark.read.parquet("Tax.parquet") scala> val df2 = spark.read.parquet("Ticketing.parquet") scala> val df3 = spark.read.parquet("TravelerRefNumber.parquet") scala> val df4 = spark.read.parquet("PTC_FareBreakdown.parquet") scala> val df5 = spark.read.parquet("PaymentDetail.parquet") scala> val df6 = spark.read.parquet("AirTraveler.parquet") |
We can take a look at the schema of the data frames generated and do some preliminary analysis before proceeding further on the data parsed. For example, let’s look at the “Ticketing data” and the “Air Traveler data” created above.
|
1 2 3 4 5 6 7 8 9 10 11 12 13 14 15 16 17 |
# printing the Schema of the dataframes created above scala> df2.printSchema() root |-- PassengerTypeCode: string (nullable = true) |-- TicketDocumentNbr: string (nullable = true) |-- TicketingStatus: string (nullable = true) |-- TravelerRefNumber: decimal(2,0) (nullable = true) ... scala> df6.printSchema() root |-- Address_CountryName: string (nullable = true) |-- Email: string (nullable = true) |-- GroupInd: string (nullable = true) |-- PersonName_GivenName: string (nullable = true) |-- PersonName_Surname: string (nullable = true) |-- TravelerRefNumber: decimal(2,0) (nullable = true) ... |
We can see that headers and data types of the various columns. We can also perform some basic analysis on the dataset in Scala and look at the various variables present
|
1 2 3 4 5 6 7 8 9 10 11 12 13 14 15 16 17 18 19 20 21 22 23 24 25 26 |
# showing all the values of GroupInd column in df6 scala> df6.select("GroupInd").show() +--------+ |GroupInd| +--------+ | N| | N| | N| | N| | Y| | N| | N| | Y| | N| +--------+ # showing all the distinct values of TravelerRefNumber column in df2 scala> df2.select(df2("TravelerRefNumber")).distinct.show() +-----------------+ |TravelerRefNumber| +-----------------+ | 1| | 2| | 2| | 3| ... +-----------------+ |
Various basic data processing can be performed on the dataframe generated on the steps above as given below. The sql function on a SparkSession enables applications to run SQL queries programmatically and returns the result as a DataFrame.
|
1 2 3 4 |
# filtering the data frame based on the values of a certain column scala> df.filter($"<column-name>" > value).show() # group by the values of a column and creating a count scala> df.groupBy("<column-name>").count().show() |
Let’s take the df2 data frame which contains the Ticketing.parquet output and query the rows which contains the non-null values of the TravelerRefNumber.
Temporary views in Spark SQL are session-scoped and will disappear if the session that creates it terminates. If you want to have a temporary view that is shared among all sessions and keep alive until the Spark application terminates, you can create a global temporary view. Global temporary view is tied to a system preserved database global_temp, and we must use the qualified name to refer it, e.g. SELECT * FROM global_temp.view1.
|
1 2 3 4 5 6 7 8 9 10 11 12 13 14 |
# Creating a Global temporary view df1.createOrReplaceTempView("TaxTable") # Selecting rows containing positive values of the column Amount val qTicket = spark.sql("SELECT * FROM TaxTable where Amount > 0") # Displaying the output above qTicket.show() +--------------------+------+------------+-------+ |PTC_FareBreakdown|Amount|CurrencyCode|TaxCode| +--------------------+------+------------+-------+ |33000000000000000...| 36.4| CHF| CH| |33000000000000000...| 43.5| CHF| YQ| |33000000000000000...| 21.06| CHF| UP| ... +--------------------+------+------------+-------+ |
We can also perform other SQL queries on the dataframes. Let’s take an example to perform a join on the two datasets loaded from the parquet files
|
1 2 3 4 5 6 |
# loading Air traveler dataset Val AirTraveler=sqlContext.read.format("parquet").option("header","true").load("AirTraveler.parquet") # loading Ticketing dataset Val Ticketing=sqlContext.read.format("parquet").option("header","true").load("Ticketing.parquet") # Inner join on both the datasets on the common column TravelerRefNumber val AirTicket = AirTraveler.as('a).join(Ticketing.as('b), $"a.TravelerRefNumber" === $"b.TravelerRefNumber") |
Still on the fence about automated XML to Parquet conversion?
We’ve shown how cool Flexter is at turning XML into Spark Parquet automatically.
But if you’re still having doubts about the pros and cons of automated XML to Parquet conversion, I’ve put together a full section on how you could potentially free up your team with Flexter.
Already convinced? Book a demo and let’s talk about your project needs.
Further Reading
Deep dive on XML converters, XML conversion tools and XML conversion projects
Converting XML and JSON to a Data Lake
How to Insert XML Data into SQL Table?
The Ultimate Guide to XML Mapping in 2024
Optimisation algorithms for converting XML and JSON to a relational format