How to Use the Flexter XML to CSV/TSV Converter Online
In this guide, I’ll walk you through the online version of Flexter, a free XML to CSV converter that puts professional-grade XML conversion right at your fingertips.
Keep reading if you are looking for a solution that:
- Will automatically convert your XML into ready-to-use tabular formats like CSV and TSV,
- Requires no manual mapping between your source XML file and the produced files,
- Unlike other freeware tools that flatten your XML into One Big Table (OBT)—a method with known limitations—Flexter Online normalises your XML into multiple CSV/TSV, eliminating redundancies.
- Accepts XSD as input, making it ideal for projects built on established industry standards or XML documents that come with a schema.
- Provides the key documentation you need to get started and stay organised over the long term, including a readme, an Entity-Relationship (ER) diagram, and a Source-to-Target mapping.
- The readme file provides basic usage information and useful links.
- The ER diagram shows the schema created with Flexter’s normalisation algorithms, while the Source-to-Target map will show you the mapping between the source XML’s XPaths and the converted CSV/TSV fields.
- You also get free support via email or chat on the website. (For a broader perspective on integrating AI into your projects, consider building AI chatbots.)
- A full-version upgrade is available with Flexter Enterprise, along with professional services to meet your evolving project needs (if and when they arise).
In earlier posts, I showed how Flexter Online easily handles even the most challenging XML test cases.
Use Flexter to turn XML and JSON into Valuable Insights
- 100% Automation
- 0% Coding
Watch: Convert XML to CSV/TSV in 2 Minutes (No Coding)
Prefer a quick video tutorial? Watch the step-by-step process of using Flexter Online to convert XML (and XSD) files into CSV and TSV formats — all in under 2 minutes! This video covers both workflows discussed in this guide.
Want to dive deeper? Keep reading for screenshots, detailed steps, and examples to help you make the most out of Flexter’s advanced features.
Unlike the noise of random tools you’ll find through search engines and chatbots, Flexter Online is ideal for small to medium-sized data tasks. Just drag and drop your XML (and XSD if needed), and your converted results will land directly in your email. It’s that simple!
TL;DR: This post covers two XML to CSV/TSV workflows you can follow online for free: one with XSD and one without. It explains how to read and understand the output (CSV, TSV and documentation) locally on your computer. I will also provide a detailed comparison list of features between Flexter Online and Flexter Enterprise to help you assess when scaling up with Flexter Enterprise might be beneficial.
Conversion workflows for Flexter Online
When converting with Flexter Online, you can choose between two main workflows: converting XML files directly to CSV/TSV or using an XSD (XML Schema) if one is available for your source XML. In the following sections, I’ll guide you through both options to help you get started.
Conversion workflow for when converting XML (without an XSD)
Before jumping in, make sure you know where your XML lives on your system and have a rough idea of its XPaths and parent-child relationships. I’ll use a simple XML file (download link) from my stash of XML test cases.
When you’re ready, access the Online XML Converter to CSV to start the process:
Step 1: Start by uploading your XML. You can drag and drop it or browse your local filesystem by clicking “Upload a file”.
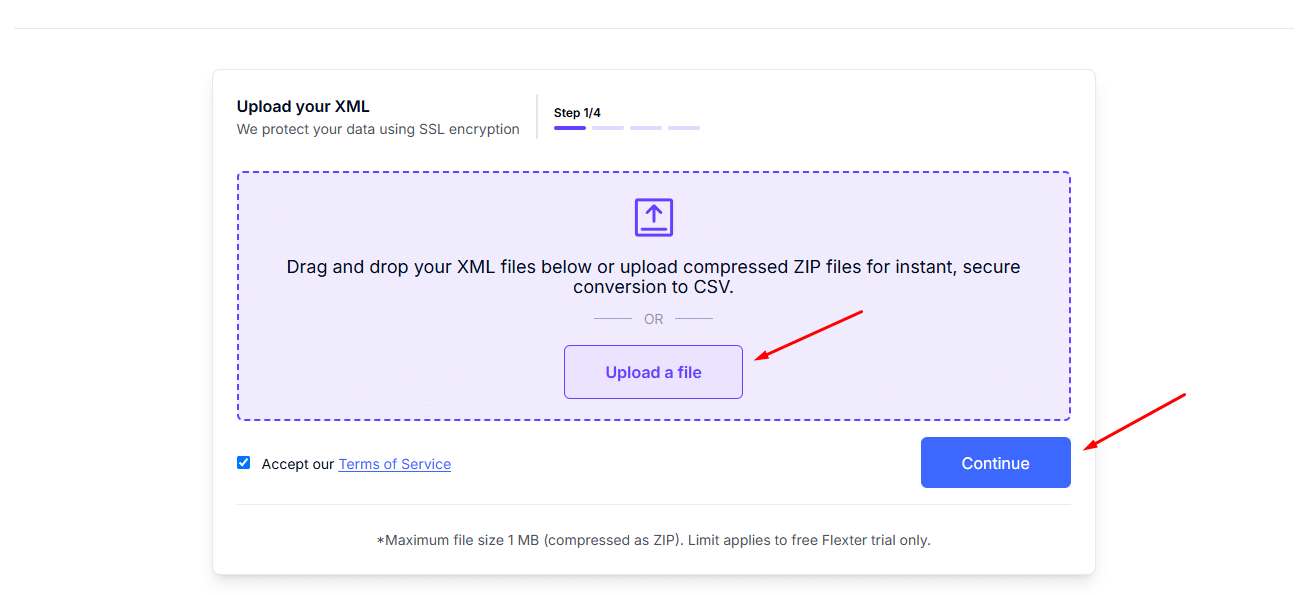
After uploading the file, click “Continue”.
Step 2: In the next step of the workflow, the converter will ask you for an XML Schema, or as it is called in short, XSD.
In this workflow, we’re converting a simple XML test case without an XSD schema, so you may click “Skip This Step” or “Continue” to go to the next step, as highlighted in the picture.
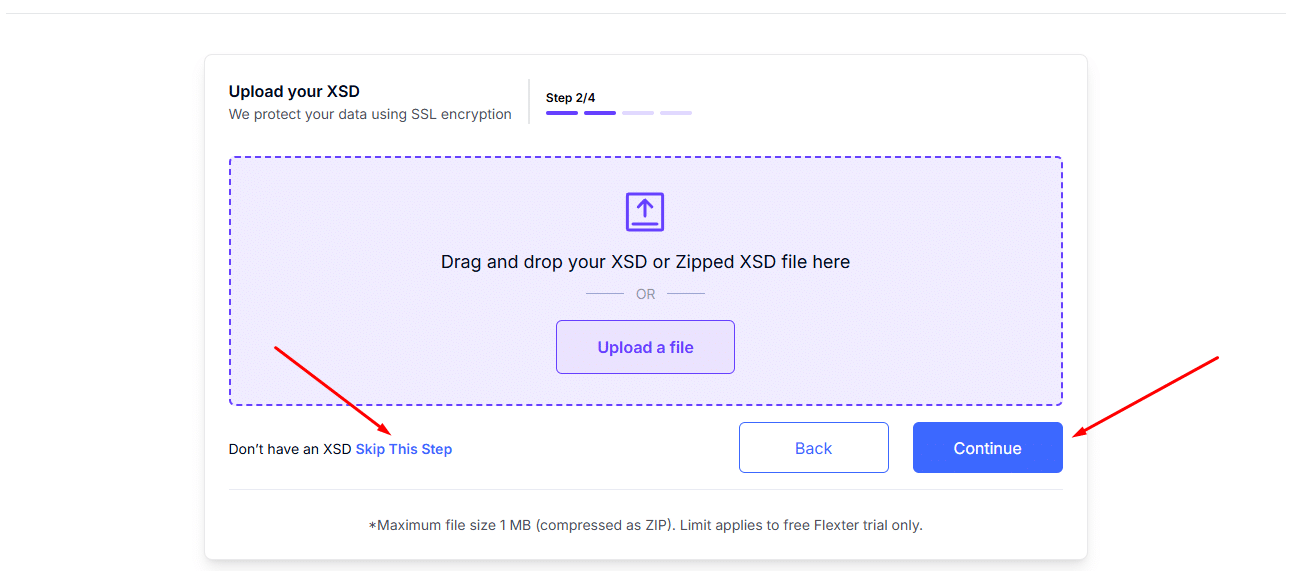
If you have an XSD available, you need to check the second workflow guide of this post.
Step 3: You’re nearly there! In Step 3, simply provide your contact details so the converter knows where to deliver your converted files and documentation.
While providing your email address is essential for ensuring the delivery, the company and phone number fields are optional.
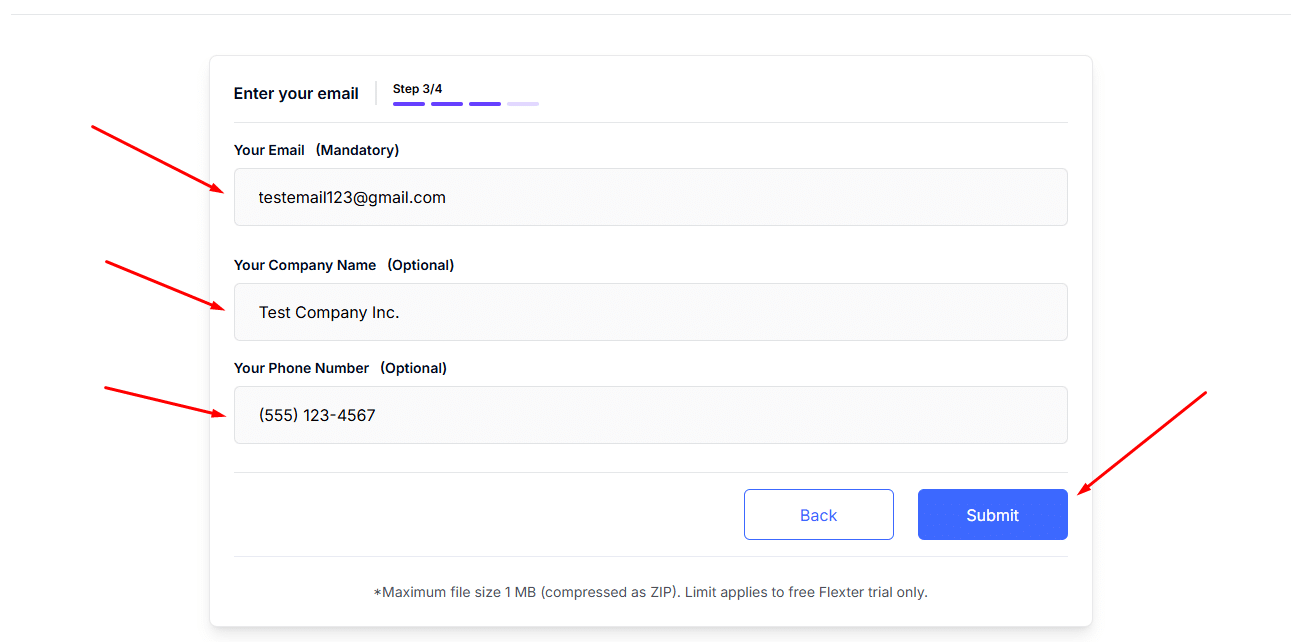
Step 4: If you’ve followed the steps, your XML data should be heading to your inbox!
In a few seconds, look for an email titled “Your XML Conversion Results Are Ready!”—and don’t forget to check your Spam folder if it doesn’t show up.
The email contains a download link for your files, which redirects you to this page when clicked.
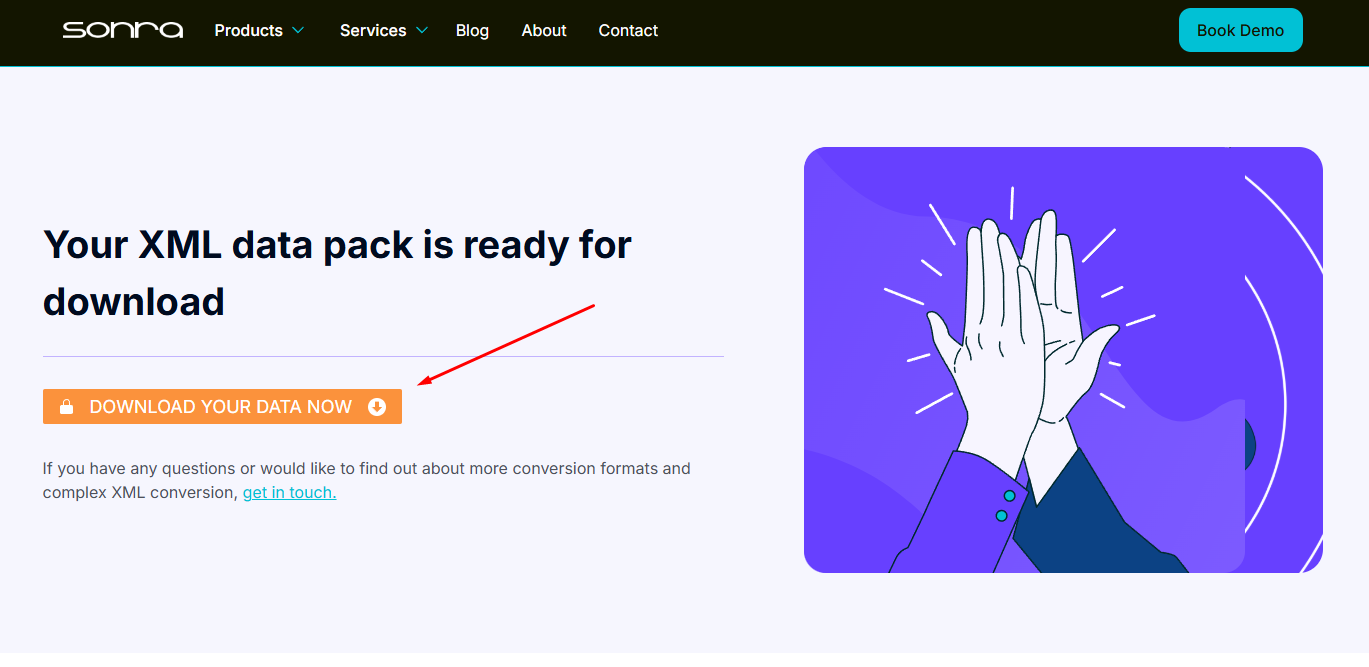
If the conversion doesn’t go as planned, no worries! You’ll get a heads-up from the Flexter support team—usually within 1 business day, though it might take up to 2 days if we’re extra busy.
If you got the email, click “Download Your Data Now,” choose where to save the zip file, and hit save. If you unzip it, your downloaded folder will look like this:

The CSV folder contains your converted XML data in CSV format, while the TSV folder holds the same data in TSV format. The documentation folder includes an ER Diagram and a Source-to-Target map. The readme file contains basic information as well as useful links.
Later on in this blog post, we’ll discuss how to open the files and understand the documentation.
Pro Tip
Need to convert XML data into SQL tables?
Option 1: Use the Free Online XML to CSV/TSV converter mentioned in this article to convert your XML to tabular data, then manually write the required DDL commands to import it into a database.
Option 2: For a fully automated solution, try our Free Online XML to Database tool, which handles the conversion for you.
Check out the step-by-step guide on accessing and using the XML to Database tool.
Conversion workflow for when converting XML and XSD
Are you working on a project that involves converting XML to CSV or TSV with XSD validation? You’re in the right place!
In this guide, I’ll walk you through a quick, free, and efficient online workflow to convert your XML and XSD to CSV and TSV. Using my multi-branch XML test case and the corresponding XSD file as an example, I’ll show you some straightforward steps anyone can follow.
Gather your files, head to Flexter Online for CSV/TSV—the most robust free XML to CSV converter—and let’s get started:
Step 1: After accessing the online XML to CSV converter, use the handy widget that you can see in the picture below to drag and drop or upload your source XML file.
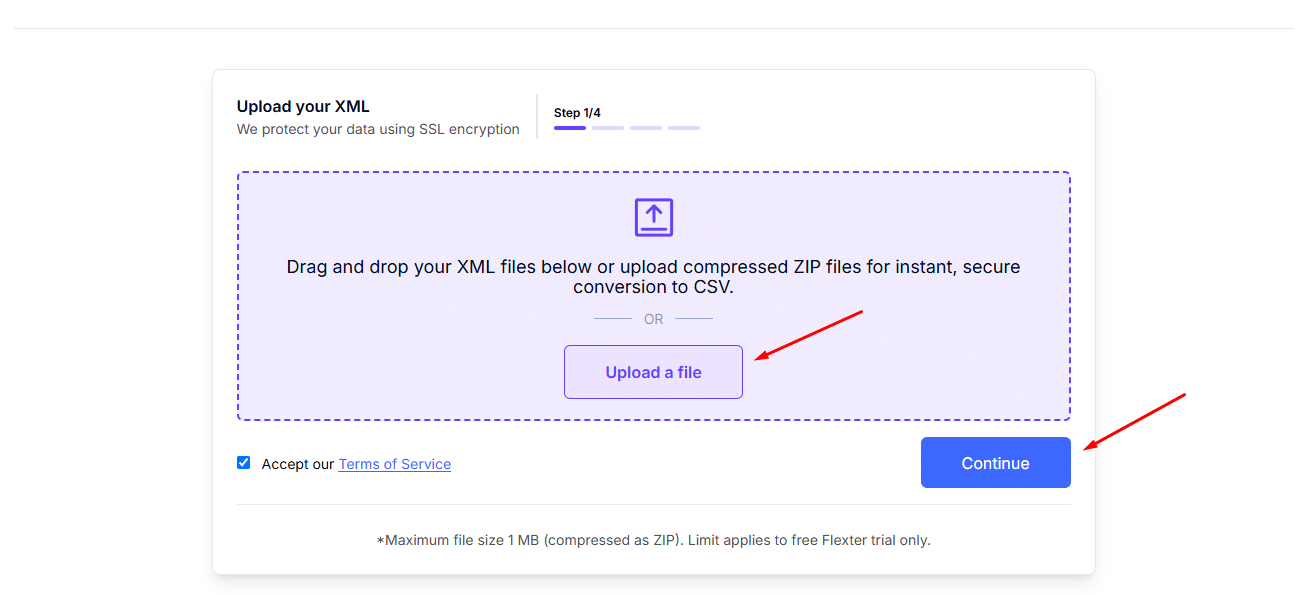
Once uploaded, click “Continue.” Be sure not to mix up your files—if you accidentally upload the XSD file instead of the XML, the conversion won’t be successful.
Step 2: In the second step, you’ll need to upload your XSD file. Just like in step one, double-check that you’ve selected the correct file—the XSD, not the XML this time.
Once uploaded, the webpage will display the XSD for this workflow. Click “Continue” to move forward.
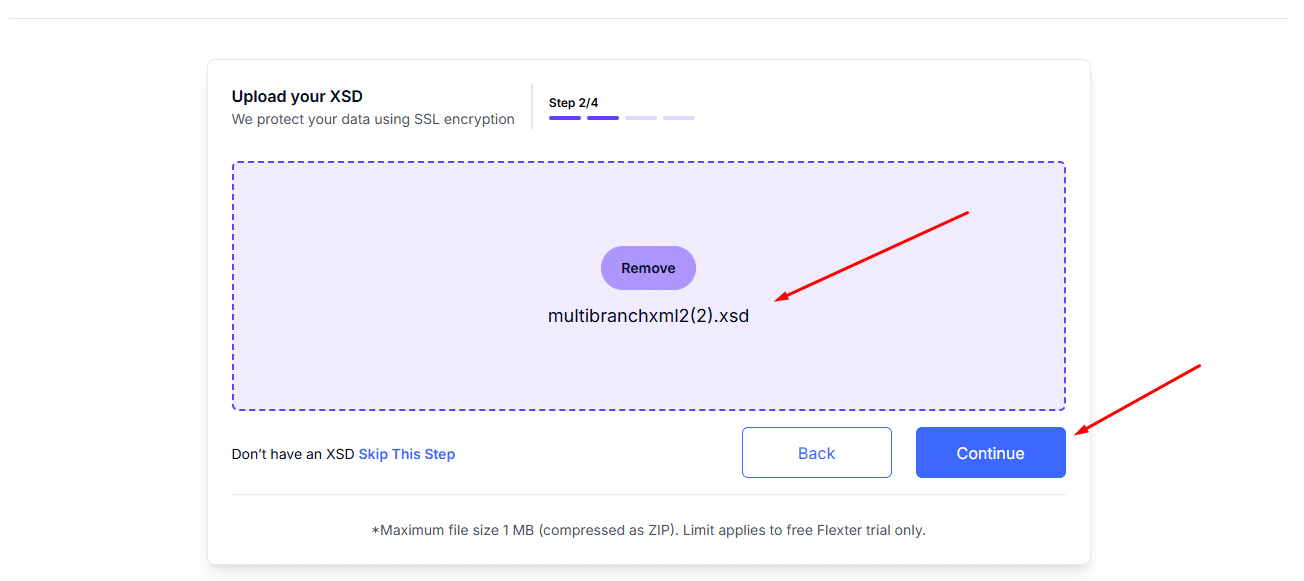
If you do not have an XSD available, then in this step, you can select “Skip this Step,” as we showed in the first workflow guide of this post.
Pro Tip
Need to convert XML data into SQL tables?
Option 1: Use the Free Online XML to CSV/TSV converter mentioned in this article to convert your XML to tabular data, then manually write the required DDL commands to import it into a database.
Option 2: For a fully automated solution, try our Free Online XML to Database tool, which handles the conversion for you.
Check out the step-by-step guide on accessing and using the XML to Database tool.
Step 3: If you’ve made it to Step 3, you’re nearly there! Simply enter your email address so the online XML to CSV converter knows where to send your results.
While your email is required, providing your Company Name and Phone Number is optional.
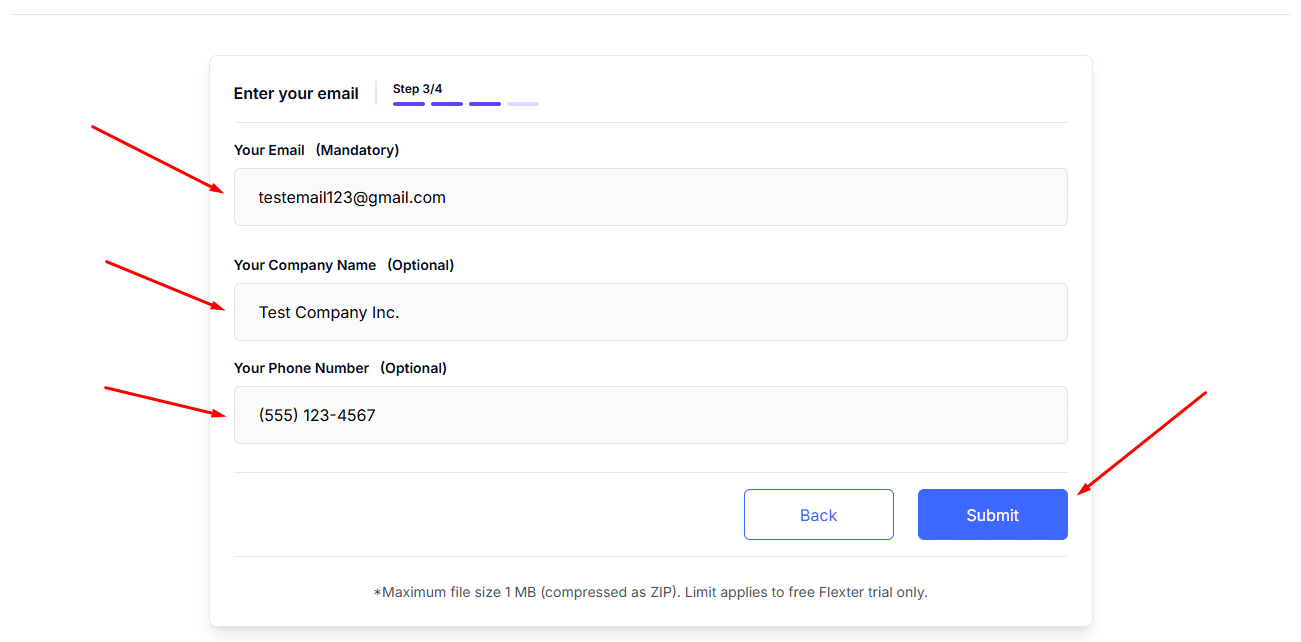
If you’ve clicked “Submit”, then sit back and relax. Your XML data conversion is underway.
Step 4: If everything goes smoothly, your converted CSV and TSV data and documentation will arrive in your inbox within seconds!
Look for an email titled “Your XML Conversion Results Are Ready!”. Be sure to check your Spam folder if it’s not in your Inbox.
The email includes a download link for your files, which will bring you to the following page when clicked.
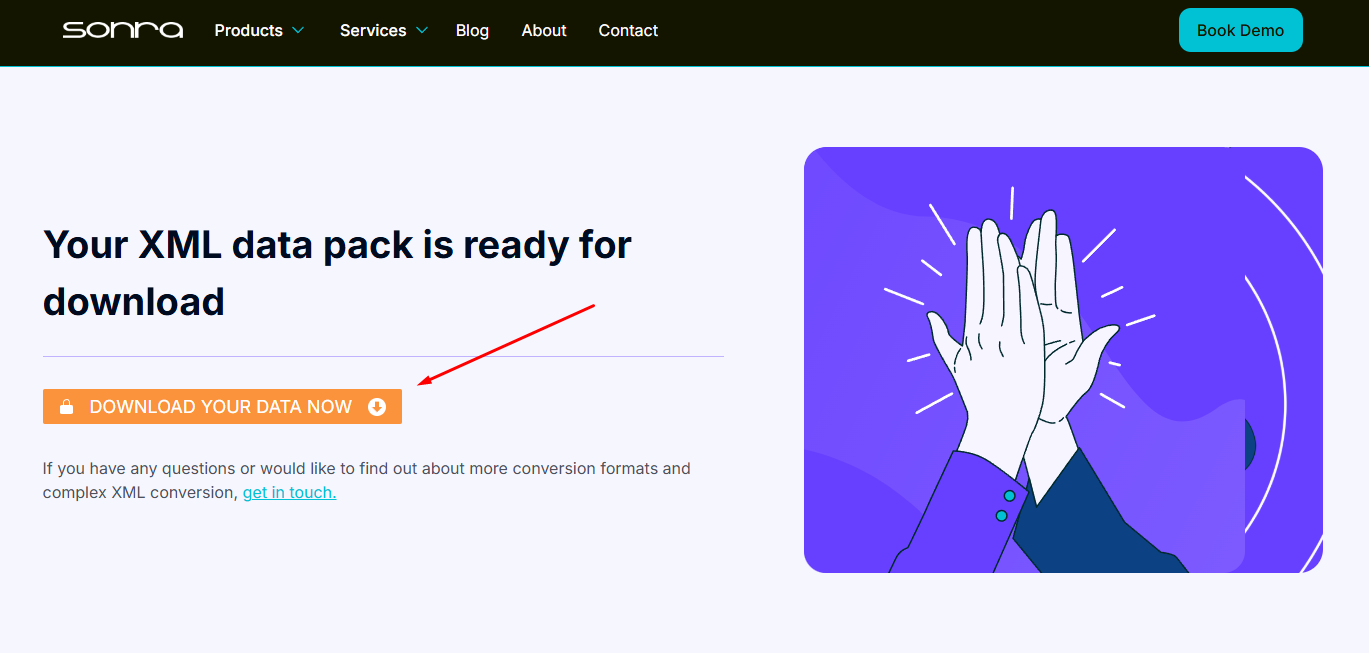
Click the orange “Download Your Data Now” button and choose where to save the files within your local filesystem.
The final downloaded folder, when unzipped, includes:
- CSV folder: Your converted XML data into CSV format,
- TSV folder: The same data in TSV format,
- Documentation folder: Includes the ER Diagram and the Source-to-Target map for your conversion,
- And the readme file with basic information for your converted data and useful links.
Here’s what it should look like:

In the next section of this blog post, we’ll explore how to open the files and interpret the documentation.
Pro Tip
Need to convert XML data into SQL tables?
Option 1: Use the Free Online XML to CSV/TSV converter mentioned in this article to convert your XML to tabular data, then manually write the required DDL commands to import it into a database.
Option 2: For a fully automated solution, try our Free Online XML to Database tool, which handles the conversion for you.
Check out the step-by-step guide on accessing and using the XML to Database tool.Want to dive deeper? Keep reading for screenshots, detailed steps, and examples to help you make the most out of Flexter’s advanced features.
Understanding and making the most out of your converted files
If you’ve followed either of the workflows outlined earlier, your CSV/TSV files and documentation should now be safely parked on your computer.
Next, I’ll guide you through decoding the results and transforming your data into a powerful and actionable asset.
This section builds on the multi-branch XML test case from the XML and XSD conversion example.
Opening and reading the converted CSV/TSV
I’ll be using Microsoft Excel, the world’s favourite spreadsheet sidekick, to show you how to open and inspect the converted CSV and TSV.
The converted CSV files for your XML
After receiving the email and unzipping the downloaded folder, you should locate and open the “CSV” file containing your converted CSV data.
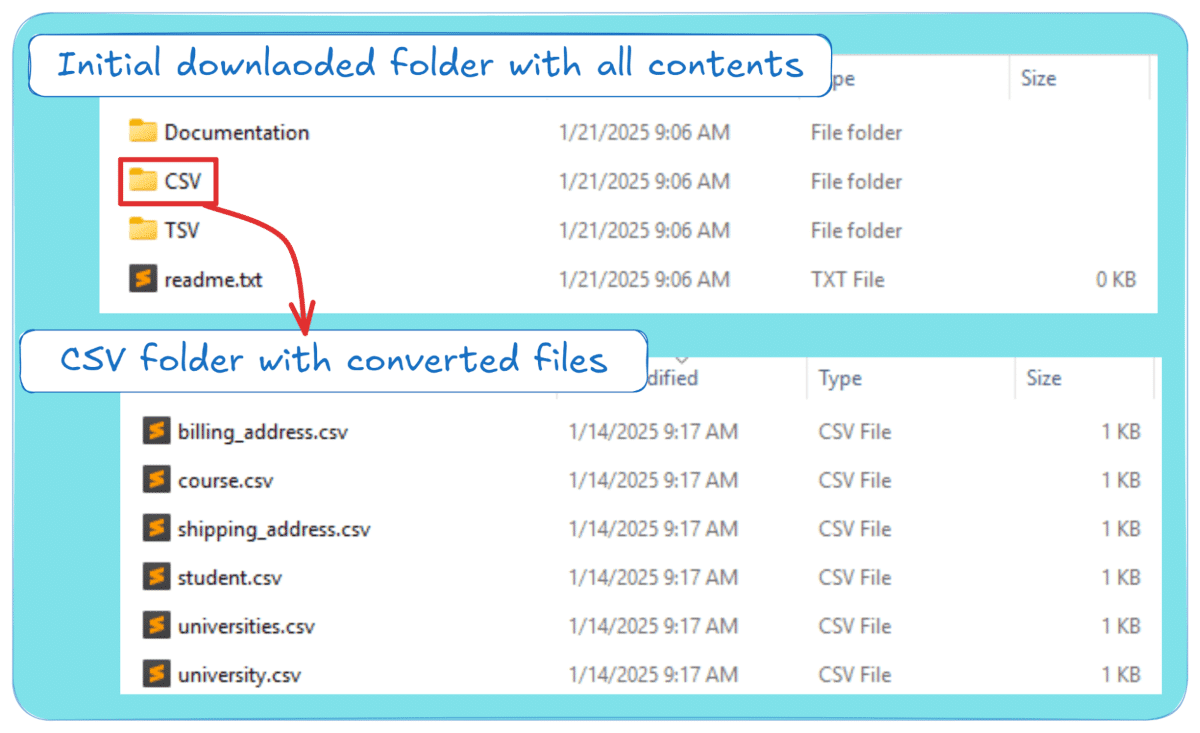
You may notice that while in our initial XML, we had one file, the multi-branch XML test case, the CSV folder contains multiple CSV files.
This is because, with Flexter Online, you don’t just get your XML flattened into One Big Table (OBT); rather, you get your XML normalised into separate CSV files/tables that follow a relational model.
As I demonstrated in my post comparing online XML to CSV converters, this is an advanced feature exclusive to Flexter.
I’ll show you exactly how each converted file maps to the initial XML, but let’s see how to open and read your CSV.
How to open and inspect your CSV with Excel
Excel is one of the most famous tools for handling small datasets (<1MB), like the one converted in our example.
To open any of the CSV files, follow the following 4-step process:
Step 1: Open Excel and create a Blank workbook. Your workbook should include one sheet named “Sheet1”.
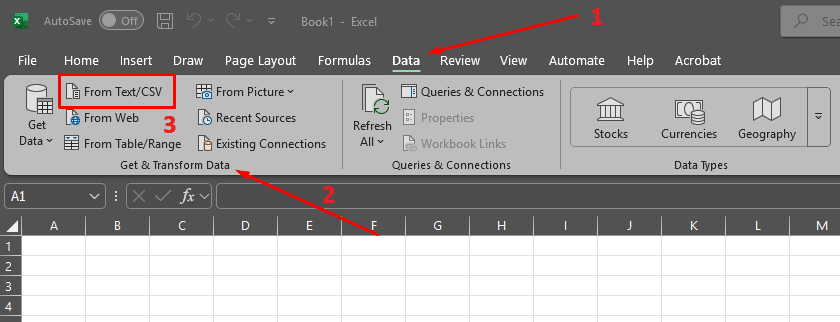
Step 2: Select the Ribbon tab “Data” at the top of the window. Then locate the “Get & Transform Data” section, and from there, select “From Text/CSV”. It should look like this:
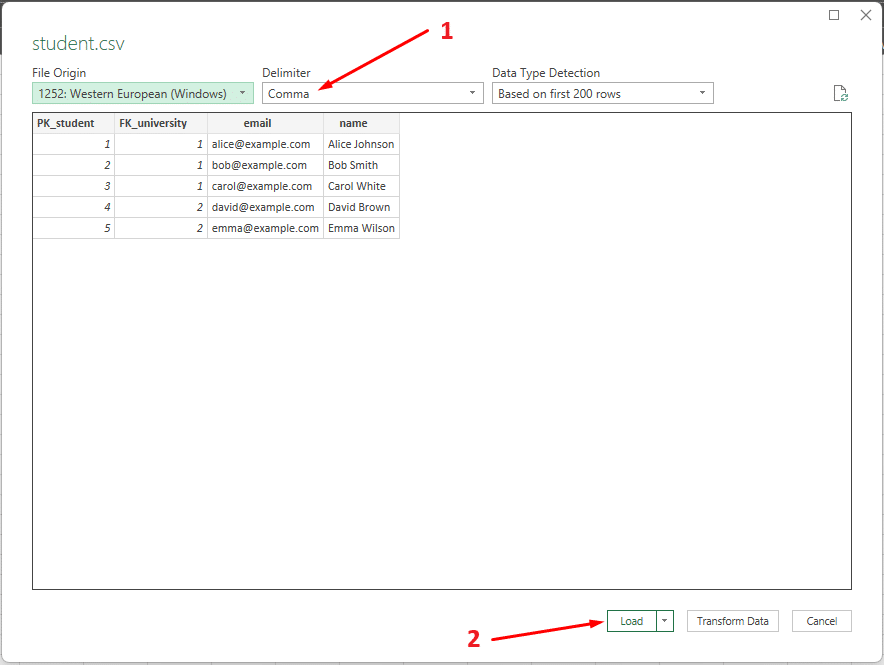
Step 3: Select one of the CSV files to load, and then, in the window that pops up, select “Comma” as the delimiter. Then click “Load”.
In my example, where I selected the “student.csv” file, the pop-up window looks like this:
Step 4: Your CSV file should be imported into Excel in a new sheet with the file’s name. The sheet should be called “student” and should include the data as follows:
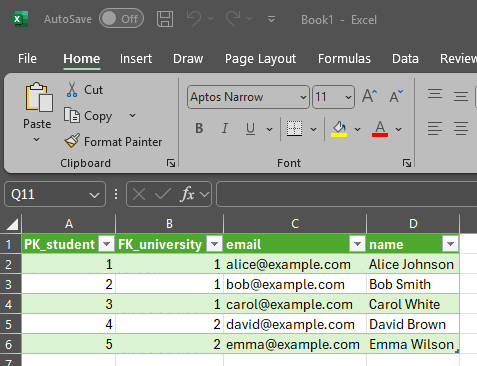
That’s it! The first of your converted CSV files is now loaded in Excel. Follow the same 4-step process for the rest of the files in the “CSV” folder until you have an Excel spreadsheet with six sheets, one for each converted CSV file.
Pro Tip
Need to convert XML data into SQL tables?
Option 1: Use the Free Online XML to CSV/TSV converter mentioned in this article to convert your XML to tabular data, then manually write the required DDL commands to import it into a database.
Option 2: For a fully automated solution, try our Free Online XML to Database tool, which handles the conversion for you.
Check out the step-by-step guide on accessing and using the XML to Database tool.
The Source-to-Target Map
You’ve got your converted CSV files in Excel, but how do the six CSV files map back to your source XML file?
No need to worry! This info is already on your computer. Flexter Online doesn’t just hand you files like most online XML to CSV conversion tools; it equips you with everything you need to decode the conversion like a pro.
Up next, I’ll walk you through the first part of the documentation delivered by Flexter Online, the Source-to-Target map, or STM for short.
As it can be understood by its name, the STM tracks the XPaths from your initial XML to the target CSV/TSV rows and columns. Here’s how it looks for the multi-branch XML conversion:
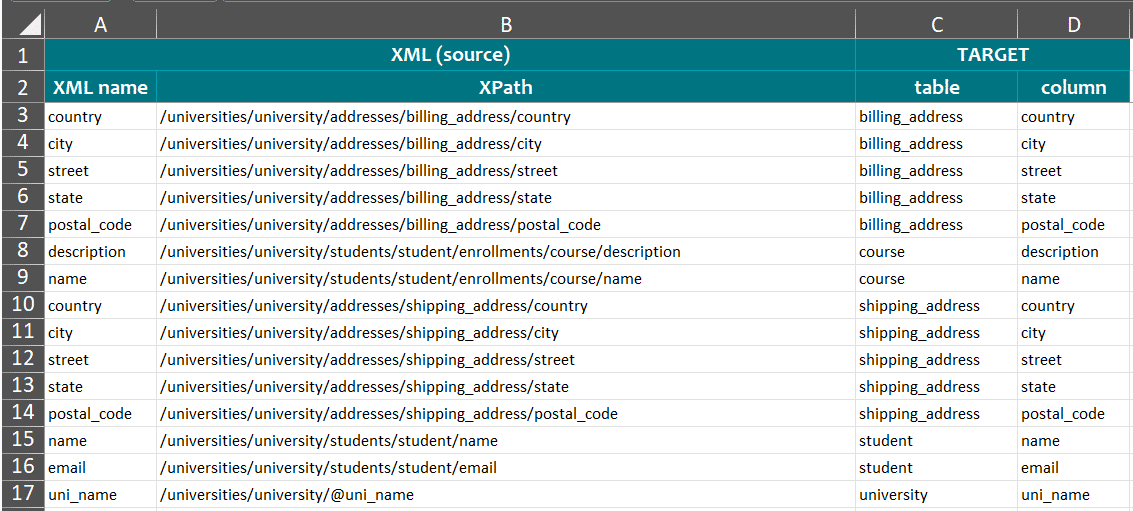
How to read the Source-to-Target map
At first glance, the Source-to-Target Map (STM) might feel like a daunting puzzle. But trust me—it’s a lot simpler than it seems!
Think of it as your data’s ultimate cheat sheet, laid out in a neat and tidy matrix. Here’s how it works:
- The “XML Name” Column: This column is like the guest list for your source XML—it shows all the element and attribute names, giving you a clear snapshot of your starting lineup.
- The “XPath” Column: Consider this your treasure map! It reveals the XPath for each element, complete with parent-child relationships, so you can navigate your XML structure like an experienced explorer.
- The “Table” and “Column” Columns: These parts bridge your XML and your CSV, showing exactly where each XML element lands in your CSV/TSV tables.
See? Not so scary after all.
Let’s see an example. If you’re looking to map the student “Alice Johnson” from the source multi-branch XML test case to the converted CSV/TSV, then follow these steps:
- Step 1: Quickly go through your source XML file to identify the parent-child relationships from the parent node of “Alice Johnson” up to the root node of the XML. Keep that in mind as you proceed to the next step.
- Step 2: Check the row of the Source-to-Target map that shows where the specific node you want to check (“name” in our case) is, and verify that its XPath is the same as the parent-child relationships you identified in Step 1. Then, find the location of your source XML data in the converted CSV by inspecting columns “table” and “column” of the same row of the Source-to-Target map.
- Step 3: Finally, your converted data are in the “CSV” folder and the table (CSV/TSV file) and column (of the CSV/TSV file) you identified in Step 2 and the Source-to-Target map.
Here’s how this 3-step process looks for the multi-branch XML test case:
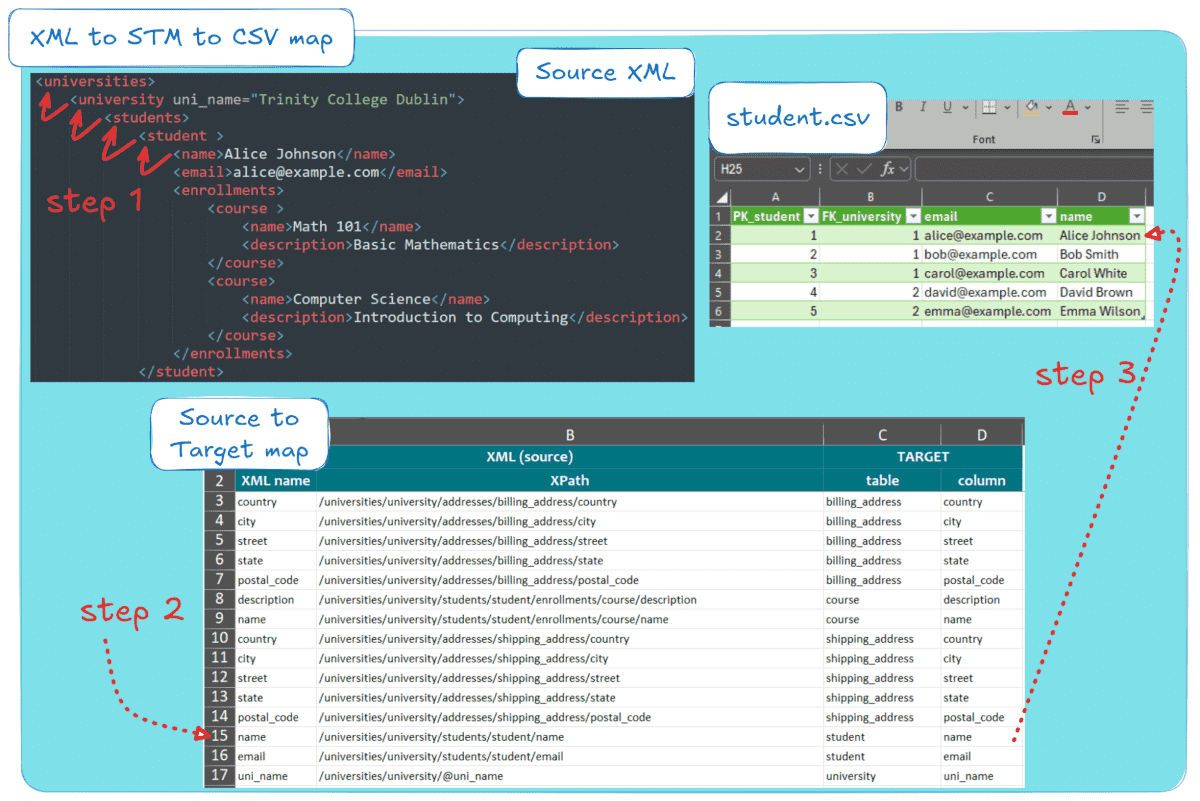
This process can also work in reverse: start by identifying the converted data in the CSV or TSV, then trace it back to its original location in the source XML.
The Entity-Relationship (ER) diagram
You’ve opened the CSV and figured out how the source data maps to the final tables. But how does it all tie together? And what’s with those extra columns like “PK_student” and “FK_university” in the CSV/TSV?
What you’re seeing is the Primary Keys (PK) and Foreign Keys (FK)—the backbone of normalised schemas, connecting the six CSV files efficiently.
Unlike other online XML converters that flatten your XML into One Big Table (OBT)—creating redundant values and limiting usability—Flexter Online normalises your XML, mapping it intelligently to CSV/TSV while adding the necessary PKs and FKs for a clean relational schema.
To help you understand your converted CSV data and their new schema, Flexter Online provides the ER diagram, a visual representation of the relational schema of the CSV tables.
That’s right—it generates an ER diagram for every data conversion you run, completely free.
I’ll show you how the ER diagram looks for multi-branch XML conversion:
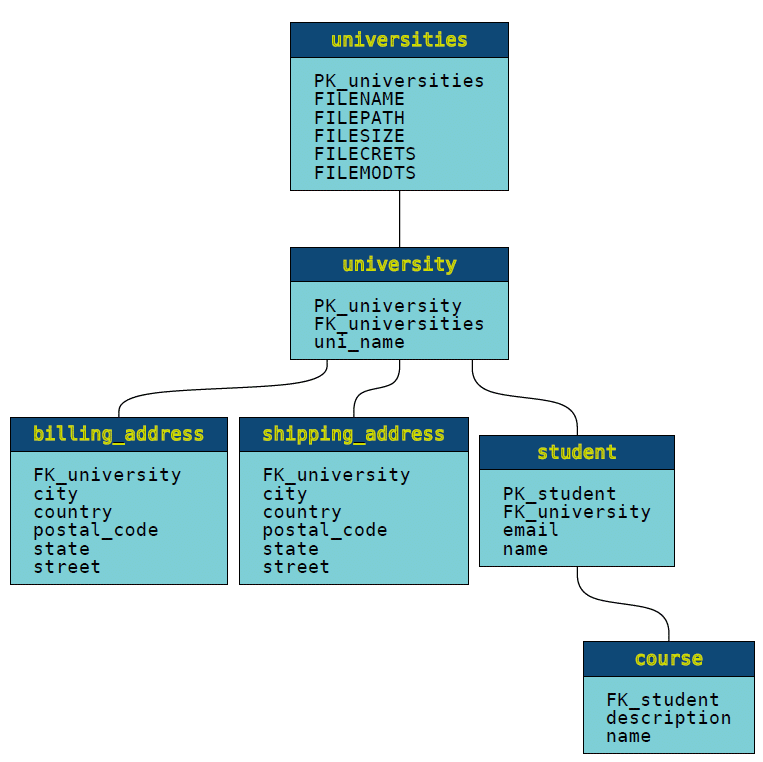
Each little box represents one of your CSV/TSV files. The file’s name is the label on top, and inside (i.e. light blue part of the box), you’ll find a list of all its columns.
This means that each row in the CSV/TSV files is associated with the columns in the light blue part of each box and, more importantly, with the newly introduced foreign (“FK_”) and primary (“PK_”) keys.
This ER diagram will feel like second nature if you’re a relational database whiz. But if you’re scratching your head, no worries—I’ve got you covered! Check out my other post, where I break down ER diagrams in more detail.
Pro Tip
Need to convert XML data into SQL tables?
Option 1: Use the Free Online XML to CSV/TSV converter mentioned in this article to convert your XML to tabular data, then manually write the required DDL commands to import it into a database.
Option 2: For a fully automated solution, try our Free Online XML to Database tool, which handles the conversion for you.
Check out the step-by-step guide on accessing and using the XML to Database tool.
Bringing It All Together: XML to STM to CSV to ER Diagram
Before wrapping up, let me share a final diagram to offer an experienced data engineer’s perspective on XML to CSV/TSV conversion.
Using the source XML, converted CSV (or TSV), Source-to-Target (STM) map, and ER diagram, this is how I usually think about the XML to CSV data transformation journey:
Step 1: Locate the XML node of interest in the source file. For example, track where “Alice Johnson” from “Trinity College Dublin” appears in the source XML. Note the XPath from the root node to Alice Johnson and her university (attribute of the “university” element).
Step 2: Consult the Source-to-Target map. Identify the row (or rows) that contain the table and column information for your source XML data.
This can be done by checking the “XML name” column and verifying “XPath” as you remember it from Step 1. Based on this, the location of your data in the converted CSV is in columns “table” and “column”.
In our example, from this step, you should be able to deduce that student.csv contains the student name in the column “name” and university.csv holds the university name in the “uni_name” column.
Step 3: You can now open the CSV data in Excel and locate the values from the initial XML from Steps 1 & 2 in the converted CSV. Also, check that the CSV files contain new columns for the PKs and FKs that interconnect your CSV tables.
Step 4: Review the ER diagram to understand how the six CSVs fit into the overall schema for the multi-branch XML test case. If you inspect the diagram closely, you’ll also notice how the columns of the converted CSVs are shown in the ER diagram for each CSV file.
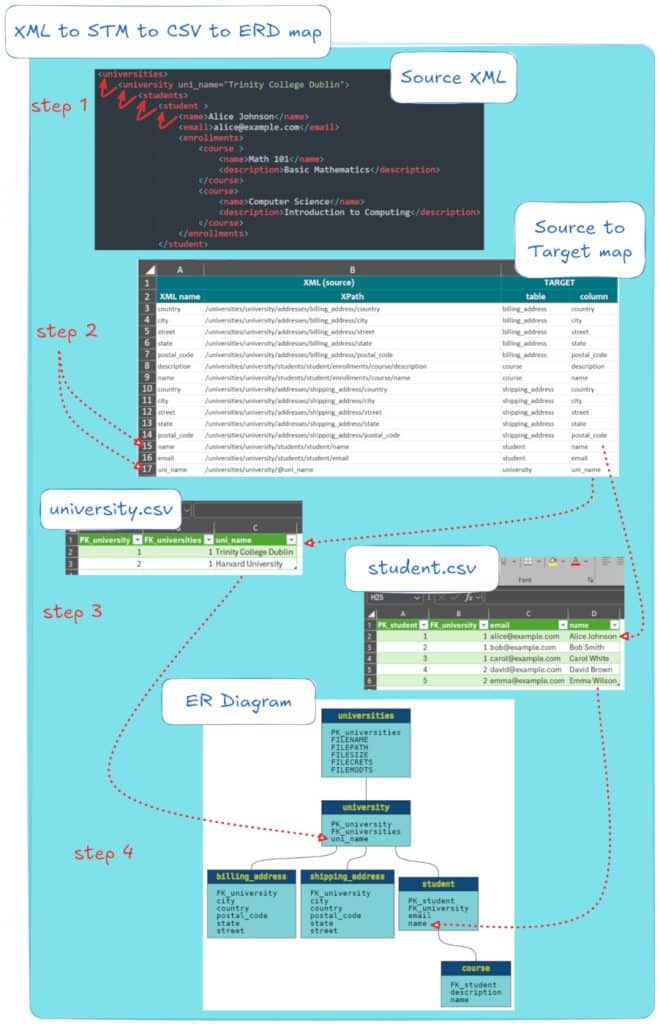
This 4-step process connecting the source XML with the three artefacts (converted CSV/TSV, STM, ER diagram) can also be done in reverse.
Start with the ER diagram to understand the bigger picture and work your way from the converted CSV to the source XML.
Flexter Online or Flexter Enterprise: Which version of Flexter suits you best?
By now, you’ve probably realised that Flexter Online isn’t just another XML to CSV online converter you’ll use once and forget. It’s a powerful portal built to give you access to cutting-edge algorithms for unmatched XML to CSV/TSV conversion results.
Why not bookmark the Flexter XML to CSV/TSV Online webpage and keep it within easy reach? For one-off conversions or small, periodic tasks, it’s a top-tier choice you’ll want at your fingertips.
While Flexter Online excels at many tasks, it’s not designed to handle every XML conversion scenario. For projects involving frequent conversions or larger volumes of XML, manually uploading files through a browser can quickly become a bottleneck.
Even if Flexter Online fits your current needs, it’s wise to keep Flexter Enterprise in mind. Built for scalability, automation, and effortless integration, it’s the ideal solution for future projects as your requirements expand.
Here’s how Flexter Online and Flexter Enterprise compare:
| Feature Category | Feature | Flexter Online | Flexter Enterprise |
|---|---|---|---|
| Data | Data volume | Up to 1MB | Any |
| Access | WebUI | ✓ | ✓ |
| Command Line | – | ✓ | |
| API | – | ✓ | |
| Input Formats | XML | ✓ | ✓ |
| JSON | – | ✓ | |
| CSV, TSV, PSV | – | ✓ | |
| RDBMS | – | ✓ | |
| Output formats | CSV, TSV | ✓ | ✓ |
| Excel | – | ✓ | |
| ORC | – | ✓ | |
| Parquet | – | ✓ | |
| Avro | – | ✓ | |
| Delta Tables | – | ✓ | |
| Output databases | Snowflake | – | ✓ |
| Oracle | – | ✓ | |
| MySQL | – | ✓ | |
| PostgreSQL | – | ✓ | |
| Teradata | – | ✓ | |
| Redshift | – | ✓ | |
| MS SQL Server | – | ✓ | |
| Azure SQL Data Warehouse | – | ✓ | |
| Yellowbrick | – | ✓ | |
| BigQuery | – | ✓ | |
| Databricks | – | ✓ | |
| AWS Athena | – | ✓ | |
| Documentation | Data lineage | ✓ | ✓ |
| ER diagram | ✓ | ✓ | |
| Schema version diff | – | ✓ | |
| Schema evolution | – | ✓ | |
| Support | ✓ | ✓ | |
| Live chat | ✓ | ✓ | |
| Phone | – | ✓ |
This table highlights just a fraction of Flexter Enterprise’s powerful features (check here for full product specifications).
Built for large-scale XML conversion projects, Flexter Enterprise integrates with platforms like Kubernetes, Snowflake, Databricks, and Spark and operates across environments such as GCP, AWS, Azure, or on-premises.
In addition, Flexter Enterprise leverages advanced target schema optimisation algorithms, delivering relational schemas designed for long-term efficiency and schema management.
If you’re curious to see what Flexter Enterprise can do for your projects, we’ll happily provide you with a Proof of Concept and discuss your specific needs and requirements!
Pro Tip
Need to convert XML data into SQL tables?
Option 1: Use the Free Online XML to CSV/TSV converter mentioned in this article to convert your XML to tabular data, then manually write the required DDL commands to import it into a database.
Option 2: For a fully automated solution, try our Free Online XML to Database tool, which handles the conversion for you.
Check out the step-by-step guide on accessing and using the XML to Database tool.


