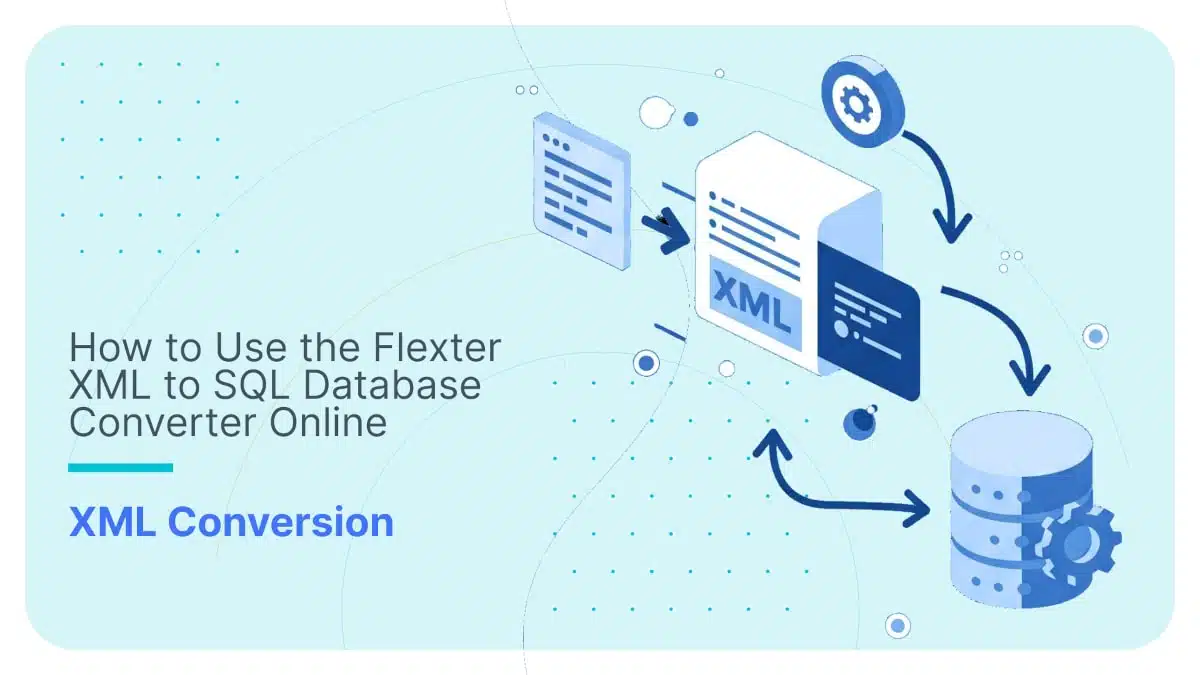
How to Use the Flexter XML to SQL Database Converter Online

Converting deeply nested XML to database for free, without writing a single line of code.
Too good to be true? With Flexter Online, it’s a reality.
In this guide, I’ll show you how to convert XML to Snowflake with a simple drag-and-drop; no setup, no database connections, no hassle.
Here’s why Flexter Online is the smartest way to convert XML to database:
- It’s a no-code free online solution that automatically converts your XML into query-ready Snowflake tables.
- It eliminates the need for manual mapping between your source XML and the Snowflake database schema.
- Goes beyond the “One Big Table” (OBT) approach used by other tools. Flexter Online normalises your XML into multiple relational tables, reducing redundancy and improving efficiency.
- It supports XSD as input, making it perfect for industry-standard XML with a predefined schema.
- Provides essential documentation to help you stay organised, including:
- A readme file with instructions and useful links.
- An Entity-Relationship (ER) diagram that visualises the database schema Flexter’s normalisation algorithms created.
- A Source-to-Target (STM) mapping that shows how XML XPaths are converted into Snowflake tables and fields.
- Includes free support via email or chat on the website.
- If your requirements increase, it offers an upgrade to Flexter Enterprise for advanced features and professional services.
As I’ve discussed in my previous posts, free online XML to database converters are scarce, making one-off conversions or XML to SQL testing frustrating.
But with Flexter Online, those struggles are over. By the end of this post, you’ll be transforming XML into Snowflake like a pro, without the headaches. Let’s dive in!
TL;DR for those in a hurry:
- This post will show you how to use the Flexter XML to Snowflake Converter Online with two free workflows:
- Convert XML to Snowflake, and,
- Convert XML and XSD to Snowflake.
- Once the conversion is triggered, you’ll receive an email with Snowflake login credentials for your newly instantiated Snowflake database, which will include your converted XML. I’ll show you how to:
- Login to Snowflake and view your freshly converted tables,
- Query the tables through Snowflake’s SQL Worksheet.
- You’ll also receive conversion documentation, so we’ll cover how to:
- Find and read the ReadMe.txt file,
- Interpret the Entity-Relationship (ER) diagram,
- Use the Source-to-Target (STM) mapping
Use Flexter to turn XML and JSON into Valuable Insights
- 100% Automation
- 0% Coding
XML to Snowflake Conversion workflows for Flexter Online
Converting XML into a database with Flexter Online is straightforward, and you have two main options: process the XML files directly or use an XML Schema (XSD), if one is available for your source XML.
In the next sections, I’ll break down both approaches step by step, helping you quickly master the XML to database conversion process.
Conversion workflow for when converting XML (without an XSD)
Before we dive in, it’s helpful to know exactly where your XML data is stored on your computer and to have a general sense of its structure, especially its XPaths and parent-child relationships.
For this walkthrough, I’ll use a simple XML file (download it here) from my collection of XML test cases.
Once you’re ready, head over to the Online XML Converter to Database converter and let’s get started!
Step 1: First, let’s upload your XML file. You can simply drag and drop it onto the page, or click “Upload a file” to select it from your computer.
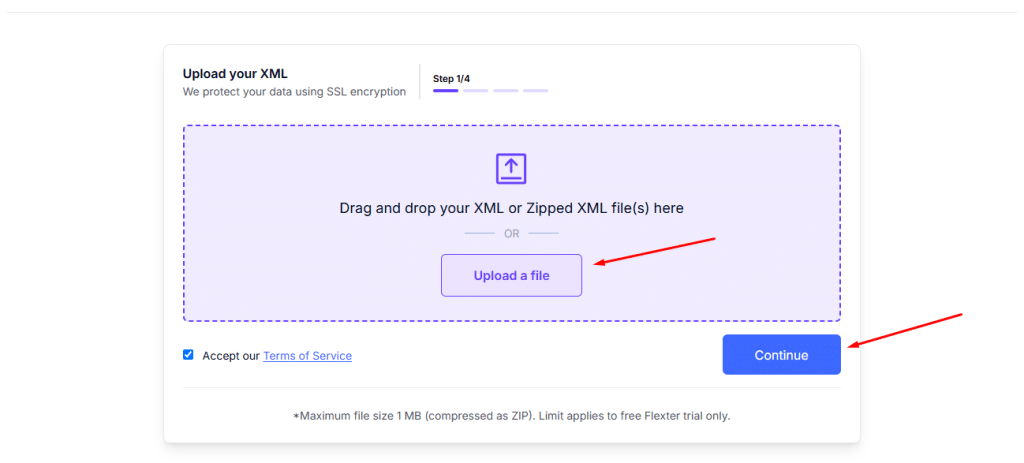
Once your file is uploaded, just hit “Continue” to move on.
Step 2: In the next step, the converter will ask if you have an XML Schema (also known as XSD).
Since we’re working with a simple XML test case without an XSD, you can just click “Skip This Step” or “Continue” to move ahead.
I’ve highlighted these buttons for you in the image below.
If you do have an XSD file, be sure to check out the second workflow guide later in this post, where I’ll walk you through exactly how to use it.
Step 3: You’re almost done! In Step 3, just enter your contact details so the converter knows where to send your converted files and documentation.
Your email is required to ensure everything gets delivered to the right place, but adding your company name and phone number is completely optional.
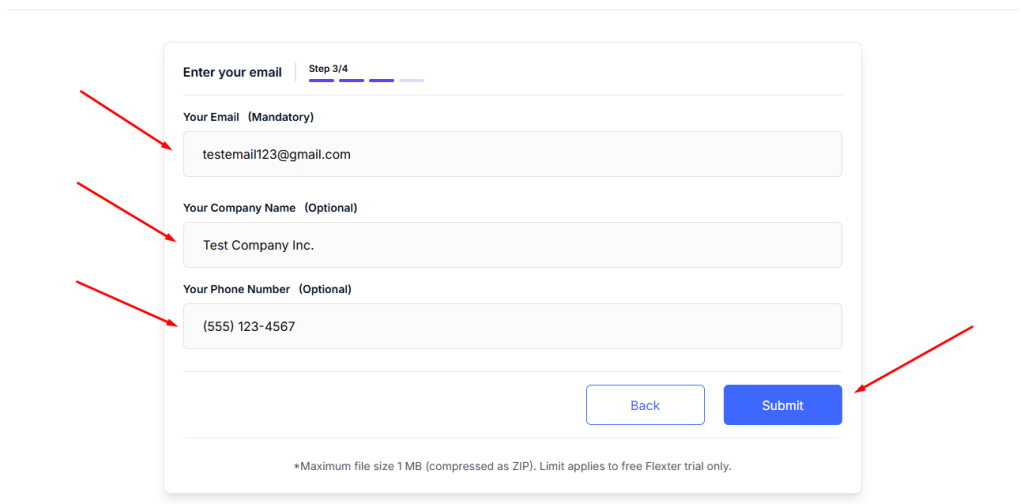
And don’t forget to click “Submit”.
Handling batches of XML or zipped XML files? No worries!
With Flexter Online, there’s nothing extra you need to do; just drag and drop your zipped XML file or even a full batch right into your browser in Step 1.
From there, just follow the same simple steps as you would for a single XML file.
It doesn’t get easier than that!
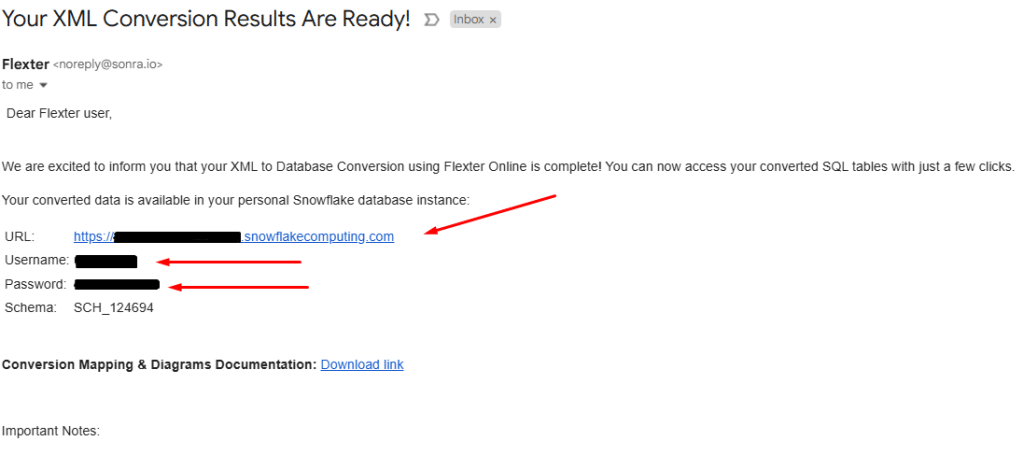
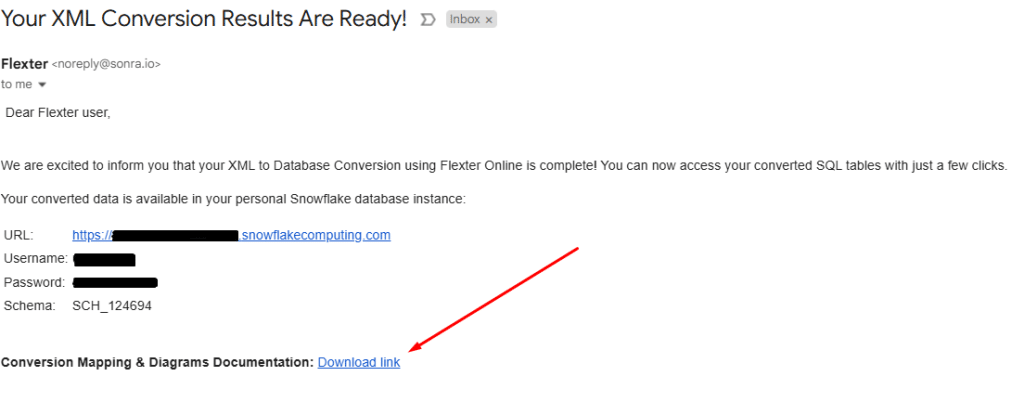
Step 4: If you’ve followed the steps, your converted XML data should be on its way to your inbox!
Keep an eye out for an email with the subject “Your XML Conversion Results Are Ready!”. And if you don’t see it, be sure to check your spam folder.
The email that you’ll receive should look like this:
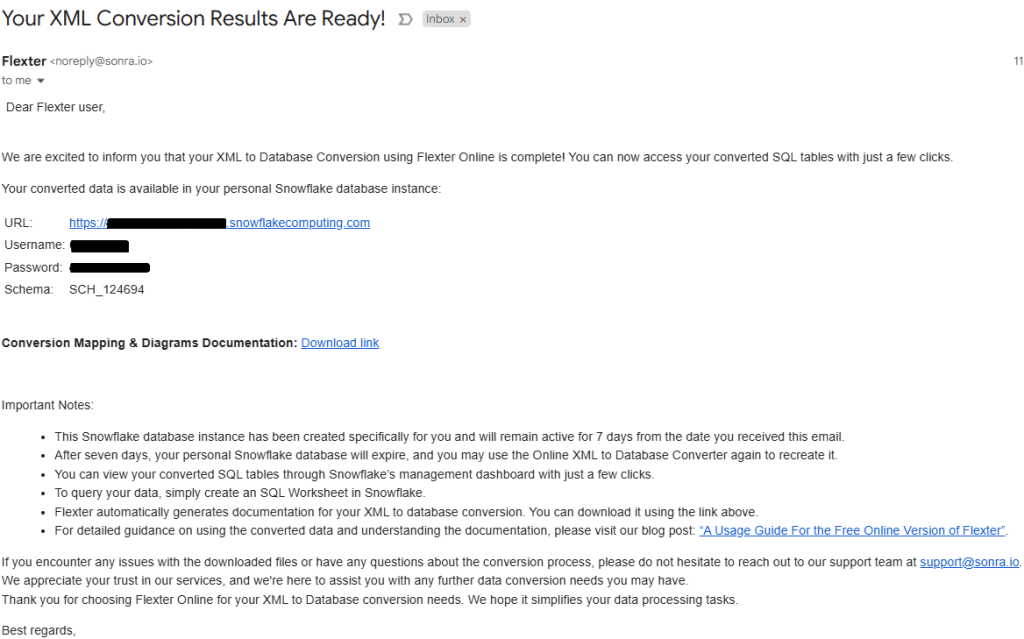
I’ve blacked out sensitive details in my example, but your email will include your own private login credentials for accessing a Snowflake database with your converted SQL tables.
In the next few sections, I’ll walk you through how to use the information in that email to access both your converted data and the accompanying documentation.
Stuck on a step or still waiting for that email?
No worries! Flexter’s support team has you covered! Free of charge.
Yes, you heard that right. If your conversion fails, you’ll usually hear from our support within one business day (though if we’re swamped, it might take up to two days).
Need help sooner? Just reach out through our contact form or live chat on the website, and we’ll make sure your XML to database conversion completes successfully.
Conversion workflow for when converting XML and XSD
Need to convert XML with XSD into a database? You’re exactly where you need to be!
In this guide, I’ll show you a fast, free, and easy way to transform your XML and XSD into Snowflake.
Using my multi-branch XML test case as an example, I’ll break it down into simple, step-by-step instructions, ensuring that converted data adheres to the rules of the corresponding XSD.
So, gather your files, head over to the Free XML to Database Tables & SQL Converter Online, and let’s get started!
Step 1: Once you’re in the online XML to database converter, simply drag and drop your source XML file using the purple widget shown below, or upload it manually (through “Upload a file”).
After uploading your file, click “Continue”.
Just make sure you’re selecting the right file: if you accidentally upload the XSD instead of the XML, the conversion process will break!
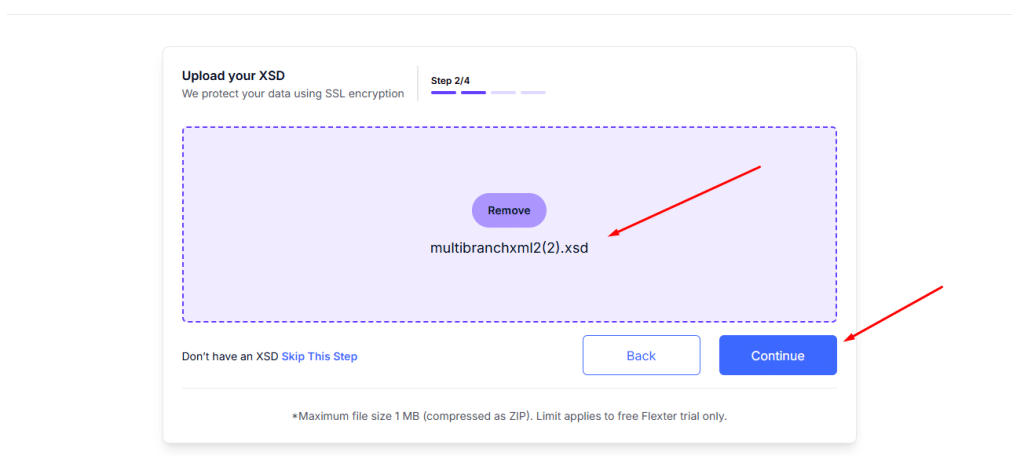
Step 2: In Step 2, it’s time to upload your XSD file. Just like before, make sure you’ve picked the right one: this time it should be the XSD, not the source XML.
Once uploaded, the webpage will display your XSD for this workflow. When everything looks good, click “Continue” to proceed.
If you don’t have an XSD file, no worries! In this step, simply click “Skip this Step”, just like we did in the first workflow guide earlier in this post.
Uploading Single vs. Multiple XSD Files
Many XML Schemas aren’t always standalone; they often rely on multiple XSD files.
For instance, different XSDs within a schema might be used to define specific parts of the source XML structure, which are then imported into a main schema (e.g., main.xsd).
This modular approach makes larger and more complex schemas easier to handle, but it also means you need to upload all related XSD files together so Flexter can process them correctly.
When working with complex XSD Schemas, you must ensure that the XSDs provided to the Online XML to SQL converter are properly connected without errors.
To achieve that, follow these checks before uploading the XML schema to Flexter:
- Check for Dependencies: Look for xs:import, xs:include, or xs:redefine statements in your XSD referencing other schemas. Are they all correct?
- Upload All Related XSD Files: Make sure every referenced XSD is in the same folder and included in your upload. If one is missing, you’ll need to find it.
- Verify Namespaces: Ensure that XML namespaces in your files align with those declared in the XSDs.
Step 3: If you’ve reached Step 3, you’re just about done! Simply enter your email address so the online XML to CSV converter knows where to send your results.
Your email is required, but adding your Company Name and Phone Number is completely optional.
If you’ve hit “Submit”, that’s it! Now, just sit back and let the converter do its thing. Your XML data is being processed.
Step 4: If all went well, your XML data should now be transformed into SQL tables!
Check your inbox for an email titled “Your XML Conversion Results Are Ready!”. And if it’s playing hide and seek, don’t forget to peek into your Spam folder just in case.
Here’s what that email will look like:
If things don’t go as planned, don’t sweat it; Flexter’s support team is on it!
You’ll typically get an update within one business day, though if they’re juggling a full plate, it might take up to two days.
But if that email has already landed in your inbox, congrats! You’re now ready to access, explore, and query your freshly converted data with the help of the documentation.
Up next, I’ll show you exactly how to make the most of it, let’s get started!
More Than Just a Converter: A Game-Changer
By now, you might be asking yourself: Did this online converter really transform my XSD into Snowflake?
And that’s a fair question because Snowflake’s lack of support for XSD is a well-known challenge.
The short answer? Yes! Flexter Online successfully converted your XML and XSD into a database, but you haven’t even seen the best part yet.
The Cherry on Top: Scaling Beyond Flexter Online
Once you’re familiar with Flexter Online, you can take things to the next level with Flexter Enterprise, our fully automated XML conversion solution.
Designed to integrate with your workflow with minimal effort, it offers:
- XML to CSV/TSV.
- XML to databases, data warehouses, and data lakes.
- A series of other benefits that I’ll explain in detail later in this blog post.
If tackling XML conversion still feels overwhelming, why not let the experts handle it for you?
I’ve compiled a handy checklist elsewhere in this blog to help you determine whether outsourcing is the right fit for your team.
Understanding and making the most out of your converted files
If you’ve been following along with the workflows I covered earlier, congratulations! Your XML data is now successfully converted and sitting in Snowflake.
But here’s where things get really interesting. Now it’s time to decode the results and turn your raw data into a powerful, actionable asset within Snowflake.
To get started, check your inbox for an email from Flexter. This email is your key to accessing everything you need, including:
- A download link to the documentation for your XML to Snowflake conversion.
- The URL for your personal Snowflake database instantiation (and dashboard).
- Your Snowflake login credentials (username and password).
- The Snowflake database schema, where your converted tables are stored.
If you followed the multi-branch XML (and XSD) conversion from my conversion example, you should have all this information at your fingertips and ready to start exploring the results.
Using the credentials to log in to Snowflake
The first step in viewing your data is to access your new Snowflake database.
To do that, you must find the URL from the email you received, along with your username and password.
You should locate them in the received email as follows:
If you click the URL, a new tab should open in your browser, including Snowflake’s sign-in widget.
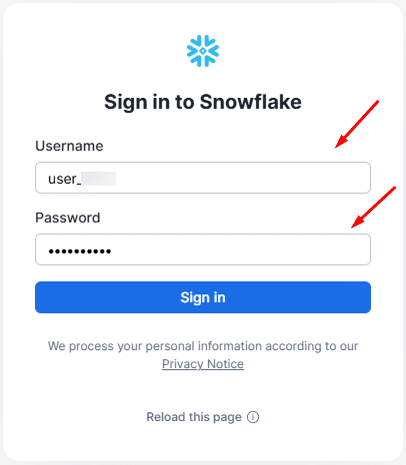
Copy and paste the Username and Password Flexter created just for you, and click “Sign in”.
Snowflake will take a few seconds to load, and then you should land on your personalised dashboard, where you can view and query your Snowflake database.
New to Snowflake and Snowsight?
No worries! Getting up to speed is easier than you think.
With Flexter Online, you can access and query your data thanks to its automatically generated documentation for your XML to database conversion.
Plus, Snowflake has a very intuitive user interface, and it is worth exploring since it is packed with features you’ll love!
I’ll walk you through everything you need to know in this post, but if you’re ready to explore even more, check out these deep dives:
- How to Parse & Flatten XML in Snowflake with Examples.
- Master Snowflake Data Lineage – Features, Tools & Tips.
- Optimal Usage of Snowflake Virtual Warehouses: Breaking Down Parallelism & Concurrency.
- Data Orchestration Deep Dive Snowflake Tasks. An Airflow replacement?
- 7 guardrails against common mistakes that inflate Snowflake credit usage.
Locating your new SQL tables
Next, I’ll show you how to locate the SQL tables that include your converted XML data in Snowflake.
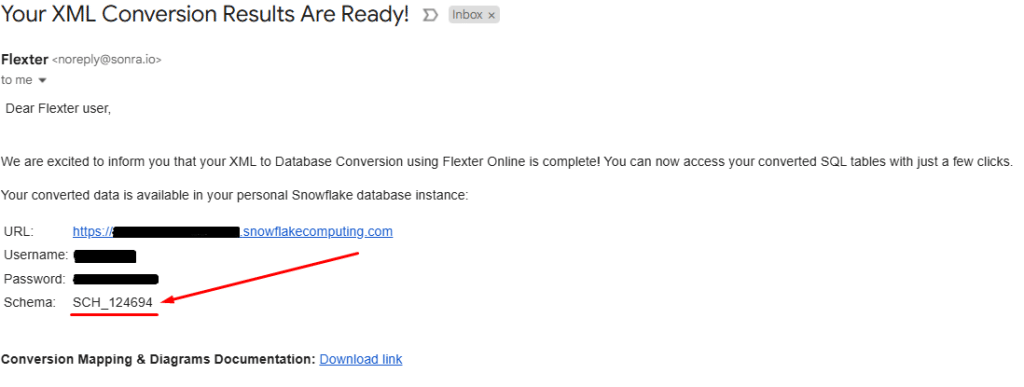
First, identify the “Schema” field in the received email. It should look like this:
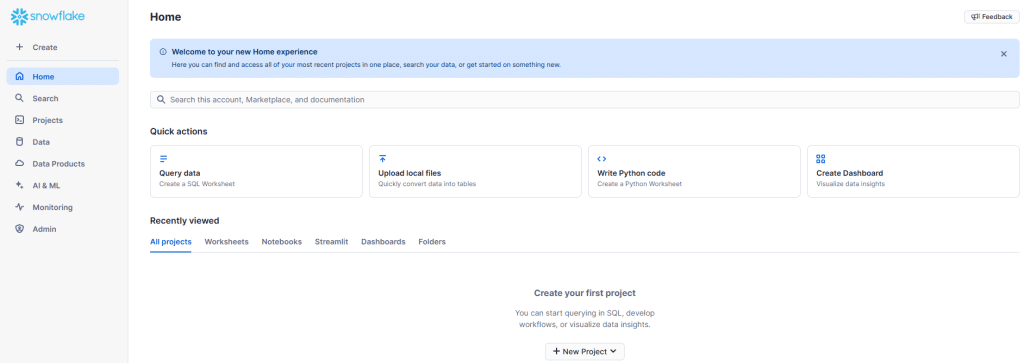
When you locate it, head over to the main Snowflake dashboard (which appears after logging in with your credentials).
On the left side panel of the Snowflake dashboard, you should be able to identify and select “Data” from the main menu, and then from the extra panel that pops up, you should be able to locate a database called “DB_FLEXWEB”.
It should look as follows:
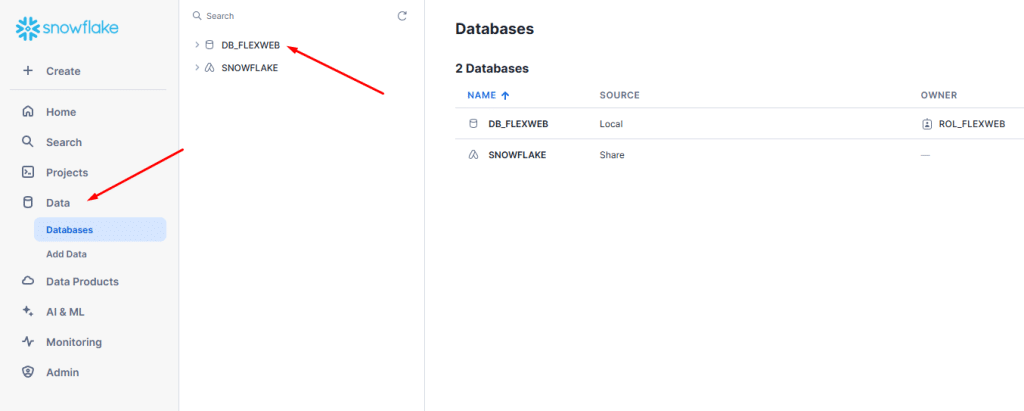
If you click on your newly instantiated database called “DB_FLEXWEB”, then a drop-down menu should show, which includes two entries:
- The first is INFORMATION_SCHEMA, which contains metadata about the database that Flexter created for your converted XML data.
- It should also include an entry named after the “Schema” field in the email you received. In my case, it is called “SCH_124694”.
Go ahead and click your Snowflake database schema (i.e. “SCH_124694” for this example), which should reveal your converted SQL tables. It should look like this:
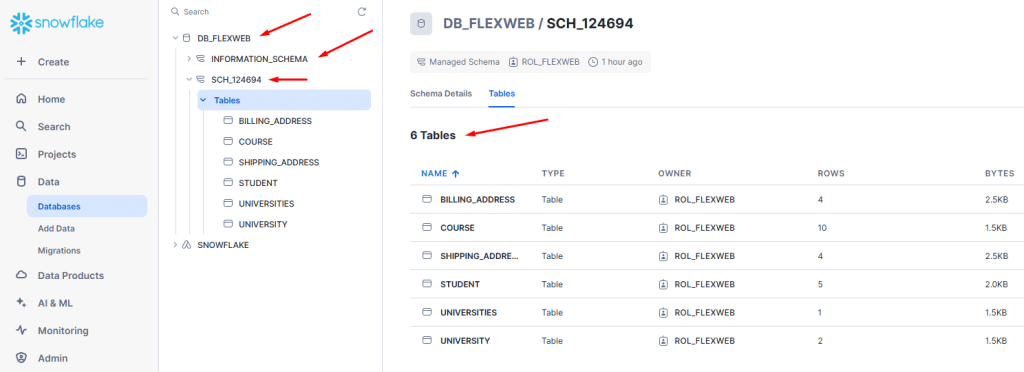
My Snowflake database contains six tables with the converted XML data.
However, the number of tables may vary if you test the online converter with your own XML.
This is because Flexter Online splits XML’s hierarchical structure into several SQL tables, using Primary and Foreign Keys to connect them into a queryable schema.
The tables created for the XML with multiple branches and the corresponding XSD are:
- BILLING_ADDRESS,
- COURSE,
- SHIPPING_ADDRESS,
- STUDENT,
- UNIVERSITIES,
- UNIVERSITY.
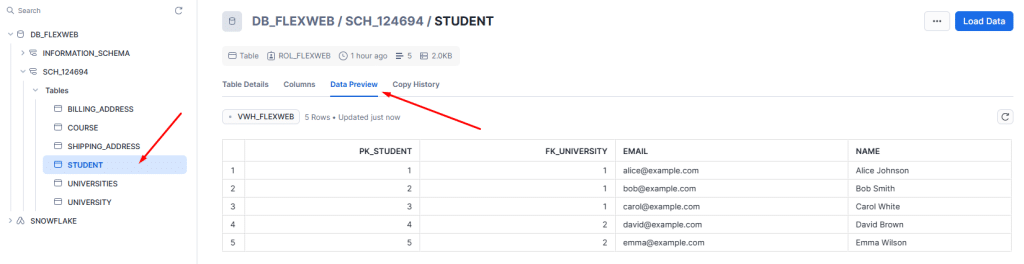
If you just want to view a small table (or preview a bigger one), you can do that easily by clicking on one of the tables, and then from the menu that shows up, selecting “Data Preview”.
If you click on the “STUDENT” table and then “Data Preview”, then it should look like this:
If you’ve reached this point, you’ve successfully converted your source XML to database and found your converted tables in Snowflake. That’s a huge step!
But don’t stop here. Stick with me a little longer, and I’ll show you exactly how to run SQL queries in Snowflake using Snowflake’s SQL Worksheet.
But before we dive into querying, let’s take a step back for a clearer view of your converted data. Understanding the big picture first will make your analysis even more powerful.
To make this step easier, Flexter automatically generates detailed documentation for your XML to Snowflake conversion so that you can explore your data with confidence.
How to read the documentation
Along with your newly instantiated Snowflake database, Flexter Online will provide the necessary documentation to decode any mysteries that may be holding you back.
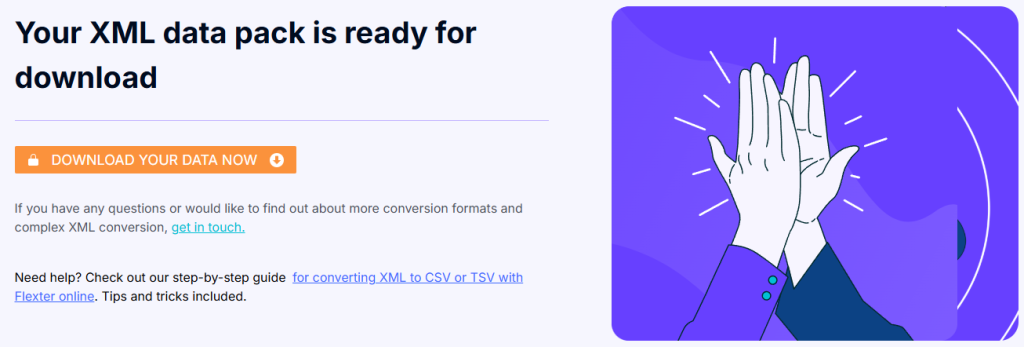
To get your hands on it, simply click the link in the email you received:
Then you should land on the following page, where you can download the documentation by clicking “DOWNLOAD YOUR DATA NOW”.
If you’ve done that successfully, then a zipped folder should have landed in your “Downloads” folder, which, when unzipped, will include:
- A ReadMe.txt that includes general usage information and links to related resources.
- A Source-to-Target Map (STM), connecting your source XML’s elements and attributes to your SQL tables’ rows and columns,
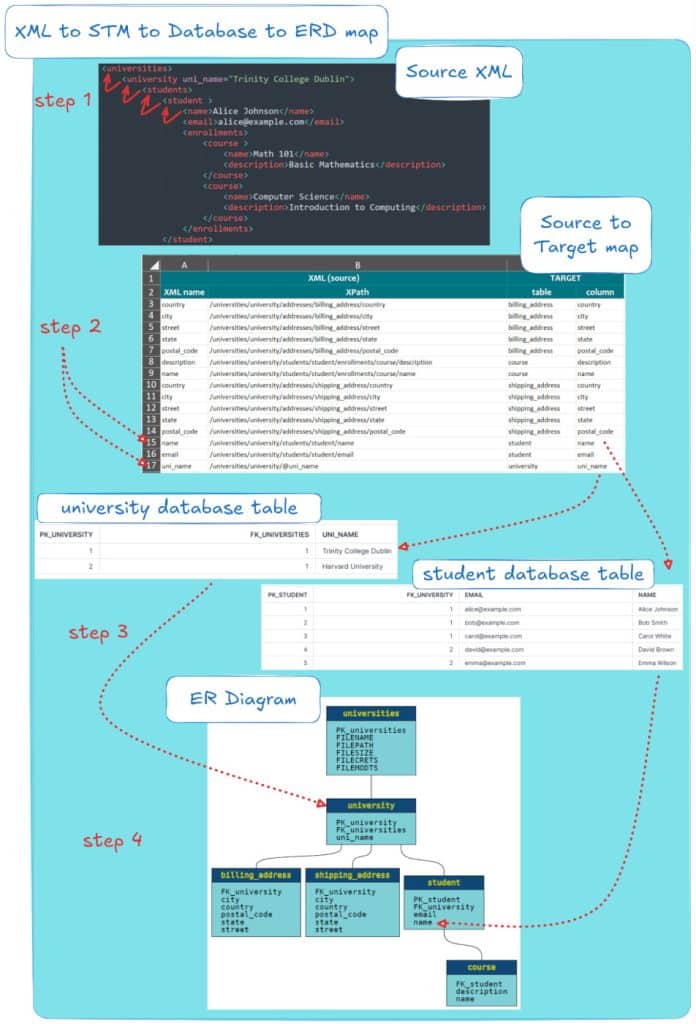
- An Entity-Relationship Diagram (ER Diagram), which shows you the schema of your newly instantiated database and how tables are related.
- A mapping example between your source XML, the STM, the converted SQL tables, and the ER diagram.
I’ll show you how to read these files below.
The Source-to-target map
You’ve got your converted data in Snowflake, but here’s the big question: how do those SQL tables map back to your original XML file?
Unlike most XML conversion tools that simply dump data into a database (or, even worse, just give you the DDL commands), Flexter Online gives you the full picture, equipping you with everything you need to understand the transformation inside out.
Up next, I’ll walk you through one of the most powerful tools in your XML to Snowflake conversion: the Source-to-Target Map (STM).
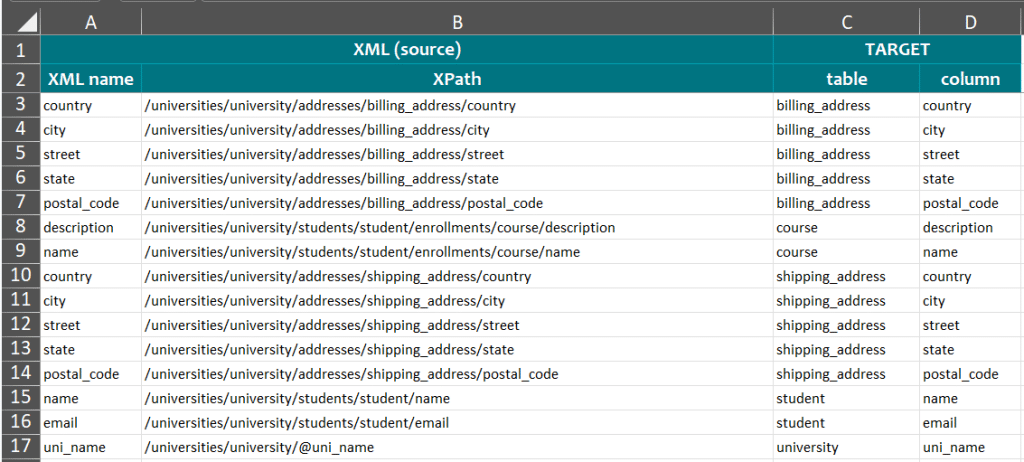
As the name suggests, the STM traces every XPath from your original XML and shows exactly where it lands in Snowflake, down to the tables, columns, and rows.
Here’s how it looks for the multi-branch XML conversion:
How to read the Source-to-Target map
The STM might look overwhelming at first sight, like trying to crack a secret code.
No need to stress! Once you know how to read it, you’ll have a powerful cheat sheet that shows exactly how your XML data transforms into Snowflake tables.
Here’s how it works:
- The “XML Name” Column: Imagine this column as the ultimate who’s who of your XML data. Every element and attribute from your original XML file is listed here, just like every important guest invited to a high-profile event.
- The “XPath” Column: This is like knowing the background of each guest: their origin, family, and connections. The XPath shows exactly where each element comes from in the XML structure, mapping out the relationships between parent and child elements. Just like an event planner tracks where guests are coming from (city, organisation, or VIP invite), XPath keeps a record of the path each XML element follows before reaching Snowflake.
- The “table” and “column” Columns: Now, where do these guests actually sit? These columns tell you where each XML element has been placed in Snowflake, which table they belong to and which column holds their data.
See? It’s not so intimidating after all! Now, let’s put it into action.
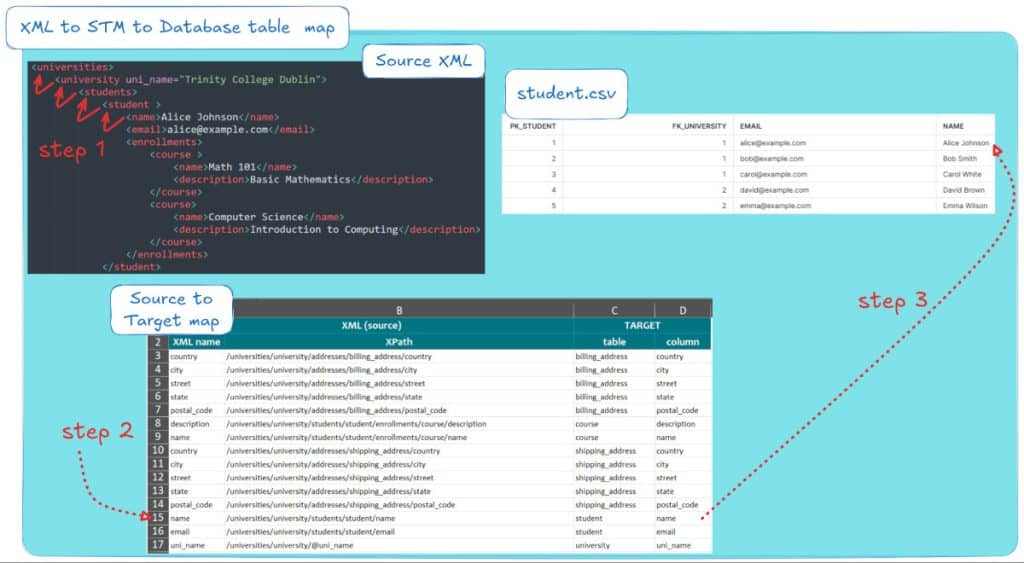
Let’s see an example. Let’s say you need to track down Alice Johnson, a student from your multi-branch XML test case, and find out where she’s been seated (stored) in Snowflake. Here’s how you do it in three simple steps:
- Step 1: Open your source XML file and identify the parent-child relationships leading from the parent node of “Alice Johnson” all the way to the XML root. Think of it as figuring out where she originally came from before arriving at the event.
- Step 2: Look at the STM and find the row that lists the XML node you’re tracking (e.g., “name”). Make sure its “XPath” matches the parent-child structure you identified in Step 1. Then, check the “Table” and “Column” columns to see where Alice has been “seated” in Snowflake.
- Step 3: Open Snowflake and navigate to the table and column identified in Step 2. That’s where your converted data now lives!
Here’s what this process looks like for the multi-branch XML test case:
This process can also work in reverse: start by identifying the converted data in Snowflake and trace it back to its original location in the source XML.
The Entity-Relationship (ER) diagram
You’ve loaded your converted data into Snowflake and mapped the source XML to its tables. But how does it all connect?
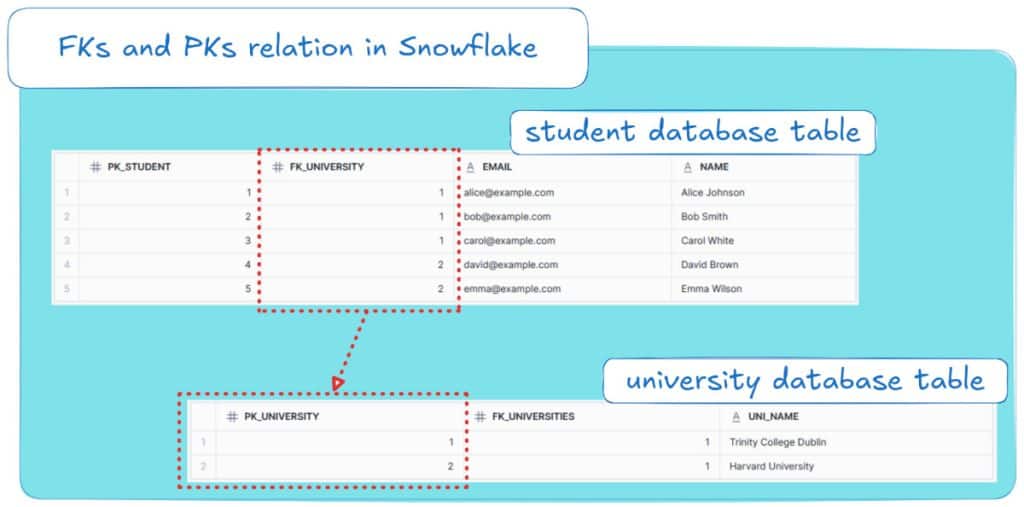
And what’s with columns like “PK_student” and “FK_university”?
Those are Primary Keys (PKs) and Foreign Keys (FKs), the glue holding your relational schema together.
Most XML converters flatten everything into a single bloated table, causing redundancy, messy queries and other problems.
Flexter Online does it differently: it intelligently normalises your XML, mapping it into structured Snowflake tables with PKs and FKs for straightforward relationships.
To make it even easier, Flexter Online auto-generates a free ER diagram, a visual blueprint of your new schema.
Let’s dive in and see what this looks like for the multi-branch XML conversion:
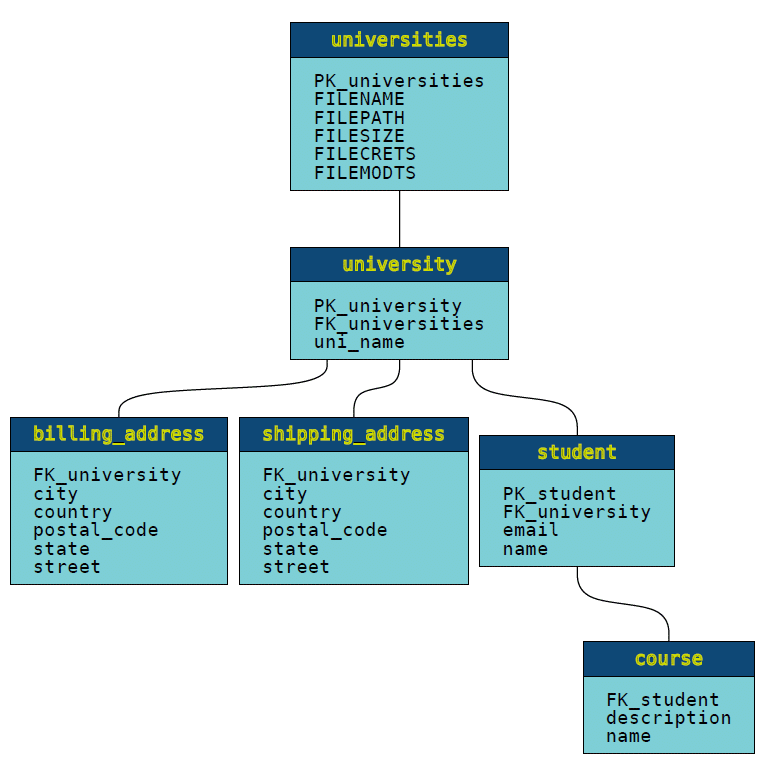
Each box represents a Snowflake table, with its name on top and a list of columns inside.
Every row in your tables aligns with these columns, including the crucial Primary Keys (“PK_”) and Foreign Keys (“FK_”) that link everything together.
If you’re a relational database pro, this will click instantly. If not, no worries, I’ve got you! Check out my other post for a simple breakdown of ER diagrams.
Are you looking to convert your XML to CSV instead of database?
Great news, you just skipped hours of manual coding and messy scripts!
The latest version of Flexter Online now automatically converts XML into structured CSV/TSV files (for free), eliminating extra steps and tedious transformations.
No more struggling with complex mappings or workarounds!
And, if online converters are not enough for your requirements, you can always scale up your XML to CSV/TSV and XML to database conversions with Flexter Enterprise.
Connecting it all together
Before closing out, let me share one final diagram that offers an experienced data engineer’s perspective on XML to Snowflake conversion.
By using the source XML, converted Snowflake tables, Source-to-Target Map (STM), and ER diagram, this is how I typically approach the XML to Snowflake data transformation journey:
Step 1: Locate the XML Node in the Source File
Find the XML element of interest in the original source file. For example, track where “Alice Johnson” from “Trinity College Dublin” appears in the XML.
Identify the XPath leading from the root node of the XML to Alice and her university (stored as an attribute of the “university” element).
Step 2: Consult the Source-to-Target Map
Check the STM to locate the corresponding table and column for your XML data.
Look at the “XML Name” column and verify its XPath from Step 1.
Use the “Table” and “Column” columns to pinpoint where your data ended up in Snowflake.
From this step, you should be able to determine that the “student” table holds the student name in the “name” column, while the university table stores the university name in the “uni_name” column.
Step 3: Locate the Data in Snowflake
Now, open Snowflake and navigate to the tables and columns identified in Step 2.
Confirm that the values from your XML are properly mapped. Also, check that each table contains additional columns for Primary Keys (PKs) and Foreign Keys (FKs) that maintain the relationships between tables.
Step 4: Review the ER Diagram
Finally, examine the ER diagram to see how the Snowflake tables fit together within the schema created for the multi-branch XML test case.
If you look closely, you’ll notice how each table and its columns are visually represented, making it easy to understand their relationships.
If you’re an experienced data engineer, you should now have a good grasp of running complex queries and selecting the appropriate primary and foreign keys.
If not yet, read my next section on how to run queries against your new Snowflake database.
This 4-step process linking the source XML with its three key artifacts, converted Snowflake tables, Source-to-Target Map (STM), and ER diagram, can also be done in reverse.
Start with the ER diagram to get a high-level view of the schema, then trace your way from the Snowflake tables back to the original XML to understand the full transformation journey.
Running queries against your new database with SQL Worksheet
If you’ve followed this blog post up to this point, then you should be in a position to:
- Run a conversion through the online XML to database converter,
- Log in to your database in Snowflake and preview your converted data,
- Download and read the documentation for your conversion on your computer.
Only one thing remains now. Querying your data in Snowflake.
For that, we’ll use Snowflake’s SQL Worksheet feature, which allows us to run queries through our browser to store our data in the online database.
Running a simple SELECT command
Here are the steps to run a simple SELECT command against your database:
Step 1: To access a new SQL Worksheet, where we’ll run a few SQL commands, you’ll have to access Snowflake’s main dashboard (the one you landed on after logging in to Snowflake with your credentials).
From there, click on the “Query data” option from the “Quick actions” menu. Like so:
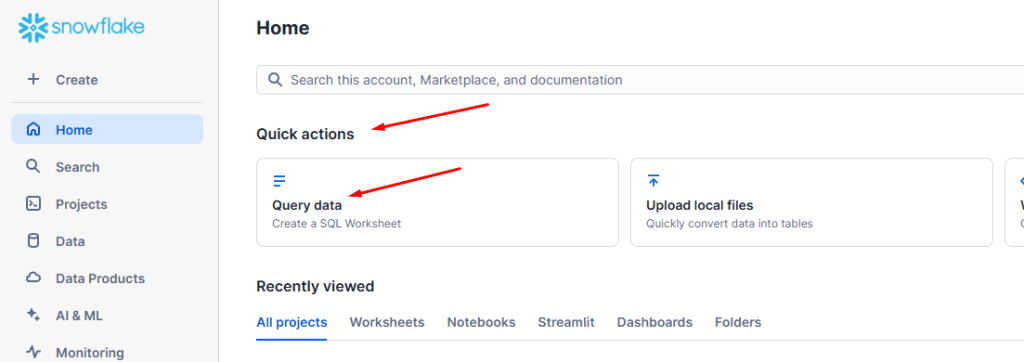
After clicking “Query data”, you should land on a brand new SQL Worksheet, an editor within your browser for running SQL queries.
Step 2: If you’re new to Snowflake and Snowsight, I want you to pay close attention to the next step: to run a query against one of your tables, don’t just include its name as you see it on the editor or in the documentation.
Instead, in the left side panel where the database information is located, find your schema (i.e. “SCH_124694” in my example), locate your table, and from the three dots menu, select “Copy name”. It should look like this:
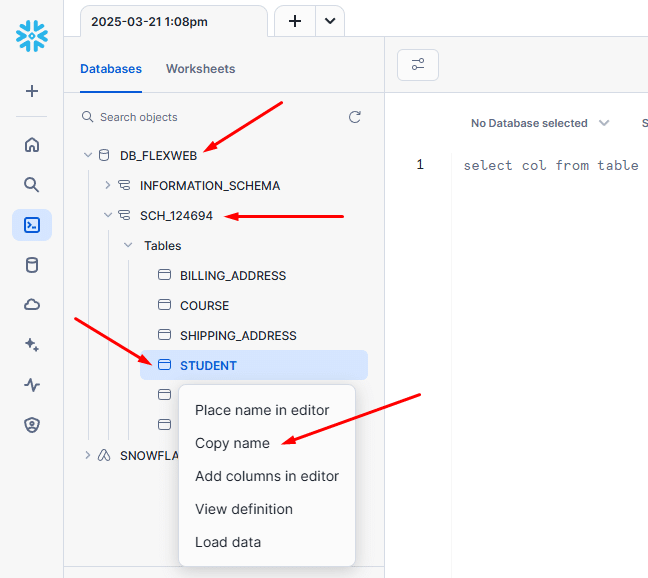
After you select “Copy name”, your absolute path to your table is copied to your clipboard, and you are ready to run an SQL command.
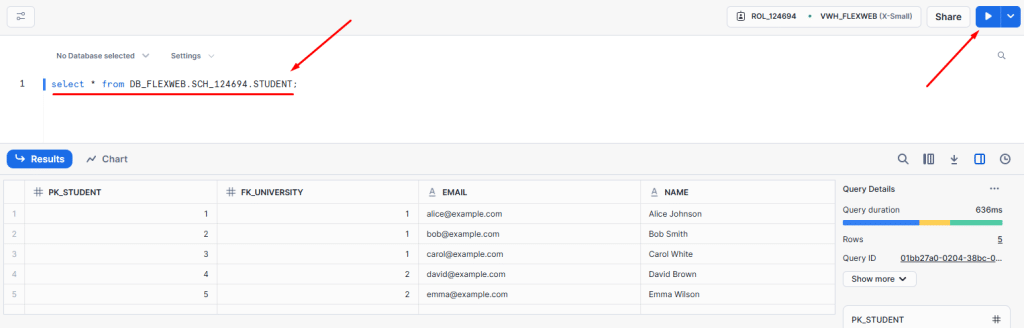
Step 3: Use the editor of the SQL worksheet to write and run your SQL command.
To keep things simple, I’ll just run a SELECT command on my STUDENT table.
I’ll just write it in the editor, and for the table name, I’ll paste the absolute path to the table (which I copied in Step 2).
And don’t forget to hit the blue Play button on the upper right side of the editor to execute the query!
We’re done! After Snowflake runs our query against the database, you should get your table printed out along with some query performance information in a pop-up window within your browser.
If all goes well, it should look like this:
Running a SELECT command with a JOIN clause
Now, let’s take things up a notch and run a slightly more advanced query that brings together data from two of our converted SQL tables.
Imagine you need an SQL table for a simple report that lists all students and the universities they belong to. Sounds straightforward, right?
But there’s a catch: after converting the XML data, our new normalised database structure splits this information across two separate tables: STUDENT and UNIVERSITY.
So, how do we pull this data together into a single view? That’s where SQL’s JOIN clause comes in, which will help us merge the data from two SQL tables into one.
To run such a query, you must follow Steps 1 & 2 as I showed you in the previous section.
Step 3: Before writing the query in the editor, you need to follow an extra step and identify how the two tables relate to each other through Primary Keys (PKs) and Foreign Keys (FKs).
If you closely inspect the ER diagram for this example, the STUDENT table has a foreign key “FK_university” that links to the primary key “PK_university” in the UNIVERSITY table.
This means that each student is assigned to a university, and we can use this relationship to join the two tables. This is how the two columns (FK_university and PK_university) that connect the two tables look like in each table:
Step 4: Now that you know the PKs and FKs you should use, it’s finally time to write the query and hit run!
To properly syntax this SQL command, you must SELECT the student name from the STUDENT table and the university name from the UNIVERSITY table. Instead of just using the table names, you should use the absolute paths to the tables you retrieved from Step 2. Then, use a JOIN clause to link them based on the foreign key FK_university in STUDENT and the primary key PK_university in UNIVERSITY (as you identified them in Step 3).
After putting this SQL command together and running it, if the query executes successfully, the results should look like this:
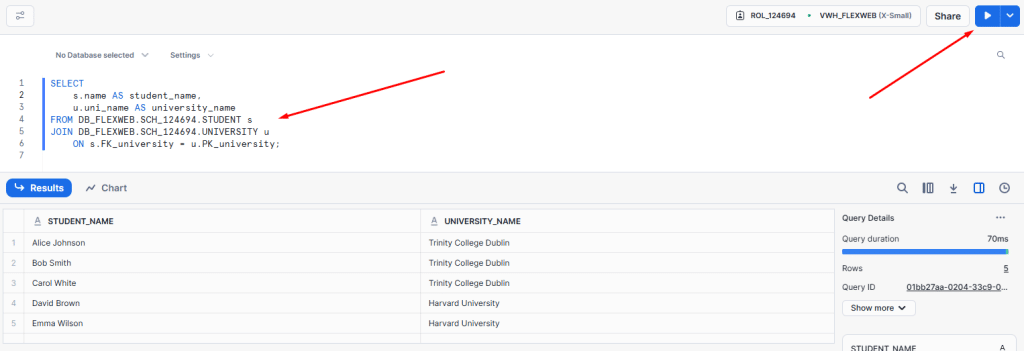
And there you have it: your SQL table includes all the students from your source XML file and the universities they attend. It’s ready to be included in your report!
Flexter Online vs. Flexter Enterprise: How to know when to switch
By now, you’ve probably realised this XML to database converter isn’t just another tool you’ll use once and forget; it’s a powerhouse, and it’s here to stay.
Powered by cutting-edge algorithms, it delivers unmatched XML to database conversion results with ease.
So, you’ve read this blog post and might wonder what’s Next? Here’s my 2 cents:
Step 1: Bookmark Flexter XML to SQL Converter Online
If you haven’t already, bookmark the Flexter Online XML to Database Converter.
Whether it’s for quick, one-off conversions or occasional data processing, it’s a tool you’ll want at your fingertips.
Step 2: Try and Bookmark our XML to CSV/TSV Converter
Need to convert XML to CSV or TSV instead? Check out (and bookmark) our free XML to CSV/TSV tool.
It’s just as powerful and fast as the online XML to Snowflake tool while maintaining the same ease of use. You can use it by following almost the same steps through a similar UI.
Step 3: Think Bigger with Flexter Enterprise
Let’s be real: Flexter Online is powerful, but it’s not built for every XML conversion scenario.
If you’re handling large volumes of XML or need frequent, automated conversions, manually uploading files through a browser can slow you and your team down.
That’s where Flexter Enterprise comes in. Built for scalability, automation, and integration, it’s the go-to solution when your XML processing needs outgrow occasional conversions.
Even if Flexter Online works for you now, it’s smart to plan ahead and keep Flexter Enterprise on your radar.
Here’s how they stack up against each other:
| Feature Category | Feature | Flexter Online | Flexter Enterprise |
|---|---|---|---|
| Data | Data volume | Up to 1MB | Any |
| Access | WebUI | ✓ | ✓ |
| Command Line | – | ✓ | |
| API | – | ✓ | |
| Input Formats | XML | ✓ | ✓ |
| JSON | – | ✓ | |
| CSV, TSV, PSV | – | ✓ | |
| RDBMS | – | ✓ | |
| Output formats | CSV, TSV | ✓ | ✓ |
| Excel | – | ✓ | |
| ORC | – | ✓ | |
| Parquet | – | ✓ | |
| Avro | – | ✓ | |
| Delta Tables | – | ✓ | |
| Output databases | Snowflake | – | ✓ |
| Oracle | – | ✓ | |
| MySQL | – | ✓ | |
| PostgreSQL | – | ✓ | |
| Teradata | – | ✓ | |
| Redshift | – | ✓ | |
| MS SQL Server | – | ✓ | |
| Azure SQL Data Warehouse | – | ✓ | |
| Yellowbrick | – | ✓ | |
| BigQuery | – | ✓ | |
| Databricks | – | ✓ | |
| AWS Athena | – | ✓ | |
| Documentation | Data lineage | ✓ | ✓ |
| ER diagram | ✓ | ✓ | |
| Schema version diff | – | ✓ | |
| Schema evolution | – | ✓ | |
| Support | ✓ | ✓ | |
| Live chat | ✓ | ✓ | |
| Phone | – | ✓ |
This table showcases just a glimpse of what Flexter Enterprise brings to the table; for the complete rundown, check the full product specification.
Designed for large-scale XML conversion projects, Flexter Enterprise integrates with industry-leading platforms like Kubernetes, Snowflake, Databricks, and Spark while running effortlessly across GCP, AWS, Azure, or on-premises environments.
But that’s not all: Flexter Enterprise goes beyond standard XML conversion by leveraging advanced target schema optimisation algorithms to create highly efficient relational schemas, which can help reduce Snowflake credit usage in the long term.
Want to see Flexter Enterprise in action? Let’s talk! We’d be happy to provide a Proof of Concept and discuss how it can be tailored to your specific needs.
Flexter: The XML Conversion Powerhouse They Don’t Want You to Know About
Did you know Flexter’s XML conversion game is so strong that it outperforms many top-tier data warehouses and even leaves paid conversion tools in the dust?
Yep, while others are still trying to catch up, Flexter is already miles ahead.
After extensive testing (and a few frustrating encounters with subpar converters), I can confidently say that Flexter is one of the rare tools that actually delivers on its promises.
If I sparked your interest and you want to continue reading, here are some resources:
- XSD to Database Schema Guide – Create SQL Tables Easily
- How to Parse & Flatten XML in Snowflake With Examples
- How to Insert XML Data into SQL Table?
- Master Snowflake Data Lineage – Features, Tools & Tips
- XML Converters & Conversion – Ultimate Guide (2024)
- Location analytics on Snowflake with OpenStreetMap, US property data, and our ready made Geography Dimension
- XML to Database Converter – Tools, Tips, & XML to SQL Guide
- Improving performance and reducing costs with Materialised Views on Snowflake
- 9 Critical Types of XML Tools for Developers
Uli Bethke
Uli has been rocking the data world since 2001. As the Co-founder of Sonra, the data liberation company, he’s on a mission to set data free. Uli doesn’t just talk the talk—he writes the books, leads the communities, and takes the stage as a conference speaker.
Any questions or comments for Uli? Connect with him on LinkedIn.
Follow Uli Bethke: