ODI: Automating deployment of scenarios to production in Oracle Data Integrator
Get our e-books Discover the Oracle Data Integrator 11g Repository Data Model and Oracle Data Integrator Snippets and Recipes
In this post I will show you how you can automatically deploy scenarios in ODI.
It is rather cumbersome to manually deploy scenarios from a test/development to a production environment.
Typically it involves the following steps:
– Manually (re-)generate all scenarios that need to be deployed and any child scenarios referenced.
– Manually export the (re-)generated scenarios
– Log in to the Operator module for the production environment and manually import the scenarios.
You do the above once or twice manually before getting extremely fed up. Actually I was rather patient (unlike my normal self) and did this about ten times before I got very, very annoyed.
[big_data_promotion] In this post I will show you how you can automate the deployment process. The proposed solution will allow you to logically group scenarios together via marker groups for automatic deployment, thus giving you more flexibility and allowing you to just deploy a subset of scenarios in your project.
To achieve our goal we will make use of the following Oracle Data Integrator features:
– Marker groups
– ODIGenerateAllScen tool
– ODIExportScen tool
– OdiImportScen tool
– Meta-information in the ODI work repository
– Execution of scenarios from a Windows batch file
In a first step we create a new marker group. We will use the marker group to logically group together scenarios we want to deploy. We will subsequently use the marker group in the ODIGenerateAllScen, ODIExportScen, and OdiImportScen tools.
Log on to Designer > Expand Markers > Right click Markers > Select Insert Marker Group
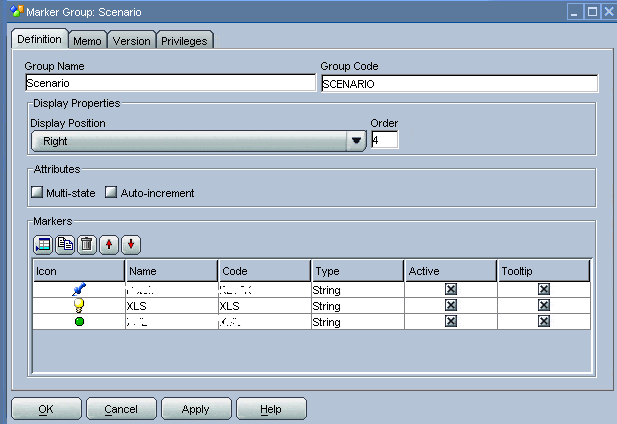
As you can see from the figure above I have named the marker group Scenario and added three markers. One of the markers is named XLS (short for scenarios that load data from Excel sheets). Flagging these scenarios (or rather their packages) via a marker will allow us to deploy them separately.
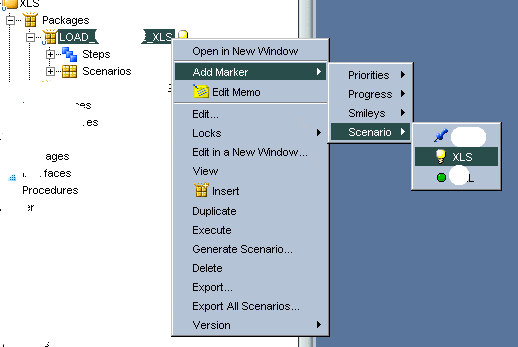
Next we will add the XLS marker to those packages that we wish to logically group together for deployment. In our particular case, all of the Excel related packages.
Right click package > Add Marker > Scenario XLS
In the next step we will create a package that will (re-)generate all packages marked with XLS.
Create a new package, name it GENERATE_SCENARIOS_XLS, add the ODIGenerateAllScen tool to it, and use the following parameters for the tool:
Project: The name of your project
Mode: Replace. This will overwrite the latest version of your scenario.
Marker Group: Scenario
Marker: XLS
Leave the default values for the other parameters.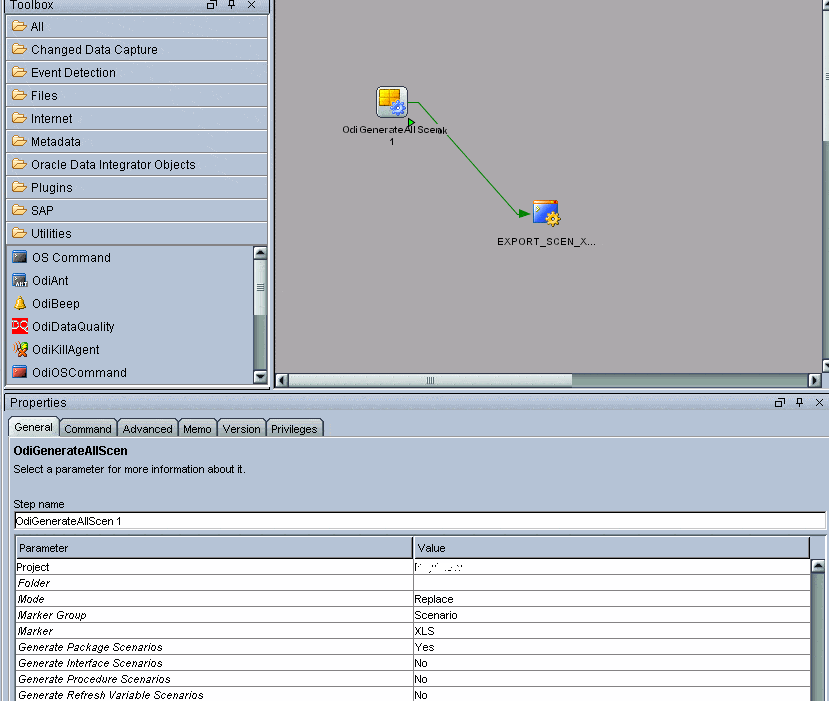
In a next step we need to export the (re-)generated scenarios to XML. Unfortunately, the OdiExportScen tool does not allow us to make use of marker groups to logically group together scenarios for export. To achieve our goal we need to make use of a workaround.
As ODI is a meta-driven ELT tool we can retrieve information about the marker groups from the ODI work repository.
The query below will exactly do this. It returns alls packages that are marked as XLS.
|
1 2 3 4 5 6 7 8 9 10 11 12 13 14 15 16 17 18 19 20 |
SELECT scen_name AS pack_name FROM ( SELECT LAST_VALUE(d.scen_name) OVER (PARTITION BY c.pack_name ORDER BY scen_version) AS scen_name, MAX(scen_version) OVER (PARTITION BY c.pack_name ) max_scen_version, scen_version, c.pack_name FROM snp_obj_state a join snp_state2 b on (a.i_state = b.i_state) JOIN snp_package c ON (a.i_instance = c.i_package) JOIN snp_scen d ON (c.i_package = d.i_package) WHERE state_code = 'XLS' ) WHERE scen_version = max_scen_version |
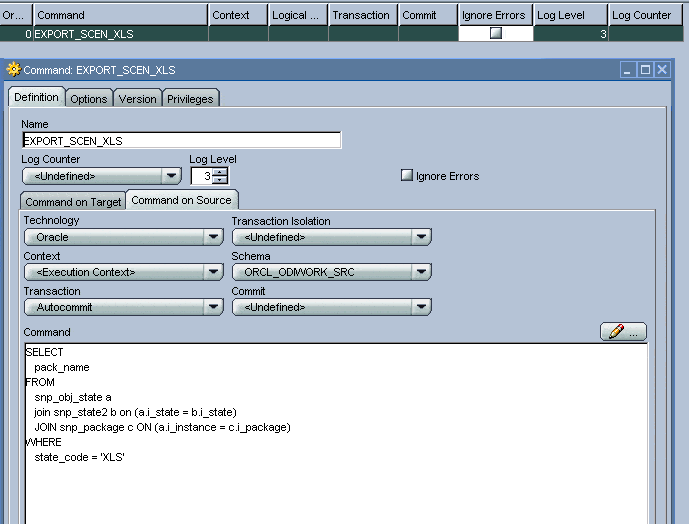
We will employ this query as an implicit cursor in an ODI procedure at the Command on Source. You will first need to create a data server to the ODI work repository in Topology Manager for this to work. As per figure below, set the Technology to the technology of your work repository (in my case Oracle) and set the schema to the logical schema of your work repository (in my case ORCL_ODIWORK_SRC).
We will then use the resultset together with the OdiExportScen tool to create XMLs for our scenario and write them to disk.
|
1 2 3 4 5 |
OdiExportScen "-SCEN_NAME=#pack_name" "-SCEN_VERSION=-1" "-FILE_NAME=D:ODISCEN_#pack_name Version 001.xml" "-FORCE_OVERWRITE=YES" "-RECURSIVE_EXPORT=YES" "-XML_VERSION=1.0" "-XML_CHARSET=ISO-8859-1" "-JAVA_CHARSET=ISO8859_1" |
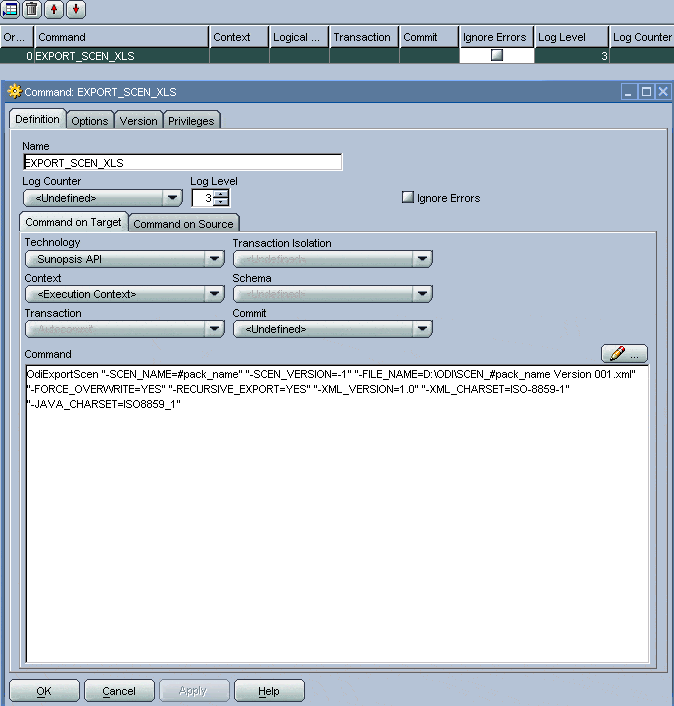
Important parameters here are
SCEN_NAME: #pack_name. This is the bind variable from our Command on Source.
SCEN_VERSION: -1. This means that we will export the scenario that was generated last.
FILE_NAME: This is the path on your file system where the XMLs will be generated.
Make sure that you have set the Technology to Sunopsis API.
In a next step add the ODI procedure we just created to our package.
Finally, manually create a scenario for this procedure via ODI Designer.
Now we are in a position to import the exported scenarios from their XML files.
Once again we will use a procedure to achieve this
For command on source use the following query:
|
1 2 3 4 5 6 7 8 9 10 11 12 13 14 15 16 17 18 19 20 |
SELECT scen_name AS pack_name FROM ( SELECT LAST_VALUE(d.scen_name) OVER (PARTITION BY c.pack_name ORDER BY scen_version) AS scen_name, MAX(scen_version) OVER (PARTITION BY c.pack_name ) max_scen_version, scen_version, c.pack_name FROM snp_obj_state a join snp_state2 b on (a.i_state = b.i_state) JOIN snp_package c ON (a.i_instance = c.i_package) JOIN snp_scen d ON (c.i_package = d.i_package) WHERE state_code = 'XLS' ) WHERE scen_version = max_scen_version |
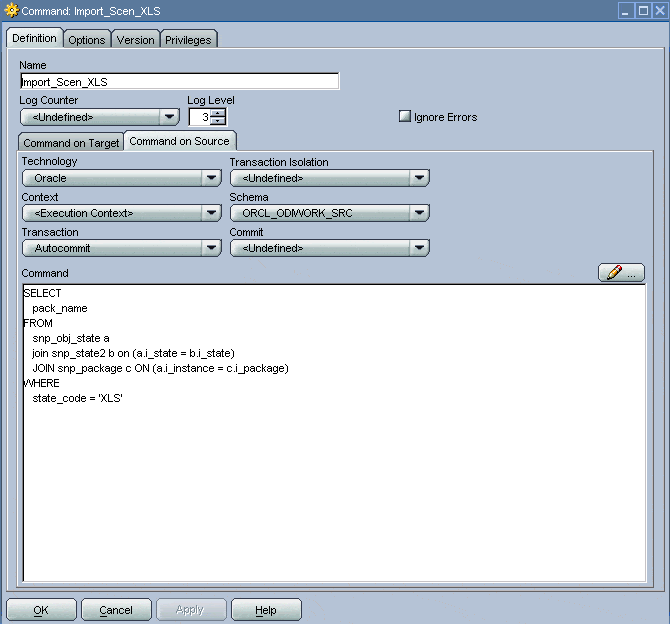
For Command on Target use the following command
|
1 2 |
OdiImportScen "-FILE_NAME=D:ODISCEN_#pack_name Version 001.xml" "-IMPORT_MODE=SYNONYM_INSERT_UPDATE" |
Name the above procedure IMPORT_SCEN_XLS and generate a scenario for it.
We now have all the components that we need for automated scenario deployment. We will just have to glue them together. We will do this via a batch file. In my particular case this will be a Windows batch. Of course, you can achieve the same in a Linux etc. environment.
ODI allows you to execute scenarios via the startscen.bat. You can find this batch file in the oracledibin folder in your ODI home. Three parameters are mandatory for executing this batch:
%1: The name of the scenario. In our case these are the GENERATE_SCENARIOS_XLS and the IMPORT_SCEN_XLS scenarios.
%2: The version number of the scenario. In our case -1, as we want to export the last version of the marked scenarios.
%3: The execution context. In our case we deploy the scenarios from UAT to PRD. So for the export of our scenarios we will use the UAT context, as this is where we (re-)generate and export the marked scenarios. For the import of the marked scenarios we will use the PRD context as we want to import the exported XMLs into the production environment.
You will need to either have agents installed on the same server (one for each environment). I explain how you can install multiple agents on one server in a separate post. Alternatively, you should be able to use a shared folder that both agents can access (I haven’t tried this out).
|
1 2 3 4 5 6 7 8 9 10 11 12 |
@echo off cls d: echo generate xls scenarios cd D:apporacleproductodi_homeoracledibin call startscen.bat GENERATE_SCENARIOS_XLS -1 UAT echo import xls scenarios cd D:apporacleproductodi_homeoraclediagent_prd call startscen.bat IMPORT_SCEN_XLS -1 PRD |


