Data Orchestration Deep Dive Snowflake Tasks. An Airflow replacement?

Use Flexter to turn XML and JSON into Valuable Insights
- 100% Automation
- 0% Coding
What are Snowflake Tasks
Snowflake introduced Tasks for scheduling and orchestrating data pipelines and workflows in late 2019. The first release of Tasks only offered the option to schedule SQL statements, e.g. for loading and unloading data. At this point in time you were not able to create data pipeline DAGs or workflows. However, over the last couple of years Snowflake has added a significant number of enterprise features:
- Task Chaining: Snowflake added the ability to chain tasks together, allowing the output of one task to trigger the execution of subsequent tasks, enabling complex workflows.
- Multiple Schedules: Snowflake introduced the capability to define multiple schedules for a single task, allowing greater flexibility in task execution planning.
- External Functions and External Network Support: Support for invoking external functions within tasks was added to access external services and APIs.
- Stream Integration: Snowflake enhanced tasks to work more seamlessly with streams, enabling tasks to trigger based on changes captured by Snowflake streams, thus supporting real-time data processing workflows.
FlowForward.
All Things Data Engineering
Straight to Your Inbox!
Can you use Snowflake Tasks instead of a data orchestration tool?
One question that regularly comes up in Snowflake implementations is how Snowflake Tasks stack up against dedicated enterprise data orchestration tools such as Apache Airflow. Is there support for very specialised scenarios? Can Snowflake Tasks replace an enterprise level data orchestration tool? The short answer is yes for most scenarios, but there are certain caveats you need to be aware of. For the long answer you will need to read through this post.
What can you expect from this post?
We will first go through common data orchestration patterns and features, e.g. fan in, fan out, branching, conditional dependencies, dependency management, restartability, integration with external applications, scheduling etc. The patterns range from simple to advanced and common to edge cases. We will then check how Snowflake Tasks stack up against these and how it handles them.
At the end of the post we summarise the findings and give guidance on when to use Snowflake Tasks and when to use a dedicated enterprise data orchestration tool for orchestrating your data pipelines. If you are in a hurry you can jump straight to the conclusion.
Key takeaways
Here are the key takeaways from the post
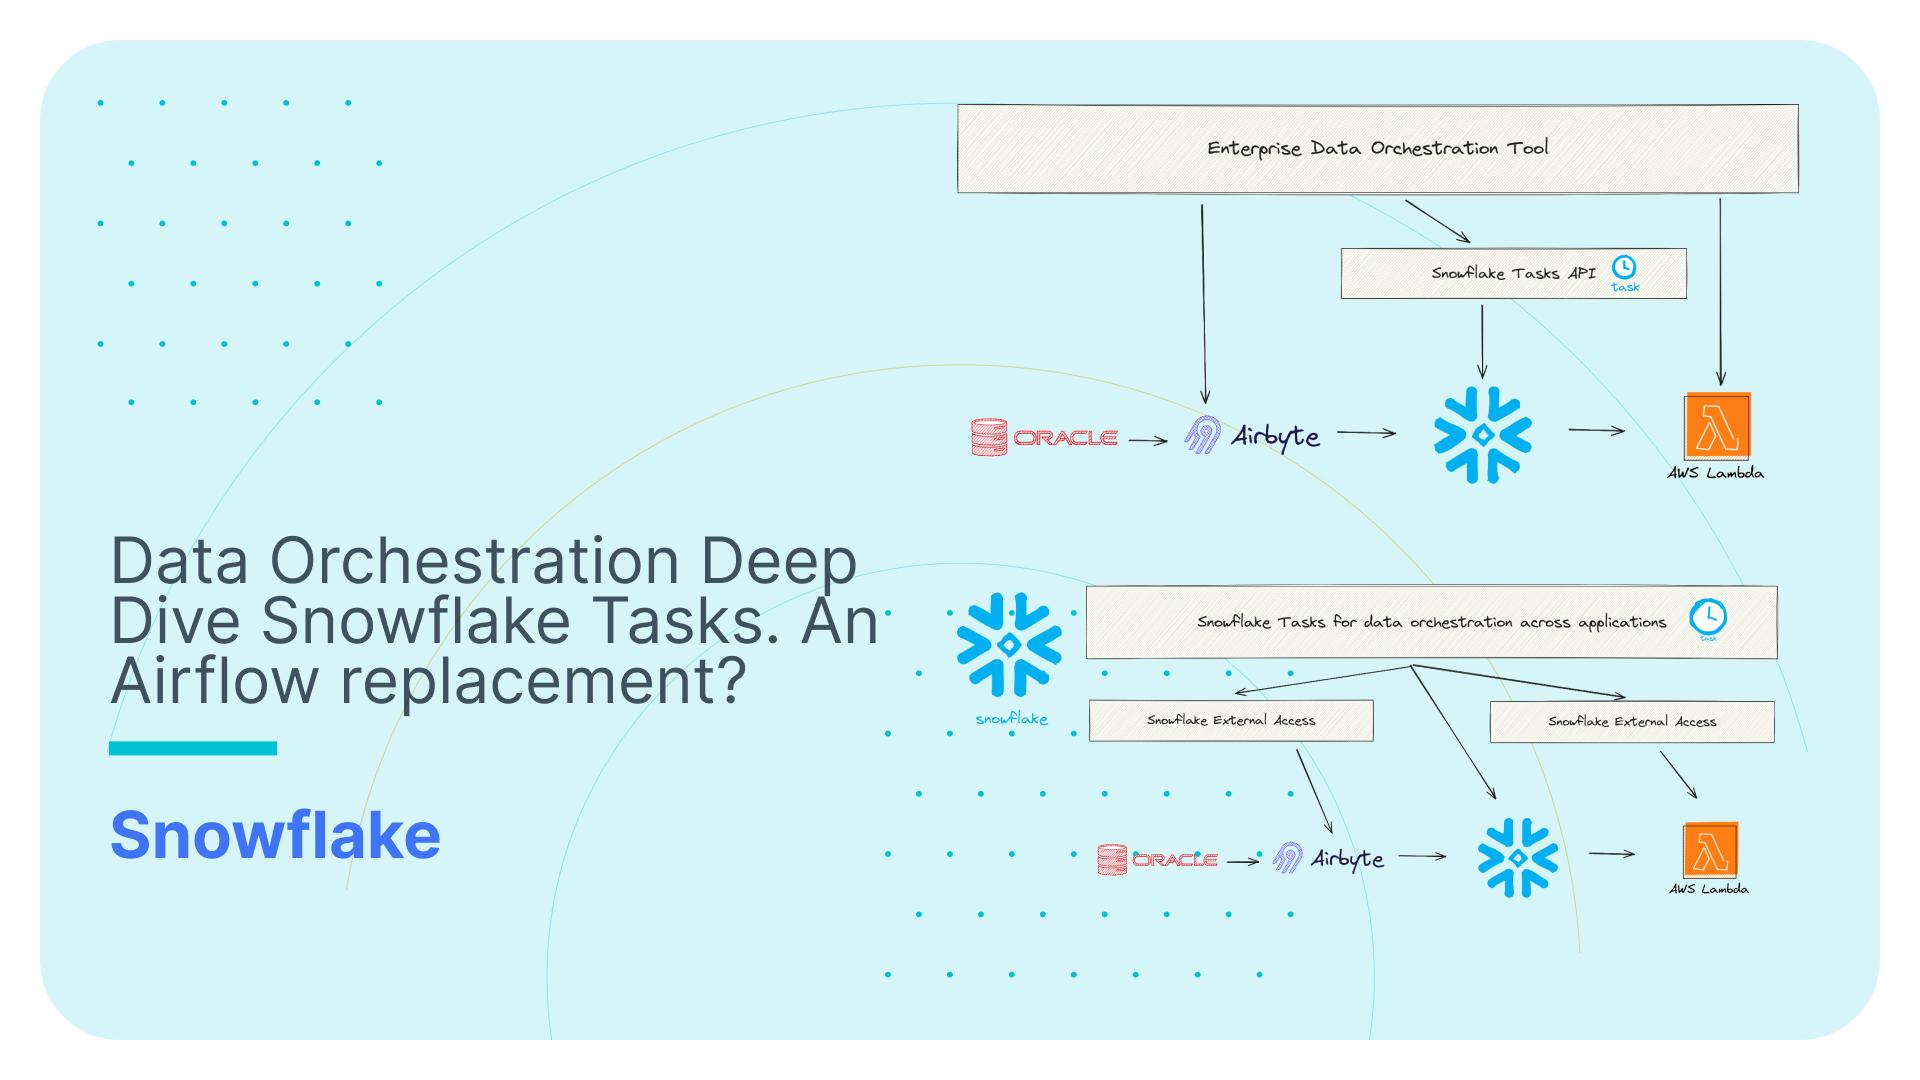
- Yes, Snowflake Tasks can replace Airflow and other data orchestration tools in principle. Data orchestration is one layer within a broader enterprise data architecture. For the full architectural framework, see our reference data architecture guide.
- Snowflake Tasks piggyback on external functions and external network access to integrate with external APIs and apps., e.g. you could create a Task that calls the API of Flexter to automatically convert complex XML to Snowflake relational tables.
- Vice versa you can use the Python API for Tasks to programmatically call Snowflake Tasks from an external data orchestration tool.
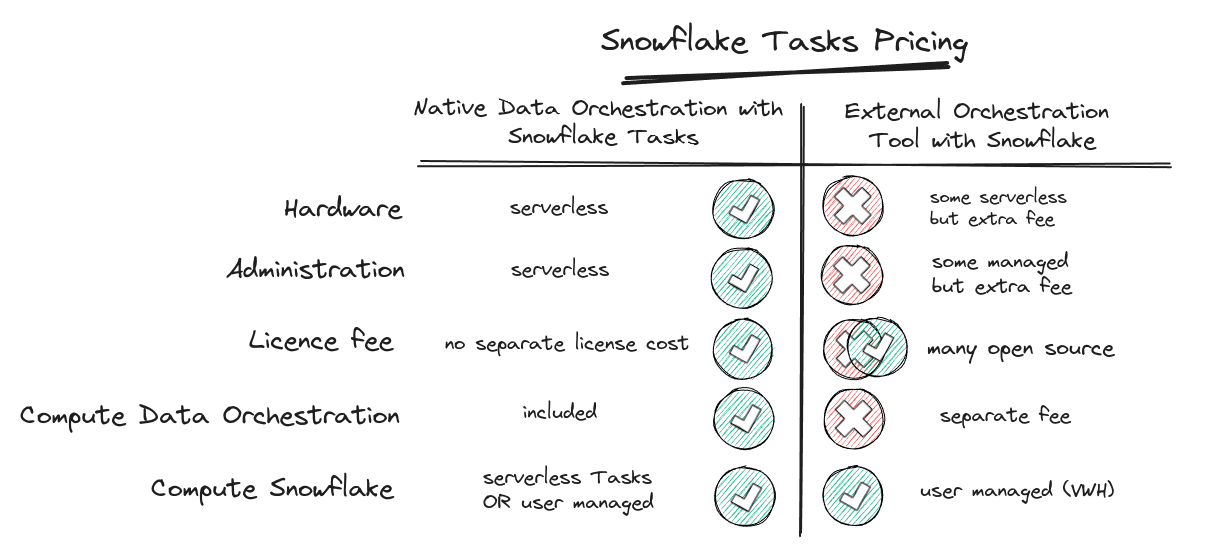
- The biggest advantage of Snowflake Tasks is that they are serverless and don’t come with any extra costs. No extra hardware or software or additional servers are needed. No licence cost. And no separate cost for running Snowflake Tasks apart from the compute resources consumed for the jobs that the Tasks execute.
- Snowflake Tasks handle most data orchestration patterns but there are some edge cases such as Branching that require workarounds.
- There is a hard limit of 1,000 Tasks per data pipeline. For very large implementations this is an issue and you need to split out the data pipeline into multiple separate data pipelines as a workaround. In case you wonder. Yes, data pipelines with 10,000+ tasks exist.
Core data orchestration concepts
Before diving into the specifics of how Snowflake Tasks can be leveraged to create and manage data pipelines, it’s crucial to familiarise ourselves with some foundational concepts. These include Directed Acyclic Graphs (DAGs), tasks, orchestration, and scheduling. Each of these plays a vital role in data processing and pipeline management, serving as the building blocks for effective data orchestration.
Directed Acyclic Graph (DAG): A DAG is a fundamental concept in data processing and workflow management. It represents a sequence of operations or tasks where each task is a node in the graph, and dependencies between these tasks are directed edges. The “acyclic” nature means that there are no loops, ensuring that the workflow progresses from start to finish without revisiting any task. This structure is pivotal for designing data pipelines that are complex, yet deterministic and predictable.
Task: In the context of Snowflake and data orchestration, a task refers to a single operational unit that performs a specific function. This could be a SQL statement for data transformation, a procedure call, or an action to trigger external services. Tasks are the actionable components that, when chained together, form a comprehensive data pipeline. Snowflake Tasks can have a maximum of 1,000 tasks. The maximum number of upstream and downstream tasks is 100 each. You can chain together multiple DAGs to get around the limit.
Data Orchestration: Using plumbing as an analogy, data orchestration is like the system that manages how and when water flows through the various pipes and valves, directing it to different parts of your house as needed. Similarly, in data management, data orchestration refers to the coordinated and managed flow of data flows across different systems and processes. It involves scheduling tasks, managing dependencies, and ensuring that data flows smoothly and efficiently from its sources to its destinations, just like a well-managed plumbing system ensures water is available where and when it’s needed.
Schedule: Scheduling is essential for managing when and how data tasks run, simplifying complex data jobs. Here’s how scheduling can be effectively utilised:
- Frequency-Based Scheduling: Schedule tasks at regular intervals, like every few hours or daily, to meet your operational needs.
- Cron-Style Scheduling: Use cron expressions for precise timing, such as at 8:45 PM on the first day of the month, or every 15 minutes during work hours on weekdays.
- Event-Based Scheduling: This method activates tasks based on certain events rather than at scheduled times. It automatically triggers tasks either when previous tasks complete or when data changes are detected.
Serverless is king. Also for data orchestration
Serverless is a cloud computing model that abstracts the server layer from the application development process, allowing developers to focus on writing and deploying code without worrying about the underlying infrastructure. Servers are managed and maintained by the cloud provider. It goes hand in hand with the serverless compute model where the cloud provider dynamically manages the allocation and provisioning of servers and compute resources.
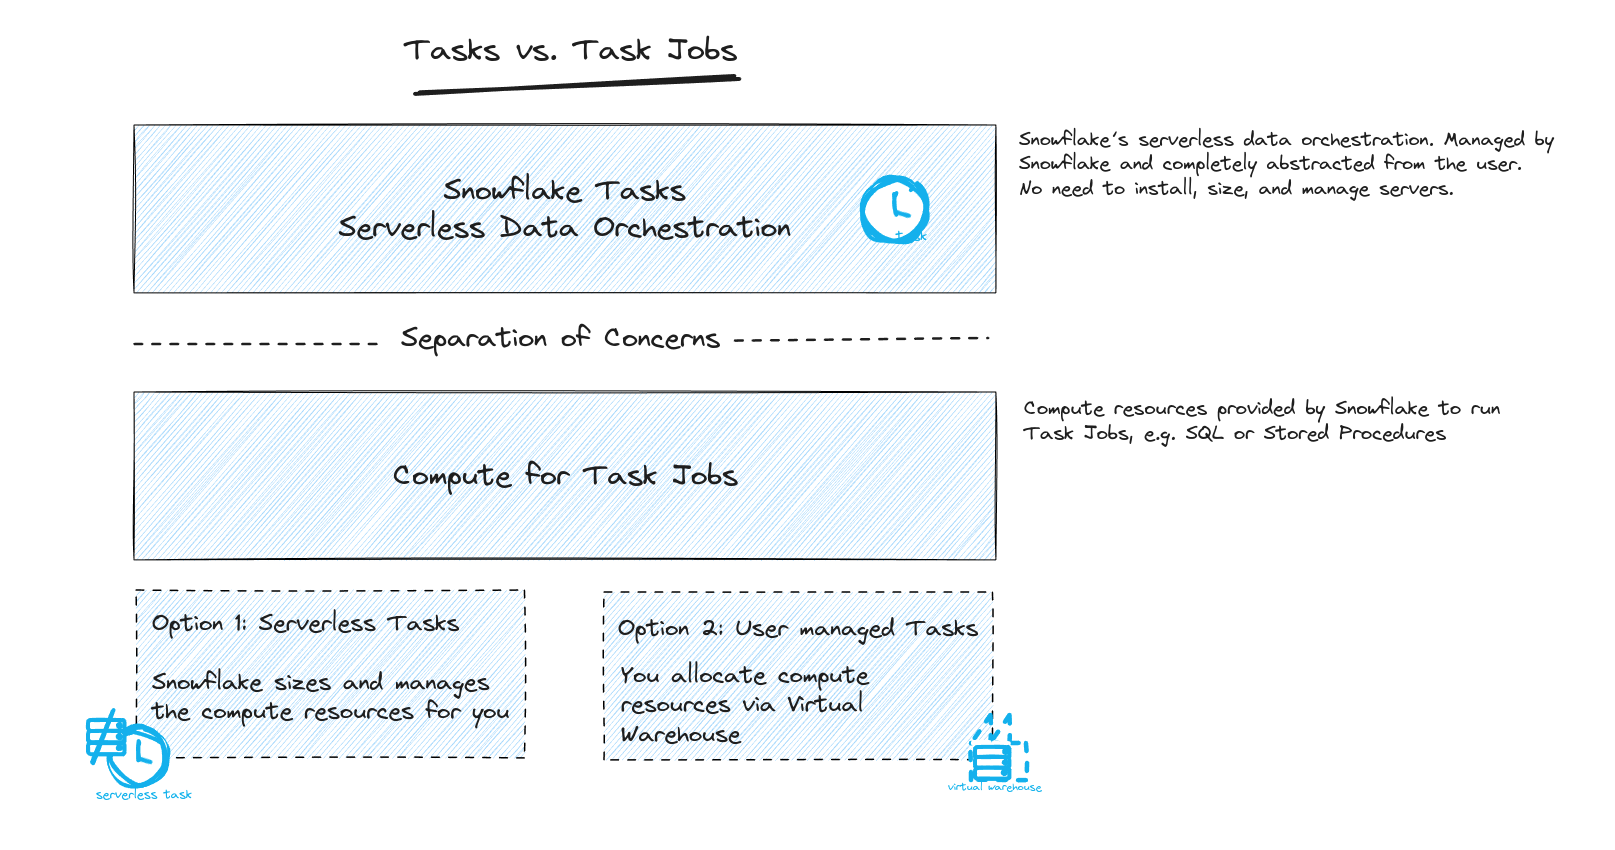
Separation of Tasks and Task jobs
Snowflake Tasks is a serverless data orchestration framework, which separates the compute of Tasks from the compute of Task Jobs.
Tasks act as containers for a Task Job. They define the Task Jobs that need to be run.
Task Jobs: These are the actual workloads, e.g. DML statements that perform the work. They are defined inside the Task. These are similar to Airflow’s Operators.

Here is some sample code to illustrate the structure of Tasks and Task Jobs
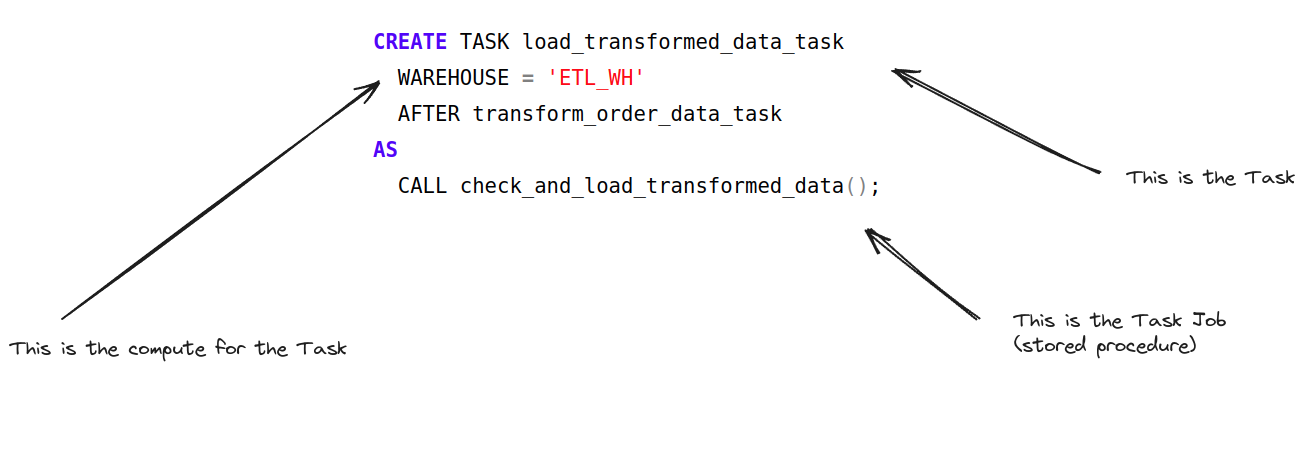
Snowflake separates the compute of Tasks from Task Jobs
Tasks use compute resources that are managed automatically by Snowflake, abstracting complexity away from the user.
Task Jobs can execute via two types of compute models:
- Virtual warehouses: These are user-managed and must be specified in the Task definition.
- Serverless compute: Managed by Snowflake, which optimally adjusts the compute resources based on the task’s requirements and past performance.
Comparison to Airflow
Depending on how you use Airflow this may be very different as outlined in the post We’re All Using Airflow Wrong and How to Fix It. Airflow Tasks and Task Jobs (Operators) often are bundled together and compete for compute resources. In data orchestration there should be a clear separation between the compute resources for Task Jobs and Tasks. Tasks should push down Task Jobs to the layer where the data resides. The data orchestration tool should not run any Task Jobs itself on its own infrastructure. This is similar to the ELT concept where compute is pushed down from the tool to where data resides. You don’t want to run heavy workloads on your data orchestration server.
Serverless data orchestration
Data orchestration with Snowflake Tasks is completely serverless and built into the product.
- You don’t have to manage separate hardware, software, and infrastructure.
- You will not incur separate licence costs.
- You will not have to install, manage, and maintain a separate product.
- Snowflake Tasks are integrated directly with Snowflake, which reduces overhead such as setting up security.
- No need to think about high availability (HA). It is part of Snowflake Tasks.
- Snowflake Tasks are serverless and you can have any number of tasks running at the same time only limited by your budget. Snowflake tasks scale with the Snowflake platform.
This is a huge advantage over third party orchestration tools. Let’s compare this to Airflow where you need to have expertise in dealing with all of the following questions:
- What should the Airflow architecture look like? Distributed or single machine?
- What web server should be deployed and how?
- What database should we pick for the metadata?
- How can we make sure to scale Airflow? Airflow tasks can be quite compute intensive and you need to make sure that things scale.
- Related to scalability: Which executor model is right for me?
- How do we capture and manage the logs from the web server, database server, DAGs
- How do we capture and visualise Airflow metrics?
- How can we secure the web interface?
- How do we encrypt data?
- How do we connect to LDAP for SSO?
With Snowflake Tasks you don’t have any of these headaches.
Serverless vs. user managed compute
When running the actual task jobs you have two options. You can follow the traditional Snowflake model of selecting a virtual warehouse for each task job or go completely serverless and let Snowflake manage the compute requirements for your data pipeline.
There are pros and cons for each scenario
Serverless Tasks
Pros:
- Optimised for Light or Variable Workloads: Ideal for scenarios where tasks don’t run often or complete quickly, ensuring you only pay for the compute resources actually used.
- Cost-Efficiency for Stable Workloads: Since billing is based on actual usage, stable tasks with predictable execution times can be more cost-effective.
- Adherence to Schedule: Serverless tasks automatically adjust compute resources to meet the scheduled interval, making them suitable for time-sensitive operations.
Cons:
- Less Control Over Performance: Users have limited control over the compute resources, which might affect performance predictability for complex or long-running tasks.
User-managed Tasks
Pros:
- Full Control Over Resources: Users can specify warehouse sizes and scale compute resources as needed, offering better control over performance for demanding tasks.
- Ideal for Heavy Workloads: Best suited for workloads that can fully utilize a warehouse, especially with concurrent tasks, making the most of the compute capacity.
- Flexibility for Unpredictable Loads: More adaptable to unpredictable or ‘spiky’ workloads, especially with multi-cluster warehouses that can expand or contract as required.
Cons:
- Billing Concerns: Since billing is based on warehouse size with a minimum billing period, short tasks may lead to higher costs if the warehouse is underutilised.
- Schedule Flexibility: While these tasks offer more power, they might not always adhere strictly to schedule intervals, especially if the workload varies.
Pricing
The biggest beauty of Snowflake Tasks is the pricing. It’s free. You don’t pay a cent extra.
As with many other features in Snowflake you only pay for the compute resources you use for executing Task Jobs, e.g. a DML job that merges data into a dimension table. You don’t pay for the feature itself.
Compare this to a self hosted data orchestration tool where you pay for the administration, hardware, licence, the compute for running Task Jobs, the compute resources for running Tasks, and the human resources to keep it up and running. No it is not trivial to run a Kubernetes cluster.
Let’s see how Snowflake Tasks pricing stacks up against a third party data orchestration tool.
Integrating with external applications
Data orchestration tools need to make calls to external applications and APIs. Vice versa you will also need to programmatically call the data orchestration tool from external applications.
Calling external applications from Snowflake Tasks
Using external functions or external network access in Snowflake tasks lets you reach out to other applications or services for more complex data orchestration patterns. Think of it as a way to make your Snowflake tasks smarter by allowing them to interact with the outside world, like web APIs or cloud functions. This is particularly useful if you have data pipelines where certain tasks need to be completed in systems and applications other than Snowflake.

For example, imagine you are using an ingestion tool such as Fivetran or Airbyte to load data from various operational data sources. You can use external functions and external network access to call the Fivetran REST API as part of your Snowflake Tasks data pipeline to ingest the data and then run your ETL inside Snowflake and then downstream of ETL unload the data to S3 and run some AWS Lambda functions.
Here is another example. Imagine you have a Snowflake pipeline that runs every evening to process sales data from the day. You can include a task with an external function that could also call a service to check for any discrepancies in transactions or use a predictive model hosted in a cloud function to estimate the next day’s sales. Once it gets the results, it can store them back in Snowflake. This way, your task isn’t just moving and crunching numbers within Snowflake; it’s also pulling in valuable insights from outside.
External functions and external network access extend Snowflake’s capabilities significantly by allowing it to execute logic in other environments and applications.
Calling Snowflake Tasks from external applications
The Snowflake Tasks Python API is a new feature that makes it easier for external applications to run tasks on Snowflake.
This is great for automating work and running Snowflake Tasks programmatically, like running SQL queries or scheduled data jobs, directly from Python.
You can also use the Python API for integrating with data orchestration tools at enterprise level where your Snowflake data pipelines are part of a bigger pipeline and you execute the Snowflake pipeline programmatically from your enterprise level data orchestration tool.

Snowflake Tasks API code samples
For example, to connect to Snowflake and prepare for task management, you would start with:
|
1 2 3 4 5 |
from snowflake.core import Root from snowflake.snowpark import Session session = Session.builder.config("connection_name", "myconnection").create() root = Root(session) |
This sets up your connection. Then, to create a task that runs every hour and executes a SQL query, you can write:
|
1 2 3 4 5 6 |
from datetime import timedelta from snowflake.core.task import Task my_task = Task(name='my_task', definition='SELECT * FROM my_table', schedule=timedelta(hours=1)) tasks = root.databases['my_db'].schemas['my_schema'].tasks tasks.create(my_task) |
This code snippet creates a task named my_task that runs a SQL query every hour.
If you want to update an existing task or create it if it doesn’t exist, you can use:
|
1 2 3 |
tasks['my_task'].create_or_update( Task(name='my_task', definition='SELECT * FROM my_table_updated', schedule=timedelta(hours=1)) ) |
This will update my_task to run a new SQL query, or create it with this new query if it wasn’t there before.
You can also perform common task operations—such as executing, suspending, and resuming tasks—with a TaskResource object.
Code in the following example executes, suspends, resumes, and deletes the my_task task:
|
1 2 3 4 5 6 7 8 9 10 |
from snowflake.core import Root from snowflake.core.task import Task tasks = root.databases["my_db"].schemas["my_schema"].tasks task_res = tasks['my_task'] task_res.execute() task_res.suspend() task_res.resume() task_res.delete() |
These examples show how the Snowflake Python API simplifies integrating Snowflake Tasks into external applications, making automation and data management tasks much more straightforward.
Continuous data pipelines with Streams and Tasks
Continuous data pipelines really are a separate topic but let’s briefly discuss it here.
In Snowflake, a stream is a specialised feature designed to track changes to a table in near real-time. It acts as a continuous log, capturing every insert, update, or delete operation made to the associated table. Think of it as a running record of all modifications, allowing users to stay updated with the latest data changes as they occur. Streams play a crucial role in enabling real-time data processing and synchronisation, facilitating tasks like data replication, auditing, and incremental data loading. By leveraging streams, users can build efficient data pipelines and implement automated processes to respond to changes in their data environment promptly.
You can use Streams and Tasks together to build real time pipelines on Snowflake but this is a big topic best reserved for another blog post.
Basic Dependencies in Snowflake
Just like in Airflow, Snowflake allows for the definition of dependencies between tasks to construct both linear and complex workflows, including fan-out/fan-in patterns.
Linear Dependencies
In Snowflake, linear sequences of tasks are established by specifying the AFTER keyword in the task definition, indicating that a task should execute after the completion of another task. This mirrors the concept of the bitshift operator (>>) in Airflow for linear dependencies.
Let’s illustrate this with an example involving a data pipeline for processing customer orders:
|
1 2 3 4 5 6 7 8 9 10 11 12 13 14 15 16 17 18 19 20 21 |
CREATE TASK extract_order_data_task WAREHOUSE = my_warehouse SCHEDULE = '0 0 * * *' -- CRON expression for running once every day at midnight AS CALL extract_order_data_proc(); -- Task to transform the raw order data CREATE TASK transform_order_data_task AFTER extract_order_data_task WAREHOUSE = my_warehouse AS CALL transform_order_data_proc(); -- Task to load the transformed data into Snowflake tables CREATE TASK load_transformed_data_task AFTER transform_order_data_task WAREHOUSE = my_warehouse AS CALL load_transformed_data_proc(); |
In this example, we are setting up a basic data pipeline in Snowflake with three tasks:
- Extract Order Data Task:
- Transform Order Data Task:
- Load Transformed Data Task:

Overall, this setup establishes a sequential flow of tasks, where each task depends on the successful completion of its preceding task. Raw order data is first extracted, then transformed, and finally loaded into Snowflake tables for further analysis or reporting purposes. The use of CRON expressions allows for automated scheduling of these tasks according to specified time intervals.
Fan-in/-out dependencies
In Snowflake, task dependencies can be structured to handle more complex patterns, including fan-in and fan-out structures. These structures enable orchestration of tasks where multiple upstream tasks contribute to a single downstream task (fan-in), or a single upstream task triggers multiple downstream tasks (fan-out). Below, we’ll explore a scenario illustrating both fan-in and fan-out dependencies using a different example.
Example Scenario: E-commerce Data Processing
Consider an e-commerce platform that processes data from various sources, including user activity logs and product inventory databases. The platform requires daily updates to ensure timely analysis and decision-making. Let’s design a Snowflake task dependency structure for this scenario.
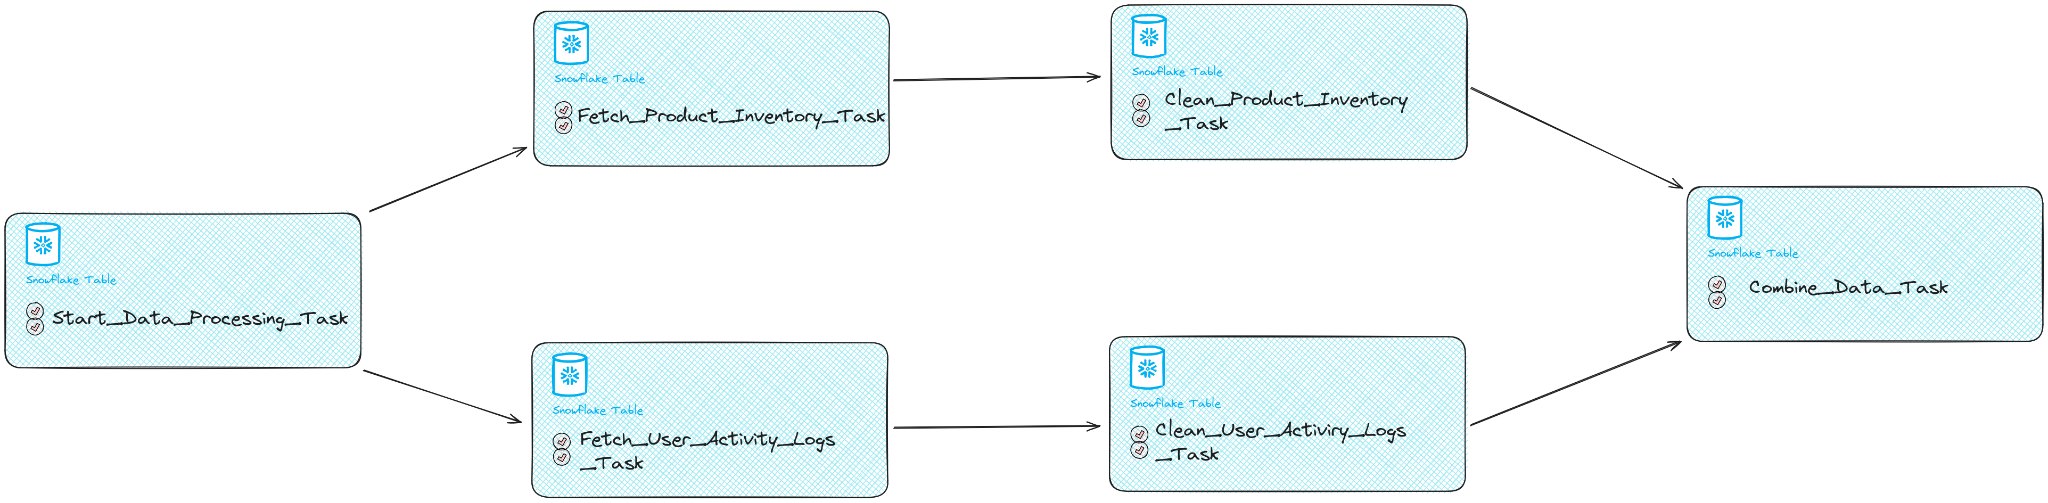
Fan-Out Structure
Start Task:
- Represents the initiation of the workflow.
- Fans out to the fetch tasks for each data source.
|
1 2 3 4 5 |
CREATE TASK start_data_processing_task WAREHOUSE = 'COMPUTE_WH' SCHEDULE = 'USING CRON 0 0 * * * UTC' -- Run daily at midnight AS CALL start_data_processing_proc(); |
Fetch User Activity Logs Task:
- Retrieves user activity logs from the platform’s servers.
- It is scheduled to run after the start_data_processing_task
|
1 2 3 4 5 6 |
CREATE TASK fetch_user_activity_logs_task WAREHOUSE = 'COMPUTE_WH' AFTER start_data_processing_task AS CALL fetch_user_activity_logs_proc(); |
Fetch Product Inventory Task:
- Retrieves product inventory data from the database.
- It is scheduled to run after the start_data_processing_task
|
1 2 3 4 5 6 |
CREATE TASK fetch_product_inventory_task WAREHOUSE = 'COMPUTE_WH' AFTER start_data_processing_task AS CALL fetch_product_inventory_proc(); |
Clean User Activity Logs Task:
- Cleans and processes the fetched user activity logs.
- It is scheduled to run after the completion of the fetch_user_activity_logs_task, ensuring that the logs are cleaned only after they have been successfully retrieved from the platform’s servers.
|
1 2 3 4 5 6 |
CREATE TASK clean_user_activity_logs_task WAREHOUSE = 'COMPUTE_WH' AFTER fetch_user_activity_logs_task AS CALL clean_user_activity_logs_proc(); |
Clean Product Inventory Task:
- Cleans and processes the fetched product inventory data.
- It is scheduled to run after the completion of the fetch_product_inventory_task.
|
1 2 3 4 5 6 |
CREATE TASK clean_product_inventory_task WAREHOUSE = 'COMPUTE_WH' AFTER fetch_product_inventory_task AS CALL clean_product_inventory_proc(); |
Fan-In Structure
Combine Data Task:
- Combines the cleaned data from all sources into a unified dataset.
- Depends on the completion of all clean tasks.
|
1 2 3 4 5 6 7 |
CREATE TASK combine_data_task WAREHOUSE = 'COMPUTE_WH' AFTER clean_user_activity_logs_task, clean_product_inventory_task AS CALL combine_data_proc(); |
In this example, the workflow begins with a start task, which fans out to fetch tasks for each data source. Each fetched dataset is then cleaned separately using individual clean tasks. Finally, the cleaned datasets are combined into a unified dataset using a single combine data task. This fan-in/fan-out structure allows for efficient orchestration of the data processing workflow in Snowflake.
Branching tasks
Imagine we’re managing a DAG, specifically an ETL (Extract, Transform, Load) process, for organising sales data. We’re hit with news that in a few weeks, our data will start coming from a new source. This means the incoming data will not only be in a different format but will also require us to adjust how we clean and prepare it for use. The goal is to ensure that this change doesn’t interrupt our ongoing data operations. Moreover, we have to keep our system flexible enough to handle both the old and new data sources, allowing us to analyse past and future sales data together. Now, we’re faced with the challenge of tweaking our data pipeline to seamlessly integrate this new data source while maintaining the flow of our current operations.
To tackle this challenge, we can use the concept of task branching in our DAG. Branching allows us to create separate paths in our workflow for processing the old and new data formats. By first identifying the data source, the workflow splits into two branches tailored for either the old or new data format, involving specific transformation and cleaning steps for each. Once processed, the paths converge, allowing the merged data to be loaded for downstream use in analytics or machine learning models, ensuring a seamless transition between data sources.
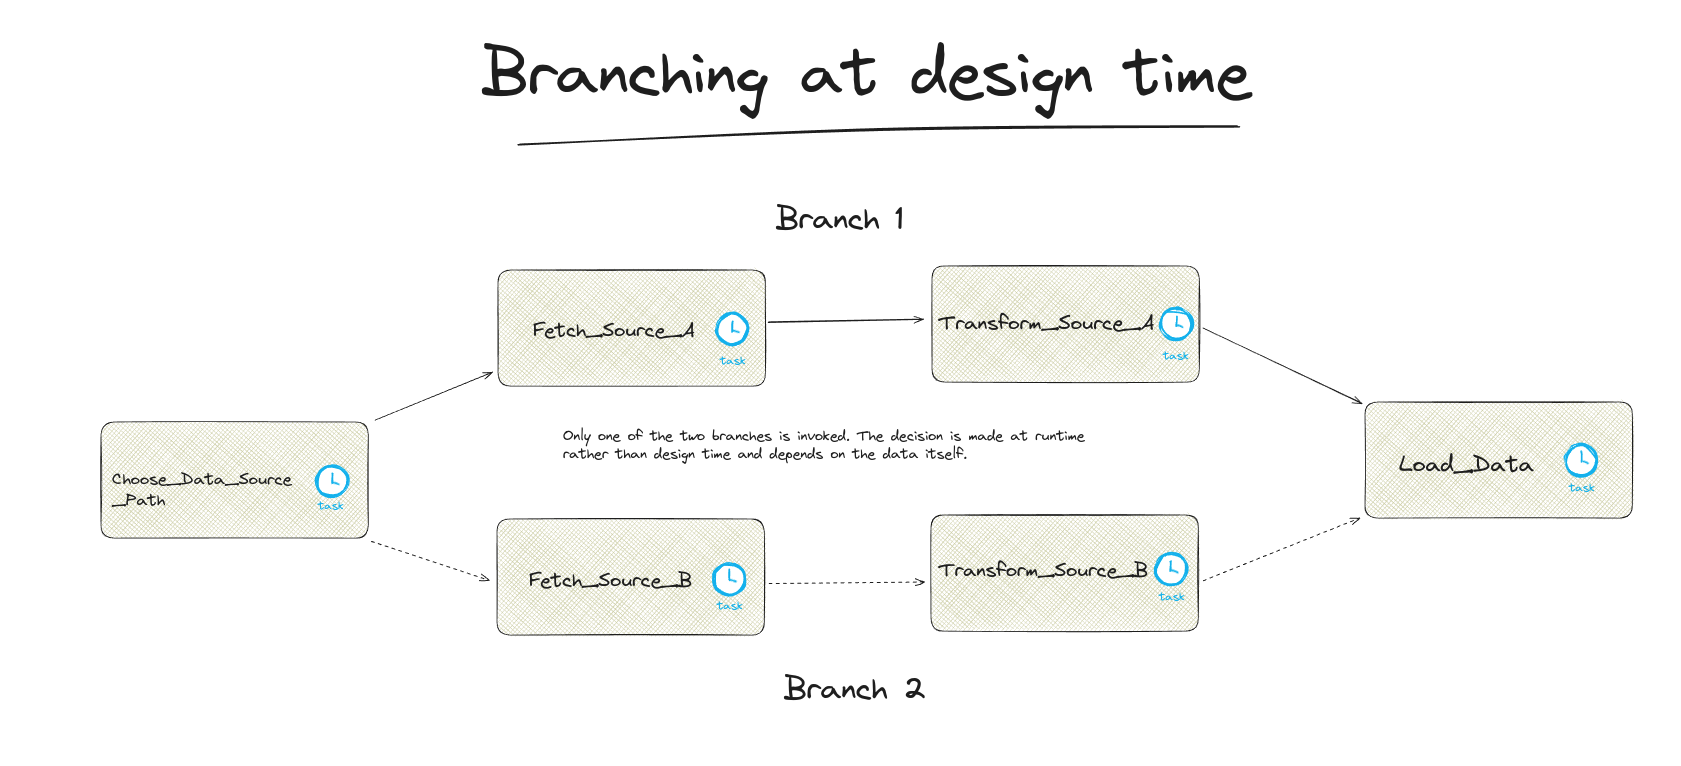
Branching versus fan-in / fan-out
While Branching looks like the fan-in / fan-out pattern we introduced earlier on, the branching pattern is very different. Only one of the branches is executed when the data pipeline is invoked. Which of the branches is invoked depends on the data itself and is not determined at design time but at runtime.

Let’s see how these can be achieved in different data orchestration tools like Airflow and Snowflake Tasks.
Branching in Airflow
In Airflow, the branching logic is facilitated by creating two separate task sequences, each dedicated to processing data from one of the two sources. For instance, the tasks might look like:
|
1 2 3 4 5 6 7 8 |
transform_source_a = PythonOperator(...) fetch_source_a = PythonOperator(...) transform_source_b = PythonOperator(...) fetch_source_b = PythonOperator(...) fetch_source_a >> transform_source_a fetch_source_b >> transform_source_b |
Now we need to add these tasks to our DAG and make sure Airflow knows which ones to run.
Airflow makes this easy by letting us choose between task groups using something called the BranchPythonOperator. This operator, by taking a Python callable, determines the path the DAG should follow based on specific criteria, such as the nature of the incoming data. Callables passed to the BranchPython-Operator are expected to return the ID of a downstream task as a result of their com-putation. The returned ID determines which of the downstream tasks will be executed
For example, the decision function could look like:
|
1 2 3 4 5 6 |
def choose_data_source(**context): # Logic to decide based on data characteristics if data_condition_meets_source_a_criteria: return "fetch_source_a" else: return "fetch_source_b " |
Subsequently, this logic is integrated into the DAG through the BranchPythonOperator:
|
1 2 3 4 5 6 7 8 |
choose_data_source_path= BranchPythonOperator( task_id="choose_data_source_path", python_callable=choose_data_source, ) choose_data_source_path>> [fetch_source_a , fetch_source_b ] |
When you’re connecting tasks in Airflow, especially after branching, you might think it’s straightforward to link tasks from different branches to a single downstream task. For instance, after cleaning data from two sources, you might want to combine this data:
|
1 |
[transform_source_a , transform_source_b ] >> load_data |
But, if you set it up this way and run the DAG, you’ll find that the load_data task, along with any downstream tasks gets skipped by Airflow. This happens because Airflow, by default, waits for all upstream tasks to succeed before it runs a given task. In a branching scenario, where only one branch will execute, the load_data task waits indefinitely because it’s expecting both cleaning tasks to complete, which never happens since only one branch runs.
This issue arises due to Airflow’s default “trigger rules”. Trigger rules define when a task should run based on the status of its upstream tasks. The default rule, all_success, means all upstream tasks must succeed for the task to run. However, in a branching situation with a BranchPythonOperator, not all branches will execute, causing non-selected tasks to be skipped, and hence, the downstream load_data task gets skipped because it’s waiting for tasks that never run.
To handle this, you can change the trigger rule for the load_data task. Instead of waiting for all upstream tasks to succeed, you can set it to none_failed or one_success, meaning the task will run as long as none of the upstream tasks have failed, or at least one has succeeded, respectively. This adjustment accommodates the branching logic by allowing the workflow to proceed even if some tasks are skipped due to the branching decision.
Here’s how you might adjust the trigger rule for the load_data task:
|
1 2 3 4 5 6 |
load_data = PythonOperator( task_id='combine_data', python_callable=combine_data_function, trigger_rule='none_failed', # This allows the task to run if no upstream tasks have failed # Additional parameters as needed ) |
This setup ensures that after branching and conditional execution of tasks, the workflow can still converge efficiently, allowing downstream tasks like load_data to execute properly, even if only a subset of the tasks in the branched paths were executed.
Branching in Snowflake.
In Snowflake, unlike in Airflow, there isn’t a built-in feature for branching logic in workflows that directly mirrors the BranchPythonOperator’s functionality. However, we came up with a method to implement a similar decision-making process for our data pipeline involving two distinct branches, each designed to handle information from several sources. Our approach leverages Snowflake’s ability to pass values between tasks in a workflow, using SYSTEM$SET_RETURN_VALUE() and SYSTEM$GET_PREDECESSOR_RETURN_VALUE() functions for communication between tasks.
Here’s how we define our tasks for selecting and executing branches based on data source:
Choose Data Source Task: This task decides which data source to process and sets a return value indicating the choice.
|
1 2 3 4 |
CREATE OR REPLACE TASK choose_data_source_path WAREHOUSE = 'COMPUTE_WH' AS CALL system$set_return_value('source_a'); |
Fetch Source A Task: This task is executed if the choose_data_source_path task sets the return value to ‘source_a’. It fetches data from source A
|
1 2 3 4 5 6 |
CREATE OR REPLACE TASK fetch_source_a WAREHOUSE = 'COMPUTE_WH' AFTER choose_data_source_path WHEN SYSTEM$GET_PREDECESSOR_RETURN_VALUE() = 'source_a' AS CALL fetch_from_source_a(); |
Fetch Source B Task:
|
1 2 3 4 5 6 |
CREATE OR REPLACE TASK fetch_source_b WAREHOUSE = 'COMPUTE_WH' AFTER choose_data_source_path WHEN SYSTEM$GET_PREDECESSOR_RETURN_VALUE() = 'source_b' AS CALL fetch_from_source_b(); |
This setup in Snowflake allows for conditional execution of tasks based on the outcome of a preceding task, effectively enabling a branching mechanism in our ETL workflow to process data differently based on its source.
Branching challenge and trigger rules
When we attempt to connect the transformation tasks from each branch to a single load_data task, similar to how we might structure it in Airflow we face a similar challenge in Snowflake
|
1 |
[transform_source_a, transform_source_b] >> load_data |
The load_data task can be defined in Snowflake like this:
|
1 2 3 4 5 |
CREATE OR REPLACE TASK load_data WAREHOUSE = 'COMPUTE_WH' AFTER transform_source_a, transform_source_b AS CALL load_data_procedure(); |
By designating the load_data task as a child of both transform_source_a and transform_source_b tasks, we encounter an issue where the load_data task and any subsequent tasks may be skipped (the pipeline stops). This happens because, in any given run, only one of the branches executes based on the condition set earlier, which mirrors the behaviour observed in Airflow where a task requires all upstream tasks to succeed before it can proceed. In Snowflake’s task dependency model, if a parent task does not run (in this case, because the branch condition was not met), the child task (load_data) will not execute, leading to the skipping of this task and potentially others downstream in the workflow.
Unlike Airflow, where we can address the issue of task skipping after branching by adjusting trigger rules, Snowflake does not offer a native solution to directly mimic this behaviour. In Airflow, the flexibility of trigger rules like none_failed or one_success allows tasks to proceed even if only a subset of upstream tasks have completed. However, Snowflake’s task dependency model strictly requires all preceding tasks to execute before a dependent task can run. This means that in scenarios where our workflow diverges into branches with conditional execution, there isn’t a straightforward, built-in mechanism in Snowflake to ensure that a single downstream task will execute following the completion of just one branch.
Workarounds
Independent DAG for Load Task
One creative way to get around Snowflake’s branching problem is to make the load_data task the root task of a separate DAG.This method involves triggering the load_data task independently from the outcome of its preceding tasks in the main workflow.
Implementation Steps:
- Create the load_data Task within a New DAG: First, define the load_data task as part of a new, independent DAG. This separation ensures that the execution of load_data is not directly tied to the completion of all tasks in the main DAG.
- Trigger load_data from Predecessor Tasks: Modify the final tasks of each branch in the main DAG (transform_source_a and transform_source_b) to include a command that triggers the load_data task. This setup ensures that regardless of which branch was executed, the load_data task will be triggered immediately after the completion of the branch-specific task.
|
1 2 3 4 5 6 7 8 9 10 11 12 13 14 15 16 17 18 19 |
CREATE OR REPLACE TASK transform_source_a WAREHOUSE = 'COMPUTE_WH' AS BEGIN CALL transform_data_from_source_a(); -- Trigger the load_data task upon completion EXECUTE TASK load_data ; END; -- Task to transform data from source B CREATE OR REPLACE TASK transform_source_b WAREHOUSE = 'COMPUTE_WH' AS BEGIN CALL transform_data_from_source_b(); -- Trigger the load_data task upon completion EXECUTE TASK load_data ; END; |
This strategy ensures the load_data task executes as needed, without being skipped due to the branching logic in the main workflow, thereby providing a seamless integration of data processing steps across branches.
The disadvantage with this method is that it would break visual representative flows of the DAGs in Snowsight UIs which could make troubleshooting issues a little unpleasant.
Conditional Tasks in Snowflake
Consider an ETL workflow where the transformation process occasionally produces data that does not meet quality standards, such as the presence of duplicate records. If proceeding with the loading process when duplicates are present, data integrity could be compromised. For such instances, it’s beneficial to have a method to conditionally execute tasks. Let’s delve into the ways this can be approached within Snowflake.
Conditions Within Tasks
One way to manage this is by incorporating conditions directly within tasks or the stored procedures they call. This allows for dynamic control over the execution flow of data tasks in Snowflake. For instance, if the transformation task results in duplicate records, the stored procedure for the Load task can be designed to check for duplicates before loading the data.

Stored Procedure for Conditional Load Task
To implement a check for duplicates, we modify the Load task’s stored procedure as follows:
|
1 2 3 4 5 6 7 8 9 10 11 12 13 14 15 16 17 18 19 20 21 22 23 24 25 26 27 |
CREATE OR REPLACE PROCEDURE check_and_load_transformed_data() RETURNS STRING LANGUAGE SQL AS $ DECLARE duplicate_count INTEGER; BEGIN -- Determine the number of duplicate records based on a combination of fields SELECT COUNT(*) INTO :duplicate_count FROM ( SELECT id FROM transformed_data GROUP BY id HAVING COUNT(id) > 1 ); IF (duplicate_count = 0 )THEN -- Proceed with loading as there are no duplicates INSERT INTO final_table SELECT * FROM transformed_data; RETURN 'Load successful: No duplicates found.'; ELSE -- Skip loading due to the presence of duplicates RETURN 'Load skipped: Duplicates detected in the data.'; END IF; END; $; |
This procedure first calculates the number of duplicate records in transformed_data by grouping records by the id field (or any set of fields that together should be unique). It then checks if any duplicates exist. If none are found (duplicate_count = 0), the procedure proceeds with the load operation; otherwise, it skips the load, ensuring data integrity.
Incorporating the Procedure into the Load Task
The Load task, defined to run after the Transform task, calls this stored procedure to conditionally load the transformed data:
|
1 2 3 4 5 |
CREATE OR REPLACE TASK load_transformed_data_task WAREHOUSE = 'ETL_WH' AFTER transform_order_data_task AS CALL check_and_load_transformed_data(); |
In this ETL scenario, the conditional logic within the check_and_load_transformed_data stored procedure ensures that the Load phase proceeds only when the data meets the established quality criteria, in this case, the absence of duplicates. This approach highlights the utility of conditional task execution in maintaining high standards of data quality and integrity within Snowflake-driven workflows.
Incorporating conditional logic within Snowflake tasks introduces several challenges that can impact operational transparency and team efficiency.
- Tracking the execution of tasks becomes more complex, as understanding whether a task was executed or skipped due to internal conditions often necessitates a deep dive into logs or the implementation of additional monitoring solutions.
- This complexity extends to troubleshooting efforts as well; when tasks are skipped or fail because of these conditions, identifying the root cause is not always straightforward, complicating diagnostic processes.
- Furthermore, this approach can steepen the learning curve for new team members or external collaborators, who may find it challenging to grasp the workflow’s underlying logic and the specific conditions dictating task execution.
Making tasks conditional
A better way of handling conditional tasks is to separate the condition out into a separate task.The dedicated task checks for a specific condition, e.g. a data quality check. The task then passes the output to a downstream task. Based on the output the task is executed or skipped.
Snowflake facilitates conditional executions through the inclusion of a dedicated task. thereby controlling the flow of downstream tasks based on the outcome.Let’s go through an example. In our dedicated task we check for duplicates in a table and only continue downstream processing if we do not find any duplicates.
Let’s see how this can be implemented in Snowflake.

After the transformation task (transform_task) completes, we introduce a new task designed to check for duplicates. This task uses a stored procedure that implements the required logic to check the condition, such as confirming no duplicates are found in the transformed data.
|
1 2 3 4 5 |
CREATE TASK condition_check_task WAREHOUSE = 'COMPUTE_WH' AFTER transform_task AS CALL check_condition_for_load(); |
The stored procedure within this task leverages SYSTEM$SET_RETURN_VALUE to pass the outcome of the condition check forward, effectively communicating the decision on whether to proceed with the downstream tasks.
|
1 2 3 4 5 6 7 8 9 10 11 12 13 14 15 16 17 18 19 20 21 22 23 24 25 26 27 28 |
CREATE OR REPLACE PROCEDURE check_condition_for_load() RETURNS STRING LANGUAGE SQL AS $ DECLARE duplicates_exist BOOLEAN; BEGIN -- Determine if there are duplicate records based on a unique identifier SELECT COUNT(*) INTO :duplicate_count FROM ( SELECT id FROM transformed_data GROUP BY id HAVING COUNT(id) > 1 ); IF (duplicate_count > 0 ) THEN -- Duplicates found, do not proceed with load SYSTEM$SET_RETURN_VALUE('0'); -- Indicate duplicates exist ELSE -- No duplicates, proceed with load SYSTEM$SET_RETURN_VALUE('1'); -- Indicate no duplicates, condition met END IF; RETURN 'Duplicate check completed.'; END; $; |
Following the condition check task, the load task is configured to execute based on the outcome determined by its predecessor. This is achieved by utilizing the WHEN clause in the load task’s definition, which references SYSTEM$GET_PREDECESSOR_RETURN_VALUE() to decide on its execution.
|
1 2 3 4 5 6 7 |
CREATE OR REPLACE TASK load_transformed_data_task WAREHOUSE = 'my_warehouse' AFTER condition_check_task WHEN SYSTEM$GET_PREDECESSOR_RETURN_VALUE() = '1' AS -- Load operation INSERT INTO final_table SELECT * FROM transformed_data; |
In this configuration, the load task proceeds only if the WHEN condition is satisfied. If the condition is not met, the load task is skipped and any downstream tasks are skipped as well. This is to ensure that only data without data quality issues (duplicates) makes its way into the target table (final_table).
Sharing data between tasks
Now, let’s consider an ETL setup where we’re tasked with loading values into a table, but with a twist: the table name needs to be dynamically determined based on conditions evaluated by predecessor tasks. As mentioned earlier in the last sections, we can navigate this challenge by using Snowflake’s SYSTEM$SET_RETURN_VALUE() and SYSTEM$GET_PREDECESSOR_RETURN_VALUE() functions. This method enables straightforward value transfer between tasks, ensuring our data workflows remain flexible and efficient.It’s crucial to note that the shared data must be a string, and there exists a size limitation: the string size must be less than or equal to 10 kB when encoded in UTF-8.
Let’s see how this can be set up in Snowflake.
Step 1: Create Stored Procedures
Procedure 1: set_return_value
Sets the return value to the name of the table using SYSTEM$SET_RETURN_VALUE, intended for use by the next task in the sequence.
|
1 2 3 4 5 6 7 8 9 10 |
CREATE OR REPLACE PROCEDURE set_return_value() RETURNS STRING LANGUAGE JAVASCRIPT EXECUTE AS CALLER AS $ var setReturnStmt = snowflake.createStatement({ sqlText: `CALL SYSTEM$SET_RETURN_VALUE('dict_table')` }); setReturnStmt.execute(); $; |
Procedure 2: insert_based_on_predecessor_return
Retrieves the predecessor task’s return value with SYSTEM$GET_PREDECESSOR_RETURN_VALUE() and uses it to insert a new row into the specified table.
|
1 2 3 4 5 6 7 8 9 10 11 12 13 14 15 16 17 18 |
CREATE OR REPLACE PROCEDURE insert_based_on_predecessor_return() RETURNS STRING LANGUAGE JAVASCRIPT EXECUTE AS CALLER AS $ var result = snowflake.execute({sqlText: "SELECT SYSTEM$GET_PREDECESSOR_RETURN_VALUE()"}); result.next(); var tableName = result.getColumnValue(1); if (tableName) { var insertSql = `INSERT INTO ${tableName} (id, value) VALUES (1, 'Value1')`; snowflake.execute({sqlText: insertSql}); return "Insertion into " + tableName + " completed."; } else { return "No table name was retrieved from the predecessor task's return value."; } $; |
Step 2: Create Tasks
Transform_source_a Task
Executes the first stored procedure to insert a row and set a return value.
|
1 2 3 4 |
CREATE OR REPLACE TASK transform_source_a WAREHOUSE = 'COMPUTE_WH' AS CALL set_return_value(); |
Load_task
Set to run after Transform_source_a, this task calls the second procedure to perform an insertion based on the predecessor’s return value.
|
1 2 3 4 5 |
CREATE OR REPLACE TASK load_task WAREHOUSE = 'COMPUTE_WH' AFTER transform_source_a AS CALL insert_based_on_predecessor_return(); |
Following the execution of transform_source_a ,load_task is automatically triggered, successfully retrieving the table name dict_table from Task A’s return value. By following this method we can effectively transfer values between tasks. The functions can also be used in the task definition instead of a stored procedure. We have already seen this in the branching task section.
The above example illustrates retrieving values from an immediate predecessor task. For situations where we need to obtain values from any ancestor, not just the directly preceding one, we can still utilise these functions by specifying the name of the specific ancestor task as a parameter in the function call.
|
1 |
SYSTEM$GET_PREDECESSOR_RETURN_VALUE('<task_name>') |
Restartability
An important feature in data orchestration is to have the option to restart a task from the point of failure.
You don’t want to execute the full data pipeline from the start as this would be super wasteful.
In Snowflake Tasks you can use RETRY LAST. This will resume the data pipeline from the point of failure
|
1 |
EXECUTE TASK <name> RETRY LAST |
Let’s assume we have the following pipeline
TaskA > TaskB > TaskC
TaskB fails. If you don’t do anything the pipeline will restart from TaskA based on its schedule. This is the default behaviour. Instead you can use RETRY LAST to resume from where the task failed once you have addressed the underlying issue. In our example the DAG would restart from TaskB.
There is one very important caveat. The next bit is very important to understand.
RETRY LAST does not work if you change any tasks in your DAG. This can be an issue if you have transformation logic inside your Snowflake tasks.
Let’s assume TaskB inserts data into TableB using an INSERT INTO… SQL / DML statement inside the task. A column is dropped from this table and as a result TaskB fails. If you modify TaskB by changing your INSERT statement you will not be able to use RETRY LAST but start your data pipeline from the root task, which is not ideal to say the least.
What to do?
As a general rule and best practice you should separate task logic from business / transformation logic. If you move your INSERT statement to a stored procedure you will not have this issue. For our scenario we can simply change the INSERT statement inside the stored procedure and then resume the data pipeline using RETRY LAST.
Separate the task logic from business and transformation logic. The latter should go into stored procedures.
Task security
Snowflake manages task security through specific privileges assigned to roles. These privileges define what roles can create, run, and manage tasks. Here’s a closer look at these important areas:
- Privileges for Creating Tasks:
- Privileges for Owning Tasks:
- Managing Task Operations:
- Running SQL Statements:
Troubleshooting tasks
Monitoring
The TASK_HISTORY table function can be used to monitor and troubleshoot tasks.
The TASK_HISTORY function is a direct window into the past and current execution details of Snowflake tasks. It allows users to query the history of task executions within a specified date range, offering insights into task outcomes, execution times, error messages, and failure points.
This function can return all executions run in the past 7 days or the next scheduled execution within the next 8 days.
Example Query Using TASK_HISTORY:
|
1 2 3 4 5 |
SELECT * FROM TABLE(INFORMATION_SCHEMA.TASK_HISTORY( SCHEDULED_TIME_RANGE_START => DATEADD('hour', -1, CURRENT_TIMESTAMP()), SCHEDULED_TIME_RANGE_END => CURRENT_TIMESTAMP(), TASK_NAME => 'specific_task_name')); |
This query helps you monitor the recent activities of a specific task, giving you information on its last hour’s executions.
Enhanced Visibility with TASK_HISTORY View
While the TASK_HISTORY function provides task monitoring for the last 7 days, the TASK_HISTORY view within Snowflake’s Account Usage schema extends the functionality of the table function by allowing access to task execution data for up to the last 365 days. This view is particularly useful for performing long-term trend analysis and auditing of task executions.
Example Query for TASK_HISTORY View:
|
1 2 3 4 5 |
SELECT query_text, state, error_code, error_message, scheduled_time, completed_time FROM snowflake.account_usage.task_history WHERE task_name = 'specific_task_name' ORDER BY completed_time DESC LIMIT 10; |
This query enables you to retrieve detailed information on the ten most recent runs of a specific task, helping you track its success rate and troubleshoot recurring issues over an extended period.
Task Graph Monitoring: Exploring COMPLETE_TASK_GRAPHS, CURRENT_TASK_GRAPHS, and TASK_DEPENDENTS
Task graph monitoring in Snowflake allows administrators to visualise and manage dependencies within task executions. This aspect is crucial for understanding complex workflows and optimising task scheduling and execution.
COMPLETE_TASK_GRAPHS Function
The COMPLETE_TASK_GRAPHS function returns the status of completed graph runs, whether successful, failed, or cancelled, within the past 60 minutes. It is useful for a detailed review of recent task graph completions.
Example Query for COMPLETE_TASK_GRAPHS:
|
1 2 3 |
SELECT * FROM TABLE(INFORMATION_SCHEMA.COMPLETE_TASK_GRAPHS()) ORDER BY completed_time; |
Retrieve the 1000 most recent completed graph executions in the account. Note that the maximum number of rows returned by the function is limited to 1000 by default. To change the number of rows returned, modify the RESULT_LIMIT argument value.
CURRENT_TASK_GRAPHS Function
In contrast, the CURRENT_TASK_GRAPHS function focuses on the status of graphs that are either currently executing or scheduled to run shortly. This function is especially useful for real-time monitoring of ongoing or upcoming tasks.
Example Query for CURRENT_TASK_GRAPHS:
|
1 2 3 |
SELECT * FROM TABLE(INFORMATION_SCHEMA.CURRENT_TASK_GRAPHS()) ORDER BY scheduled_time; |
Retrieve the 1000 most recent graph runs (still running, or scheduled in the future) in the account. Note that the maximum number of rows returned by the function is limited to 1000 by default. To change the number of rows returned, modify the RESULT_LIMIT argument value.
TASK_DEPENDENTS Function
Lastly, the TASK_DEPENDENTS function provides a list of child tasks for a specified root task in a task graph, essential for understanding task dependencies.
Example Query for TASK_DEPENDENTS:
|
1 2 |
SELECT * FROM TABLE(INFORMATION_SCHEMA.TASK_DEPENDENTS(task_name => 'mydb.myschema.mytask', recursive => false)); |
This query retrieves the direct child tasks for a specified root task, offering clarity on the task’s influence within a larger workflow.
Data pipeline versions with TASK_VERSIONS
If you are interested in a history of the different versions of your data pipeline you can look at the TASK_VERSIONS view. The returned rows indicate the tasks that comprised a task graph and their properties at a given time.
Here are some use cases for this view
- Change Tracking: By querying this view, administrators can see a complete history of how a task has changed over time, including what changes were made and when.
- Debugging: If a task starts behaving unexpectedly, reviewing its history can help determine if a recent change may have caused the issue.
- Compliance and Auditing: For environments where changes need to be monitored for compliance reasons, TASK_VERSIONS provides a clear audit trail.
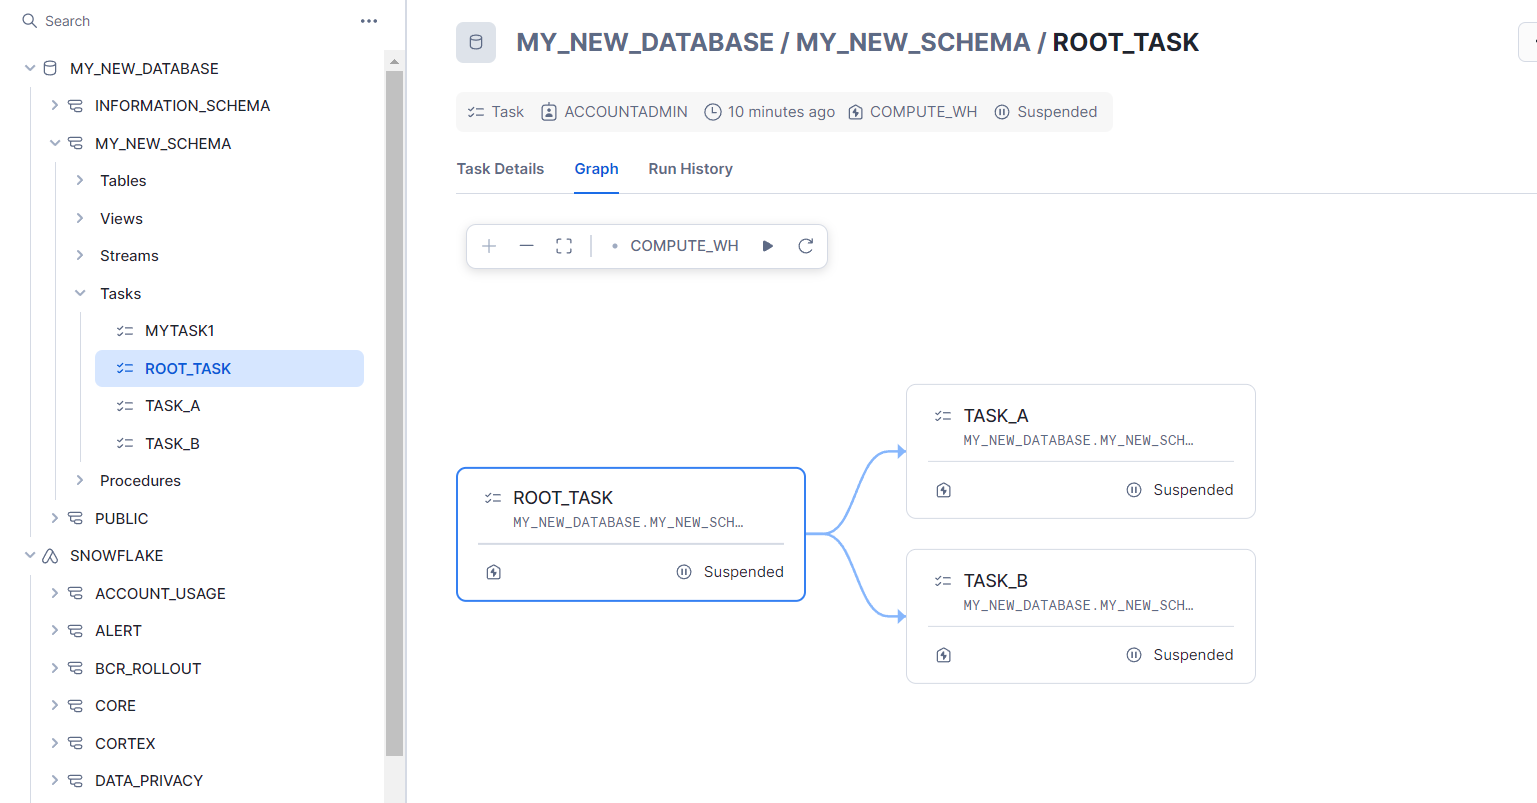
Visualise UI
You can visualise tasks and task graphs in Snowflake through Snowsight. Users can view and manage the relationships and statuses of tasks within a task hierarchy. Users can examine a task graph to see the root task and its dependent tasks clearly laid out in a visual format.
By selecting any task within the graph, users can access detailed information such as the task’s predecessors, the Snowflake warehouse running the task, and the owning role. This helps in understanding the execution flow and troubleshooting issues related to task dependencies.
To view a task graph in Snowsight for a specific database schema, the process involves a few steps:
- Log into Snowsight and navigate to the ‘Data » Databases’ section.
- Locate the database and schema of interest using the object explorer.
- Click on ‘Tasks’ within the selected schema to see a list of associated tasks.
- Select a task to open its details, which include ‘Graph’ and ‘Run History’ tabs.
- Click on the ‘Graph’ tab to display the task graph, which illustrates a hierarchy of tasks.
- Clicking on any task in the graph will show more details about that specific task.
Error handling
Retrying failed tasks
Automatic retries can make your data pipeline more resilient to transient issues such as temporary network failures, brief service disruptions, or resource constraints. By automatically retrying, the data pipeline can recover from these intermittent problems without human intervention.
By default when a task fails, Snowflake does not retry it. However, you can change the default behaviour and specify the number of times Snowflake retries the task by changing the parameter TASK_AUTO_RETRY_ATTEMPTS.
You don’t have the option to specify a retry condition or a retry interval. This is useful for scenarios where you know that retrying will not help, e.g. think of a scenario where you fail a task due to duplicate data. Retrying will not help unless someone fixes the data quality issue.
You define the number of retries at the root task.
Notifications
If a task in a DAG fails you can send out an email notification to the support / operations team. This is useful to be alerted of data pipeline failures.
Snowflake Task error integration is implemented using notification integration objects. These provide an interface between Snowflake and various cloud message queuing services.
What are Snowflake integration objects?
Snowflake integration objects are configurations within the Snowflake data platform that allow you to set up and manage secure integrations with external systems, services, or applications. These objects streamline the process of sharing data or connecting different technologies with Snowflake, enhancing the platform’s capabilities in terms of data exchange, security, and automation.
Storage Integrations: These are used for configuring secure access to external cloud storage locations, such as Amazon S3, Google Cloud Storage, or Microsoft Azure Blob Storage.
Notification Integrations: These integrations are used to set up connections with external notification services.
External Function Integrations: For situations where Snowflake needs to interact with external functions hosted on cloud services like AWS Lambda or Azure Functions, external function integrations provide the necessary configuration.
A task notification is a global setting for the DAG as a whole. You set up the notification at the root task level. This will make sure that the notification is triggered for any failing tasks in your data pipeline. You can’t set up notifications on a task by task basis.
You specify the notification integration when creating the root task
ERROR_INTEGRATION = my_email_notification
Failure handling
While Snowflake Tasks can notify you of a failed task it does not have a generic failure handling process such as on_failure_callback in Airflow. The on_failure_callback is an argument on the DAG, which is executed whenever a data pipeline fails. The function to execute is something you will need to implement yourself.
Airflow example
|
1 2 3 4 5 6 7 8 |
def handle_error(): print("ERROR!") dag = DAG( dag_id="data_pipe", on_failure_callback=handle_error, ... ) |
When a task in the DAG fails the handle_error function is called, which can be used to handle any failure handling routine such as writing to logs or sending notifications.
On Snowflake you can leverage the Finalizer task to achieve something similar. The implementation is more verbose but you can achieve the same result.
The Finalizer task is a task that gets called whenever a DAG finishes including failed DAG runs. For failure handling you can check if your Snowflake DAG failed and based on this check implement an error handling process.
Here is some sample code to achieve this. The code checks CURRENT_TASK_GRAPHS function for errors and then based on that check implements some actions.
|
1 2 3 4 5 6 7 8 9 10 11 12 13 14 15 16 17 18 19 20 21 22 23 24 25 26 27 28 |
CREATE OR REPLACE PROCEDURE check_error_and_suspend_task() RETURNS STRING LANGUAGE JAVASCRIPT execute as caller AS $ var query = ` SELECT FIRST_ERROR_CODE FROM TABLE(MY_NEW_DATABASE.INFORMATION_SCHEMA.CURRENT_TASK_GRAPHS( RESULT_LIMIT => 1, ROOT_TASK_NAME => 'root_task')) `; var result = snowflake.execute({sqlText: query}); result.next(); // Move to the first row in the result set var first_error_code = result.getColumnValue(1); // Check if there is an error code (not null and not empty) if (first_error_code !== null && first_error_code !== '') { // error detected . do something } else { // no error detected. Do something else } $; |
Remember to call this procedure from the Finalizer task.
Snowflake Tasks scheduling
In Snowflake, scheduling tasks plays a crucial role in automating data workflows, enabling SQL tasks to run automatically at predefined intervals or specific times. Let’s explore the different ways this can be achieved in Snowflake tasks.
Cron-based scheduling
Cron-based scheduling in Snowflake provides the flexibility to set up precise and complex scheduling patterns for tasks. It enables specifying exact times and conditions for task execution, such as at specific hours on certain days of the week or month.
Imagine your organisation requires a financial report to be generated at 6:00 AM on the first day of every month, summarising the previous month’s transactions. This task demands precision in scheduling that interval-based scheduling can’t provide.
|
1 2 3 4 5 |
CREATE OR REPLACE TASK monthly_financial_report_generation WAREHOUSE = 'reporting_warehouse' SCHEDULE = 'USING CRON 0 6 1 * * UTC' AS INSERT INTO monthly_financial_reports SELECT * FROM transaction_summary WHERE .......; |
This task uses a cron expression (0 6 1 * *) to specify that the task should run at 6:00 AM UTC on the first day of every month. The cron schedule ensures the financial report is prepared on time, providing valuable insights into the previous month’s transactions.
Cron expressions in Snowflake follow the standard format, allowing you to specify execution times down to the minute, and accommodate complex scheduling needs such as specific days of the week or month. This capability is particularly useful for tasks that don’t fit a simple interval pattern, offering precise control over when tasks are executed.
Frequency based scheduling
Cron expressions, while powerful and versatile for defining complex schedules, fall short when it comes to certain frequency-based intervals. This is due to Cron’s design, which matches patterns against the current time to trigger executions, making it difficult to specify schedules that don’t align neatly with calendar intervals.
For example, attempting to schedule a task to run every three days using cron expressions can lead to inconsistencies, especially around the end of the month. A cron pattern set to trigger a task on the first, fourth, seventh day, and so on, of each month will inadvertently schedule back-to-back runs at the transition from the 31st of one month to the 1st of the next, contradicting the intended three-day interval.
For scenarios requiring frequency-based scheduling, such as executing a task every three days in Snowflake, leveraging interval-based scheduling discussed earlier directly can offer a straightforward solution.So, to set up a task in Snowflake that runs every three days, you specify 4320 MINUTE as the schedule interval.
|
1 2 3 4 5 |
CREATE OR REPLACE TASK my_three_day_task WAREHOUSE = 'my_warehouse' SCHEDULE = '4320 MINUTE' AS INSERT INTO my_target_table SELECT * FROM my_source_table; |
Event based scheduling
Event-based scheduling is a method in task automation where the execution of tasks or workflows is triggered by specific events rather than occurring at preset times. This type of scheduling is often used in environments where actions need to respond dynamically to changes or specific conditions in a system, such as the arrival of new data files, completion of other tasks, or external signals from other systems.
There are two approaches for event based scheduling in Snowflake.
Snowflake Tasks and Streams
You can combine Snowflake Tasks with Snowflake Streams for event based scheduling. The Task is triggered once the Stream has new data by specifying the WHEN SYSTEM$STREAM_HAS_DATA condition. The task checks every minute for new data.
|
1 2 3 4 5 6 7 |
CREATE OR REPLACE TASK mytask1 WAREHOUSE = 'COMPUTE_WH' SCHEDULE = '1 minute' WHEN SYSTEM$STREAM_HAS_DATA('MYSTREAM') AS INSERT INTO fact_table (id, dict_id, value) SELECT id, 100, 100 FROM mystream WHERE METADATA$ACTION = 'INSERT'; |
Scheduling tasks using Snowflake Python API
Snowflake has introduced a new preview feature in its Tasks Python API, similar to what you might find in Apache Airflow.Using this new feature, you can directly specify the scheduling interval of a task using timedelta, a concept Python developers are likely already comfortable with. The timedelta object allows for specifying intervals in days, hours, minutes, and even seconds, providing a high degree of flexibility.
Imagine you want to schedule a task to run every three days within Snowflake, using the Python API with the new preview feature. Here’s how you might do it:
|
1 2 3 4 |
tasks = root.databases["SAMPLE_DATABASE"].schemas["SAMPLE_SCHEMA"].tasks tasks['my_task_schedule'].create_or_update( Task(name='my_task_schedule', definition='INSERT INTO fact_table (id, dict_id, value) VALUES (1, 1, 1);', schedule=timedelta(days=3)) ) |
In this example, timedelta(days=3) is used to define the schedule, indicating that the task should execute every three days. This method is intuitive for Python users and provides a straightforward way to manage scheduling directly from your Python code.
When leveraging Snowflake’s Python API for task scheduling with timedelta, users must adhere to specific limitations. The interval specified must be in whole minutes and fall within a permissible range: more than 1 minute and less than 11520 minutes (or 8 days). This mirrors the interval-based scheduling restrictions found in Snowflake’s SQL approach, ensuring consistency but also imposing a constraint on the maximum duration between task executions. Attempting to set a timedelta outside this range, such as 14400 minutes (10 days), results in a ValueError, highlighting the need for intervals to be carefully considered within the supported bounds.
For those looking to schedule tasks on a more extended basis, such as monthly, the inclination might be to use relativedelta for its support of specifying intervals in months or years. However, Snowflake’s Python API currently only accepts cron expressions and timedelta objects for defining task schedules. This limitation means that while relativedelta offers an intuitive solution for extended scheduling intervals, it cannot be used within this context, directing users towards cron expressions for more complex scheduling needs beyond the 8-day limit.
Start and end dates in Snowflake task scheduling
In Snowflake, scheduling tasks lacks the flexibility found in platforms like Apache Airflow, primarily due to the absence of start and end date parameters. This limitation means that users cannot specify the exact data ranges within which tasks should be active, making it challenging to control the lifecycle of scheduled activities with precision. In contrast, Airflow allows for detailed scheduling, including frequency and specific time frames, providing a more granular control over when and how often tasks run.
One approach to mitigate the scheduling limitations in Snowflake, is by embedding internal logic within the tasks to enforce these date intervals. By doing so, tasks can be made to follow predefined operational windows, even in the absence of explicit support from Snowflake’s scheduling features. Here’s an example illustrating this workaround:
The following SQL script creates a stored procedure named insert_and_check_date_task that incorporates logic to check the current date against a specified end date. If the current date surpasses the specified date, the procedure automatically suspends the associated task, effectively enforcing an end date for task execution.
|
1 2 3 4 5 6 7 8 9 10 11 12 13 14 15 16 17 18 19 20 21 |
CREATE OR REPLACE PROCEDURE insert_and_check_date_task() RETURNS STRING LANGUAGE SQL AS $ DECLARE specific_date DATE := '2024-03-01'; -- Replace with your specific date current_date DATE := CURRENT_DATE(); BEGIN -- Insert into dict table INSERT INTO dict(id, value) VALUES (1, 'Random Data'); -- Check if current date is greater than the specific date IF (current_date > specific_date) THEN EXECUTE IMMEDIATE 'ALTER TASK task_a SUSPEND'; ELSE RETURN 'CONTINUE'; END IF; END; $; |
Subsequently, a task named task_a is created, scheduled to run every minute, and designed to call the insert_and_check_date_task stored procedure:
|
1 2 3 4 5 |
CREATE OR REPLACE TASK task_a WAREHOUSE = COMPUTE_WH SCHEDULE = '1 MINUTE' AS CALL insert_and_check_date_task(); |
This method allows the task to self-regulate its execution period, suspending itself automatically once the current date exceeds the specified end date.
Snowflake Tasks API
With the Snowflake Tasks API you can define data pipelines and their dependencies as code. This is similar to enterprise orchestration tools such as Airflow.
Here is an example. Similar to Airflow you define the DAG and schedule. Next you define the Tasks and the Task jobs. In this case we have a Task that executes an SQL DML statement and one that runs a Python function. Finally you define the dependencies between the two Tasks
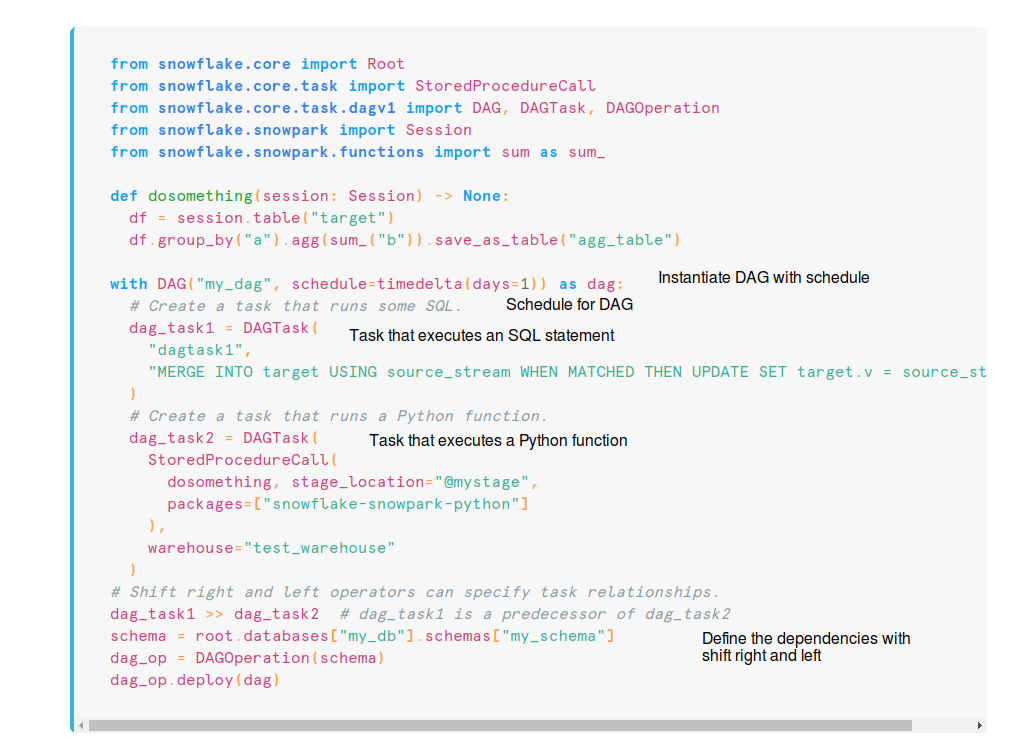
Apart from defining a data pipeline as code and scheduling a data pipeline, here are some of the other features of using the Snowflake Task API programmatically:
- Create, list, and update tasks
- Task operations such as execute or suspend a task graph (data pipeline)
- Sharing data between tasks using functions SYSTEM$SET_RETURN_VALUE and SYSTEM$GET_PREDECESSOR_RETURN_VALUE
Note
The Python API to manage Snowflake tasks is currently in public preview (April 2024).
When to use Snowflake Tasks and when to use Airflow?
Snowflake Tasks offer a comprehensive set of features for enterprise-level data orchestration.
When is it a viable alternative to tools like Airflow?
Let’s briefly recap how Snowflake Tasks stack up against an enterprise workflow tool such as Airflow.
|
Snowflake Tasks |
Enterprise data orchestration tool, e.g. Airflow | |
|---|---|---|
|
Serverless |
+ |
– Install and administration. Managed offerings from cloud vendors exist |
|
Number of tasks per DAG |
1,000 max. Chaining DAGs is an option |
No theoretical limit. Depends on hardware sizing |
|
Dependencies | ||
|
Linear dependencies |
+ |
+ |
|
Fan-in dependencies |
+ |
+ |
|
Fan-out dependencies |
+ |
+ |
|
Branching / Trigger Rules |
0 |
+ |
|
Conditional tasks | ||
|
Conditions inside a task |
+ |
+ |
|
Making tasks conditional |
+ |
+ |
|
Sharing data between tasks |
+ |
+ |
|
Scheduling | ||
|
Interval based scheduling |
+ * no start or end date |
+ |
|
Cron based scheduling |
+ |
+ |
|
Visualise DAG via GUI |
+ |
+ |
|
API for programmatic access |
+ (public preview April 2024) |
+ |
|
DAG as code |
+ (public preview April 2024) |
+ |
|
Sensors / Events |
+ |
+ |
|
Notifications / error handling |
+ |
+ |
Feature comparison of Snowflake Tasks versus enterprise data orchestration
The biggest advantage of Snowflake Tasks over third party orchestration tools is that it ships directly with Snowflake and is completely serverless. It eliminates the headaches around installing, sizing, managing, administering, and running a separate data orchestration tool, which can be a non-trivial task.
As we have seen there are some minor limitations of Snowflake Tasks for some edge cases such as branching and trigger rules.
For pure Snowflake implementations that only make limited calls to external systems you don’t need to look elsewhere for robust data orchestration and data pipeline workflows. Unless your data pipeline is large (> 1,000 tasks) our recommendation is to use Snowflake Tasks if your main concern is to run Snowflake data pipelines with some limited calls to external APIs and apps.
What about a scenario where you already have an enterprise data orchestration tool? Should you use it to orchestrate Snowflake data pipelines?
The answer depends on the scenario.
- How mature is your data orchestration tool implementation, e.g. do you have observability, metrics, reporting built into your data orchestration tool?
- Is the data orchestration tool strategically used across the organisation?
- Is your Snowflake data pipeline heavily integrated with other upstream and downstream DAGs and workflows?
If the answer is yes to these questions then you should use your existing tool. A hybrid scenario might also be a good fit where you use the enterprise workflow tool to call Snowflake Tasks via the Python API and make good use of Snowflake’s Serverless data pipeline architecture.
Can you replace your enterprise data orchestration tool with Snowflake Tasks?
In theory this is possible. You can use external functions and external network access to connect to other systems, external applications, and APIs. However, as outlined there are limitations in the size of the data pipeline DAGs (1,000 tasks max) and the number of upstream and downstream tasks. These limits should be sufficient for most organisations but we have seen data pipelines with 20K nodes and 30K edges for a data warehouse implementation only. This is not an uncommon scenario. For complex enterprise data orchestration requirements a dedicated enterprise data orchestration tool is a safer bet.
Uli Bethke
Uli has been rocking the data world since 2001. As the Co-founder of Sonra, the data liberation company, he’s on a mission to set data free. Uli doesn’t just talk the talk—he writes the books, leads the communities, and takes the stage as a conference speaker.
Any questions or comments for Uli? Connect with him on LinkedIn.
Follow Uli Bethke: