Masking Sabre XML and converting to a database (Snowflake)

In this post we will show you how to use Flexter, Sonra’s data warehouse automation solution for complex XML and JSON documents. We will use Flexter in combination with Paranoid, Sonra’s open source tool for masking and obfuscating XML and JSON documents. We will first mask a Sabre XML document with Paranoid and then convert the data to Snowflake, a popular data warehouse platform.
Flexter is a Spark application written in Scala. For this blog post we will use the managed cloud version of Flexter. Flexter SaaS is built on top of container technology. You can make calls to its endpoints via a RESTful API. It currently supports Snowflake, S3, and Redshift as sinks. We will add onto this list over time and will also add calls to APIs to transform JSON and XML on the fly. This will let you generate a relational data model from any API in seconds.
Use Flexter to turn XML and JSON into Valuable Insights
- 100% Automation
- 0% Coding
Paranoid
Paranoid is data masking and obfuscation command line tool for XML and JSON file formats. Paranoid is best used in combination with Flexter.
Sabre
Sabre is one of the largest software companies. They started in 1960 as a joint initiative between American Airlines and IBM to create the first computerized airline reservation system.
Snowflake
Snowflake is a data warehouse platform designed and built from scratch for the cloud. It follows a pay per use model. You are billed by the second and can scale the platform elastically based on workloads and number of concurrent users.
We have written extensively about Snowflake in other parts of the blog:
- e-book: A comparison of cloud data warehouse platforms
- The evolution of cloud data warehousing
- Comparing Snowflake cloud data warehouse to AWS Athena query service.
We provide Snowflake expert services to get you started on the platform.
Masking Sabre XML
In a first step we install Paranoid. by running the pip command
|
1 |
pip install PARANOID |

Next we can run paranoid and mask our data by running the command
|
1 |
paranoid.py -i <file path> -o <output file path> |

This will make all of the values of XML document. Optionally Paranoid has the feature to mask individual elements inside an XML document.
Let’s have a look at our file after making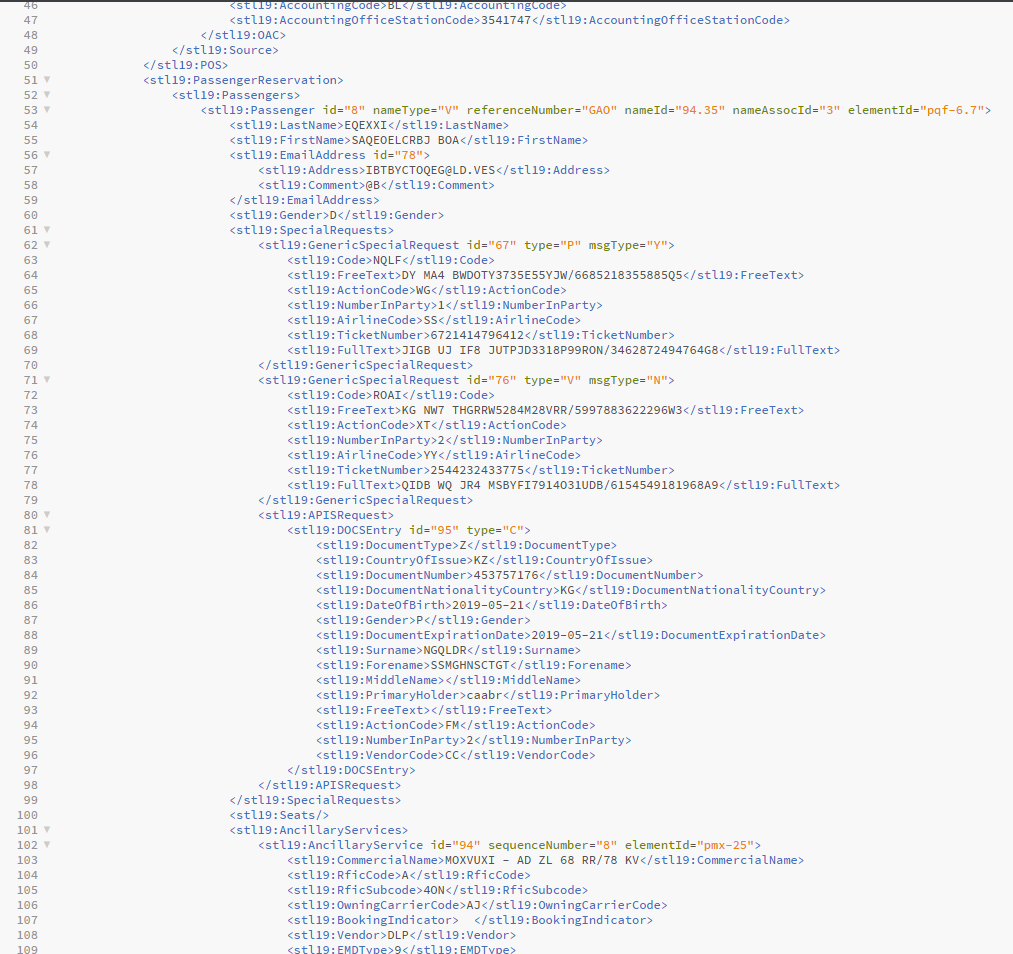
You can download before and after files here.
Processing masked XML with Flexter API
Flexter exposes its functionality through a RESTful API. Converting XML/JSON to Snowflake can be done in a few simple steps. For more details please refer to the documentation.
Step 1 – Authenticate
Step 2 – Create a File Source
Step 3 – Generate schema (target data model)
Step 4 – Define your sink, e.g. Snowflake
Step 5 – Process your XML/JSON data
Now we can go through steps and process our data.
Step 1 – Authenticate
To get an access_token you need to make a call to /oauth/token with Authorization header and 3 form parameters:
- username=YOUR_EMAIL
- password=YOUR_PASSWORD
- grant_type=password
|
1 2 3 4 |
curl --location --request POST "https://api.sonra.io/oauth/token" \ --header "Content-Type: application/x-www-form-urlencoded" \ --header "Authorization: Basic NmdORDZ0MnRwMldmazVzSk5BWWZxdVdRZXRhdWtoYWI6ZzlROFdRYm5Ic3BWUVdCYzVtZ1ZHQ0JYWjhRS1c1dUg=" \ --data "username=XXXXXXXXX&password=XXXXXXXXX&grant_type=password" |
Example of output
|
1 2 3 4 5 6 7 8 |
{ "access_token": "eyJhbG........", "token_type": "bearer", "refresh_token": "..........", "expires_in": 43199, "scope": "read write", "jti": "9f75f5ad-ba38-4baf-843a-849918427954" } |
Step 2 – Create a source
A source is the location and type of your source documents. Sources are referenced in the next step when we create the target data model.
Three different types of documents are supported.
- XML
- XSD
- JSON
The type of source determines which algorithm will be used to process the data.
|
1 2 3 4 5 |
curl --location --request POST "https://api.sonra.io/source/create/file" \ --header "Authorization: Bearer <access_token>" \ --form "type=xml" \ --form "name=sabre" \ --form "file=@<file path>" |
Example of output
|
1 2 3 4 5 |
{ "status": "ok", "file": "sabre", "type": "xml" } |
Step 3 – Generating target data model
In this step we create our Schema (target data model).
You can generate a Schema based on :
- XML Source entry ( Source with type xml )
- XML Source entry + XSD Source entry ( Sources with types xml and xsd accordingly )
- JSON Source files ( Source with type json )
|
1 2 3 4 5 6 7 |
curl --location --request POST "https://api.sonra.io/schema/create" \ --header "Authorization: Bearer <access_token>" \ --header "Content-Type: application/json" \ --data "{ \"name\": \"sabre_schema\", \"xml\": \"sabre\" }" |
Example of output
|
1 2 3 4 |
{ "status": "ok", "uuid": "sabre_schema" } |
Example of ER Diagram (Target Data Model)
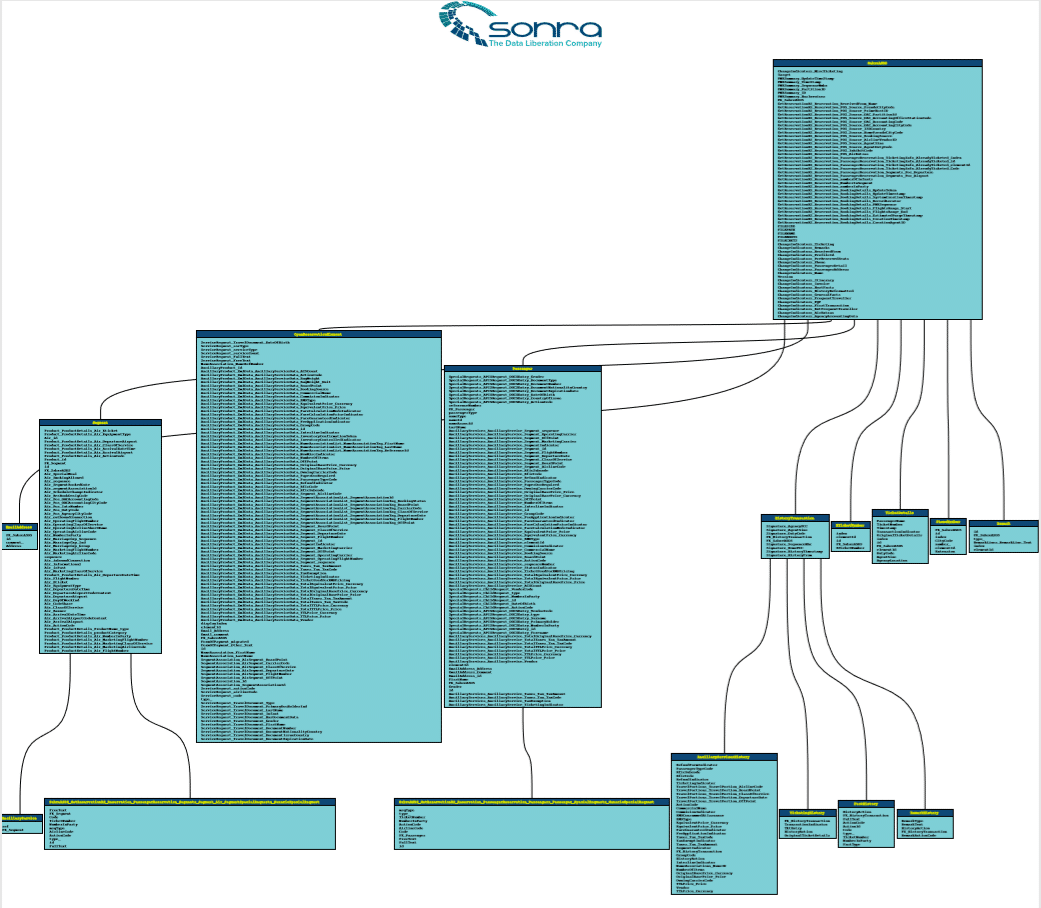
You can download ER Diagram of Sabre XML file here.
Step 4 – Creating a sink
A sink is a connection to a target data store. In this step we create a connection to Snowflake.
Use this endpoint to create a Snowflake Sink, if you want to save the data processing output to Snowflake database.
To create a Snowflake sink provide the following mandatory parameters:
- name – is a unique name of Sink, which you will use in other calls as a reference to it.
- path – a path to snowflake, should be in format snowflake://account_name.region.snowflakecomputing.com (for example snowflake://qwerty123.eu-central-1.snowflakecomputing.com)
- username – username (user must have WRITE access for selected database/schema)
- password – user’s password
- db – name of database
- schema – name of database’s schema
- warehouse – a name of a virtual warehouse (user must have OPERATE/USAGE privileges)
|
1 2 3 4 5 6 7 8 9 10 11 12 |
curl --location --request POST "https://api.sonra.io/sink/create/snowflake" \ --header "Authorization: Bearer <access_token>" \ --header "Content-Type: application/json" \ --data "{ \"name\": \"sabre\", \"path\": \"snowflake://xxxxxx.eu-central-1.snowflakecomputing.com\", \"username\": \"username\", \"password\": \"password\", \"db\": \"DEFAULT_DB\", \"schema\": \"PUBLIC\", \"warehouse\": \"DEFAULT_WH\" }" |
Example of output
|
1 2 3 4 5 |
{ "status": "ok", "file": "sabre", "type": "SNOWFLAKE" } |
Step 5 – Processing Sabre XML data
In this step we will process our data.
This endpoint is used to create a Data Processing entry. It requires 2 mandatory parameters and 1 optional parameter:
- Parameter schema is a reference to a Schema entry
- Parameter source is a reference to an XML Source
- (Optional) Parameter sink is a reference to a Sink, if you want the output of processing to be saved somewhere, you should specify a Sink reference, otherwise the output will be saved in the Sonra cloud for download
|
1 2 3 4 5 6 7 8 |
curl --location --request POST "https://api.sonra.io/data/process" \ --header "Authorization: Bearer <access_token>" \ --header "Content-Type: application/json" \ --data "{ \"schema\": \"sabre_schema\", \"source\": \"sabre\", \"sink\": \"sabre\" }" |
Example of output
|
1 2 3 4 |
{ "status": "OK", "uuid": "data-2400eb32-0a80-496d-a203-7fad46eca4d3" } |
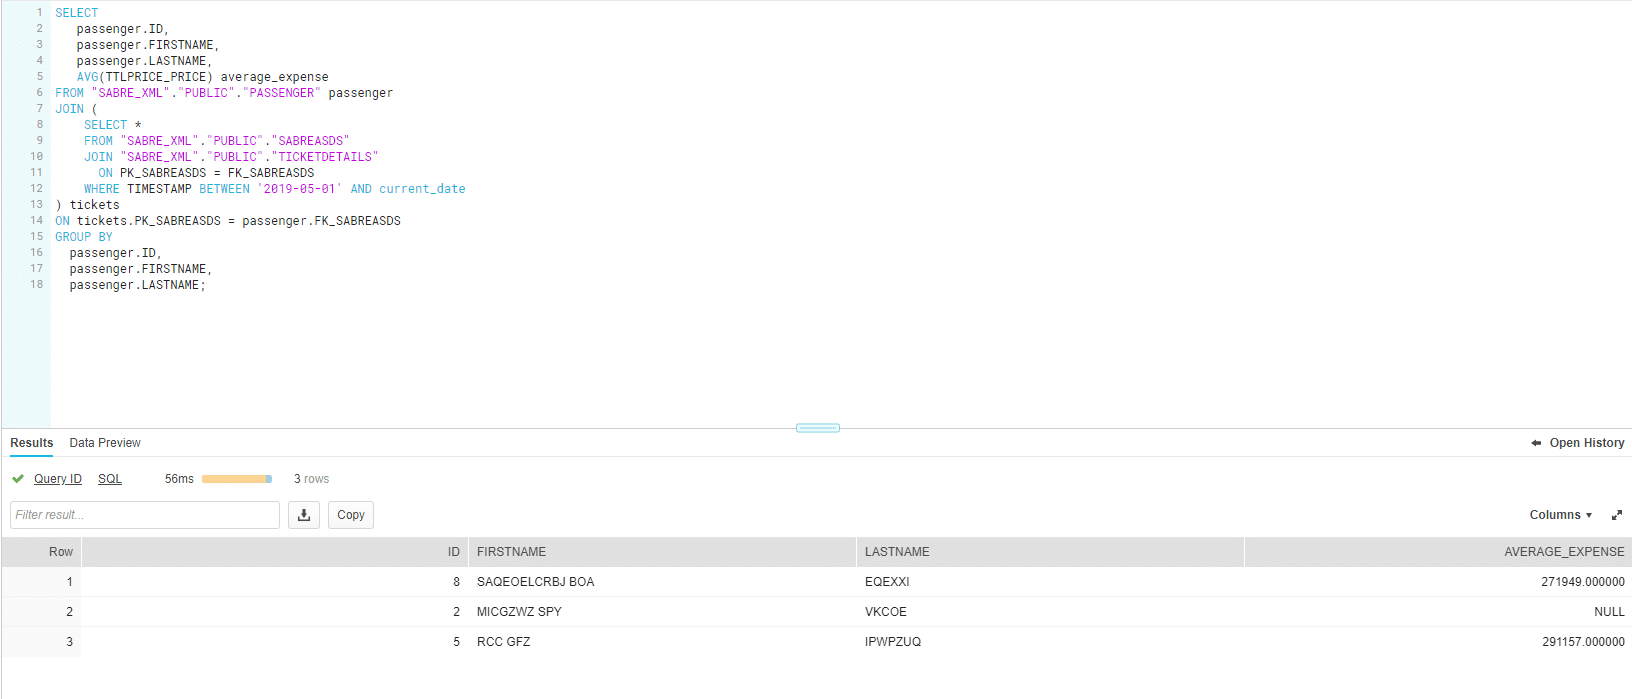
Next we will run an SQL Query where we will select the average expenses for each passenger who got a ticket in a specific time frame.
|
1 2 3 4 5 6 7 8 9 10 11 12 13 14 15 16 17 18 |
SELECT passenger.ID, passenger.FIRSTNAME, passenger.LASTNAME, AVG(TTLPRICE_PRICE) average_expense FROM "SABRE_XML"."PUBLIC"."PASSENGER" passenger JOIN ( SELECT * FROM "SABRE_XML"."PUBLIC"."SABREASDS" JOIN "SABRE_XML"."PUBLIC"."TICKETDETAILS" ON PK_SABREASDS = FK_SABREASDS WHERE TIMESTAMP BETWEEN '2019-05-01' AND current_date ) tickets ON tickets.PK_SABREASDS = passenger.FK_SABREASDS GROUP BY passenger.ID, passenger.FIRSTNAME, passenger.LASTNAME; |
Conclusion
We have masked XML data and processed it with ease. We did in a matter of minutes what would normally take a few days.
Ralph Kimball the father of dimensional modelling and data warehousing already knew:
“Because of such inherent complexity, never plan on writing your own XML processing interface to parse XML documents.
The structure of an XML document is quite involved, and the construction of an XML parser is a project in itself—not to be attempted by the data warehouse team.”
Find answers to FAQs on our website.
Our enterprise edition can be installed on a single node or for very large volumes of XML on a cluster of servers.
If you have any questions please refer to the Flexter FAQ section. You can also request a demo of Flexter or reach out to us directly.
Enjoyed this post? Have a look at the other posts on our blog.
Contact us for Snowflake professional services.
We created the content in partnership with Snowflake.
In this video, we use Flexter to automatically convert very complex FpML XML to Snowflake tables. Book a demo to see the power of Flexter in action!