Converting Complex XML to CSV: A Practical Guide
Have you ever tried to process data in XML?
Did you have to load its values into a relational database or simply convert the XML to plain CSV?
What if I told you that there is a simple way of processing complex XMLs — including solving some misconceptions around the specifics of XML?
I’m here to help. Keep reading to find out how you can practically convert complex XML to CSV better and more efficiently.

Use Flexter to turn XML and JSON into Valuable Insights
- 100% Automation
- 0% Coding
XML to CSV converter myth
Let’s first cover what XML is actually used for.
You might think, “This is just another structured text file, like CSV so it should be straightforward… Ultimately, the difference is you have the values inside their own tag delimiters rather than just commas.”
Right?
Not really, I’m afraid.
XML can indeed accommodate flat data structures. However, that leaves out the remaining 99.5% of cases where XML is utilised because we need to represent a complex structure that CSV can’t handle.
Unfortunately, in the majority of cases you will probably deal with complex scenarios that involve hierarchical data structures and multiple one-to-many relationships all being stored in a single XML file.
Think of it as a relational database that has been encapsulated into a single text file.
Hypothetically, if you have two <supplier> child entries from and at the same time, 3 independent <customer< span=””>> children of the same root — how would you flatten this out?</customer<>
|
1 2 3 4 5 6 7 8 9 |
<!--suppliers--> sA sB <!--/suppliers--> <!-- customers--> cK cL cM <!--/customers--> |
Those data points are different. They are independent XPaths and represent one-to-many child relationships. Extracting them together would result in a cartesian product:
| company | vat_id | supplier | customer |
|---|---|---|---|
| ACME | EU123 | sA | cK |
| ACME | EU123 | sA | cL |
| ACME | EU123 | sA | cM |
| ACME | EU123 | sB | cK |
| ACME | EU123 | sB | cL |
| ACME | EU123 | sB | cM |
Notice that the company’s attributes are repeated, which also creates redundant entries. These are just two of the limitations of flattening XML to CSV.
You’re likely now thinking: “OK. But what now? Surely there must be a better way to dump all of this into a basic format like CSV.”
You’re dead right. The answer is quite simple – rather than trying to squeeze everything in a single file, instead normalize and split it into one file per independent “branch.”
A loosely defined branch could be any close combination of values and attributes that are all linked together with a strict 1:1 relationship.
This process is common in the database world and is called normalisation. In this particular example, it would produce a simple tree of three files:
- The company would act as a root or header file, storing one record per each processed XML. It would be accompanied with two other files….
- Supplier storing two records and…
- Customer with three records, pretty much reflecting the relationships from the origin XML file.
Here’s a context-aware lead-in, perfect for this post’s flow:
🎥 Convert Complex XML to CSV with Flexter – No Coding Needed
Struggling to convert XML files with nested structures into clean CSV or TSV files? Before we jump into the enterprise version of Flexter, here’s a quick demo of Flexter Online – the no-code version that lets you convert XML to CSV in seconds.
✔️ Normalises complex XML structures
✔️ Splits data into logical files (no more cartesian products!)
✔️ Ideal for quick conversions and testing
We have also compiled a comparison guide on XML to CSV converters that would be helpful for you.
XML processing with Flexter in action
Now it’s time to show you the right way to convert XML files to CSV with a practical example. We will work with the enterprise version of Flexter, demonstrating its features and showing you some of its internals. The steps to process XML files through Flexter are:
- Create a Data Flow Input/Output analysis (just once!)
- Process and analyze the XSD schema
- Calculate the target layout and generate source to target mappings
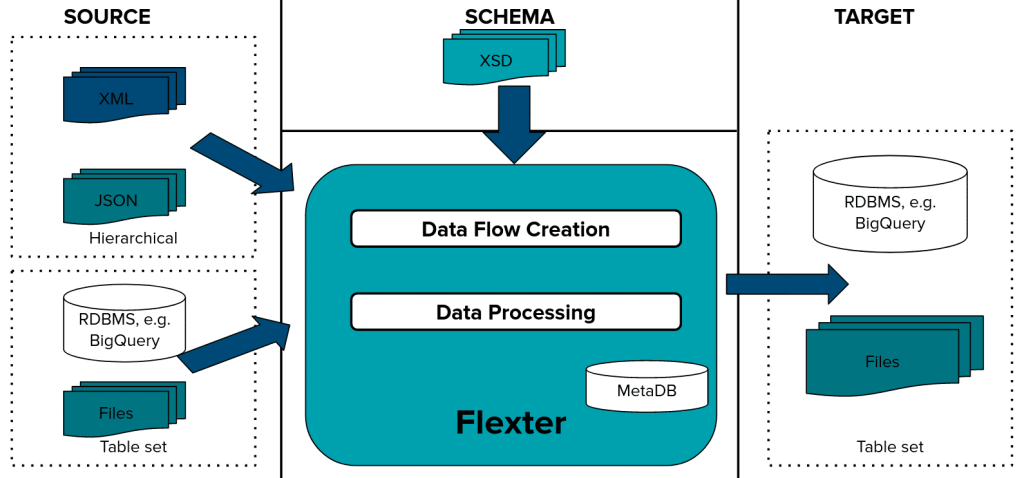
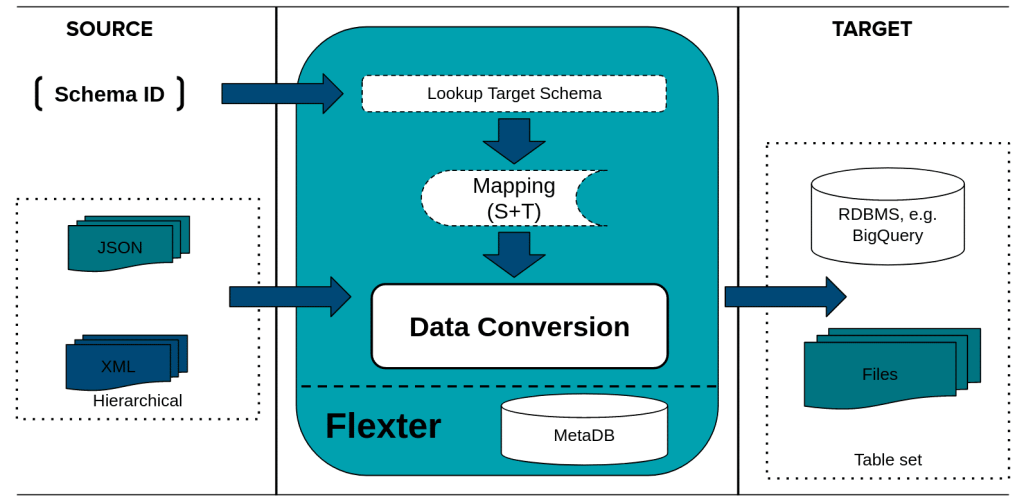
- Process the XML data files (at a repeatable basis)
For this use case, I have picked the Pain.001 (Payments Initiation but can be a real pain too 😉) schema that shows Credit Transfer messages in XML format.
This is part of a wider ISO 20022 standard that has been already put in place to process payments in the EU/SEPA (pre-Single Euro Payments Area) zone. The standard describes dozens of different financial messages and there’s a pretty good chance that you’ll come across it one day, especially if you’re working within IT in the banking sector.
Once we have downloaded both XML and XSD files we can start processing.
Analysing input XML layout
We first use Flexter to analyze the input schema:
|
1 |
xsd2er -R /mapr/dev.sonra.io/tmp/sepa/pain.001.001.03.xsd |
The -R option tells Flexter to use the smart detection feature of root elements in the XSD (so there’s no need to specify the name explicitly).
It only takes two seconds, but prints out a lot of useful information on the screen. You may access the full log here but the most interesting part is below:
|
1 2 3 4 5 6 7 8 9 10 11 12 13 14 15 16 17 18 19 20 |
18:18:49.098 INFO Registering new job 18:18:49.352 INFO Parsing pain.001.001.03.xsd 18:18:49.580 INFO Linking pain.001.001.03.xsd 18:18:49.603 INFO Root elements: pain.001.001.03.xsd - Document 18:18:49.607 INFO Building metadata 18:18:49.686 INFO Writing metadata 18:18:50.048 INFO Registering success of job 3748 18:18:50.074 INFO Finished successfully in 1294 milliseconds # schema schemaXml: 1496 org: 1 job: 3748 elements: 940 # statistics load: 452 ms parse: 372 ms build: 83 ms write: 362 ms |
After deep analysis of the XSD schema, Flexter now knows how all potential source XML are structured.
This information is saved into Flexter’s metadata for subsequent use. We can see from the above log that Flexter found only one possible root element (“Document”) in our XSD and there were no other XSD files referenced. The XML schema has been resolved into 940 possible tag elements.

You can access the full layout here.
The internal Flexter ID for our input schema is 1496.
Building the target output layout
In the next step, we calculate the normalized target layout and the mapping to connect the source layout to it. We pass the internal ID of our schema (here 1496) to the Flexter CalcMap tool:
|
1 |
calcmap -x 1496 {true, false} |
During run-time, it prints out the log information on the particular phases of the analysis. At the end, we can see a short summary:
|
1 |
Tables/Columns/Mappings: 58/780/1024 |
What we can observe here is target layout optimisation in action. Flexter ships with various optimisation algorithms that simplify the target schema.
Based on the insight Flexter gathered in the first Schema Analysis phase, it can optimise the normalisation process, resulting in fewer potential target files. This means Flexter was able to compact all possible data points from the input XML into just 58 files with a total of 780 columns.

Processing XML data
Now we are ready to process our XML files. We pass the internal schema ID to the Flexter xml2er command line tool:
|
1 |
xml2er -x 1496 tmp/sepa/pain.001.001.03.xmls.zip |
This produces our output in TSV format (excerpt):
|
1 2 3 4 5 6 7 8 9 10 11 12 13 14 15 16 17 18 19 20 21 22 23 24 25 26 27 28 29 30 31 32 33 34 35 36 37 38 39 40 41 42 43 44 45 46 47 48 49 50 51 52 53 54 55 56 57 58 59 60 |
# input path: maprfs:///mapr/dev.sonra.io/tmp/sepa/pain.001.001.03.xmls.zip # output (default) path: maprfs:///mapr/dev.sonra.io/tmp/sepa/out.opt/ format: tsv savemode: overwrite 18:19:48.775 INFO Registering new job 18:19:49.109 INFO Loading metadata [Stage 1:=> (7 + 1) / 200] [Stage 1:==> (10 + 1) / 200] [Stage 1:====> (17 + 1) / 200] [Stage 1:======> (23 + 1) / 200] [Stage 1:========> (30 + 1) / 200] [Stage 1:==========> (38 + 1) / 200] [Stage 1:============> (44 + 1) / 200] [Stage 1:==============> (53 + 1) / 200] [Stage 1:=================> (62 + 1) / 200] [Stage 1:===================> (71 + 1) / 200] [Stage 1:======================> (79 + 1) / 200] [Stage 1:========================> (89 + 1) / 200] [Stage 1:===========================> (99 + 1) / 200] [Stage 1:=============================> (108 + 1) / 200] [Stage 1:=================================> (120 + 1) / 200] [Stage 1:====================================> (133 + 1) / 200] [Stage 1:========================================> (146 + 1) / 200] [Stage 1:==========================================> (154 + 2) / 200] [Stage 1:=============================================> (165 + 1) / 200] [Stage 1:================================================> (178 + 1) / 200] [Stage 1:====================================================> (192 + 1) / 200] 18:20:01.750 INFO Parsing data 18:20:07.297 INFO calculating data 18:20:07.303 INFO writing tables 18:20:07.305 INFO writing table GrpHdr_InitgPty_Id_OrgId_Othr 18:20:07.763 INFO writing table GrpHdr_InitgPty_Id_PrvtId_Othr 18:20:08.001 INFO writing table Document 18:20:08.238 INFO writing table CdtTrfTxInf_Cdtr_Id_OrgId_Othr 18:20:08.407 INFO writing table CdtTrfTxInf 18:20:08.669 INFO writing table Cdtr_PstlAdr_AdrLine 18:20:08.865 INFO writing table Strd 18:20:09.050 INFO writing table Ustrd 18:20:09.214 INFO writing table UltmtCdtr_Id_OrgId_Othr 18:20:09.390 INFO writing table PmtInf_Dbtr_Id_OrgId_Othr 18:20:09.557 INFO writing table PmtInf_Dbtr_PstlAdr_AdrLine 18:20:09.722 INFO writing table PmtInf 18:20:09.913 INFO writing table PmtInf_UltmtDbtr_Id_OrgId_Othr 18:20:10.340 INFO calculating statistics 18:20:10.683 INFO writing statistics rows 18:20:11.513 INFO Registering success of job 3749 18:20:11.531 INFO Finished successfully in 47601 milliseconds # schema xml: 1496 logical: 419 org: 1 job: 3749 xpaths: 515 # statistics load: 37820 ms parse: 5547 ms write: 2775 ms stats: 1440 ms |
The default output mode is TSV which, in its structure, is very similar to CSV but the delimiter is its tab character (tab separated file). This tends to be a more universal standard as it generates fewer potential issues in subsequent use (commas can generally also occur in text and number formatting.)
As you might have noticed, Flexter only produced 13 files. The default operation mode of Flexter is to create only tables where data that was present in the input XML. This resulted in only 13 out of 58 files being created and populated.
|
1 2 3 4 5 6 7 8 9 10 11 12 13 14 15 16 17 |
→ ls -l -rwxr-xr-x 1 flexter 109 Nov 17 14:08 Authstn.tsv -rwxr-xr-x 1 flexter 13279 Nov 17 19:20 CdtTrfTxInf.tsv -rwxr-xr-x 1 flexter 98 Nov 17 19:20 CdtTrfTxInf_Cdtr_Id_OrgId_Othr.tsv -rwxr-xr-x 1 flexter 283 Nov 17 14:08 CdtrSchmeId_Id_PrvtId_Othr1.tsv -rwxr-xr-x 1 flexter 123 Nov 17 19:20 Cdtr_PstlAdr_AdrLine.tsv -rwxr-xr-x 1 flexter 3215 Nov 17 19:20 Document.tsv -rwxr-xr-x 1 flexter 11336 Nov 17 14:08 DrctDbtTxInf.tsv -rwxr-xr-x 1 flexter 354 Nov 17 19:20 GrpHdr_InitgPty_Id_OrgId_Othr.tsv -rwxr-xr-x 1 flexter 91 Nov 17 19:20 GrpHdr_InitgPty_Id_PrvtId_Othr.tsv -rwxr-xr-x 1 flexter 5902 Nov 17 19:20 PmtInf.tsv -rwxr-xr-x 1 flexter 85 Nov 17 19:20 PmtInf_Dbtr_Id_OrgId_Othr.tsv -rwxr-xr-x 1 flexter 104 Nov 17 19:20 PmtInf_Dbtr_PstlAdr_AdrLine.tsv -rwxr-xr-x 1 flexter 93 Nov 17 19:20 PmtInf_UltmtDbtr_Id_OrgId_Othr.tsv -rwxr-xr-x 1 flexter 1711 Nov 17 19:20 Strd.tsv -rwxr-xr-x 1 flexter 98 Nov 17 19:20 UltmtCdtr_Id_OrgId_Othr.tsv -rwxr-xr-x 1 flexter 607 Nov 17 19:20 Ustrd.tsv |
Please note those 58 files were already compacted, so you can see now the full path it took: from 940 tag elements to 58 potential target files to just 13 instance files. Pretty good huh?
Suggested reading: Add to your understanding on XML with our deep dive on XML conversion: including converters, tools, and projects.
See the benefits of Flexter for yourself
I hope you enjoyed this brief overview and I encourage you to try out Flexter in your own time.
In our next several posts, we will look at more demanding schemas and also demonstrate how to integrate Flexter with other data integration tools. Stay tuned!
Which data formats apart from XML are you struggling with and need help with? We could give you the support you need — just reach out!


