Optimisation algorithms for converting XML and JSON to a relational format
Use Flexter to turn XML and JSON into Valuable Insights
- 100% Automation
- 0% Coding
Optimisation algorithms for converting XML and JSON to a relational format. Part 1 – Elevate
Flexter, our data warehouse automation solution for the conversion of XML, JSON, industry data standards (HL7, FpML, ISO 20022 messages etc.) ships with two optimisation algorithms. The purpose of these algorithms is to simplify the relational target schema that Flexter auto-generates.
In this blog post we walk you through the Elevate optimisation. Flexter also ships another optimisation which we call Reuse. We will cover the Reuse optimisation in a separate post
Elevate optimisation
Many XML and JSON files are modeled poorly. Even experienced modelers create artificial hierarchies that are unnecessary. This makes the XML/JSON file more complex than necessary. It also makes it less readable. When converting XML/JSON to a relational format our first instinct is to create a separate table for each level in the hierarchy. However, this strategy leads to a huge number of obsolete tables in the target schema. Flexter is able to detect and fix those “anomalies” with the Elevate optimisation.
The Elevate Optimisation detects 1:1 relationships in the XML hierarchy that have been modelled as 1:N relations. It is Flexter’s default optimisation mode. In the sample XML in the figure below, the relationship between “artist” and “artist_info” has been modeled as two distinct levels in the hierarchy. This does not make sense. The tag “artist_info” is not really needed. It makes the XML document more complex. When Flexter analyses a representative sample of XML documents it will be able to detect this anomaly and elevate the child elements to the parent table. In this case, all of the elements of “artist_info” will be elevated to the “artist” tag.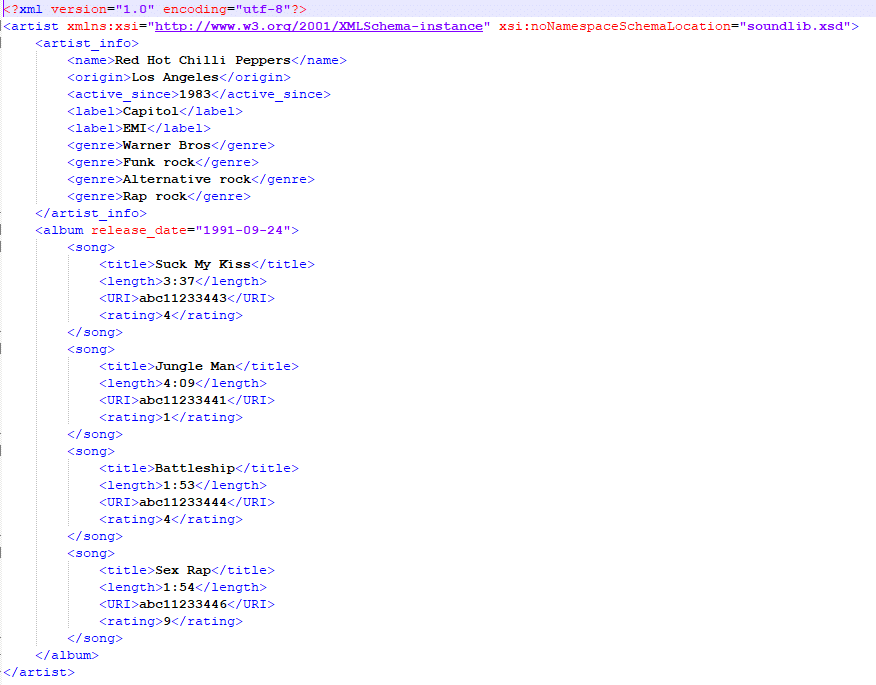
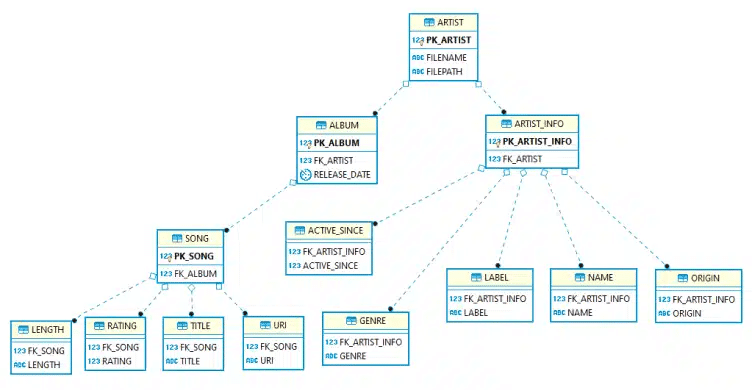
Let’s have a look at the target schema that Flexter generates with and without elevate optimisation.
Target Schema without optimisation
Target Schema with optimisation
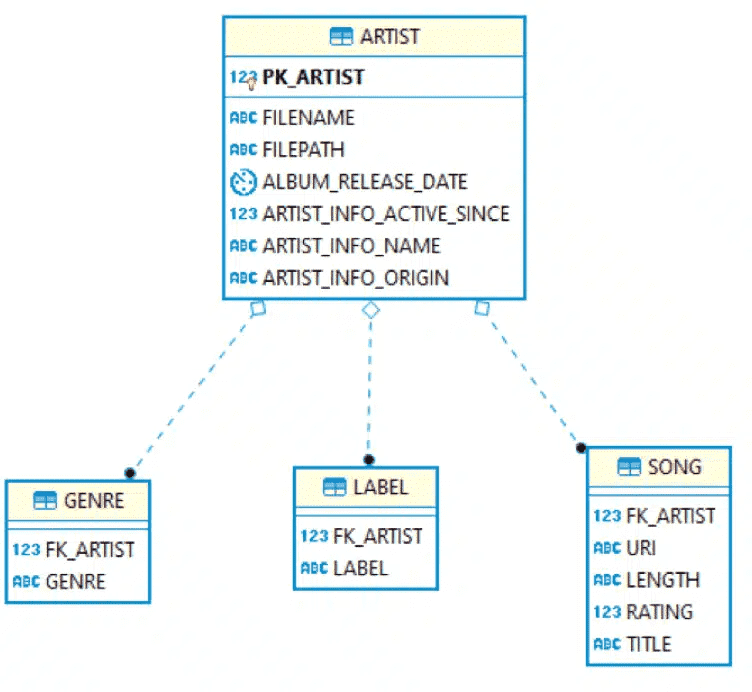
As you can see, the Elevate optimisation cut the number of tables down to four. Where possible it elevated child attributes to parent tables. This makes it much easier to work with the data for downstream consumers.
As part of the elevate process it also applied some naming conventions, e.g. active_since becomes artist_info_active_since. Flexter ships with various naming algorithms as well.
Elevate with a real-world example
Let’s have a look at a real world example to see the impact of the Elevate optimisation. We can take the clinical trial data set from the clinicaltrials.gov website.
Without any optimisations you get 172 target tables.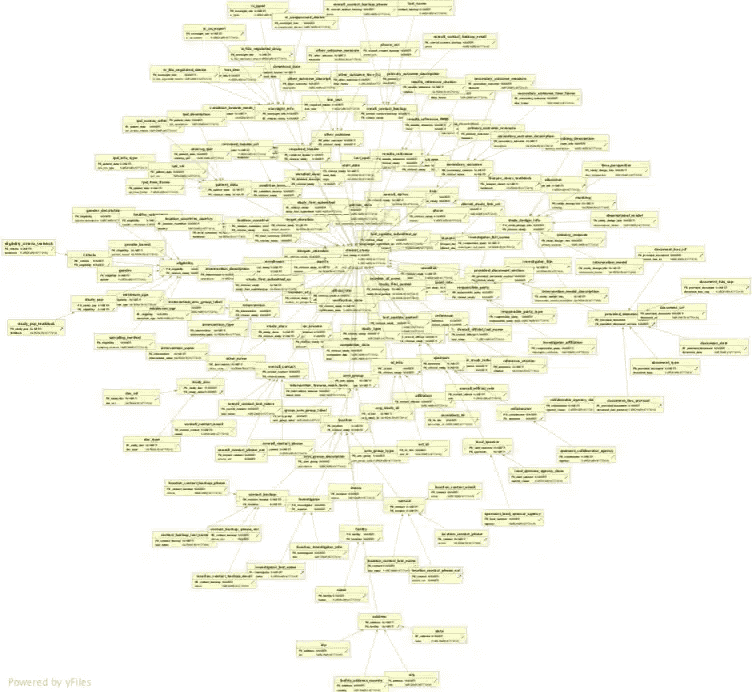
With the Elevate optimisation you just end up with 24 tables. In a follow-up post we will also talk about the Re-use optimisaton, which cuts down the number of tables to 12. I know which schema I would rather work with.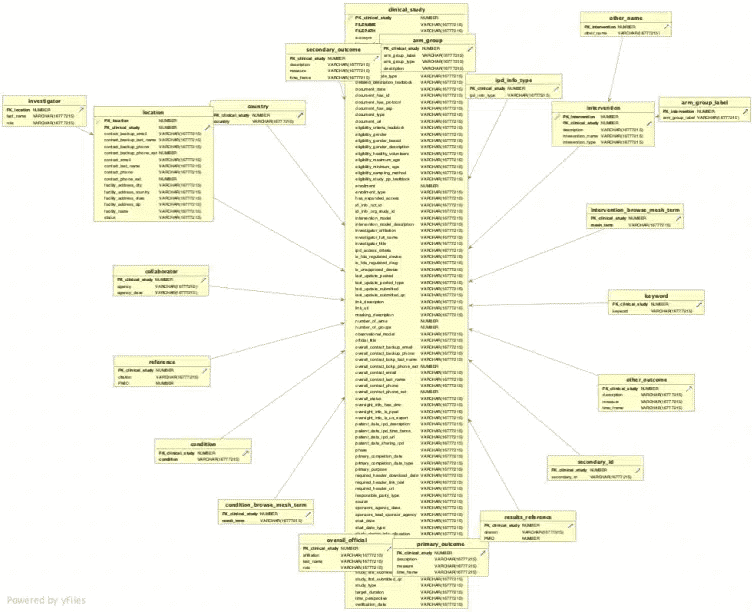
Now that you have an idea of how the Elevate optimisation works, let’s see it in action.
Converting XML data with Elevate
We will be using the Docker Version of Enterprise Flexter on our local Ubuntu. Converting XML/JSON data can be performed in a couple of simple steps.
Step 1 – Installing Docker, pulling Enterprise Flexter image and running it
Step 2 – Collecting Statistics (Information such as data type and relationships) and Data Flow (Mapping data points in the source to the data points in target schema)
Step 3 – Converting data
Step 1 – Installing Docker, pulling Enterprise Flexter image and running it
For this step we will be installing Docker CE on Ubuntu, there are different docker versions for other distributions like CentOS, Fedora, Debian.
We have to go to https://download.docker.com/linux/ubuntu/dists/ , chose our Ubuntu version, browse to pool/stable/ and choose amd64, armhf, or s390x. Download the .deb file for the Docker version we want to install. Install Docker CE, changing the path below to the path where we downloaded the Docker package.
|
1 |
sudo dpkg -i /path/to/package.deb |
Then we can check if Docker CE is installed correctly by running the hello-world image. This command downloads a test image and runs it in a container. When its runned, it will print out an information message and exit.
|
1 2 3 4 5 6 |
sudo docker run hello-world Hello from Docker! This message shows that your installation appears to be working correctly. To generate this message, Docker took the following steps: 1. The Docker client contacted the Docker daemon. 2. The Docker daemon pulled the "hello-world" image from the Docker Hub. (amd64) |
After the installation is completed, we can pull the Enterprise Flexter image from the sonra registry. We login to it using the docker login.
|
1 2 3 4 |
docker login docker.sonra.io $ Username: user.name $ Password: Login succeeded |
Once we are logged in we pull Enterprise Flexter image using the pull command. Contact us for a Flexter PoC to get access to Flexter.
|
1 |
sudo docker pull docker.sonra.io/flexter-local |
The command below will start the flexter-local docker image which we have pulled. The command runs the docker image flexter-local with the bash shell. Running the run command with the -it flags attaches us to an interactive tty in the container.
|
1 |
sudo docker run -it --rm docker.sonra.io/flexter-local |
Now we can start with the conversion process.
Step 2 – Collecting statistics. Creating a data flow
We can process XML files without a Source Schema (XSD).
Instead we can use a sample of XML documents. We analyse the sample and collect statistics such as the data types or relationships inside the sample.
As part of this step we also create the data flow, which maps the source elements in the XML or JSON to the target table columns.
In the command below we will use the -g1 switch. This switch determines which optimisation we want to use while collecting statistics and creating the data flow. There are 4 -g levels:
– 0 : No optimized mapping
– 1 : Elevate optimisation (1 = 1)
– 2 : Reuse optimisation
– 3 : Elevate + Reuse optimisation
|
1 |
xml2er -g1 <INPUT PATH> |
Example of output
|
1 2 3 4 5 6 7 8 9 10 11 12 |
… # schema origin: 4 logical: 2 job: 4 # statistics startup: 4107 ms parse: 6855 ms xpath stats: 436 ms doc stats: 4744 ms xpaths: 19 | map:0.0%/0 new:100.0%/19 documents: 1 | suc:100.0%/1 part:0.0%/0 fail:0.0%/0 |
This command collects Statistics (origin ID 4). At the same time it also creates a Data Flow (logical ID 2).
If the sample of your Source Data is too big to be processed in one iteration, we can collect statistics in multiple steps. This is also useful if the structure of your XML files changes and we need to evolve the target schema.
After we have collected statistics and created a data flow we can convert our data to a Target Connection. Target Connections are based on the URI standard. It means Flexter can access different locations and protocols defined by the path, e.g.
- file://
- ftp:// ftps://
- hdfs:// maprfs://
- jdbc:xyz://
- s3a://
- http:// https://
Some of these protocols require you to provide a username and password. In all cases it’s possible to use the parameters or configuration files to define them. For some, you can specify the username and password directly in the URI path, e.g. for FTP.
Step 3 – Converting XML data with the Elevate Optimization
In this example we will use Snowflake as our target connection. We will use the -g1 switch for the elevate optimisation.
|
1 |
xml2er -g1 -l2 (Data Flow ID (logical)) -o jdbc:snowflake://<account_name>.snowflakecomputing.com/?<connection_params> INPUTPATH |
Example of output
|
1 2 3 4 5 6 7 8 9 10 11 12 13 14 |
17:16:24.110 INFO Finished successfully in 17701 milliseconds # schema origin: 7 logical: 3 job: 8 # statistics startup: 4107 ms load: 9416 ms parse: 6855 ms write: 2297 ms xpath stats: 436 ms doc stats: 4744 ms xpaths: 19 | map:0.0%/0 new:100.0%/19 documents: 1 | suc:100.0%/1 part:0.0%/0 fail:0.0%/0 |
Once the job has finished successfully, you can find the converted data in the Target Path.
Conclusion
Flexter ships with some powerful optimization algorithms that generate a simplified target schema for easy querying downstream. In this post we looked at the Elevate algorithm. In the next post in this series we look at the Re-use optimisation.
Why did we create Flexter?
Flexter was born from our own frustration of converting XML and JSON documents into a data warehouse. We saw many projects fail or run over budget. Why waste weeks of converting XML/JSON and risking failure instead of focusing on delivering real value to your business users? We think that the time spent writing manual code to convert the data to It just takes too much time of converting the data
Our customers are delighted with Flexter. Hear what they say
“This will save us weeks”
“You did in one day what we could not achieve in 3 years”
And this is what Ralph Kimball, one of the fathers of data warehousing has to say about XML conversion:
“The construction of an XML parser is a project in itself – not to be attempted by the data warehouse team”. Ralph Kimball, ETL Toolkit
We provide Flexter in Enterprise Edition:
Our enterprise edition can be installed on a single node or for very large volumes of XML on a cluster of servers.
If you have any questions please refer to the Flexter FAQ section. You can also request a demo of Flexter or reach out to us directly.
Last but not least we have open sourced Paranoid, our solution to obfuscate data in XML and JSON documents
Who uses Flexter?
Companies in travel, finance, healthcare, automotive, finance, and insurance industry use Flexter.


