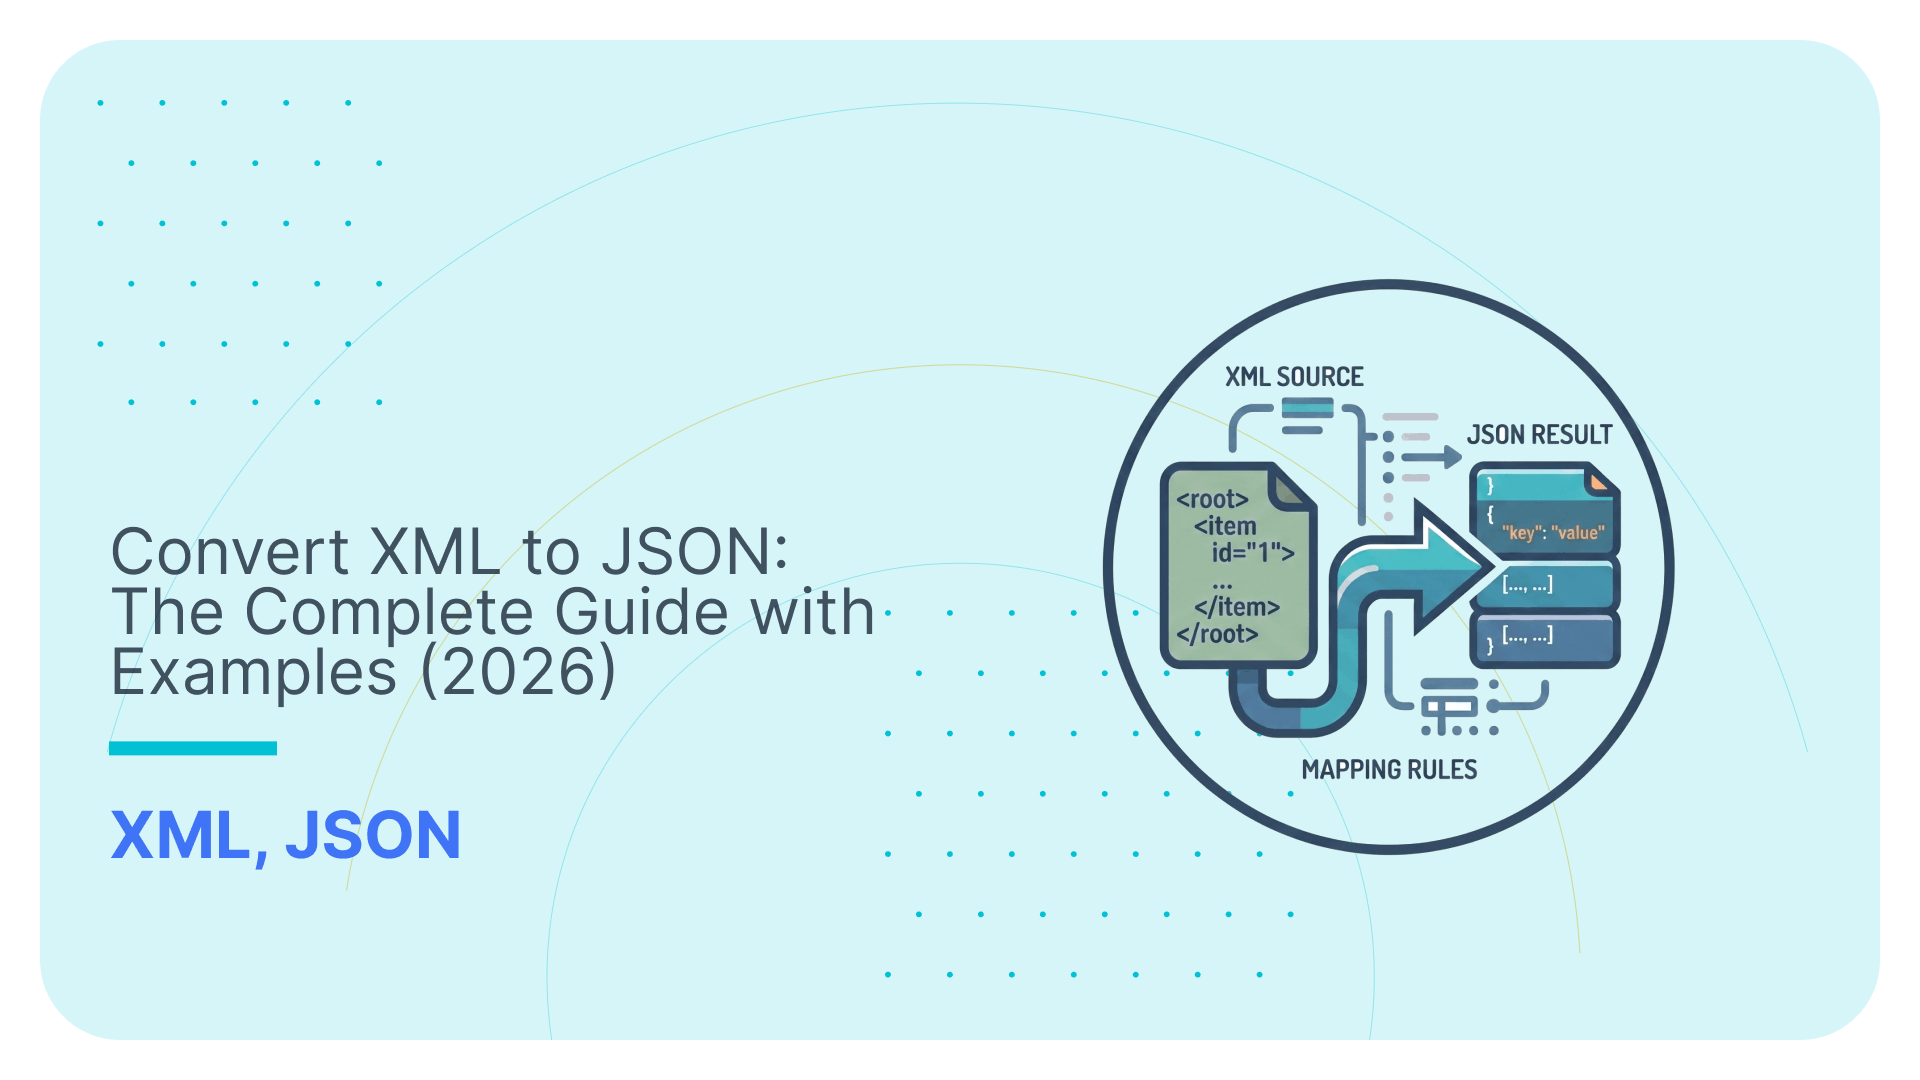
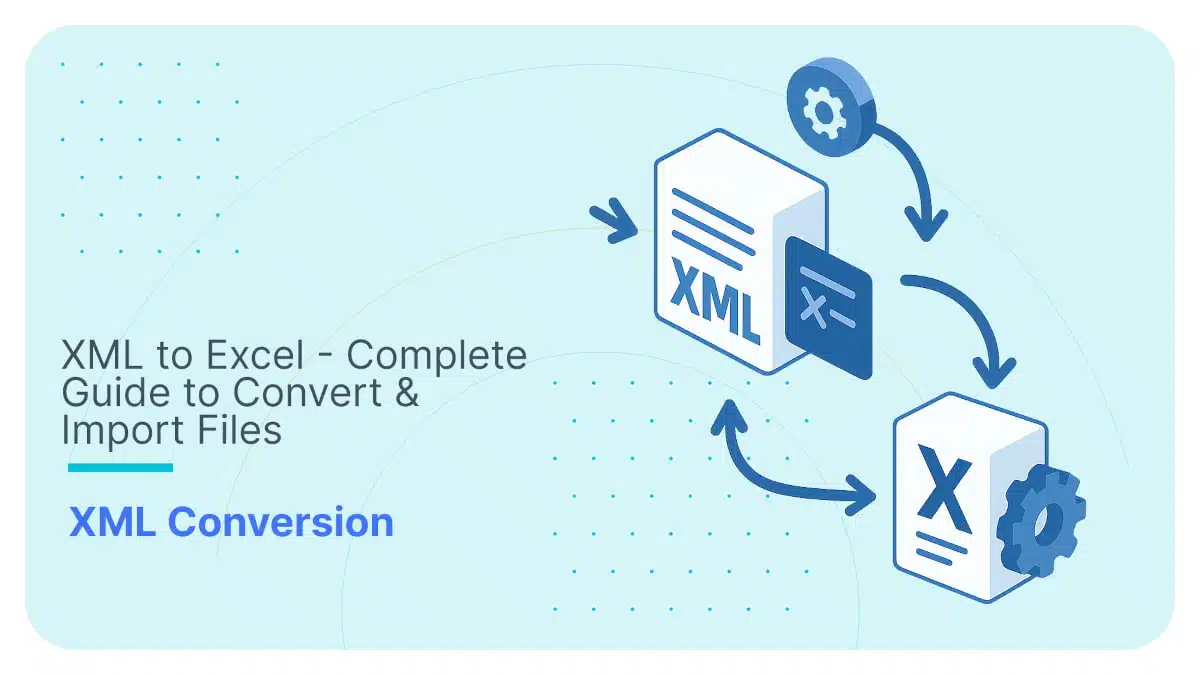
XML to Excel – Complete Guide to Convert & Import Files

Converting XML to Excel shouldn’t feel like solving a Rubik’s cube blindfolded.
But if you’ve ever tried it, you know it can feel that way.
Excel does support XML, but the experience can be limited: you might encounter flattened tables, unexpected NULLs, and workflows that struggle with highly nested XML.
On top of that, Excel processes one file at a time, requiring manual input for each conversion. Batch processing isn’t natively supported, and automation through APIs or SDKs isn’t part of Excel’s core feature set.
Do these challenges sound familiar? If you’ve ever spent hours trying to fit XML into Excel’s rows and columns, this post is your shortcut to sanity.
TL;DR: Here’s what you’ll get
- A breakdown of Excel’s three native XML import methods: what works, what doesn’t.
- The hidden traps of Power Query, XML Maps, and File → Open.
- Programmatic options (Python, XSLT) and why they’re often not worth the effort.
- A smarter, no-code way to convert XML (and XSD!) into clean, structured Excel, automatically.
Let’s fix XML to Excel — properly this time.
Use Flexter to turn XML and JSON into Valuable Insights
- 100% Automation
- 0% Coding
Why convert XML to Excel?
Let’s be honest: XML is where data goes to hide (well, and travel).
It’s structured, sure. But unless you enjoy decoding nested tags and XPath spaghetti, it’s not exactly user-friendly.
I’ve opened enough XML files to know: the first step is always getting them into Excel.
You too? Then you already get it.
Converting XML to Excel turns unreadable hierarchies into clean, sortable tables. You can filter, pivot, chart, and run formulas and work with your data instead of just staring at it.
Excel’s built-in analytics and visualisation tools mean you don’t need to be a developer or a data scientist to extract real insights.
Whether your XML comes from an API, a database, or some legacy system, Excel makes it readable, shareable, and actionable for you and everyone else on your team.
Bottom line? XML is for systems. Excel is for humans. Convert accordingly.
Native Excel tools to convert XML to Excel (including XSD to Excel)
Excel does offer a few built-in ways to open and work with XML files, but they’re more of a quick patch than a real solution.
These native options can handle basic, flat XML just fine, but once you introduce nesting, mixed content, or schema rules, things start to fall apart fast.
The “File → Open” method: Quick but Quirky
If you’re just dipping your toes into XML conversion and don’t want to deal with advanced tools or coding, Excel’s built-in “File → Open” method might feel like a shortcut worth taking. And for some simple XML files, it is.
This native method enables you to open an XML file in Excel with just a few clicks, requiring no extra software, extensions, or technical skills.
But while it’s the fastest way to crack open an XML file, it’s far from perfect for anything more complex than basic flat data (I discussed this, among other limitations, in my next section).
Next, I’ll provide a walkthrough of this native XML to Excel method.
For the walkthroughs in this article, I’ll use my simple XML test case from the wider set of XML test cases I use for testing in my blog.
Step 1
In the first step, go ahead and start with a blank workbook.
Step 2
Go to “File → Open” and then hit “Browse”. Then, locate your source XML file on your system.
Step 3
Select your XML file and click “Open”.
Step 4
When prompted, Excel offers you three ways to open the file. Here’s how the pop-up window will look:
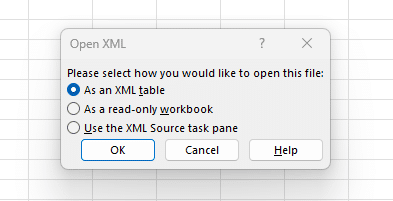
In essence, these three options are:
- As an XML table (most common choice):
Excel automatically creates a flat table by inferring the schema from your XML. Repeating elements are expanded into multiple rows. Quick and tidy, if your XML is also fast and tidy.
- As a read-only workbook:
This is similar to the first option but includes a bit more structural metadata. Think of it as a “look, don’t touch” version of the XML table.
- Using the XML Source task pane:
This gives you more control by letting you drag and drop XML elements onto specific cells. You’ll be building the table structure manually, great for structured imports, but more setup-intensive. This option is similar to the XML Maps option, which I will explore in more detail later in this post.
In general, what makes sense here is to go with importing your source file “As an XML table”, which is the simplest way to get your data into Excel.
Step 5
With your data in an Excel sheet, it’s time to review the imported data.
You should now see the data flattened into a worksheet as follows:
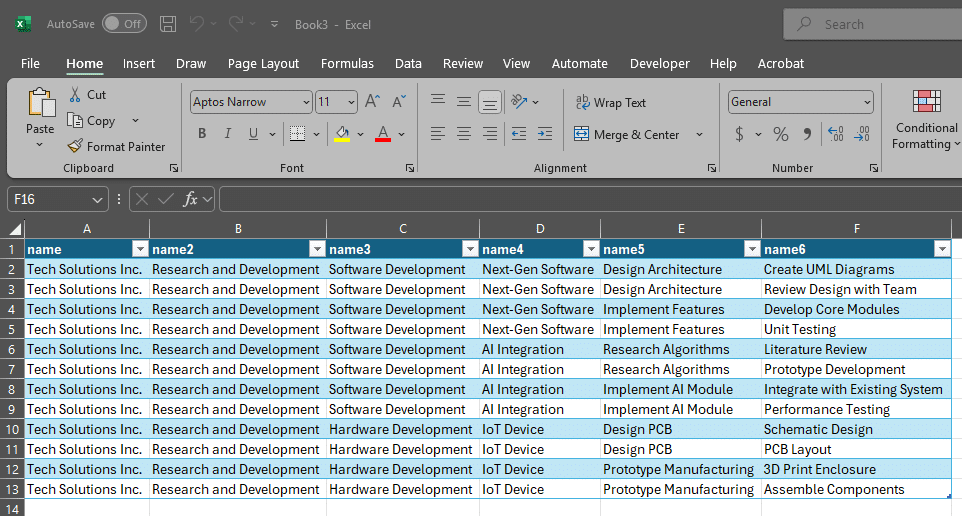
Step 6
Finally, you can save your file as .xlsx to preserve its structure and enable all of Excel’s features (although note that this method doesn’t support exporting it back to XML).
Power Query: Excel’s best attempt to handle XML imports
If Excel’s “File → Open” is a microwave dinner, fast but basic, and a full-blown XML conversion tool like Flexter is a gourmet home-cooked feast, then Power Query is the meal kit: a well-prepared middle ground.
You still have to unpack it, do a bit of prep, and follow some steps, but the results are better than what the microwave delivers.
Power Query is Excel’s built-in data transformation engine. And when it comes to XML, it offers some added flexibility over Excel’s “open/import” features, which struggle with anything beyond the most flat XML files.
If you’re working with XML with more than just one level of nesting, Power Query is where you should start, before calling in the big guns like Flexter for serious data normalisation, automation, and scale.
Here are the steps to use Power Query for XML to Excel import. As in my previous workflow, I’ll use the simple XML test case:
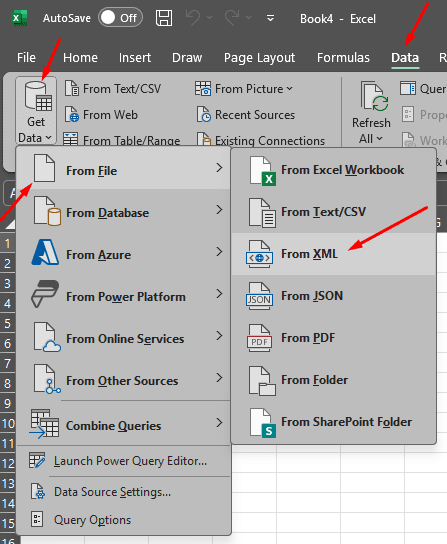
Step 1
Open Excel and go to the Data tab.
Step 2
Click Get Data → From File → From XML.
Step 3
Browse to your XML file (e.g., simplexmltocsv.xml) and click Import.
Step 4
Then a navigator window will show up, as follows:
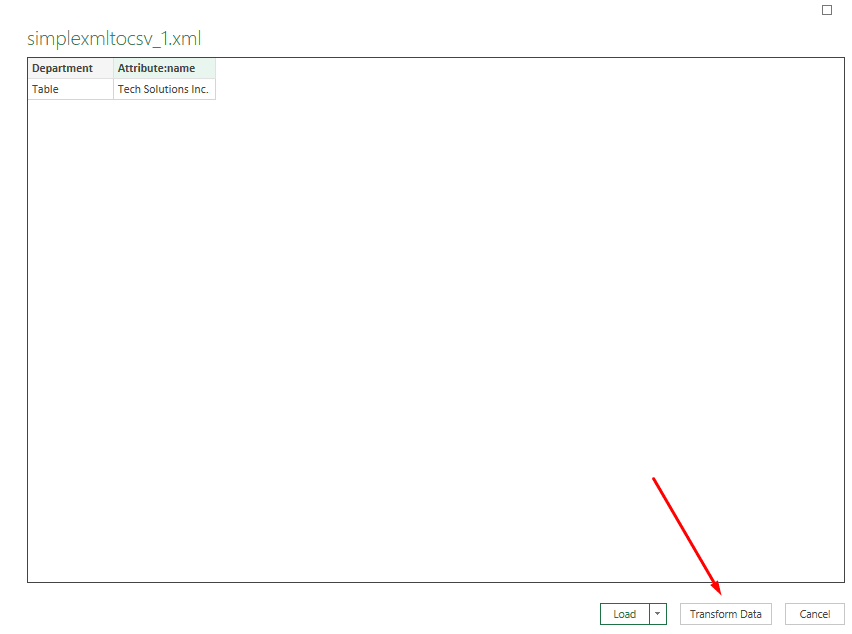
In the navigator, you may:
- Preview the XML structure.
- Click “Load” to insert it into the worksheet as-is, or
- Click “Transform Data” to open the Power Query Editor and customise your import.
While you may hit “Load” and import the data as inferred to the Excel spreadsheet, the strong point of this method is that you may use “Transform Data” to work with the data manually.
That’s what we’ll do in the next step.
If you click “Load” after selecting your XML in Power Query, Excel will only bring in the top-level node, often just a single attribute or summary row.
That’s why your worksheet might show something underwhelming, like one lonely value and no real structure.
If you just want to load a simple XML with the lowest amount of clicks possible, then use the “File → Open” method I’ve shown above.
Otherwise, continue reading to learn how to fully flatten your XML using the Power Query method.
Step 5
If you’ve reached Step 4 and clicked “Transform Data”, you should now be able to see the Power Query Editor.
In this step, I’ll show you how to fully flatten your XML into a tabular format, using the Power Query Editor interface, not the command bar at the top.
To explore your XML’s hierarchy and start expanding rows and columns, click the Expand Columns icon next to the root node (in our case, the root node is labelled “Department”).
Check the red arrow in the screenshot:
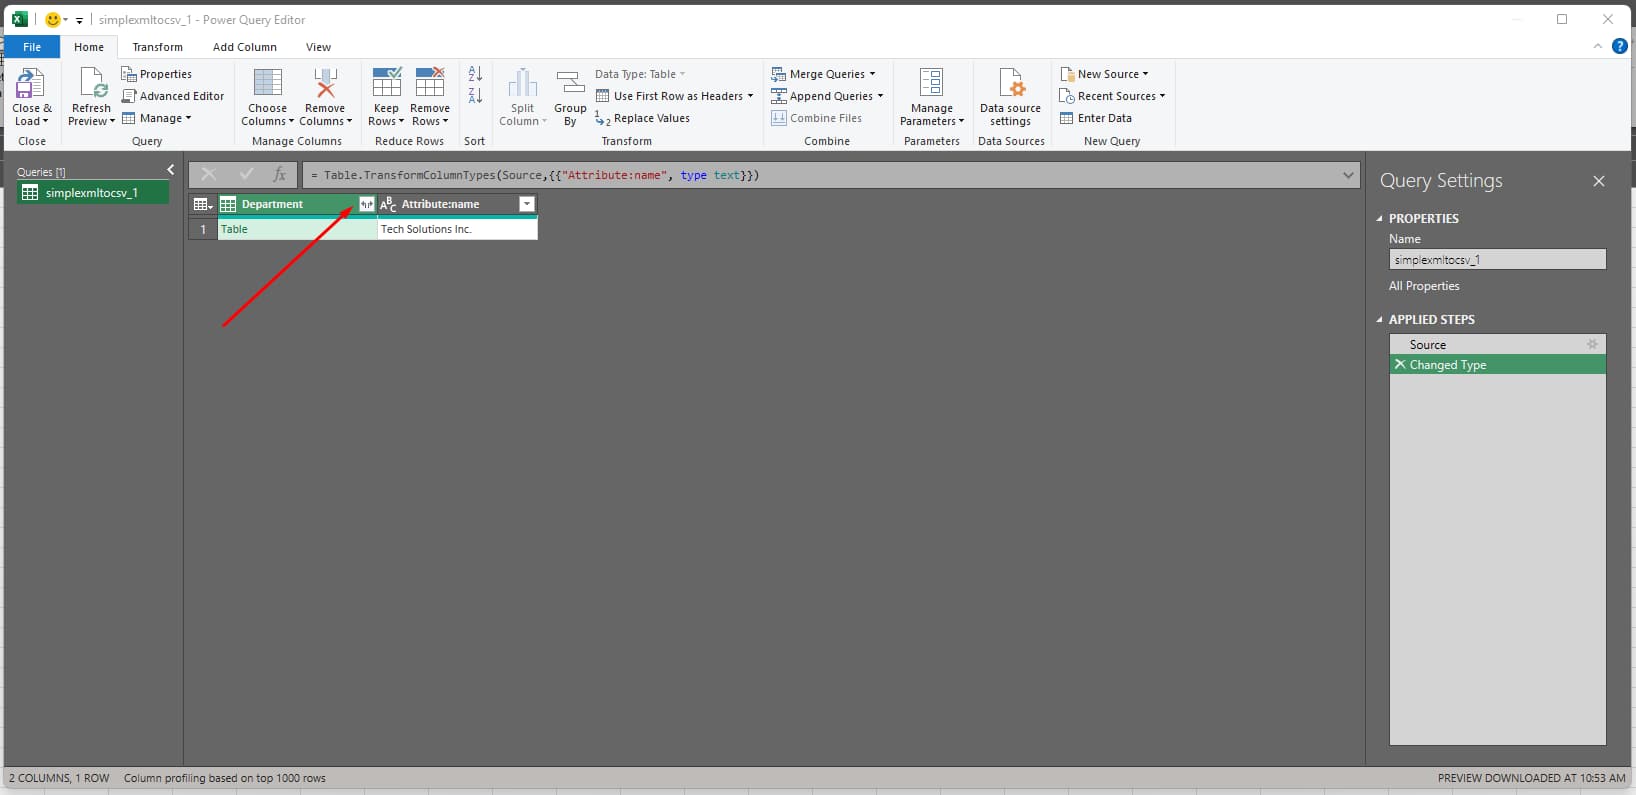
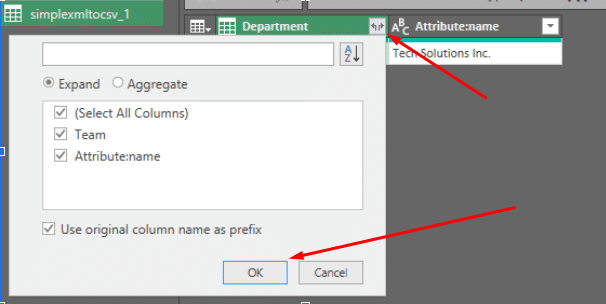
Click the Expand Columns icon next to the “Department” column, select all fields in the dialogue, and confirm with OK to unpack the nested data into separate columns.
As seen below:
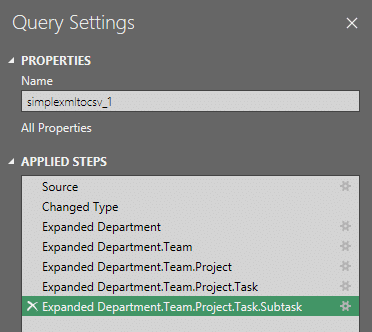
From here, it’s a bit like peeling an onion, one nested layer at a time.
Depending on how deep your XML goes, you’ll be clicking that little expand icon more times than you’d like to admit.
In our example, you’ll need to unpack four more levels (five overall) to reach a fully flattened table (the same one you’d get clumsily using File → Open in just a few clicks).
But hey, at least here you’re in control..!
Pro Tip: Power Users, This One’s for You
If you’re already comfortable with Power Query’s underlying formula language (M), you don’t have to rely solely on the GUI.
You can write custom commands to filter, sort, group, or pivot your XML data to maximise its potential.
Even if you’re sticking with the visual editor, you can always peek at the exact Power Query steps being executed in the Applied Steps panel on the right.
That said, Power Query has its limits. It lacks XSD validation and struggles with recursive or irregular XML structures, which are common in real-world datasets.
Python, using libraries like lxml, xmlschema, and pandas, offers a bit more control: you can validate schemas, navigate deep hierarchies, and apply custom logic.
Still, both approaches require significant manual effort, including tuning scripts, managing schema changes, and repeating the process for every new file.
What you really want is a no-code, automated solution. I’ve explored the differences between manual and automated XML conversion in another post.
Step 6
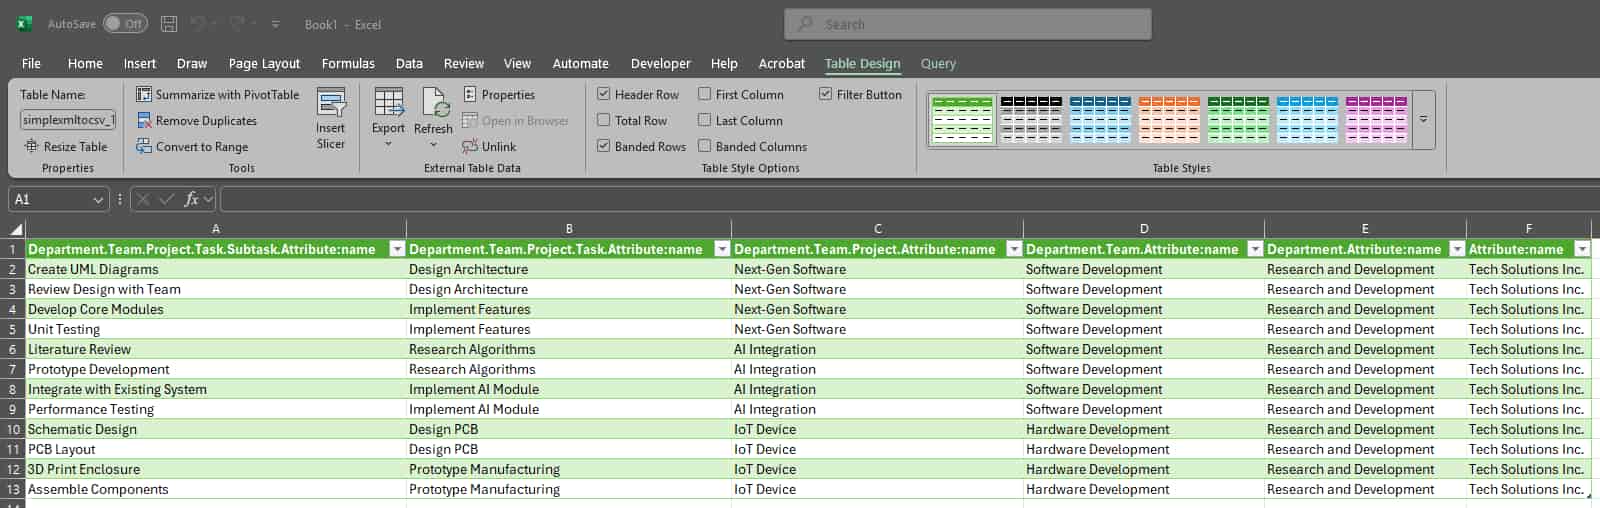
When you’re done shaping your data, click “Close & Load” to drop it into your worksheet.
This is what it should look like:
Pro Tip: Tired of peeling the XML onion?
If you’re already bored of expanding layer after layer in Power Query, good news, it’s not just Excel.
Tools like Redshift, Spark, and even Databricks require you to perform the same manual “flattening rituals”.
That’s why we built Flexter. It automatically normalises your XML into clean, query-ready tables; no peeling, no stress. It even handles XSDs and provides documentation, such as ER diagrams and source-to-target mappings.
Want to compare? Explore our blog post about the top XML converters ranked by use case.
XML Maps: An Old-School Tool with a Few Smart Tricks
If you’ve been converting XML to Excel for a while, you’ve probably come across XML Maps, a more traditional way to bring XML data into Excel.
It’s been around for years, and while it offers a few handy features not available in Power Query or the basic “File → Open” method, it’s important to know: Microsoft considers XML Maps a legacy feature.
You won’t see a bold retirement notice on Microsoft’s site. Still, there are clear signs: limited support in MS Excel online, hidden menu placement, and a push toward Power Query (check the statement under the header “Show legacy data import wizards”).
That said, XML Maps still offers two key advantages:
- You can map XML elements manually to specific Excel cells or ranges, which provides slightly more control over your resulting Excel tabular data.
- You can import an XSD schema, which not only improves structure and validation but also enables XML export, something Power Query and “File → Open” don’t support.
Next, I’ll walk you through converting XML with XSD to Excel. The steps are nearly identical to those in an XML-only workflow (where you don’t have an XSD and are using importing only XML). I’ll point out key differences along the way (take a closer look at Step 3).
This time, we’ll use the multi-branch XML test case, a slightly more complex example than the one we’ve used in previous workflows.
You may download the XML file here and the XSD from this link.
Step 1
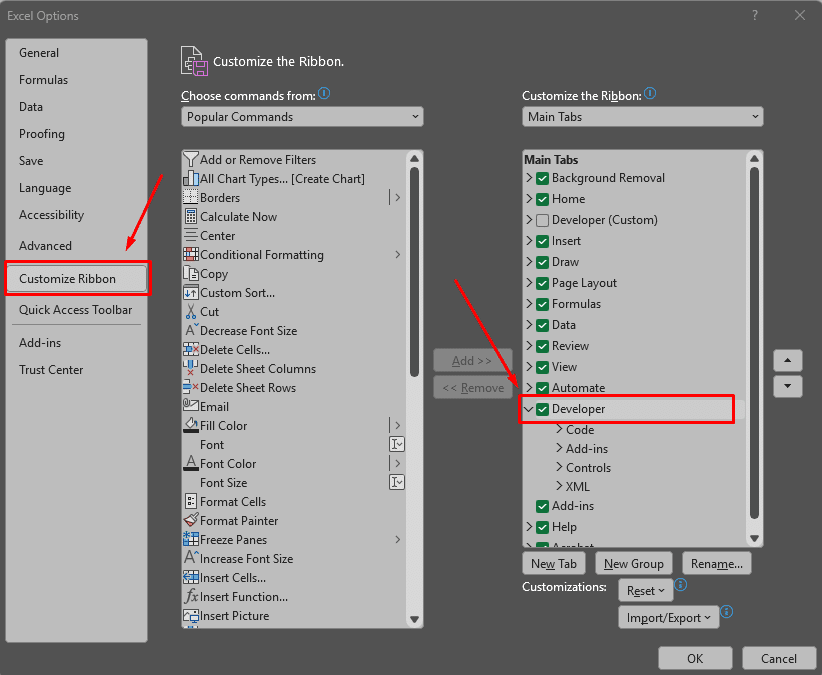
Enable the Developer tab in Excel (if it’s not already visible).
To achieve that, go to File → Options.
Then, in the window that pops up, select “Customize Ribbon” and tick the box for “Developer”. As shown below:
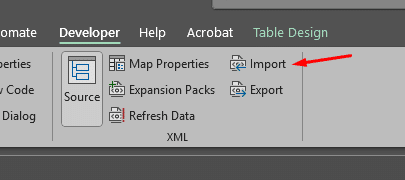
Step 2
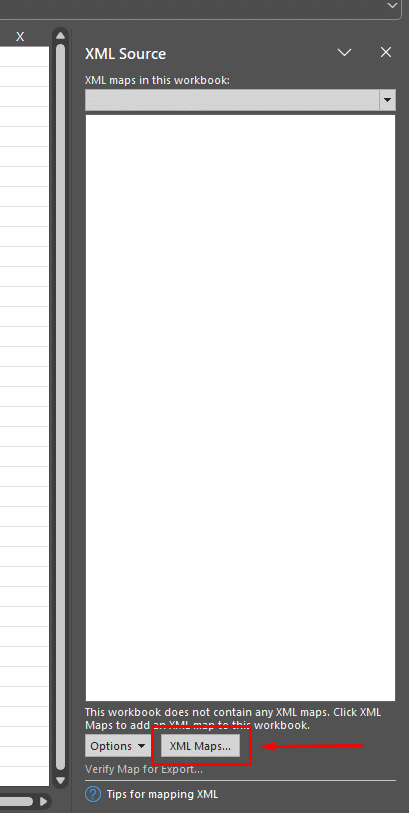
Go to Developer → Source, to open the XML Source pane.
On the right side of the Excel interface, a panel labelled “XML Source” should appear.
In the next step, I’ll show you how to use it.
Step 3 (the only step with a difference between the XML-only and the XML and XSD workflow)
From the “XML Source pane”, click XML Maps. Here’s where this option is located:
Then, the window “XML Maps” shows up, where you should choose “Add” and navigate to your XSD file.
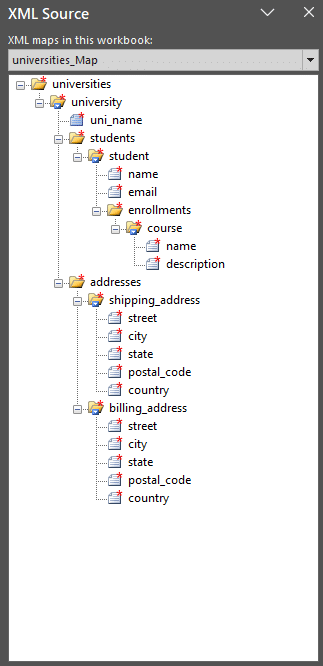
After selecting the XSD from your local filesystem, it’ll show up in the “XML Maps” pop-up window, where you may click “OK”.
After that, your XML Source panel on the right side of your sheet should look like this (if you’re using the multi-branch XML test case):
This step introduces the two key differences from the XML-only workflow (when you’re using only XML without XSD).
The first difference is that, after selecting your XML (instead of XSD), an option will show where you can choose whether Excel infers a schema for your XML.
This is how it should look like:
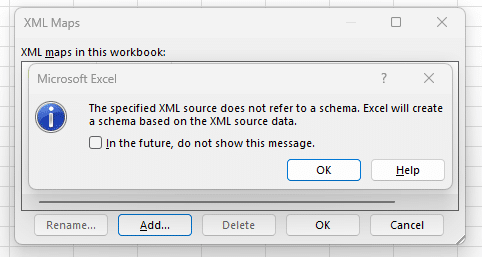
If you click “OK” in this window and the XML Maps window, then Excel should auto-generate the structure for your XML.
Also, a second difference is that when using an XSD, the XML Source panel displays nodes with red asterisks, indicating required fields defined by the schema.
Next, we’ll map these elements to specific Excel cells.
Step 4
It’s time to get your XML data into Excel!
Drag and drop elements from the XML Source pane onto the worksheet.
Ensure you drag and drop the XML element that you want to convert to a table. For example, if you select “university”, which is the root node, you will get a different result than if you drag and drop the “students” node.
For this step, I’ll drag and drop the root node called “universities”, in my case.
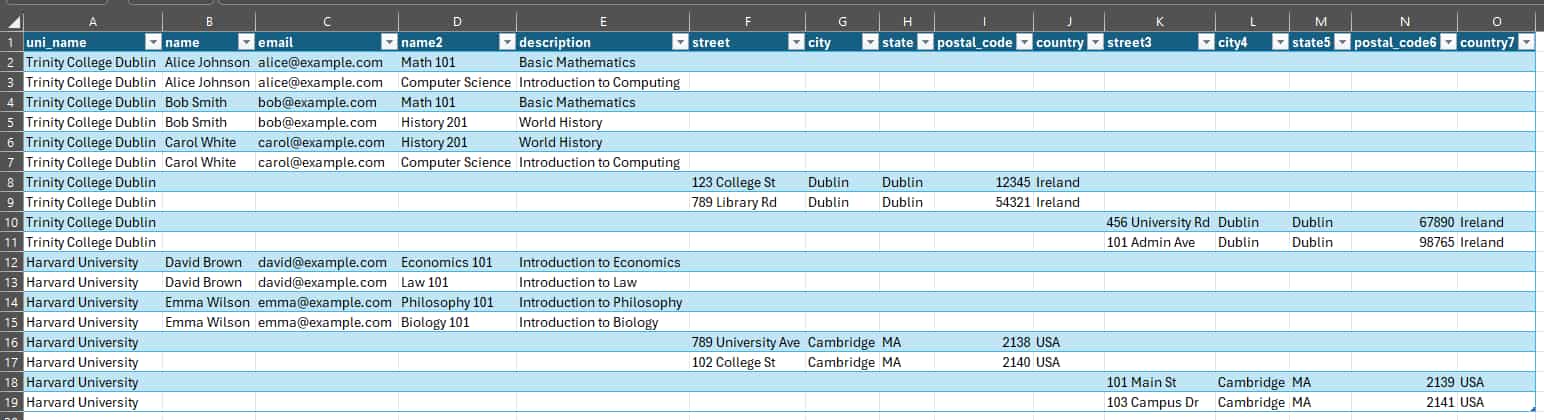
Here’s how your sheet should look after dropping the university node at cell A1:

So by the end of Step 4, you should already have the columns of your flattened XML table in your sheet.
You can think of it as importing the schema of your flattened Excel table, and in the next step, I’ll show you how to import the actual data.
Step 5
You’re one click away from seeing your data converted into Excel.
Go to the Developer tab and the “XML” tab, hit “Import”. As shown in the next screenshot:
And you’re ready to go. You should see your flattened XML data in one table in Excel, as seen below:
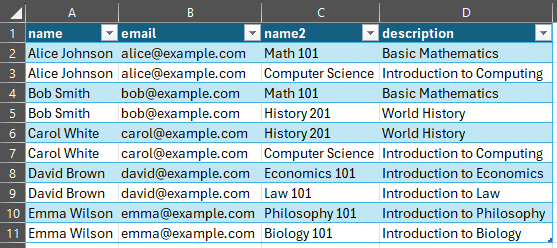
If you choose to import the “students” node from the XML Source panel, then your result would be a less sparse matrix, including only the “students” data:
Pro Tip: Flattening vs. Normalisation
Most XML to Excel workflows end in a flattened table, which data engineers call One Big Table (OBT).
It’s quick, simple, and widely used because the flattening algorithm’s logic is easy to build, but not necessarily to use.
Flattening often leads to redundant rows, NULLs, and poor performance.
In contrast, normalisation splits your XML into related tables, preserving structure, reducing duplication, and making data easier to query and maintain (especially for long-term, large-scale projects).
Want to see the difference?
Try it yourself with Flexter Online, which normalises XML automatically and outputs clean, structured CSVs ready for import to Excel.
So, I’ve shown you how to convert XML and XSD to Excel using XML Maps. If you follow the same steps, with only a slight difference in Step 3, you may also reproduce an XML-only workflow where the schema is inferred straight from your XML.
But when should you choose the XML-only workflow, and when should you select the XML and XSD workflow with XML Maps? Here are some answers:
- Use XML-only workflow when you don’t have an XSD, and you need to infer a schema from just XML, while you know that the rest of your XML will strictly have the same schema as the one used to infer the schema (initial import).
- Use an XML-only workflow when you don’t need strict validation.
On the other side, choose the XML and XSD workflow:
- When an XSD exists for your data, and you know that this schema is known and stable for your project’s lifetime.
- Use the XML and XSD workflow when you need to export data back to XML format (yes, this is a feature unique to XML Maps).
- If you don’t have an XSD but you need strong validation, then create an XSD for your XML and use the XML and XSD to Excel workflow.
As a final note on the XML Maps option, I would like to mention that, according to my testing, if you plan not to use an XSD, then the more modern “File → Open” option may be better suited for the simple XML to Excel than XML Maps.
Limitations of native Excel methods
If you’ve followed my XML to Excel testing up to now, you already know that Excel offers a few built-in ways to import XML: the File → Open, Power Query, and XML Maps.
While all three methods are OK when you want to import flat XML into Excel, none of them is built for handling complex and structured XML at scale.
They also share a major limitation: you can only process one file at a time, which makes even small batch conversions impractical. In addition, since there’s no programmatic access to these native XML import tools, automating your workflow isn’t an option either.
While all three native XML to Excel options share some universal limitations, each also comes with its own unique quirks. Let’s explore the common constraints first, followed by the specific challenges of each approach.
Common Limitations Across All Native Methods
No matter which approach you take, you’ll likely run into the same core issues:
- No way to automate the import process
Excel doesn’t offer a native way to automate XML imports through code. While Power Query can script some workarounds, it’s fragile, hard to scale, and still limited to one file at a time.
- No Native Support for Batch Processing
Excel’s built-in tools only let you open or import a single XML file at a time. There’s no way to load a folder of XML files, or a zipped archive, directly into Excel. If you’re dealing with multiple files, you’ll be stuck importing them one by one.
- You always get a Flattened Table (no normalisation)
All native methods flatten your XML into a single table (OBT), often duplicating data and breaking logical relationships.
- Schema Awareness is Partial at best
In Excel, XSD files are only supported through XML Maps, with just one schema allowed per workbook. XML Maps do not handle complex schema structures well, such as imported or included XSDs, namespace dependencies, or modular schema references, making them unsuitable for real-world or standards-based XML.
- No Data Lineage Tracking
Excel does not maintain a clear record of where imported XML data came from or how it was transformed. This lack of traceability makes auditing, debugging, and maintaining data accuracy much more difficult in complex workflows.
- Limited Support for Complex or Nested XML
In my testing, I tried the simple XML test case. But what happens if you try the deeply nested XML test case? Trust you don’t want to know. This is because native Excel options can’t handle deep hierarchies, recursive structures, and mixed content (just to name a few).
- Manual and Fragile Workflows
From dragging elements in XML Maps to expanding levels in Power Query, any change in XML structure can break your setup.
- File Size and Performance Constraints
Excel has strict row and column limits (1,048,576 rows; 16,384 columns), and large or deeply nested XMLs can crash Power Query or significantly slow down Excel.
Aside from these common limitations that show up every time you try to import an XML into Excel, there are a few more option-specific limitations:
Limitations of the “File → Open” Method
- No schema awareness
Excel infers the structure directly from the XML, often incorrectly, especially with complex or optional elements. Can’t take XSD as input.
- All-or-nothing import
You have no control over which elements are imported, and you can’t filter or transform during load.
- Only suitable for one-off conversions
You can’t refresh or automate this workflow; it’s static.
Limitations of Power Query
- No support for XSD schemas
Power Query doesn’t allow you to import or validate against an XSD. You’re relying on Excel’s schema inference.
- Manual node expansion
Flattening nested structures requires clicking through each level; this is fine for small files, but painful for anything large or deeply nested.
- No XML export
Once you transform your data, there’s no way to write it back out to XML.
- Requires familiarity with Power Query
If you want to make the most out of this tool, you’re required to learn or hire a Power Query professional.
Limitations of XML Maps
- Treated as a legacy feature
While still functional, XML Maps are hidden in the Developer tab and are no longer actively developed by Microsoft.
- Not resilient to change
Any alteration to the XML structure or schema breaks the mapping; you’ll need to remap everything manually.
- Export limitations
While this is the only native Excel option that can support export back to XML (not just save as .xslx), you can only export up to a maximum of 65,536 rows.
- Cannot map recursive structures beyond one level.
Pro Tip: Don’t Just Take My Word for It. See the Difference for Yourself!
Tried Excel’s native XML methods? You’ve likely ended up with one giant table full of NULLs and duplicate values. Not ideal.
Now picture that same XML run through a tool built for the job: normalised, clean, and ready to query.
Test it yourself: Use Flexter Online to convert your XML to CSV, which you can then import into Excel.
Try it with the test cases we’ve tested above (simple and multi-branch XML), or with your own XML source files, and see how clean XML conversion should look!
Third-party options for XML to Excel
Native Excel tools are fine for small, flat XML. But once you introduce nesting, multiple branches, an XSD, programmatic conversion, or large XML data volumes, things get messy fast.
If you’re dealing with real-world XML or scaling beyond quick fixes, it’s time to look at smarter, faster third-party options.
In this section, I’ll walk you through the best tools I’ve tested for importing your XML into Excel, cleanly, reliably, and with as little manual effort as possible (well, wait for the third option).
Programmatic Approaches: Python for XML to Excel
If you’re comfortable writing code or have someone on your team who is, you might consider using Python to convert XML to Excel.
But here’s the catch: it’s a lot of manual work.
You’ll need to build everything from scratch: parsing logic, transformation rules, error handling, and export formatting.
And when your XML changes (it will), you’re back in the code making updates. I’ve taken this route before, and while it offers some flexibility, it’s rarely fast or easy.
That’s why I only recommend this approach if you have strong in-house XML expertise, particularly in handling large and complex XML files, working with high data volumes, and understanding XSD, or are prepared to outsource parts of the process.
To help you gain some perspective on the manual conversion process, I’ve compiled this PDF, which provides a high-level description of the manual XML conversion steps (and how they compare to an automated approach).
Pro Tip: Considering Outsourcing?
Based on my experience, not all XML conversion projects are created equal.
Six key factors consistently make or break success, especially when your XML is complex, large, or constantly changing.
In such cases, outsourcing can be a smart move, particularly if you’re short on in-house expertise or need fast and reliable results.
Still unsure? I’ve also covered the pros and cons in this guide to outsourced XML conversion.
Want to see automated, outsourced XML conversion in action? Book a demo of Flexter.
XSLT for XML to Excel
Another way to convert XML to Excel (though a bit more niche) is using XSLT (Extensible Stylesheet Language Transformations).
XSLT lets you transform XML into other text-based formats like HTML, CSV, or SpreadsheetML (an XML format that Excel understands).
In theory, this means you can create a custom XSLT stylesheet to convert your XML into an Excel-friendly structure.
But in practice? It’s not exactly beginner-friendly.
It works, but it’s highly manual and doesn’t scale well, especially if your data has nested or complex relationships.
That said, if you’re working in a system that already uses XSLT or you’re migrating legacy workflows, it might be worth exploring, especially if you have deep in-house XSLT expertise. In that case, it can be a powerful option, although it is still demanding in terms of development and maintenance.
Flexter to the Rescue (Again)
By now, you’ve seen the landscape: Excel’s native tools struggle with anything beyond flat XML. Python and XSLT give you control but demand serious manual effort, expertise and headaches.
So where’s the option that just… works?
That’s where Flexter comes in, an enterprise-grade XML conversion tool designed to handle everything the others can’t.
Whether your XML is deeply nested, schema-driven, or full of repeating groups, Flexter:
- Automatically normalises your XML into clean, relational Excel tables.
- Supports both XML and XSD, leveraging XSD primarily for schema generation, not just validating source XML (which is the only thing that other tools can do).
- Outputs directly to Excel and many other formats (CSV/TSV, SQL, Snowflake, Oracle, Redshift, Delta Tables, etc.).
- Generates useful extra documentation with zero manual effort, such as ER diagrams, data lineage reports and source-to-target mappings.
- Requires no manual coding: Just point Flexter towards your source XML files and your output folder, and voila! Your XML appears there after a few seconds (no matter the size or volume of your XML).
- Flexter applies optimisation algorithms to refine the target Excel schema. It identifies artificial hierarchies (such as unnecessary one-to-many parent-child relationships) and transforms them into streamlined, one-to-one structures that are easier to work with, analyse, and maintain.
- Flexter integrates into your team’s tech stack: it runs on multiple operating systems, supports a wide range of data sources (including FTP/SFTP, database LOBs, object storage, HTTPS, and message queues).
- And don’t overlook the support and professional services: The Flexter team is known for being highly responsive, whether it’s support tickets, emails, or calls. They’re always ready to walk you through any challenge or help you navigate the documentation when needed.
No mapping by hand. No flattening logic to maintain. No NULL-stuffed one-big-tables. Just clean, structured, analysis-ready data in your Excel spreadsheets.
Still on the fence? Just take a look at our next section, where we compare all options in a single comparison table.
When to use which option?
By now, I’ve given you several options for XML to Excel converters, and it’s easy to get stuck picking the wrong one for the job.
Some options are perfect for quick one-offs; others are designed for mission-critical pipelines with millions of rows.
So, what should you use and when? Let’s run through the main options:
- The “File → Open” method in Excel.
- The Power Query method.
- The XML Maps method.
- Manual code (e.g., Python).
- XSLT transformations.
- Flexter XML to CSV Online (for normalised conversion, opens in Excel).
- Flexter Enterprise (for full-scale, automated XML to Excel conversion).
Choosing the right one depends on your use case, your technical comfort level, and the complexity and size of your XML files.
To make this decision easier, here’s a full comparison of the available options on how to convert XML to Excel:
XML to Excel Conversion Options: Side-by-Side Comparison
|
Option |
Best For |
Key Strengths |
Limitations |
For more than one-off XML conversions? |
XML Normalisation |
|---|---|---|---|---|---|
|
File → Open |
Simple, flat XML. |
Quick and easy; no setup required |
Converts one file at a time; No XSD support; Limited control, struggles with nested data. |
❌ No |
❌ No (flat table output only). |
|
Power Query |
Lightly nested XML. |
Powerful; supports transformations and nesting. |
Converts one file at a time; No XSD support; memory-heavy; learning curve for advanced use. |
⚠️ Partially |
❌ No (flat table output only). |
|
XML Maps |
Lightly nested XML; XML with XSD. |
Supports XSD; enables cell-level mapping and export. |
Converts one file at a time; Legacy feature; limited schema support; max 65K rows; no recursion. |
⚠️ Partially |
❌ No (flat table output only) |
|
Python |
Lightly nested XML; Can be used to automate based on expertise and personnel. |
Full control, customizable, handles large/complex XML. |
Requires coding; setup needed. Steep learning curve; |
✅ Yes |
✅ Yes – full control (If you’re willing to hire a team of XML Conversion Experts) |
|
XSLT |
Well-structured XML needing flattening (CSV/HTML). |
Declarative, reusable for known XML structures. |
Steep learning curve; limited for irregular XML. |
✅ Yes |
❌ No (flat table output only) |
|
Online Tools (e.g., Flexter Online) |
One-time conversions. Can convert complex XML test cases. |
Easy to use; no coding required. |
File size limits, not secure for sensitive data, and limited features. |
❌ No |
✅ Yes |
|
Flexter Enterprise |
Any XML structure, highly nested XML, and Large-scale projects that involve SLAs. |
Normalisation algorithms, Optimisation algorithms, Can scale up and scale out according to needs, Requires no code. |
There are no limitations, as XML Conversion specialists can customise this solution to their needs. |
✅ Yes |
✅ Yes |
This table collects all the results of my testing in a single place.
For quick and simple XML files, Excel’s built-in options can work, just don’t expect miracles. And don’t expect to use them to automate your XML conversion workflow at scale or to process a batch of XML files without running into limitations, frustration, or a whole lot of manual effort.
If you’re semi-technical, Power Query or Python gives you more power and flexibility (..and more manual work).
But if you’re working with real-world XML (deeply nested, schema-based, or part of a bigger data workflow), Flexter is the only no-code solution that will get your XML into Excel with ease.
FAQ: XML to Excel, Decoded
Got questions? You’re not the only one. Here’s a quickfire round of answers to the things people always ask when working with XML and Excel.
What do you mean by “converting XML to Excel”?
It means turning a structured XML file into a native Excel format (.xlsx) that you can actually use: rows, columns, filters, formulas. Or in other words, converting XML to XLSX.
Unlike importing, conversion may include flattening, restructuring, or even breaking XML into multiple sheets. If the original XML is complex or deeply nested, a proper conversion normalises it into something Excel can handle without melting down.
What’s the difference between importing and converting XML in Excel?
Importing means using Excel’s built-in tools (like XML Maps or Power Query) to bring XML into a worksheet.
Converting, on the other hand, is a more flexible and powerful process: it may involve reshaping, normalising, or even slicing XML across multiple tables or sheets. It’s the difference between dragging in data versus making it actually work.
If you’re coming from Google Sheets, note that IMPORTXML is not available in Excel. The closest equivalent is Data > Get Data > From File > From XML for structured XML imports, or the Developer tab XML Map feature for schema-based mapping.
What’s XML mapping in Excel?
XML mapping is the process by which Excel links elements from an XML file or schema (XSD) to specific cells or tables in a worksheet. Think of it as a blueprint: telling Excel, “Put this bit of data here, that one over there.”
XML mapping has been supported by the XML Maps option, which I discussed earlier in this post.
It’s useful, but limited. Mapping recursive structures? Handling mixed content? Not going to happen. And it doesn’t play well with larger or more complex XML.
Can I use an XSD file to convert XML to Excel?
Yes, but it’s clunky.
You can use an XSD with XML Maps in Excel to define how the data should be structured. But if your XML evolves (say, a new tag is added), Excel might fail completely.
It’s rigid and lacks the schema evolution capabilities you’d expect in real-world projects.
If schema validation matters, a tool like Flexter handles this far more gracefully.
Can I edit XML in Excel and save it back?
Technically, yes, if you’re using XML Maps and have set everything up correctly. You can modify the mapped XML content and export it back out.
But there are big caveats: you’re capped at 65,536 rows, recursion isn’t supported, and any structure Excel doesn’t understand? It gets ignored or stripped. So, proceed with caution.
The newest “File → Open” and Power Query options don’t support exporting back to XML; instead, they save your Excel tables as .xlsx, .xls, CSV, TSV, etc.
Wait… isn’t Excel already XML-based?
Great catch. Excel files (.xlsx) are actually Office Open XML (OOXML) under the hood, basically a zipped collection of XML files.
But that’s OOXML, a different beast from the XML you’re converting. In simple terms: an XML file is a data exchange format for storing and transferring structured data, while an XLSX file is a spreadsheet format designed for display, calculation, and analysis, even though it uses XML internally. Just because Excel is XML-based doesn’t mean it can natively handle your XML without help. Think of it like owning a toolbox; it doesn’t mean you automatically know how to use every tool inside.
I’ve actually written another blog post that discusses converting OOXML to a database using Flexter.
Can I automate XML to Excel conversion using Excel’s native tools?
Not really. At least not at scale. Excel’s built-in tools (File → Open, Power Query, XML Maps) only work on one file at a time and lack true automation.
Power Query has some scripting flexibility, but it’s clunky for complex XML and still requires manual setup.
If you’re serious about automation, especially with structured or large XML, Flexter Enterprise is a far better fit. It handles batch conversion, supports complex schemas, and delivers clean, ready-to-use Excel files without the manual grind.
How do I open an XML file in Excel?
To open an XML file in Excel, go to “File”, then “Open” and browse to your XML file. When the import dialogue appears, choose “As an XML table” to import your data as a flattened table, which is the easiest method, but there are additional options depending on how complex your source XML is. You may also want to convert your XML to Excel rather than simply opening it.
What is the difference between XML to XLS and XML to XLSX?
The main difference between XML to XLS and XML to XLSX is that XLS is the old Excel format while XLSX is the modern standard, giving you more rows, smaller file sizes, and better compatibility with today’s tools and platforms. Always choose XLSX unless you specifically need to support an older system that cannot open XLSX files.
Can I convert XML to Excel online for free?
Yes, you can convert XML to Excel online for free. If you search, several options will appear, but they are usually limited because they always flatten your XML into a One Big Table (OBT) and it is unclear how they handle your sensitive data. The better option is to use Flexter Online to convert your XML to CSV and then import it into Excel, as shown in my other guide.