How to Use the Flexter Online to Convert Your JSON to CSV and TSV


In this guide, I’ll walk you through Flexter Online: a free JSON to CSV/TSV converter that delivers professional-grade data transformation directly in your browser.
Keep reading if you are looking for a solution that:
- Automatically transforms your JSON into ready-to-use tabular formats, such as CSV and TSV,
- Eliminates the need for manual mapping between your source JSON and the generated output,
- Unlike many freeware tools that flatten JSON into a single “One Big Table” (OBT), a method notorious for its limitations, Flexter Online normalises your JSON into multiple CSV/TSV files, eliminating redundancies and preserving structure.
- Delivers essential documentation to help you get started quickly and stay organised long-term, including a README file, an Entity-Relationship (ER) diagram, and a Source-to-Target Mapping (STM).
- Provides you with a README file that offers essential usage guidance along with helpful reference links.
- The ER diagram visualises the schema generated by Flexter’s normalisation and optimisation algorithms, while the STM illustrates how the source JSON objects align with the converted CSV/TSV fields.
- Gives you access to free support directly via email or live chat on the website.
- For growing projects, you can upgrade to the full version with Flexter Enterprise, which also includes professional services to support your evolving data needs.
Unlike the clutter of random tools you might stumble across via search engines or chatbots, Flexter Online is purpose-built for small to medium-sized data tasks.
Simply drag and drop your JSON, and the converted results arrive straight in your inbox; it’s that simple.
TL;DR: This post walks you through the free, online JSON to CSV/TSV workflow and shows you how to interpret the output, CSV, TSV, and documentation, right on your computer. I’ll also share a detailed feature comparison between Flexter Online and Flexter Enterprise to help you decide when upgrading to the Enterprise edition makes sense.
If you’re also working with JSON on Databricks, see our Databricks JSON Guide Read Parse Query and Flatten Data for how to read, parse, query and flatten JSON before conversion.
Use Flexter to turn XML and JSON into Valuable Insights
- 100% Automation
- 0% Coding
Online Conversion Workflow for JSON to CSV and TSV
In this section, I’ll walk you through my 3-step workflow for converting JSON into CSV or TSV using Flexter Online.
Before we dive in, it helps to know where your JSON file is stored and to have a rough sense of its structure: the key paths and how objects nest inside one another.
For demonstration purposes, I’ll be using a simple JSON test file (download link included).
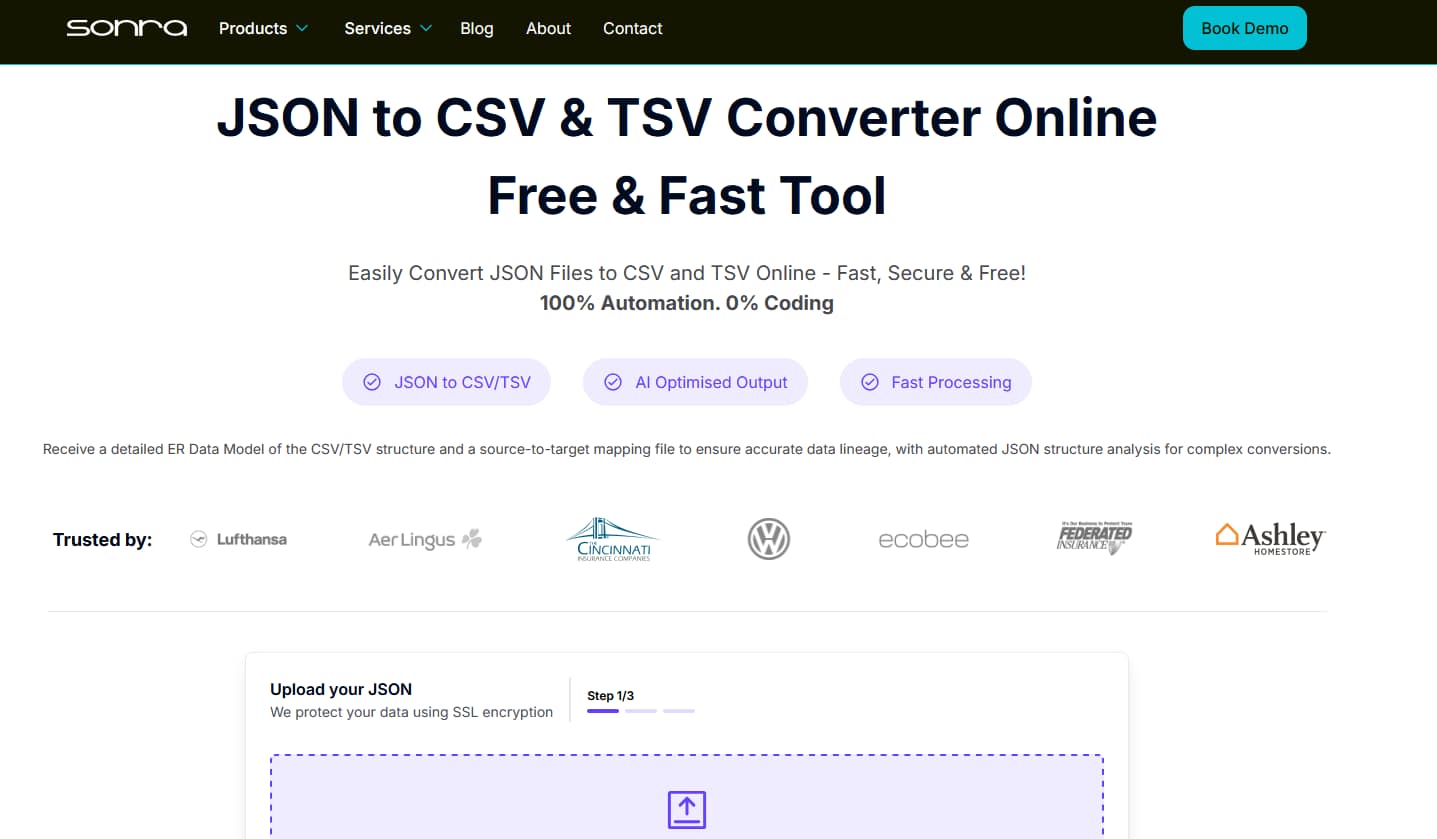
Once you’re set, head over to the Flexter Online JSON to CSV Converter and let’s get started.
Once you access the online JSON to CSV converter, the landing page should look like this:
Step 1: Scroll down a bit so that you find the purple widget, where you may start by uploading your JSON.
You can drag and drop your JSON, or browse your local filesystem by clicking “Upload a file”.
Here’s how it looks:
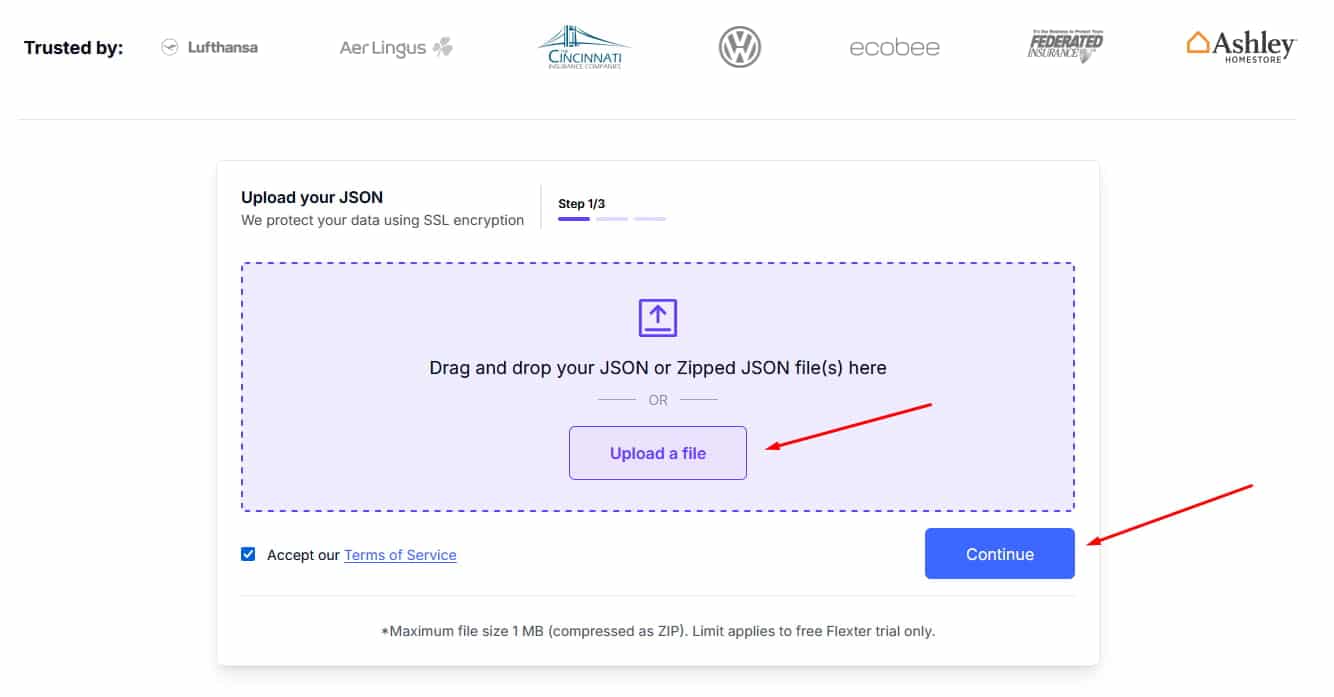
After uploading the file, click “Continue” (as I highlighted with the red arrow in my screenshot).
Pro Tip: Got a batch of JSON files or a zipped archive? Flexter Online handles them seamlessly.
Just drag and drop your ZIP or batch of JSON files into the browser at Step 1; no extra prep required.
From there, the process runs exactly as it would for a single JSON file.
Step 2: What if I told you that you’re just seconds away from receiving your CSV and TSV in your inbox?
In Step 2, enter your contact details so the converter knows where to send your converted files and supporting documentation.
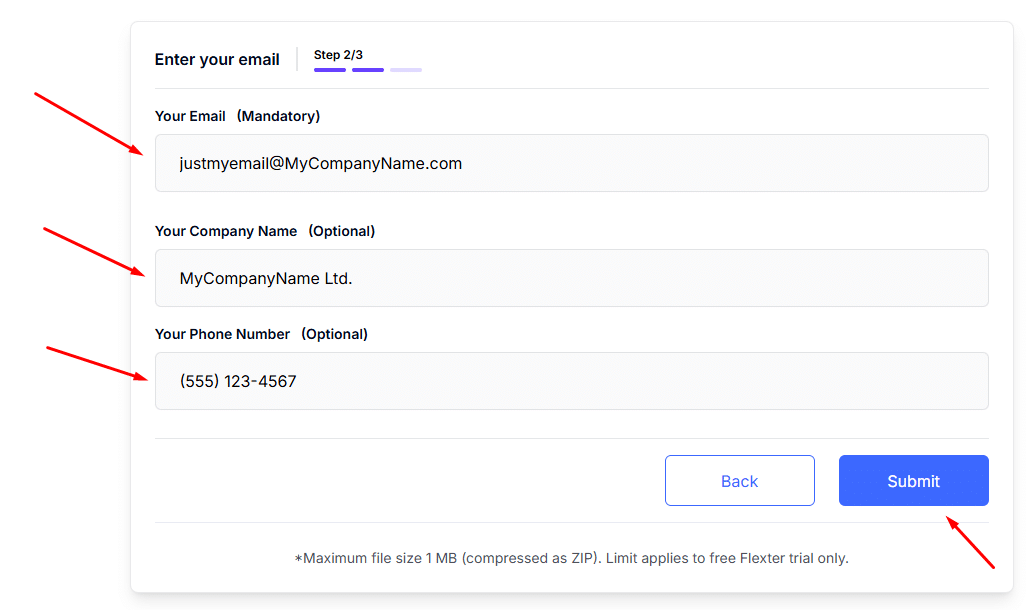
Keep in mind that your email address is required to receive the converted CSV/TSV files, while the company and phone number fields are entirely optional.
Step 3: If you’ve followed the steps, you should have landed on this page:
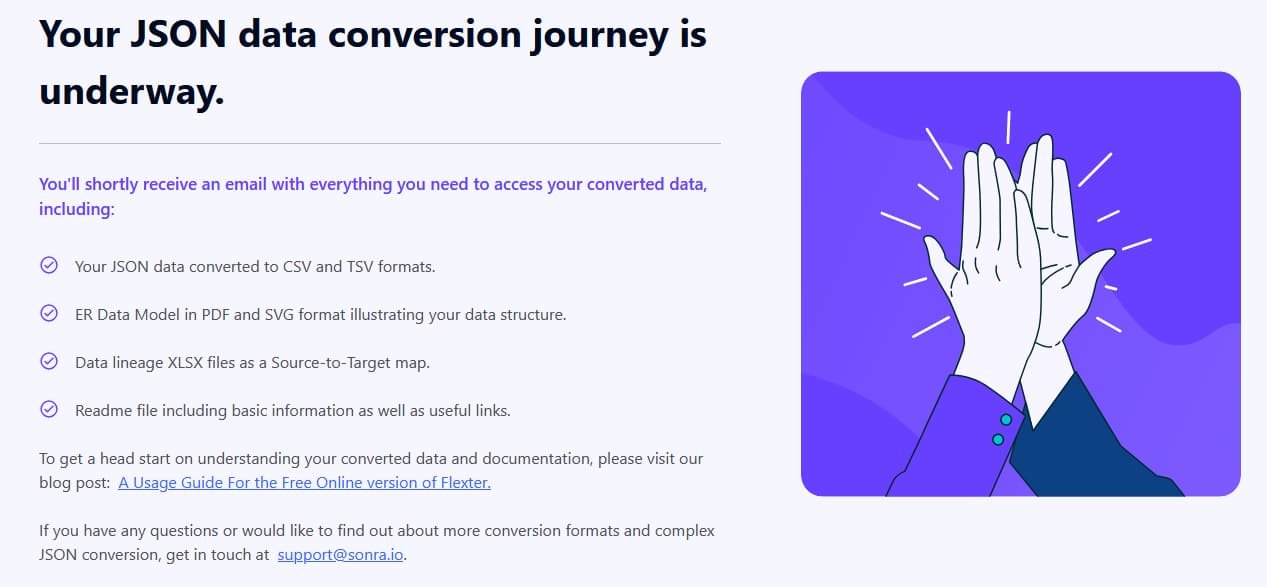
Congrats! Your converted CSV/TSV data and respective documentation should be heading to your inbox!
Within a few seconds, you’ll receive an email titled “Access Your Converted JSON Now”.
If it doesn’t land in your inbox, be sure to check your Spam or Junk folder.
The email includes a download link to your files, which will bring you back to this page when you click it:
If something goes wrong with the conversion, don’t worry; you’ll hear from the Flexter support team, typically within one business day (and up to two on rare occasions when we’re too busy).
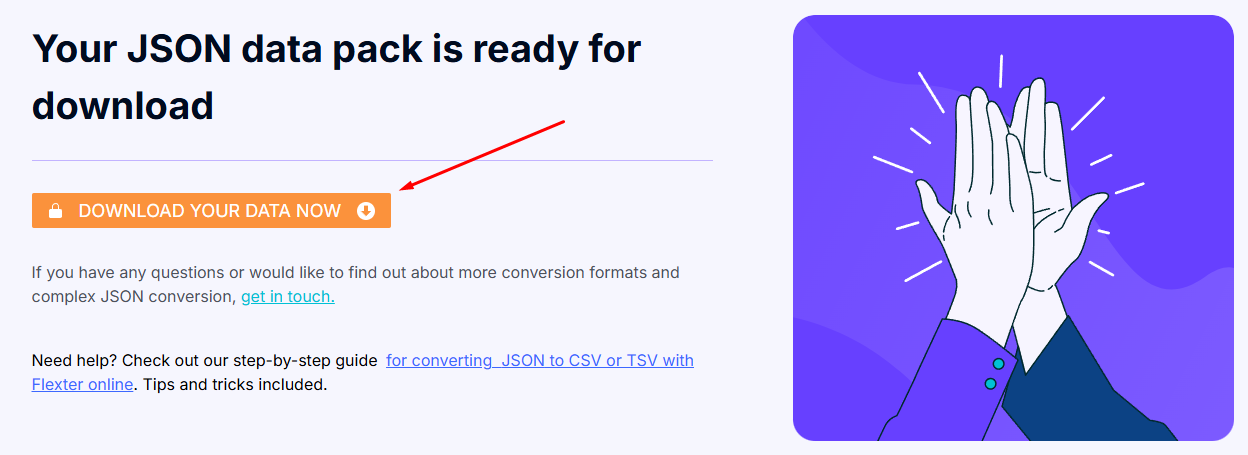
If your conversion is successful, and you’ve clicked the “Download Your Data Now” orange button, then all is well.
Your browser will ask you to choose where to save the ZIP file (i.e., conversion result).
You may choose a location on your hard drive.
Then you should extract the contents of the .zip file, and inside you’ll find:
- A CSV folder: your JSON data converted into CSV format,
- A TSV folder: the same data in TSV format,
- A documentation folder: an ER diagram and a Source-to-Target map,
- A readme file: a quick guide with useful information and links.
Next, we’ll dive into how to open these files and make sense of the documentation.
New to JSON to table conversion and feeling a bit overwhelmed? Don’t worry, Flexter has you covered.
If the conversion throws an error, our support team will step in (typically within 1–2 business days) to help you get back on track, completely free of charge.
Need more firepower?
Flexter Enterprise unlocks advanced capabilities like exporting directly to databases, data warehouses, or data lakes, along with priority phone support and professional services.
Take a breath. Since you’ve found this blog post, you’re not tackling this alone
How to Make the Most of Your Converted Files
After completing the Online JSON to CSV and TSV workflow, your CSV/TSV files and documentation are securely stored on your computer.
Next, I’ll guide you through transforming raw conversion results into a meaningful data asset.
(This section builds on my simple JSON test case that I’ve used to demonstrate Flexter Online.)
Opening and Viewing Your CSV/TSV Files
After downloading and unzipping the folder, open the “csv” folder to access your converted data.
This is how it looks:
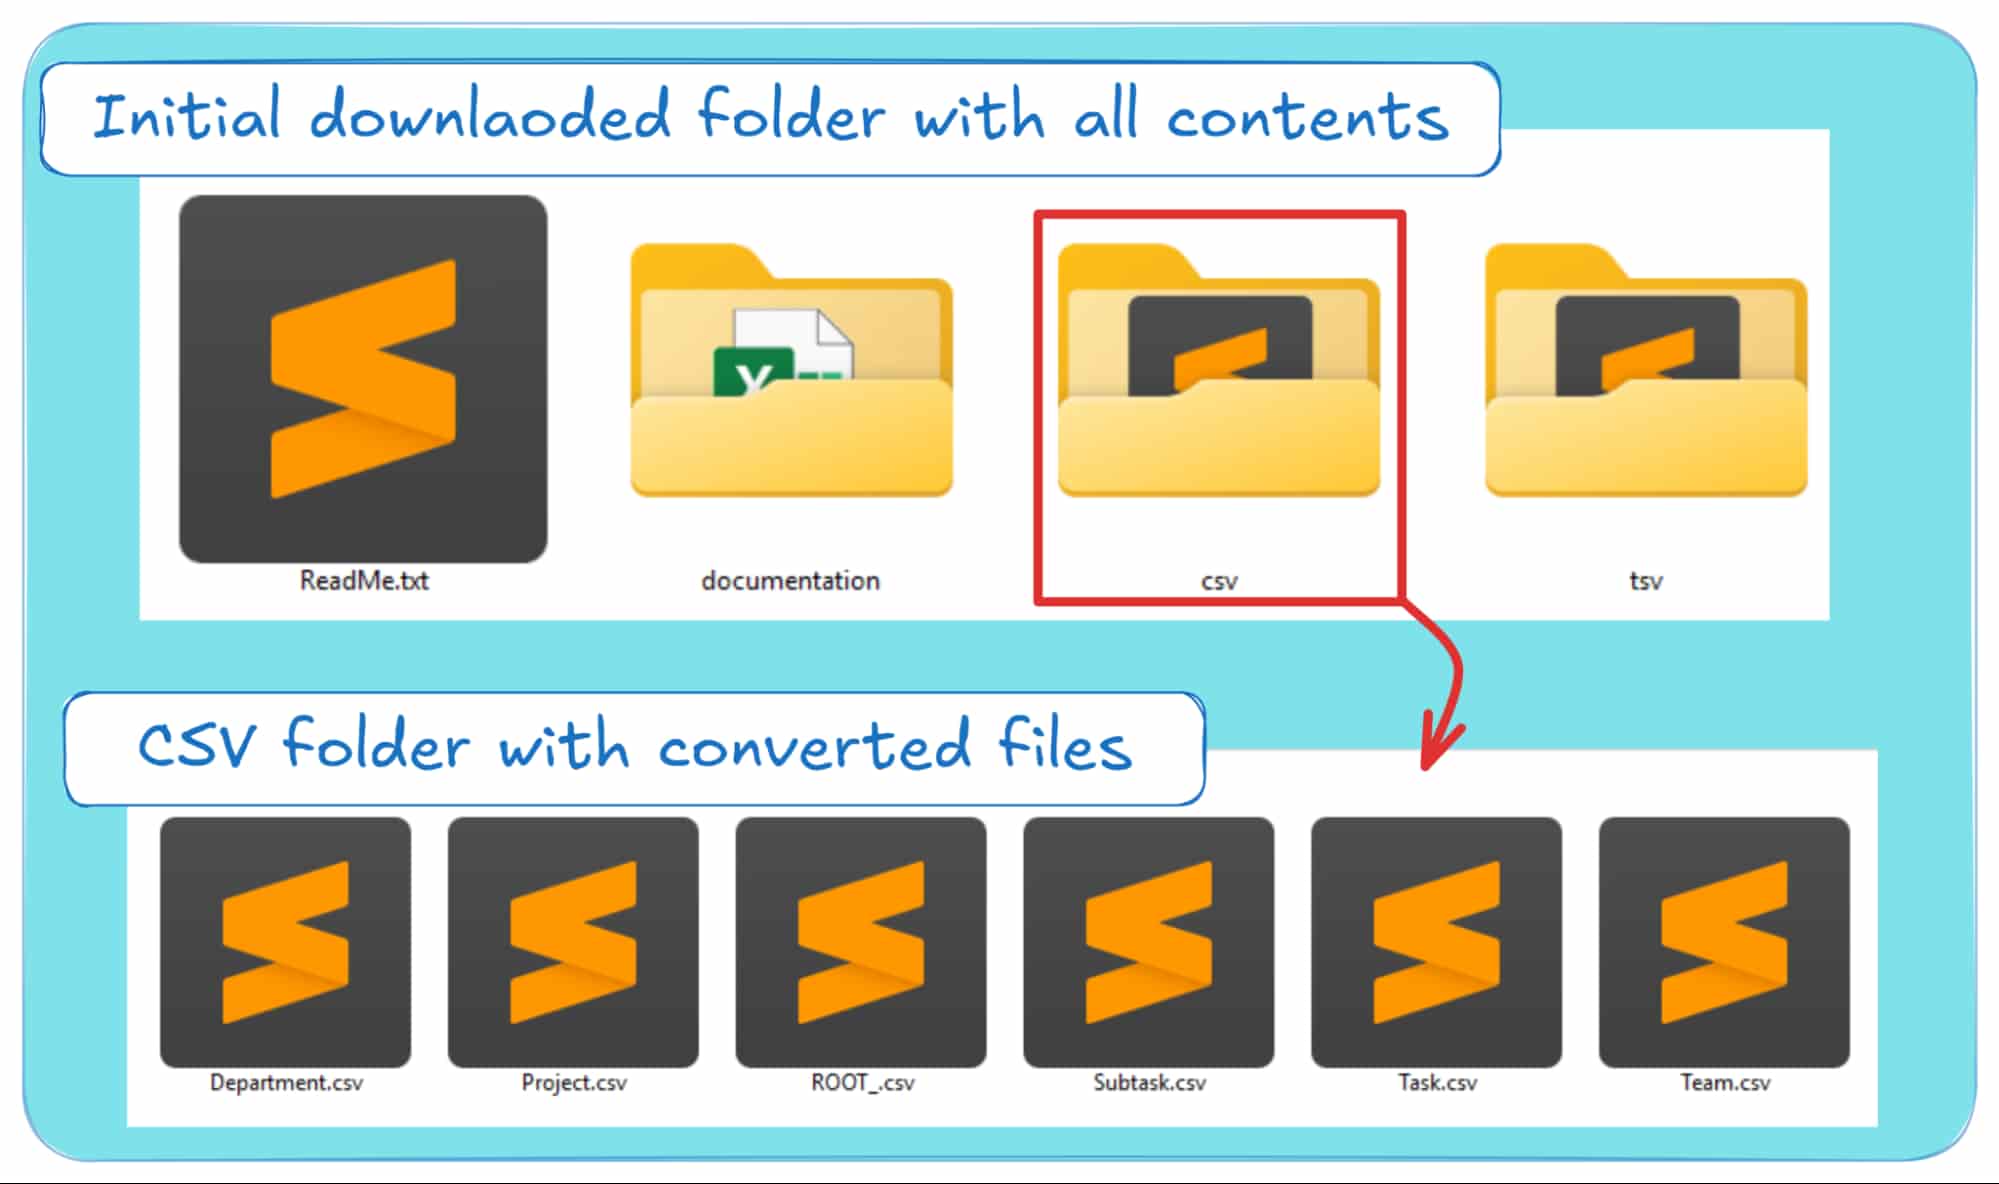
You’ll notice that while the original JSON was a single file, the CSV folder now contains multiple files.
That’s because Flexter Online doesn’t just flatten your JSON into One Big Table (OBT), it normalises the data into separate CSV files that follow a relational model.
I’ll show you how each converted file maps to the original JSON, but first, let’s look at how to open and read your CSV.
Opening and Inspecting Your CSV in Excel
Excel is one of the most popular tools for working with small datasets (<1MB), like the one in our example.
To open a CSV file, just follow these four steps:
Step 1: Open Excel and start a blank workbook. It will include a sheet named “Sheet1”.
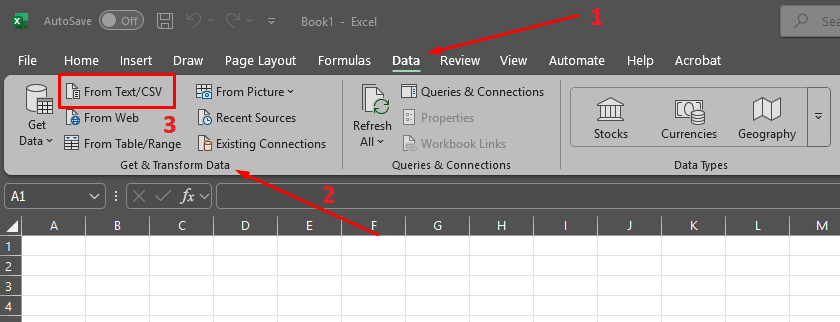
Step 2: Go to the ‘Data’ tab in the Ribbon, find the ‘Get & Transform Data’ section, and select “From Text/CSV”.
Step 3: Choose a CSV file to load, set the delimiter to “Comma” in the pop-up window, and click “Load”.
In this example, after selecting the task.csv file, the pop-up window looks like this:
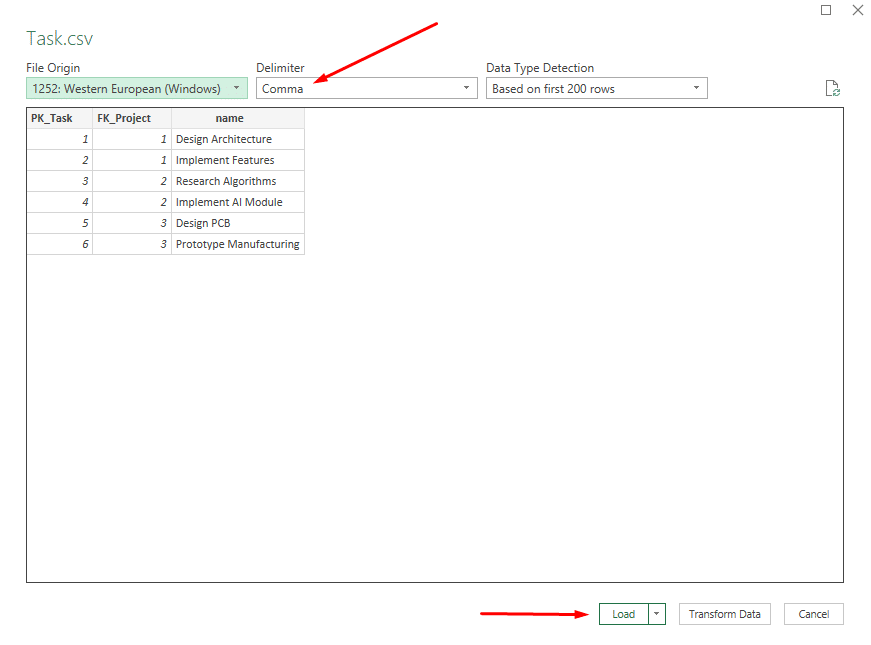
Step 4: Excel will import the CSV into a new sheet named after the file (e.g., “Task”), displaying the data as shown:

That’s it! You’ve loaded your first converted CSV into Excel.
Repeat the same four steps for the remaining files in the ‘csv’ folder until you have an Excel workbook with five sheets, one for each file (well, that will be six sheets if you also choose to include ROOT_.csv, which includes some metadata about your conversion).
You can follow the same steps for TSV files by selecting a TSV in Step 3 and choosing ‘Tab’ as the delimiter.
Just be careful not to mix up CSVs with tabs, or TSVs with commas.
Understanding the Source-to-Target Map
Now that your converted CSV files are in Excel, how do the five files map back to the original JSON?
No worries, this information is already on your computer.
Unlike most JSON to CSV converters, Flexter Online gives you not just the files but also everything you need to understand the conversion.
Next, I’ll walk you through the first part of the Flexter Online documentation: the Source-to-Target Map (STM).
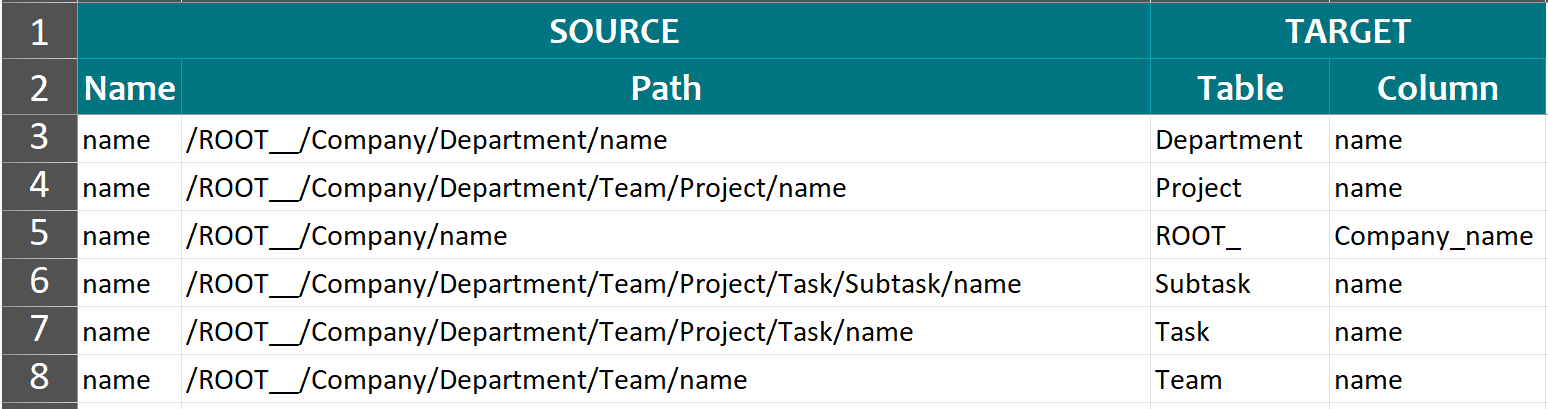
As the name suggests, the STM maps JSON paths from the original file to the rows and columns of the target CSV/TSV.
Here’s how it looks for the simple JSON test case:
How to read the Source-to-Target map
The Source-to-Target Map (STM) might look overwhelming at first, but it’s simpler than it seems.
Think of it as your data’s cheat sheet, organised in a clear matrix. Here’s how it works:
- The “name” column lists all elements and attributes from your source JSON, giving you a clear snapshot of the starting structure.
- The “Path” column shows the path to each element, including its nested key-value pair relationships, so you can easily trace the structure of your JSON.
- The “table” and “column” columns link your JSON to the CSV, showing exactly where each JSON element ends up in the CSV/TSV tables.
See? It’s not so intimidating after all.
Example: To map the Project “Next-Gen Software” from the source JSON test case to the converted CSV/TSV, follow these steps:
- Step 1: Quickly go through your source JSON file to identify the nested key-value pair relationships from the parent node of “Next-Gen Software” up to the root node of the JSON. Keep that in mind as you proceed to the next step.
- Step 2: In the STM, find the row for the node you care about (e.g., name of Project), confirm its JSON path matches the nesting you traced in Step 1, then use the “table” and “column” entries on that row to locate the value in the converted CSV.
- Step 3: Finally, your converted data will be in the ‘csv’ folder, inside the “table” (i.e., Project.csv file) and “column” (i.e., name) you identified in Step 2 using the Source-to-Target Map.
Here’s how the 3-step process works for the simple JSON test case:
You can also run this process in reverse: start with the converted data in the CSV/TSV and trace it back to its original spot in the source JSON.
Demystifying the Entity-Relationship (ER) diagram
So, you’ve cracked open the CSV and worked out how the raw data connects to the final tables. Nice! But now you might be wondering, how does it all fit together?
And what’s the deal with those extra columns, like PK_Project and FK_Team, showing up in the CSV/TSV files?
What you’re looking at are the Primary Keys (PK) and Foreign Keys (FK).
Think of them as the backbone of a normalised database schema; they’re what connect the five CSV files and make the whole structure run efficiently.
Most online JSON converters squash everything into one giant table (the dreaded One Big Table).
The result? Loads of redundant values and not much flexibility.
Flexter Online takes a smarter approach: it normalises your source JSON, maps it neatly into CSV/TSV, and even adds the right PKs and FKs so you end up with a clean schema that actually makes sense.
To make sense of your converted CSV data and its new schema, Flexter Online gives you an ER diagram, a visual map of how all the CSV tables relate to each other in the relational schema.
Exactly, every time you run a data conversion, Flexter Online automatically generates an ER diagram for you.
And the best part? It’s completely free.
Let me give you a peek at what the ER diagram looks like for our simple JSON test case:
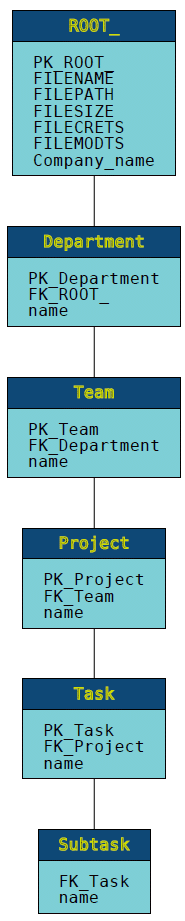
Each little blue box in the diagram represents one of your CSV/TSV files. The label on top is the file’s name, and inside the box (the light blue area), you’ll see a list of all the columns it contains.
In practice, this means every row in your CSV/TSV is tied to the columns listed in the light blue part of each box, and, even more importantly, to the newly added primary (PK_) and foreign (FK_) keys.
If you’re already a relational database pro, this ER diagram will feel totally familiar.
But if you’re looking at it and thinking, what on earth is going on? Don’t worry, I’ve got you.
In another post, I break down ER diagrams step by step so they make perfect sense.
Want to convert your JSON straight into a database?
Good news: You can save a lot of hours of manual coding by checking out our Flexter Online JSON to SQL version ..!
With the latest update, you now get your own Snowflake instance with your converted JSON data!
No need to juggle extra steps like converting to CSV first.
And here’s the kicker: if you want more automated firepower, you may check Flexter Enterprise, which is designed for larger-scale enterprise projects.
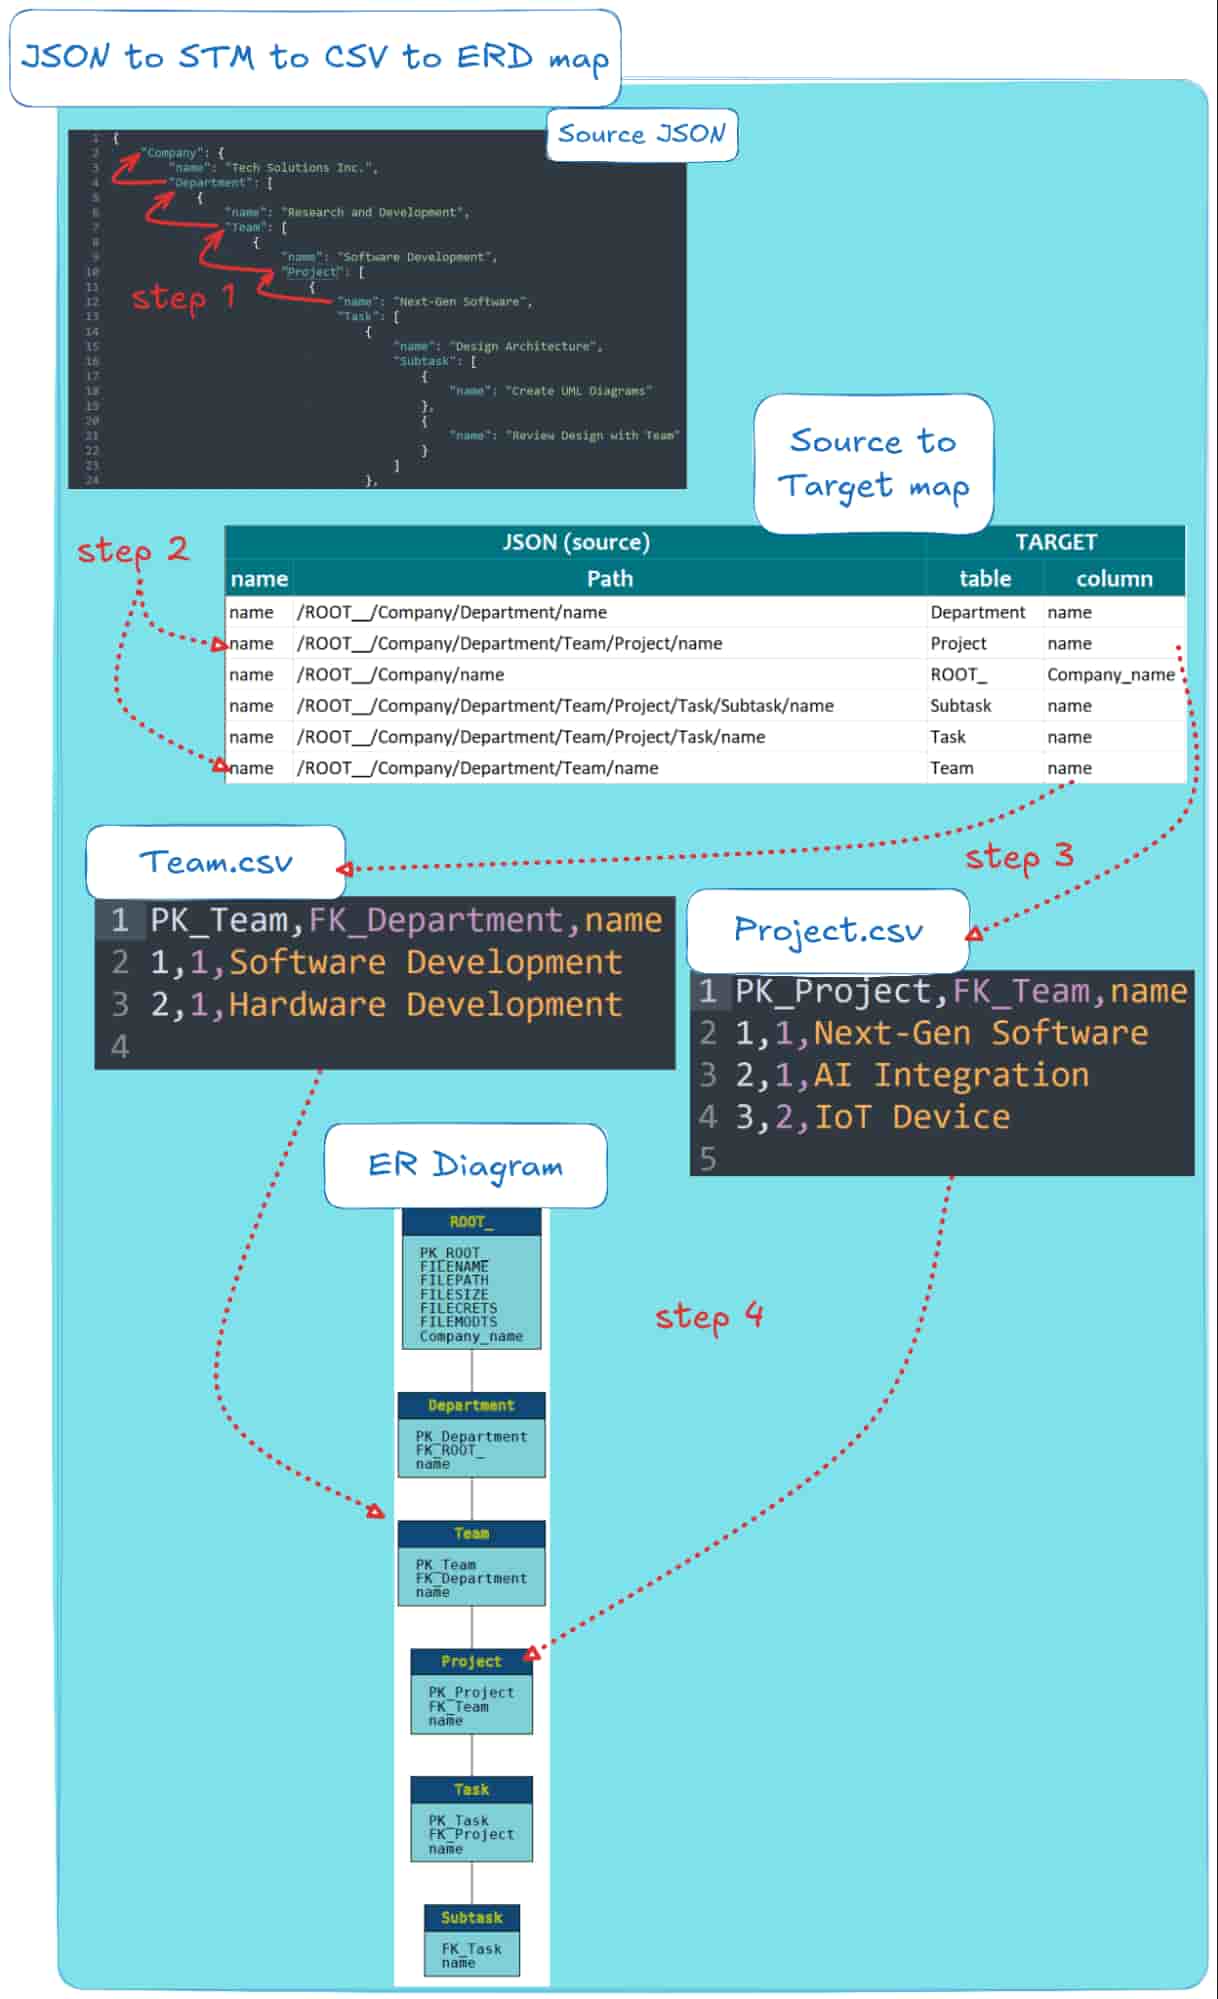
Connecting the dots: From JSON to STM, to CSV, and finally to an ER Diagram
Before we wrap things up, here’s one last diagram, this time from the perspective of an experienced data engineer, to give you a clearer view of how JSON converts to CSV/TSV.
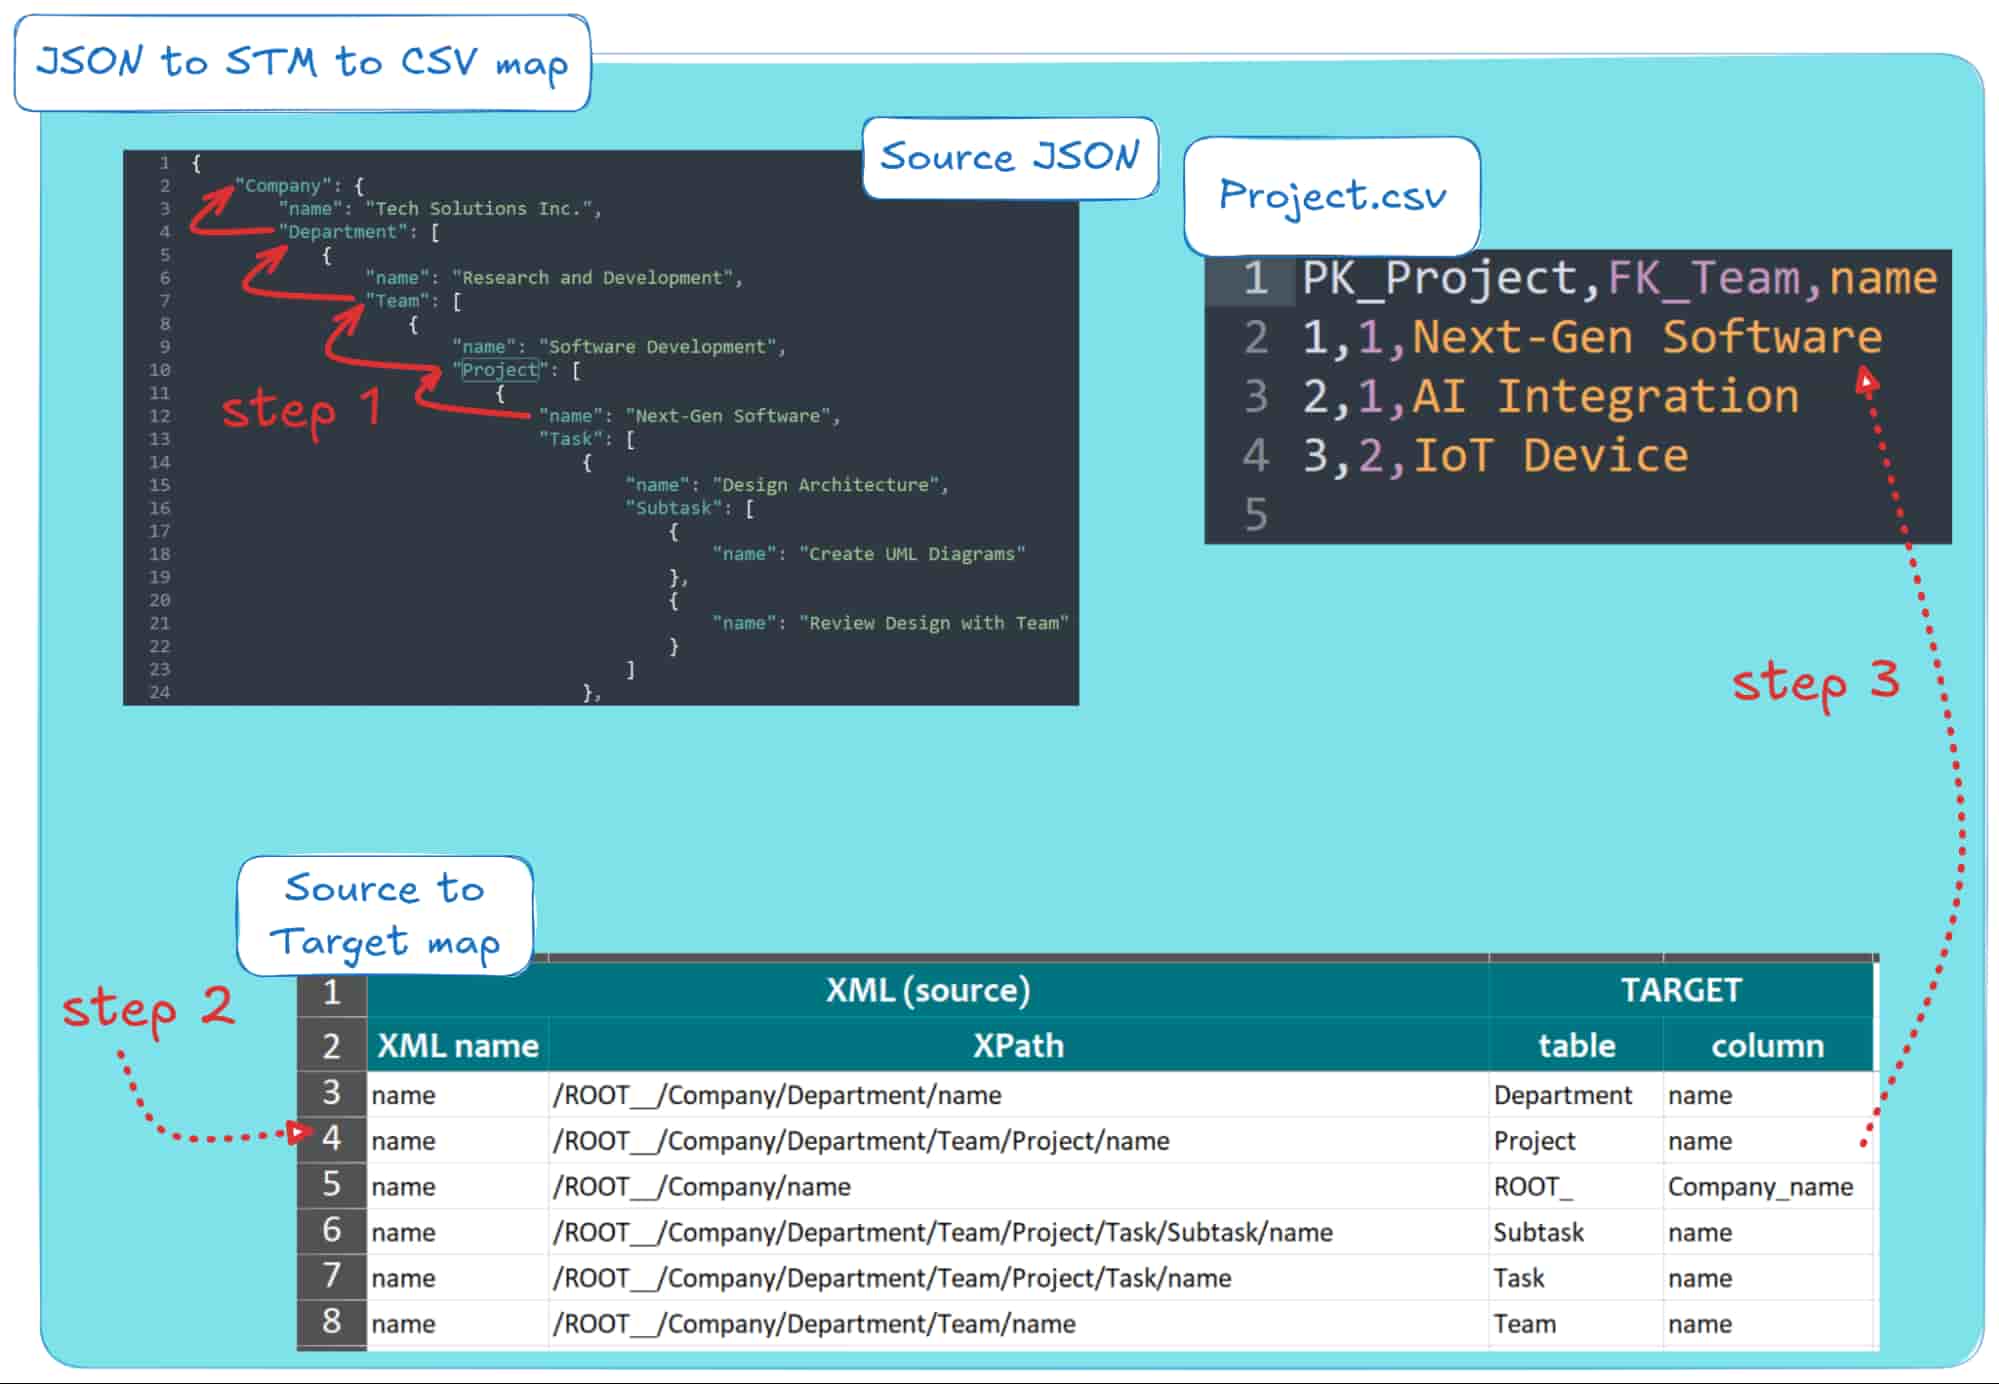
When I look at the whole process, from the source JSON to the converted CSV/TSV, the Source-to-Target (STM) map, and the ER diagram, this is the way I like to think about the JSON to CSV transformation journey:
Step 1: Locate the JSON node of interest in the source file. For example, track where “Next-Gen Software” from the “Software Development” project appears in the source JSON.
Note the JSON path from the root node to Next-Gen Software (e.g. inside the “Research and Development” team and the “Software Development” project).
Step 2: Consult the Source-to-Target map. Identify the row (or rows) that contain the table and column information for your source JSON data.
This can be done by checking the “name” column and verifying “Path” as you remember it from Step 1.
Based on this, the location of your data in the converted CSV is in columns “table” and “column”.
In our example, from this step, you should be able to deduce that Project.csv contains the Next-Gen Software project, in the column “name”.
Another example is that you should extract that the “Software Development” team can be found in Team.csv, in the column name.
Step 3: You may now open up the CSV data in Excel and trace the values from your original JSON (Steps 1 & 2) in the converted file.
While you’re at it, check out the new columns for PKs and FKs; these are what link your CSV tables together.
Step 4: Take a look at the ER diagram, which shows you exactly how the five CSV files fit together within the overall schema.
Look closely at the diagram and you’ll see something neat: the columns from each converted CSV are laid out right inside the ER diagram for their respective files.
Here’s how this 4-step process looks:
This 4-step process doesn’t just flow one way.
You can also work backwards, starting from the converted CSV/TSV, STM, or ER diagram and tracing things all the way back to the original JSON.
Flexter Online vs. Flexter Enterprise: Which One’s Right for You?
By now, you’ve probably noticed that Flexter Online isn’t just another JSON to CSV converter tool you try once and then forget about.
It’s a powerful platform designed to give you access to advanced algorithms, delivering top-notch JSON to CSV/TSV conversion results.
Pro tip
As a data engineer, I always keep the Flexter JSON to CSV/TSV Online page bookmarked.
It’s my go-to for quick, one-off conversions or smaller recurring tasks.
Depending on your needs, you may also want to keep the JSON to SQL Online Converter as a bookmark or the XML to CSV/TSV Online Converter.
Flexter Online is great for many tasks, but it’s not built for everything.
If you’re dealing with frequent or large JSON conversions, uploading files through a browser can quickly turn into a bottleneck.
Flexter Online might be perfect for what you need right now, but it’s worth keeping Flexter Enterprise on your radar.
Designed for scalability, automation, and seamless integration, it’s built to handle bigger projects as your needs grow.
Here’s a quick look at how Flexter Online stacks up against Flexter Enterprise:
|
Feature Category |
Feature |
Flexter Online |
Flexter Enterprise |
|---|---|---|---|
|
Data |
Data volume |
Up to 1MB compressed |
Any |
|
Access |
Availability |
Online |
Local install |
|
WebUI |
✓ |
✓ | |
|
Command Line |
– |
✓ | |
|
API |
– |
✓ | |
|
Input Formats |
XML |
✓ |
✓ |
|
JSON |
✓ |
✓ | |
|
CSV, TSV, PSV |
– |
✓ | |
|
RDBMS |
– |
✓ | |
|
Output formats |
CSV, TSV |
✓ |
✓ |
|
Excel |
– |
✓ | |
|
ORC |
– |
✓ | |
|
Parquet |
– |
✓ | |
|
Avro |
– |
✓ | |
|
Delta Tables |
– |
✓ | |
|
Output databases |
Snowflake |
– |
✓ |
|
Oracle |
– |
✓ | |
|
MySQL |
– |
✓ | |
|
PostgreSQL |
– |
✓ | |
|
Teradata |
– |
✓ | |
|
Redshift |
– |
✓ | |
|
MS SQL Server |
– |
✓ | |
|
Azure SQL Data Warehouse |
– |
✓ | |
|
Yellowbrick |
– |
✓ | |
|
BigQuery |
– |
✓ | |
|
Databricks |
– |
✓ | |
|
AWS Athena |
– |
✓ | |
|
Documentation |
Data lineage |
✓ |
✓ |
|
ER diagram |
✓ |
✓ | |
|
Schema version diff |
– |
✓ | |
|
Schema evolution |
– |
✓ | |
|
Support |
|
✓ |
✓ |
|
Live chat |
✓ |
✓ | |
|
Phone |
– |
✓ |
This table gives you just a glimpse of the powerful features Flexter Enterprise brings to the table (check here for full product specifications).
Flexter Enterprise is built for large-scale XML and JSON conversion projects, and it integrates seamlessly with platforms like Snowflake, Redshift, Databricks, Kubernetes, and Spark.
Plus, it runs smoothly across different environments, whether that’s GCP, AWS, Azure, or even on-premises.
To add to that, Flexter Enterprise leverages advanced re-use and target schema optimisation algorithms, all while delivering relational schemas built for long-term efficiency and easy schema management.
Curious about what Flexter Enterprise could do for your projects?
We’d be happy to set up a Proof of Concept and chat through your specific needs.
Did you know Flexter’s JSON and XML conversion features outperform many big-name data warehouses, and even some so-called paid/premium tools?
From my extended testing of various JSON and XML to database online converters, Flexter has been proven to be one of the few tools that deliver on its promises.
Here are a few useful links you might want to check out:
- Flexter FAQ & Guide – Automate XML & JSON Conversions
- Snowflake vs. Redshift – Support for Handling JSON
- Converting XML and JSON to a Data Lake
- Working with JSON in Redshift. Options, limitations, and alternatives
- Converting and analysing Rugby JSON data to Oracle Data Visualization Desktop
- CSV vs JSON vs XML – The Best Comparison Guide 2026
- Best XML to CSV Converters – Compared by Data Expert
- XML to CSV Conversion Methods and Strategies
- XML to Redshift – Parsing, Loading, & Schema Tips (Guide)
- How to convert XML to Spark Delta Tables and Parquet
Uli Bethke
Uli has been rocking the data world since 2001. As the Co-founder of Sonra, the data liberation company, he’s on a mission to set data free. Uli doesn’t just talk the talk—he writes the books, leads the communities, and takes the stage as a conference speaker.
Any questions or comments for Uli? Connect with him on LinkedIn.
Follow Uli Bethke: