How to Use the Flexter Online JSON to Snowflake Converter


Convert deeply nested JSON to a Snowflake, completely free and without writing a single line of code.
Sounds too good to be true? With Flexter Online, it isn’t.
In this guide, I’ll walk you through how to convert JSON to Snowflake with a simple drag-and-drop.
Here’s why Flexter Online is the smartest way to convert JSON to a database:
- It’s a free, no-code solution that instantly transforms your JSON into query-ready Snowflake tables.
- It removes the need to manually map your source JSON to the Snowflake database schema.
- Unlike other tools that rely on the One Big Table (OBT) approach, Flexter Online normalises your JSON into multiple relational tables.
- It also comes with built-in documentation to keep you organised. It includes:
- You also get free support, available by email or directly through chat on the website.
- And if your needs grow, you can easily upgrade to Flexter Enterprise for advanced features and professional services.
As I’ve pointed out in earlier posts, truly free online XML/JSON-to-database converters are a rare find.
That scarcity often turns something simple, like a quick one-off conversion or testing JSON to SQL, into an unnecessarily frustrating task.
But don’t worry, since you’ve landed on this post, things are already looking up for you.
By the time you finish reading, you’ll be turning JSON into Snowflake like a pro: no headaches, no hassle.
Let’s dive in!
TL;DR (for fast readers):
- I’ll walk you through how to use the Flexter Online JSON to Snowflake Converter to turn JSON into Snowflake tables.
- Once you kick off the conversion, you’ll get an email with Snowflake login credentials for a freshly spun-up database containing your converted JSON. From there, I’ll show you how to:
- You’ll also get detailed conversion documentation. So, I’ll walk you through how to:
If you’re also working with JSON on Databricks and want to learn how to read, parse, query and flatten JSON there, check out our Databricks JSON Guide Read Parse Query and Flatten Data.
Use Flexter to turn XML and JSON into Valuable Insights
- 100% Automation
- 0% Coding
Flexter Online Workflow: JSON to Snowflake Conversion
Next, I’ll walk you through my simple 3-step workflow so you can quickly get the hang of converting JSON to a database online.
Before we jump in, make sure you know where your JSON file lives on your computer and have a general idea of its structure (things like paths and key-value pairs).
For this walkthrough, I’ll use my own simple JSON file (download it here) from my collection of JSON test cases.
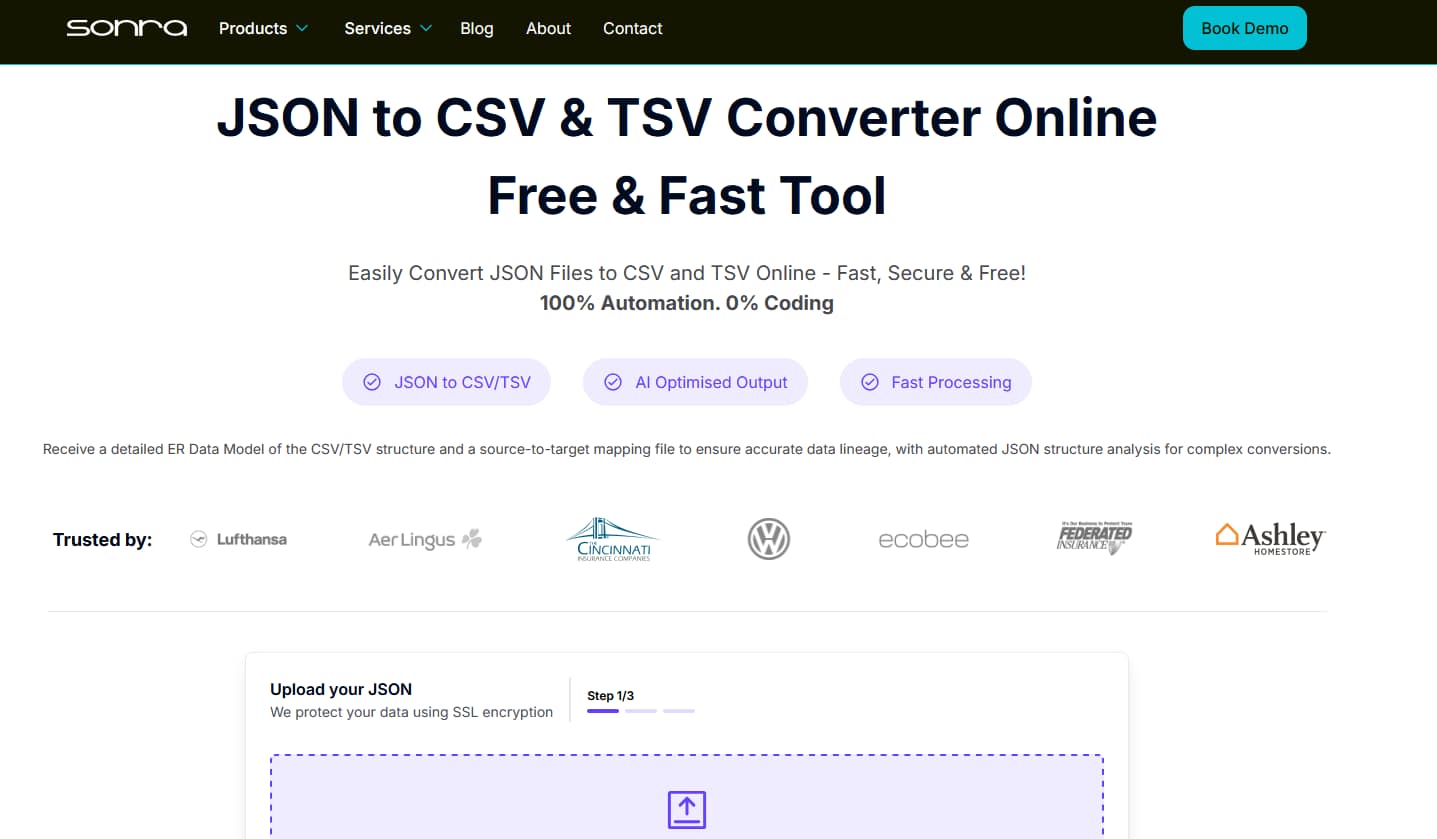
When you’re ready, head over to the Online JSON to Database Converter and let’s get started!
The landing page looks like this:
Step 1: Upload your JSON file by scrolling down to the purple widget and clicking “Upload a file” (as shown with the red arrow below).
Alternatively, you can simply drag and drop your file right onto the purple widget.
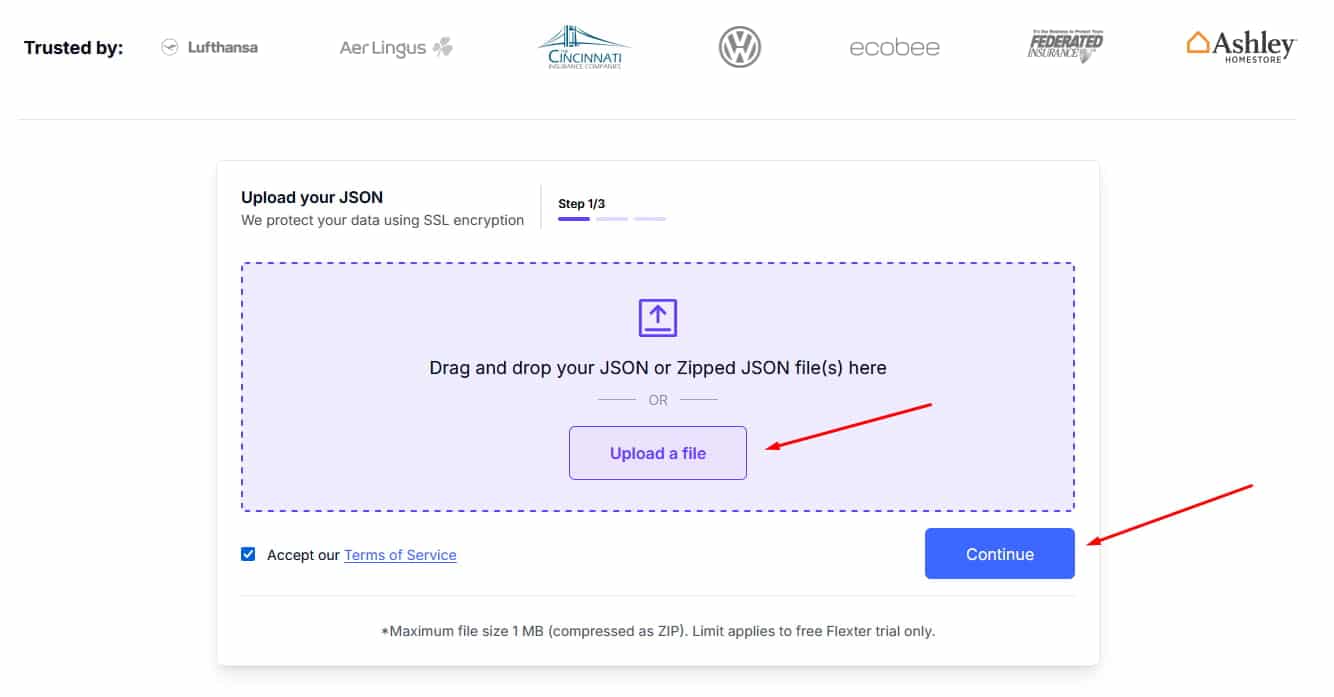
When ready, just hit “Continue” to move on.
Step 2: Almost there! Step 2 is simply adding your contact details so the converter knows where to deliver your converted files and documentation.
An email address is required to get the results to you, while fields like company name and phone number are entirely optional.
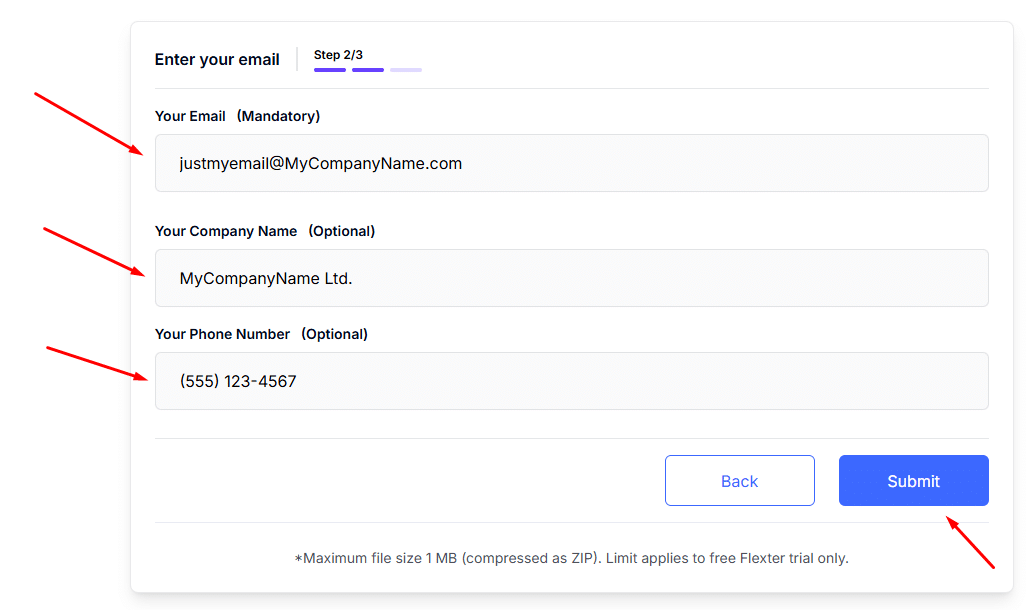
And finally, don’t forget to hit “Submit” to kick off the conversion.
Got a pile of JSON files or a .zip bundle to process? Flexter Online handles them just as effortlessly as a single file.
Simply drag and drop your zip or batch in Step 1, and the workflow takes care of the rest: no extra setup, no special steps.
Batch or single file, the process is identical. Seamless, streamlined, done.
Step 3: Followed Steps 1 & 2? Then you should have landed on the following page:
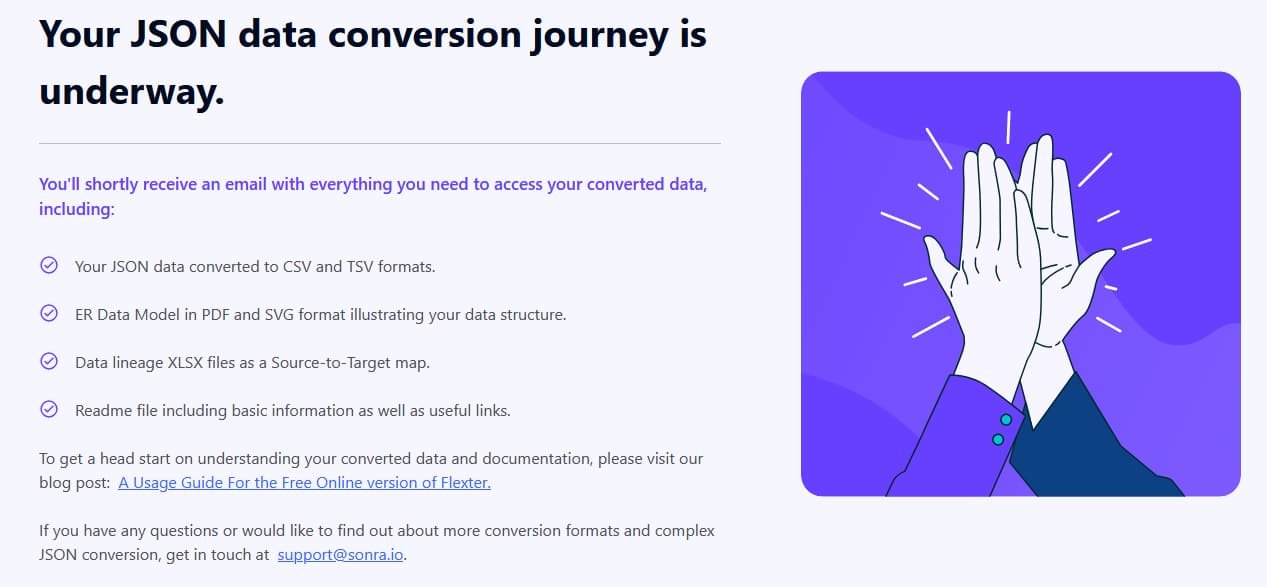
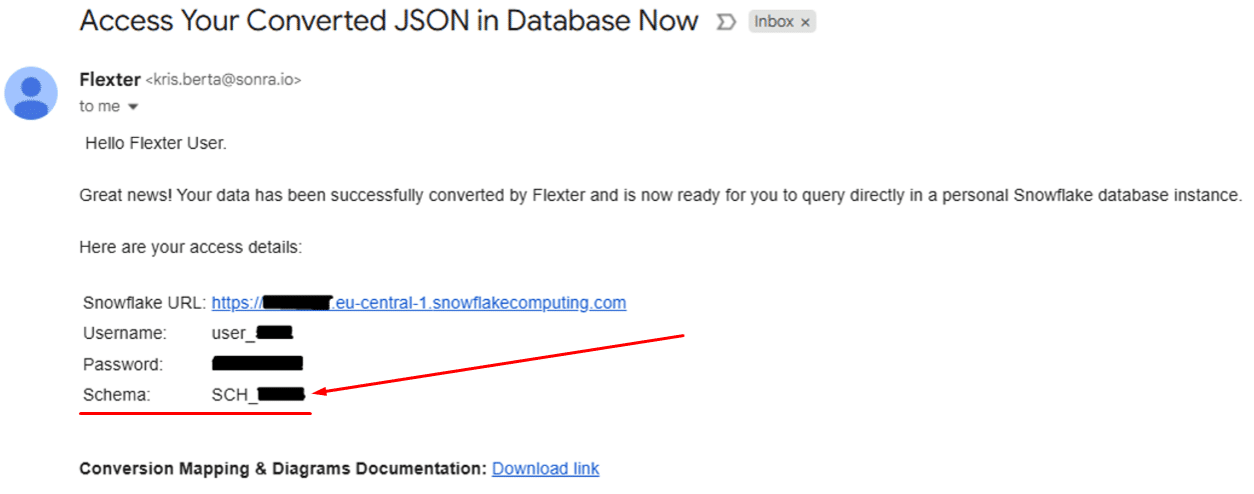
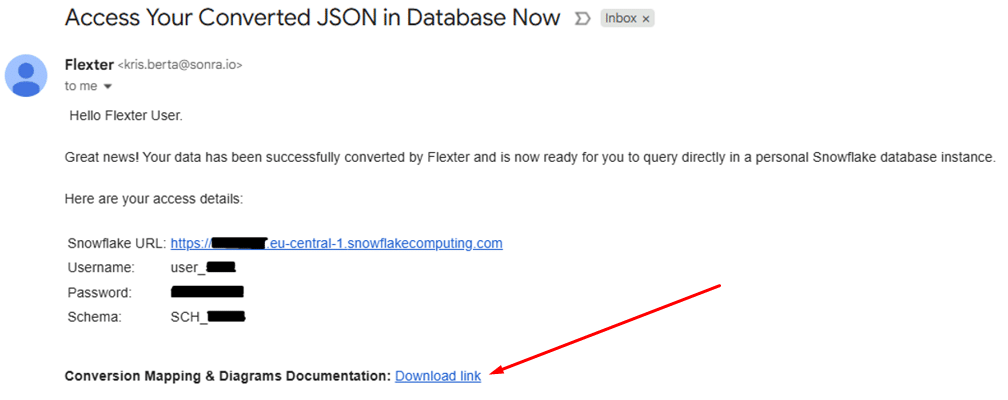
This means that your converted JSON is already en route to your inbox.
Watch for an email with the subject line “Access Your Converted JSON in Database Now”.
And if it’s not in sight, a quick peek at your spam folder usually does the trick.
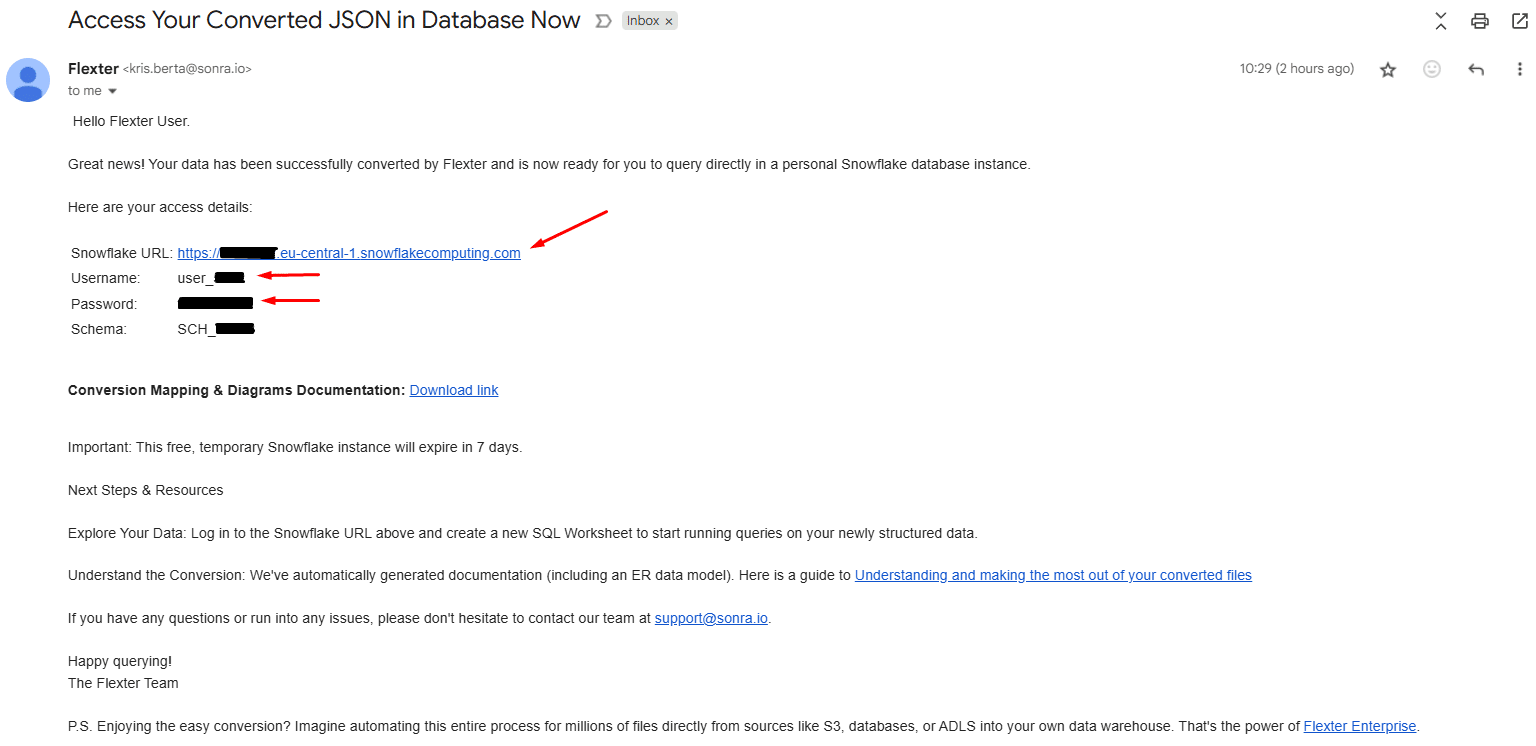
Here’s a preview of what that email looks like:

I have obviously blacked out the sensitive details in this screenshot.
Still, the email you’ll receive will have the full login credentials for accessing a Snowflake database with your converted SQL tables.
If you’ve made it this far in the JSON to SQL process, you’re practically at the finish line.
And if that email you just received looks a little confusing, don’t worry.
In the next sections, I’ll show you exactly how to use it to access your converted data and the documentation that comes with it.
Stuck on a step or still waiting for that email? No stress.
Flexter’s support team has you covered, and it won’t cost you a thing.
That’s right: if your conversion fails, you’ll usually hear back from support within one business day (two at the most if things are especially busy).
Need faster help? Just drop a message through the contact form or live chat, and we’ll make sure your JSON to database conversion gets across the finish line.
Making Sense of Your Converted SQL Tables (and Getting the Most Out of Them)
If you’ve been following the workflow so far, congrats! Your JSON data has made it safely into Snowflake.
But this is where it gets interesting.
Now comes the fun part: turning those SQL tables into a powerful, actionable asset inside Snowflake.
Step one? Check your inbox for an email from Flexter.
That email is your golden ticket, packed with everything you need:
- The URL for your personal Snowflake database instance (plus dashboard),
- Your Snowflake login credentials (username + password),
- The Snowflake database schema where your converted tables now live,
- A download link to the documentation for your JSON to Snowflake conversion.
(Yes, you heard that right, the documentation is automatically generated for your data and your conversion to SQL tables.)
I’ll show you how to use each in the next few sub-sections.
Logging in to Snowflake with Your Credentials
To start exploring your data, you need to log in to your new Snowflake database.
Grab the Snowflake URL, username, and password from the email you received.
You’ll find them listed like this (red arrows):
Click the URL, and Snowflake’s sign-in widget will pop open in a new browser tab.
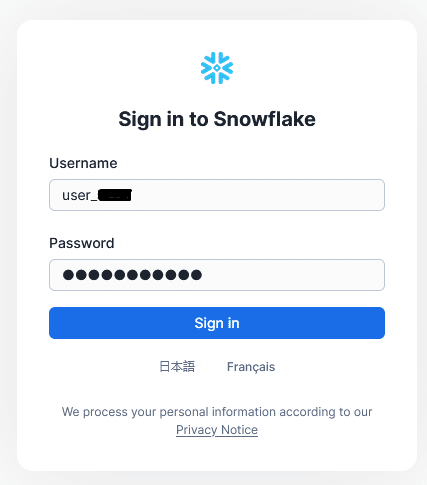
Paste in the username and password Flexter generated for you, then hit “Sign in”.
After a short load, you’ll land on your personal Snowflake dashboard, from where you may view and query your new database.
This is how it looks:
New to Snowflake and Snowsight?
Don’t sweat it; you’ll feel at home in no time.
Flexter Online hands you everything you need to query your newly converted SQL data.
As for Snowflake’s interface: think sleek, intuitive, and loaded with features you’ll actually enjoy using.
I’ll cover the must-knows in this post, but if you’re ready to nerd out even more, check out these deep dives:
- Optimal Usage of Snowflake Virtual Warehouses: Breaking Down Parallelism & Concurrency.
- 7 guardrails against common mistakes that inflate Snowflake credit usage.
- Master Snowflake Data Lineage – Features, Tools & Tips.
- Data Orchestration Deep Dive Snowflake Tasks. An Airflow replacement?
- How to Use the Flexter XML to SQL Database Converter Online
- How to Parse & Flatten XML in Snowflake with Examples.
Finding Your Newly Converted SQL Tables in Snowsight
Next up, let’s find the SQL tables holding your converted JSON data in Snowsight (Snowflake’s web-based GUI).
Start by checking the “Schema” field in the email you received.
It should look something like this:
Once you’ve got the schema, head to your main Snowflake dashboard (the one you see right after logging in).
On the left panel, click “Data” from the main menu.
In the panel that opens, look for a database called “DB_FLEXWEB”. It should look like this:
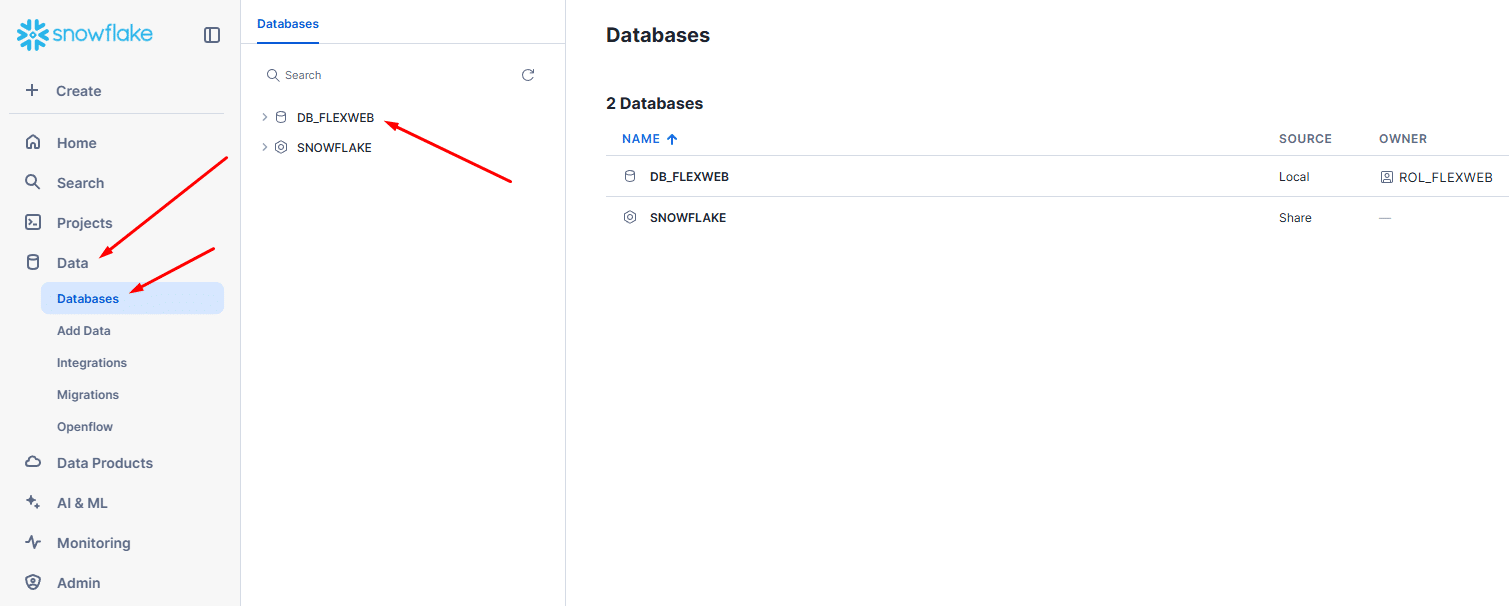
Click on your newly created database, “DB_FLEXWEB”, and you’ll see a drop-down with two entries:
- INFORMATION_SCHEMA, which includes the metadata about the database Flexter built for your converted JSON.
- An entry matching the “Schema” field from your email (in this example, it is blacked out)
Select your schema (e.g., “SCH_12345”) and voilà: your converted SQL tables will appear.
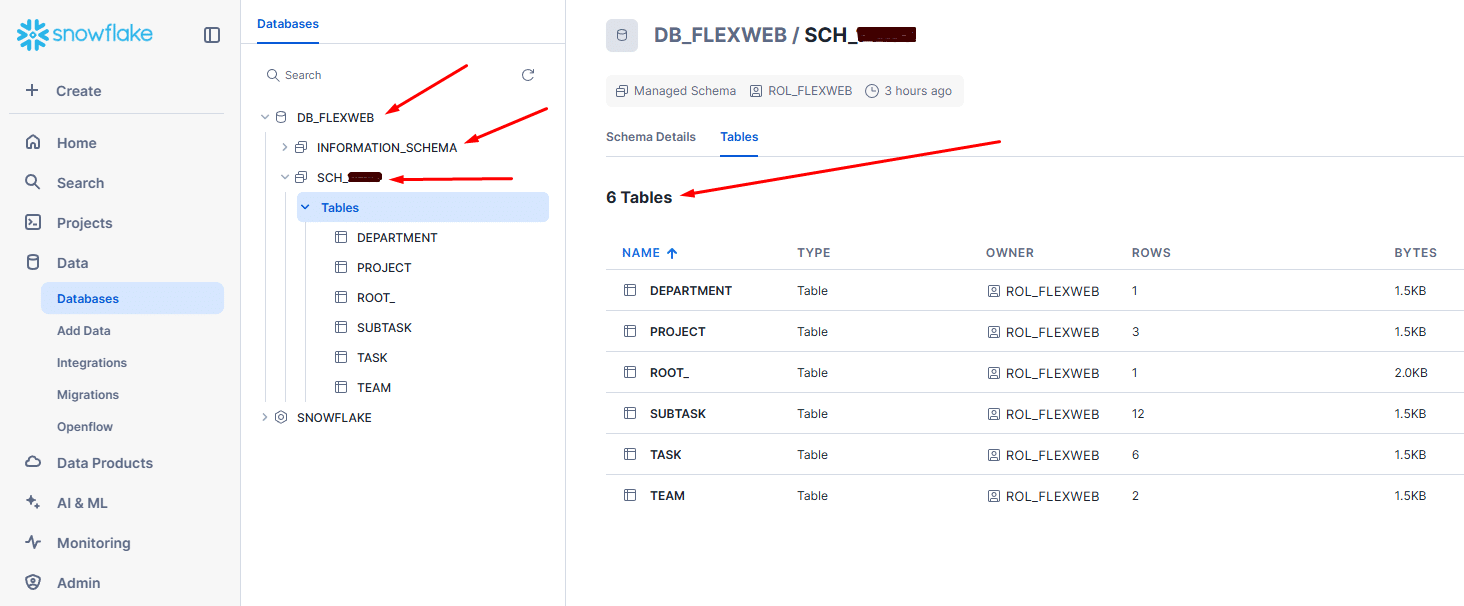
My Snowflake database shows six tables from the converted JSON (well, five with the actual data and one since ROOT_ is just holding some conversion metadata).
Your mileage may vary, though. If you try the converter with your own JSON, you might see a different number of tables.
That’s because Flexter Online breaks down JSON’s nested structure into multiple SQL tables, tying them neatly together with Primary and Foreign Keys (PKs and FKs) so you get a clean, query-ready schema.
The tables created for my simple JSON test case:
- DEPARTMENT,
- PROJECT,
- ROOT_,
- SUBTASK,
- TASK,
- TEAM.
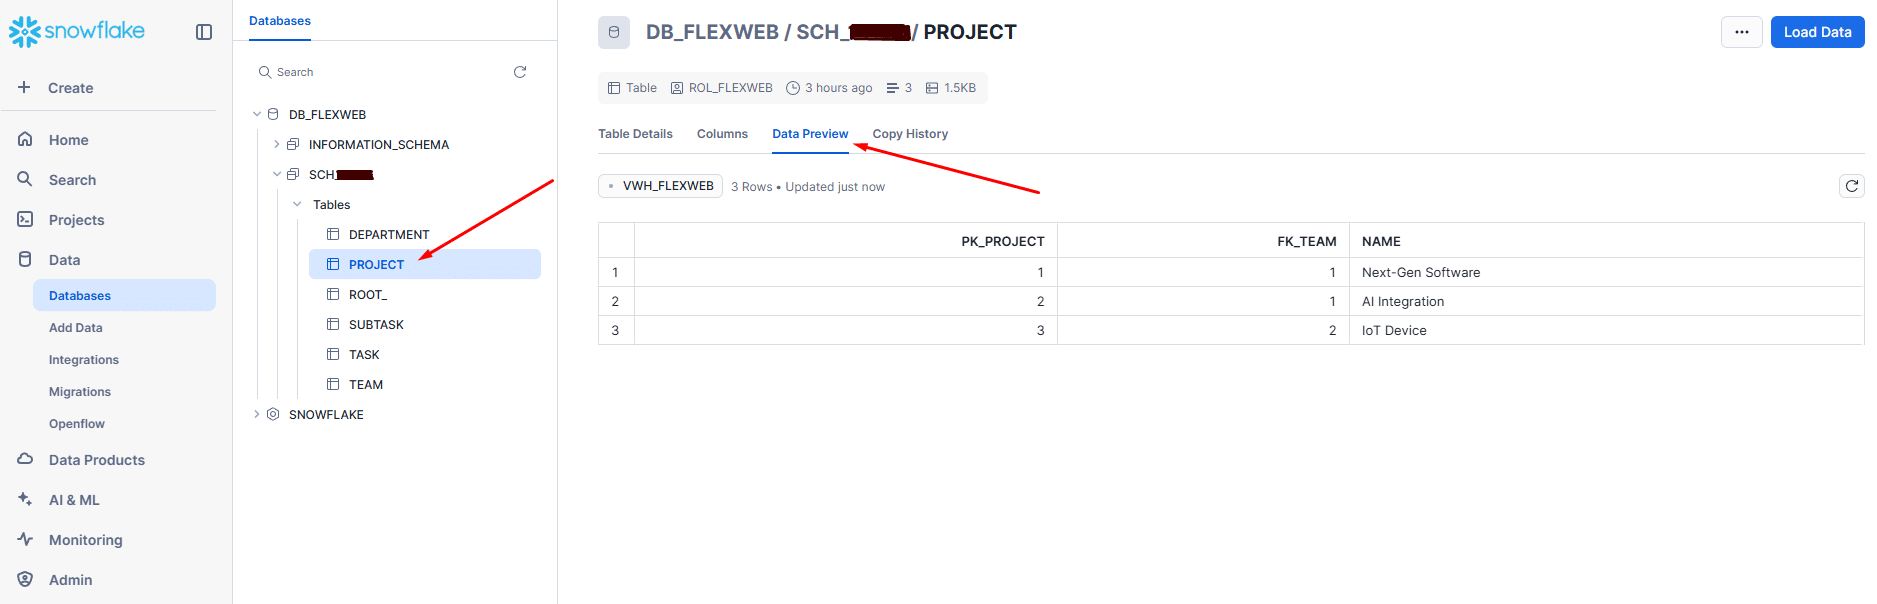
Want to take a quick peek at a table?
Easy. Just click the table name and select “Data Preview” from the menu.
For example, clicking on the PROJECT table and choosing “Data Preview” will give you this:
If you’ve made it this far, congrats! You’ve converted your JSON and found your tables in Snowflake.
Big win!
But don’t stop here. Before we jump into querying with Snowflake’s SQL Worksheet, let’s zoom out for the big picture.
Flexter makes this easy by auto-generating detailed documentation for your JSON to Snowflake conversion so that you can explore your data with confidence.
Let’s do that next.
Reading the Documentation for Your Converted SQL Tables
Alongside your new Snowflake database, Flexter Online gives you all the documentation you need to clear up any mysteries.
Just grab it by clicking the link in the email you received:
That link takes you to a new page where you can download your documentation.
Just click “DOWNLOAD YOUR DATA NOW”.
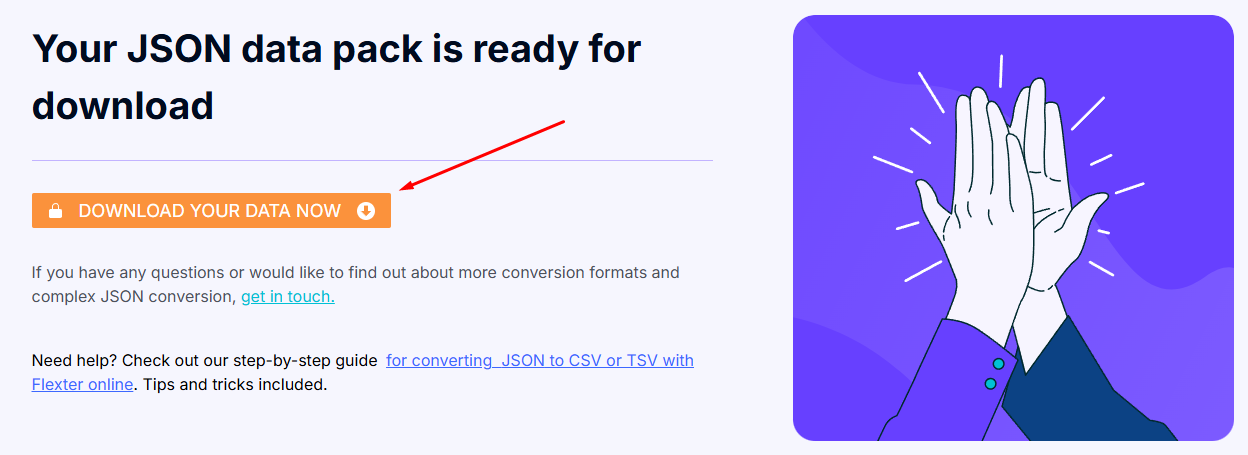
If all went well, a zipped folder should now be sitting in your Downloads.
Crack it open (e.g., with 7zip) and you’ll find:
- A ReadMe.txt with handy usage info and resource links.
- A Source-to-Target Map (STM) that connects your JSON elements to SQL rows and columns.
- An Entity-Relationship (ER) Diagram showing the schema and how your tables play together.
- A mapping example tying it all back: JSON to STM to SQL tables to ER diagram.
In short, everything you need to make sense of your shiny new database.
No detective work required. I’ll show you how to read these files below.
The Source-to-Target Map (STM)
You’ve got your data in Snowflake, but the real question is: how do those SQL tables tie back to your original JSON?
Most JSON converters either dump everything into a database or, worse, just hand you the DDL.
Flexter Online does better: it provides you with the full data lineage, allowing you to see exactly how the transformation works.
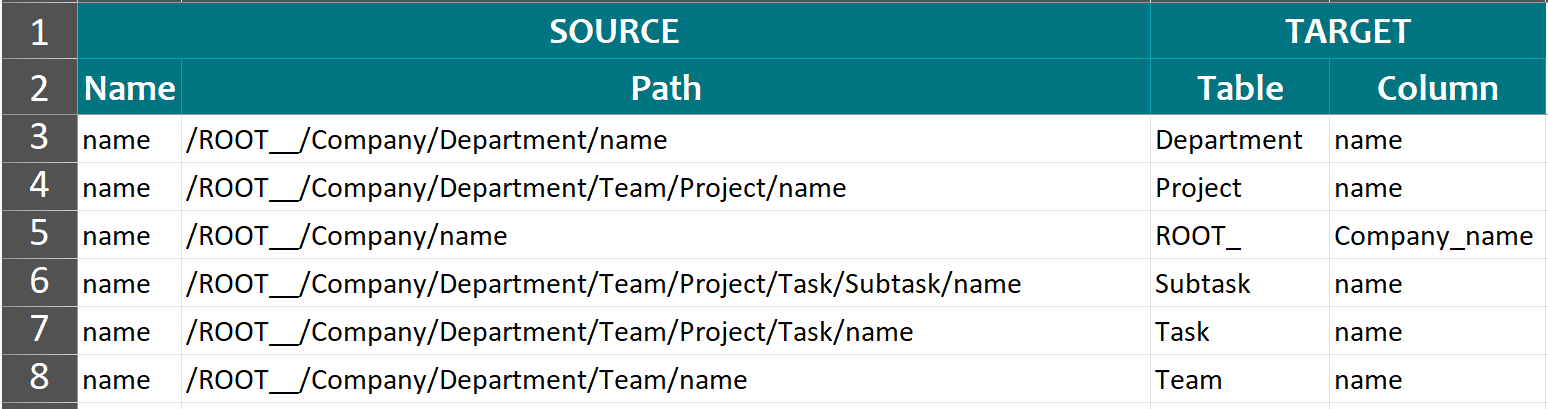
One of the most powerful tools in that story is the Source-to-Target Map (STM).
As the name hints, it traces every JSON path from your source JSON file and shows precisely where it lands in Snowflake, including tables, columns, and rows.
Here’s what that looks like for a simple JSON test case:
How to Read the Source-to-Target Map (STM)
At first glance, the STM can feel like you’ve stumbled onto a secret code.
But don’t worry.
Once you know how to read it, it becomes a powerful cheat sheet showing exactly how your JSON data transforms into Snowflake tables.
Here’s the breakdown:
- The “Name” column, or “the guest list”: every element and attribute from your JSON is listed here.
- The “Path” column, or “the backstory”, lists the path where that element lives in the JSON structure and how it connects to its parent.
- The “Table” and “Column” columns, or “the seating chart”: these tell you exactly where each JSON element ended up in Snowflake, down to the table and column.
Let’s see an example.
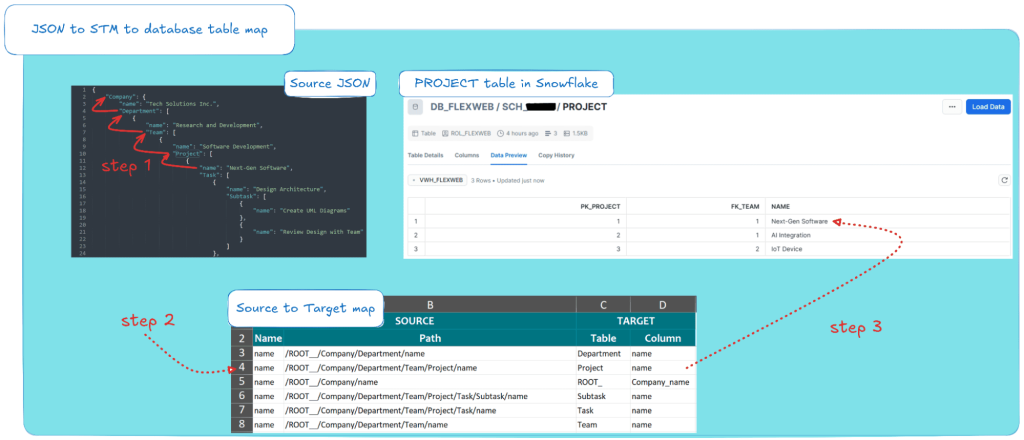
Let’s say you need to track down the project “Next-Gen Software” from the source JSON to the converted SQL tables in Snowflake:
- Step 1: Scan your source JSON to trace the nested key-value pairs from the “Next-Gen Software” node all the way up to the root. Keep that path in mind.
- Step 2: In the STM, locate the row for the node you want (e.g., Project name). Check that its JSON path matches the nesting you traced in Step 1, then use the Table and Column entries on that row to find the value in the converted SQL tables in Snowflake.
- Step 3: Head into Snowflake and jump to the table and column you identified in Step 2. That’s where your converted data now lives.
Here’s what this process looks like for the simple JSON test case that I’ve been using in this blog post:
You can also run this process in reverse: start with the converted data in Snowflake and trace it all the way back to its original spot in the source JSON.
Understanding your new Entity-Relationship (ER) diagram
You’ve got your data loaded into Snowflake and mapped back to the source JSON, but how does it all fit together?
And what’s the deal with columns like “PK_PROJECT” and “FK_TEAM”?
Those are your Primary Keys (PKs) and Foreign Keys (FKs), the superglue that keeps your relational schema from falling apart.
Most JSON converters just squash everything into one giant, bloated table, leaving you with redundancy, clunky queries, and a general mess.
Flexter Online takes the smarter route: it normalises your JSON into clean Snowflake tables, using PKs and FKs to keep relationships crystal clear.
And the cherry on top? Flexter automatically generates a free ER diagram, a visual blueprint of your schema, so you can actually see how it all connects.
Let’s take a look at how this plays out for the online JSON conversion I’ve been showing you:
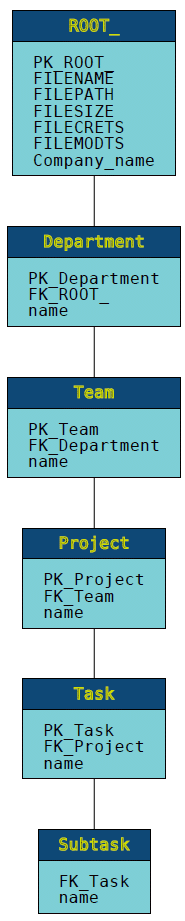
Each box in the ER diagram represents a Snowflake table. Its name sits on top, and inside you’ll find the full list of columns.
Every row in your tables maps to these columns, including the all-important Primary Keys (PK_) and Foreign Keys (FK_) that tie everything neatly together.
If you’re a relational database whiz, this will make perfect sense right away.
If not, don’t sweat it.
I’ve got a separate post that breaks down ER diagrams in plain English.
Want to convert JSON to CSV or TSV, instead of JSON to database?
Good news, you’ve just dodged hours of hand-written code and clunky scripts.
The latest version of Flexter Online now turns JSON into structured CSV/TSV files automatically (and for free), cutting out all the extra steps and painful transformations.
No more wrestling with awkward mappings or half-baked workarounds.
And if the online tool isn’t quite enough for your needs, you can always scale things up with Flexter Enterprise for heavy-duty JSON to CSV/TSV and JSON to database conversions.
Connecting it all: JSON to STM to Table to ER diagram
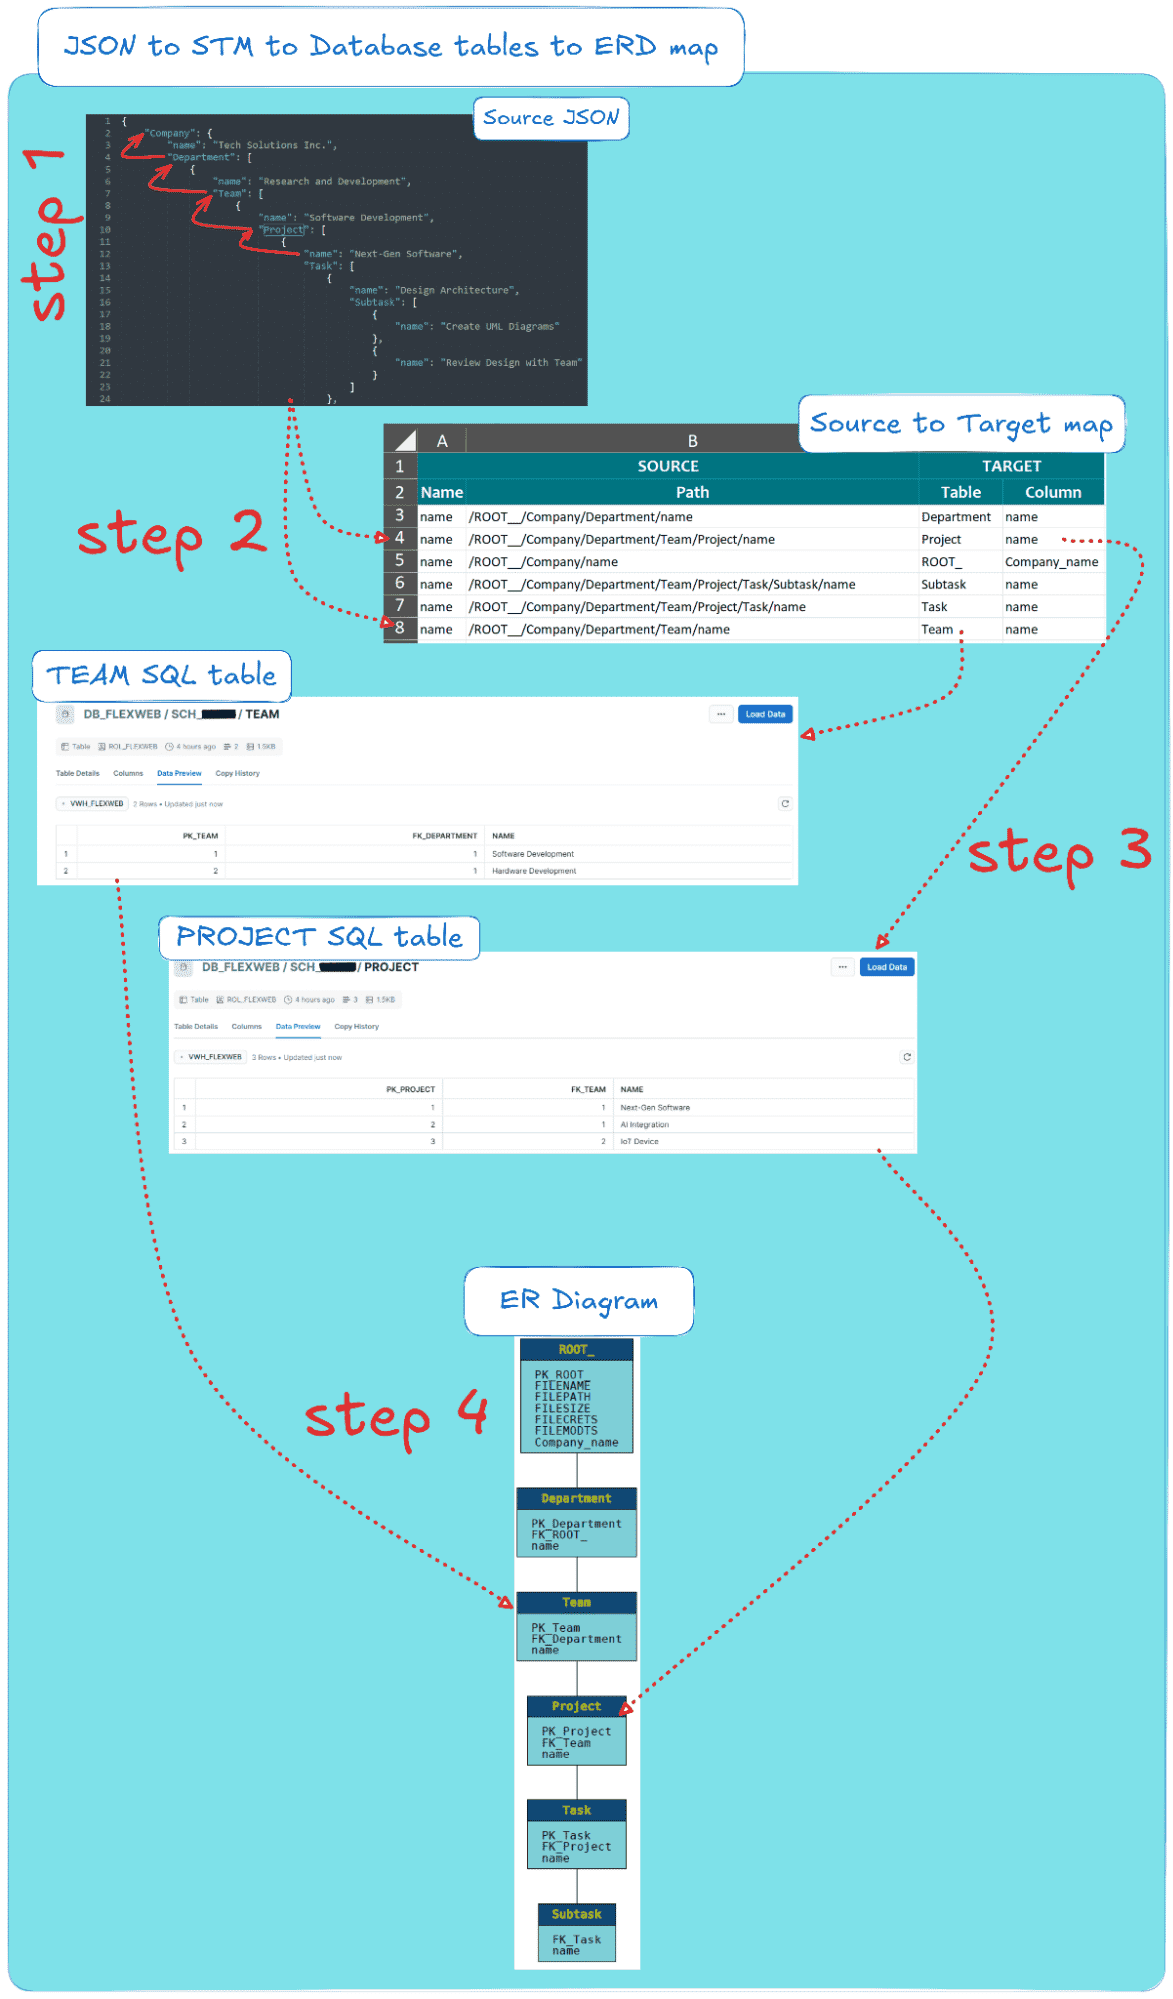
Before we wrap up, here’s one last diagram, an experienced data engineer’s eye view of JSON to Snowflake conversion.
Using the source JSON, the converted Snowflake tables, the STM, and the ER diagram, this is the lens I use to think about the JSON to Snowflake transformation journey:
Step 1: Find the JSON node you care about in the source file.
For example, track where “Next-Gen Software” from the “Software Development” project sits in the JSON.
Note its full path from the root node (e.g., under the “Research and Development” team → “Software Development” project).
Step 2: Open the Source-to-Target map.
Look for the row(s) that match your JSON element by checking the Name column and confirming the path against what you traced in Step 1.
From there, the Table and Column entries tell you exactly where the data landed.
In our example, that means Next-Gen Software shows up in the Project table under the name column, while the Software Development team is in the Team table, also under the name column.
Step 3: Locate the Data in Snowflake
Open Snowflake and head to the tables and columns you identified in Step 2. Check them with “Data Preview”.
Verify that your JSON values are mapped correctly.
Notice the extra PK and FK columns that keep your tables linked together.
Step 4: Review the ER Diagram
Take a look at the ER diagram to see how your Snowflake tables slot together in the schema generated from the simple JSON test case.
Each table (and its columns) is laid out visually, making the relationships easy to follow.
Here’s how this 4-step process looks:
This 4-step process, which links your source JSON with its three key artefacts (Snowflake tables, Source-to-Target Map, and ER diagram), works in reverse as well.
Start with the ER diagram for a high-level view of the schema, then trace your way back from the Snowflake tables to the STM and the original JSON to see the full transformation journey.
Querying Your New Database with Snowflake’s SQL Worksheet
If you’ve followed along so far, you should now be able to:
- Run a conversion with the online JSON to database converter,
- Log in to Snowflake and preview your converted data,
- Download and review the documentation on your computer.
The last piece of the puzzle? Querying your data in Snowflake.
For that, we’ll use Snowflake’s SQL Worksheet, a browser-based tool that lets you run queries directly against your online database.
Running a SELECT command
Here’s how to fire off a quick SELECT query against your database:
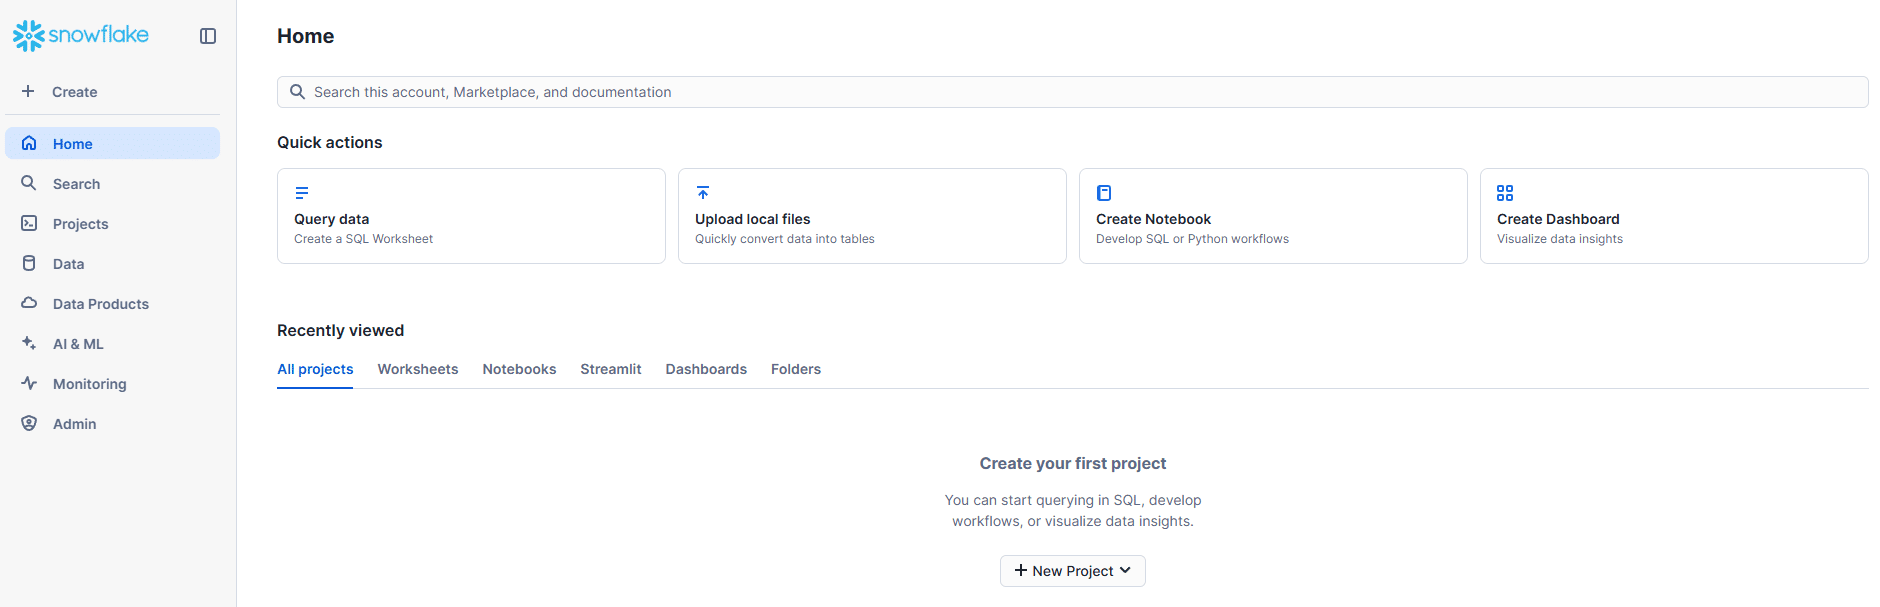
Step 1: To open a new SQL Worksheet for running queries, head to Snowflake’s main dashboard (the one you saw right after logging in).
From there, click “Query data” under the Quick actions menu. Like this:
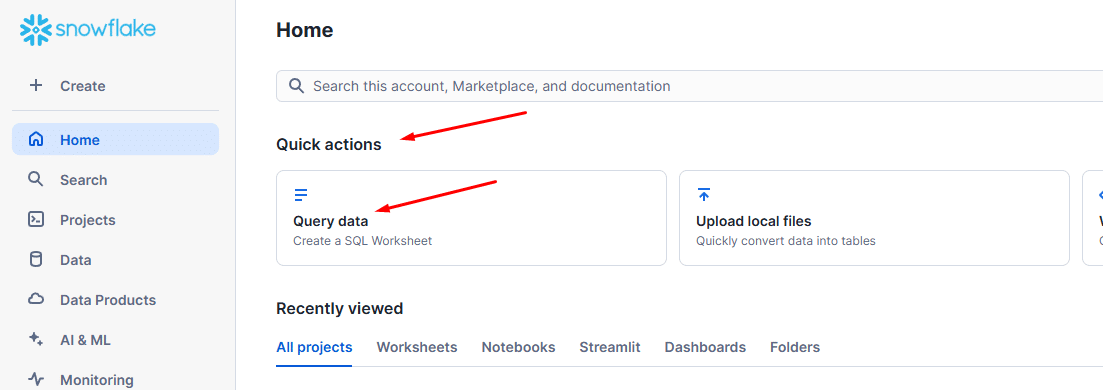
Click “Query data,” and you’ll land in a fresh SQL Worksheet.
Step 2: Next, you’ll need to find the table name that we want to query.
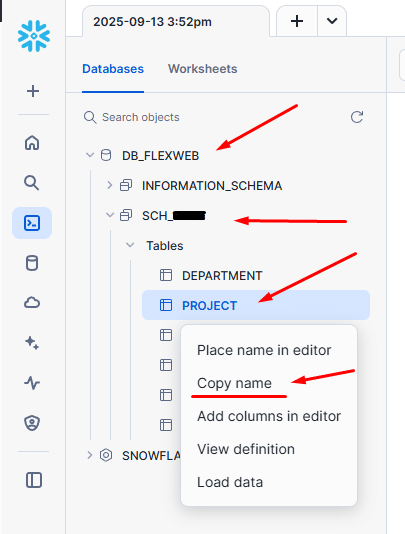
If you’re new to Snowflake and Snowsight, here’s a pro tip: don’t just type the table name as you see it in the editor or docs.
Instead, go to the left-hand panel of your SQL Worksheet, find your schema (e.g., “SCH_12345”), locate the table, click the three dots on the right, and copy its name from the Table definition section.
Be careful!
If you try to find the three dots and “Copy name” from the Data -> Databases -> SCH_12345 menu, you won’t find it.
“Copy name” is only available in the Worksheets feature.
It should look like this:
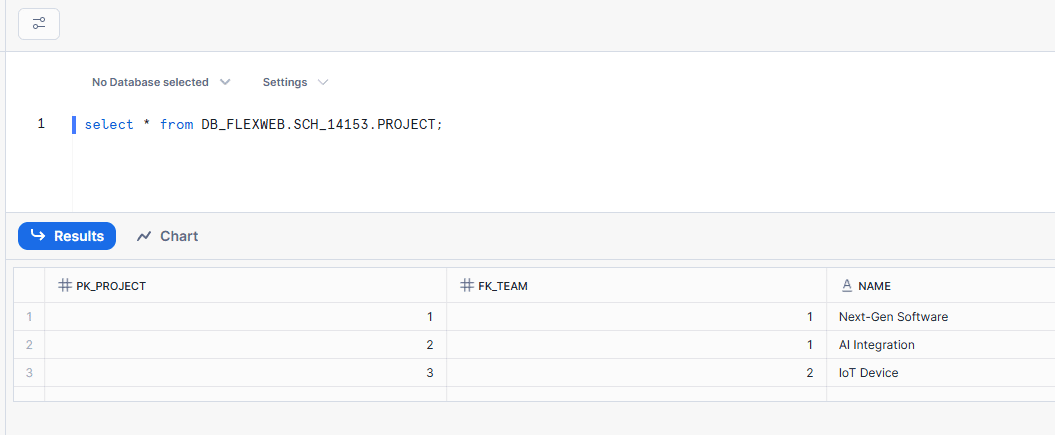
Step 3: In the SQL Worksheet editor, paste the full table path (from Step 2) and run a simple SELECT on the PROJECT table.
Hit the blue Play button, and Snowflake will execute the query, showing your table results along with query performance details in a pop-up.
If everything went smoothly, your SQL Worksheet should look like this:

And when you run it, it should give you:
Running a SELECT with a JOIN against your new database
Let’s step it up with a query that combines data from two converted tables.
Let’s say you need to put together one table that shows which teams are responsible for each project.
The solution? An SQL JOIN to merge them into one view.
First, follow Steps 1 & 2 from the previous section, then run the query with the JOIN clause in Step 3 below.
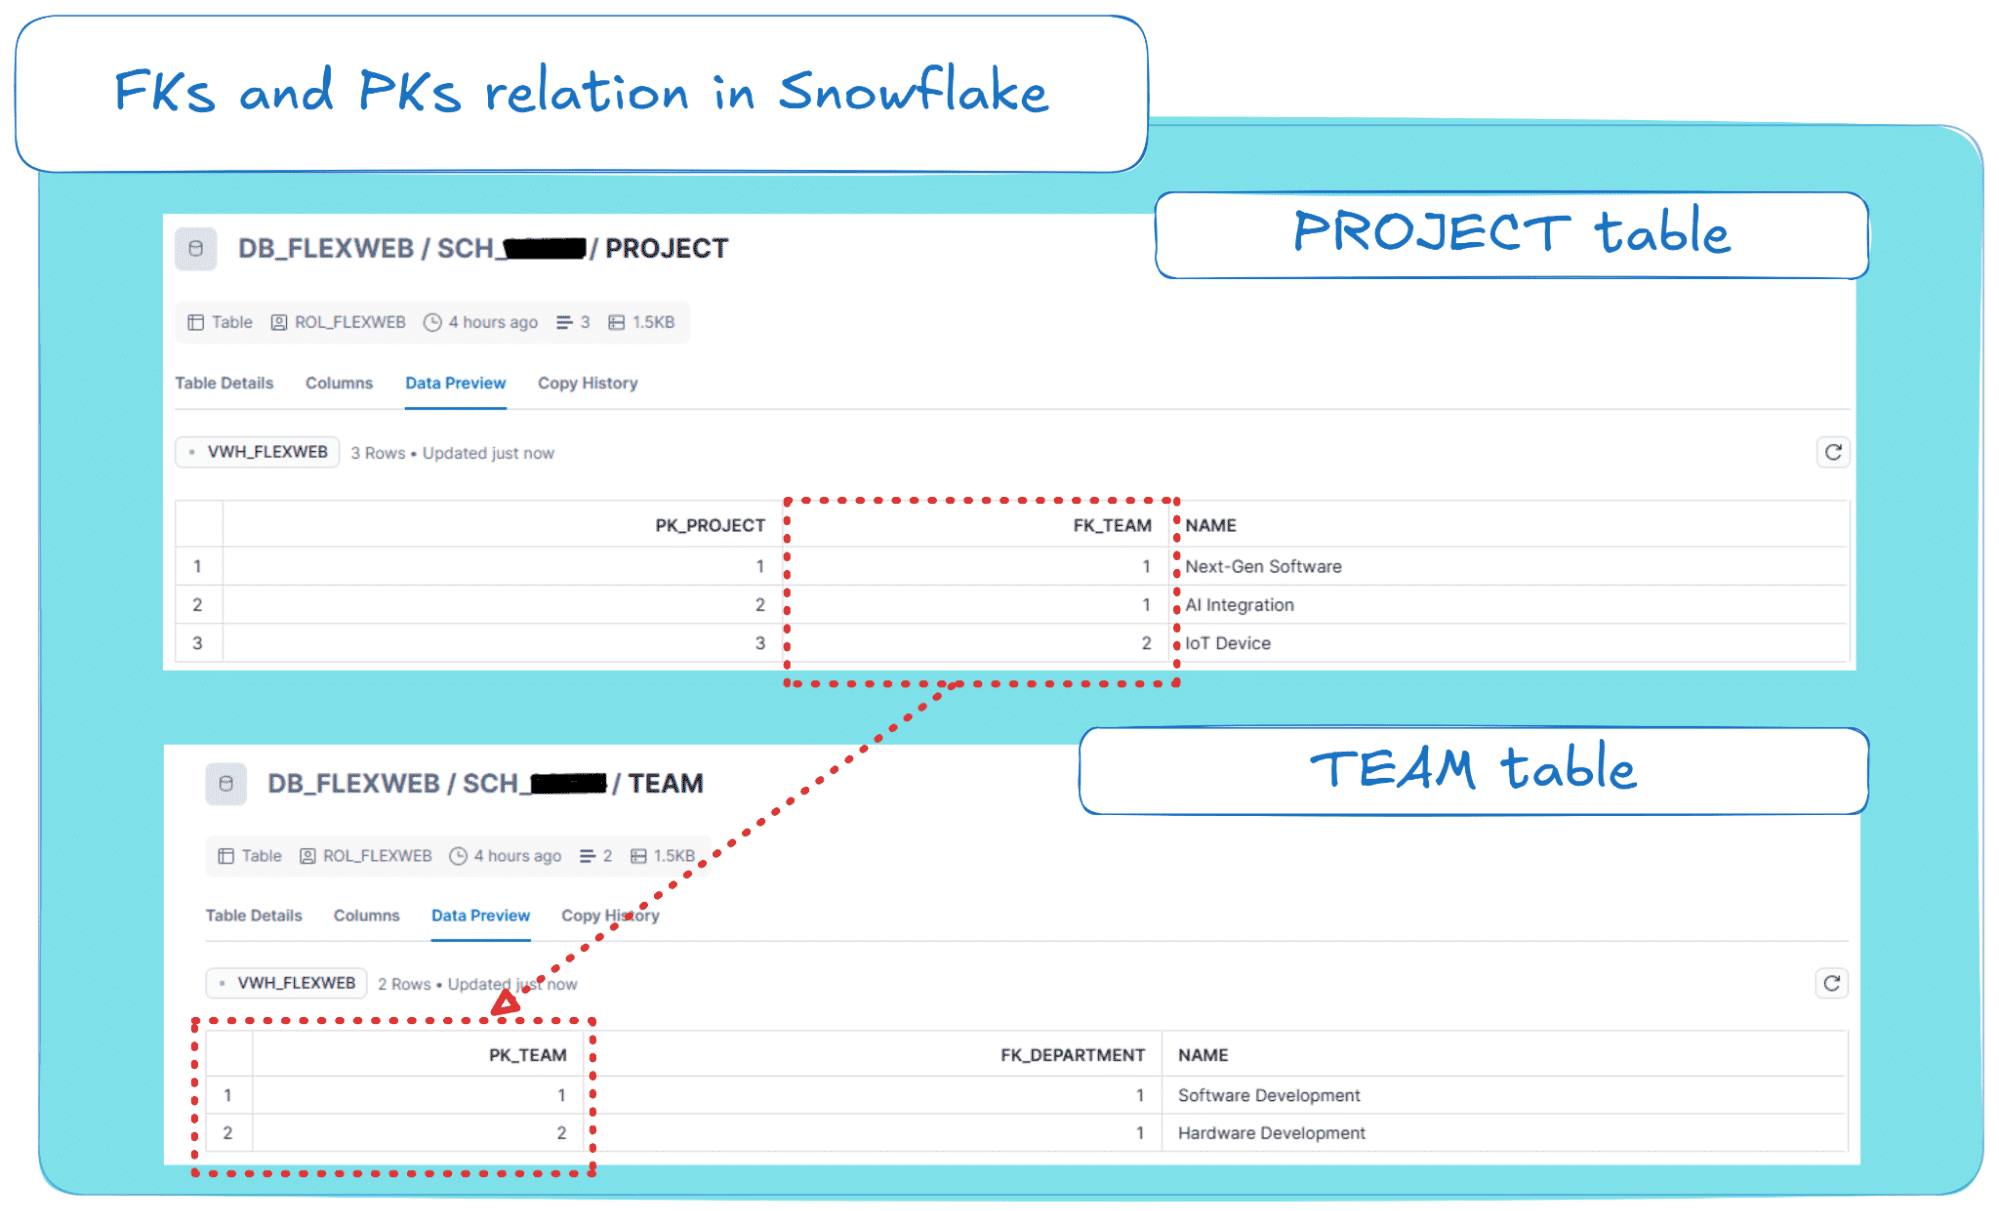
Step 3: Before writing the query in the editor, you first need to figure out how the two tables connect, specifically, which Primary Key (PK_) in one table links to which Foreign Key (FK_) in the other.
Looking at the ER diagram, you’ll see that the PROJECT table has a foreign key, FK_Team, which links to the primary key PK_Team in the TEAM table.
In plain terms, every project is assigned to a team, and that relationship is exactly what lets us join the two tables.
Here’s how those connecting columns (FK_Team and PK_Team) appear in each table:
Step 4: Now that you know which PKs and FKs connect the tables, it’s time to write the query and hit Run.
The syntax is straightforward: SELECT the project name from the PROJECT table and the team name from the TEAM table.
Remember! Don’t just use the table names. Use the full paths as I showed you back in Step 2 to make sure Snowflake knows exactly which tables you’re querying.
Next, add a JOIN clause to connect the two tables, linking FK_Team in PROJECT with PK_Team in TEAM (from Step 3).
Your query should be this:
|
1 2 3 4 5 6 7 8 |
SELECT t.name, p.name FROM DB_FLEXWEB.SCH_12345.TEAM t JOIN DB_FLEXWEB.SCH_12345.PROJECT p ON t.PK_Team = p.FK_Team; |
Run the query, and if everything goes smoothly, your results should look like this (make sure to use your Schema, not SCH_12345):
And after running it, you should get:
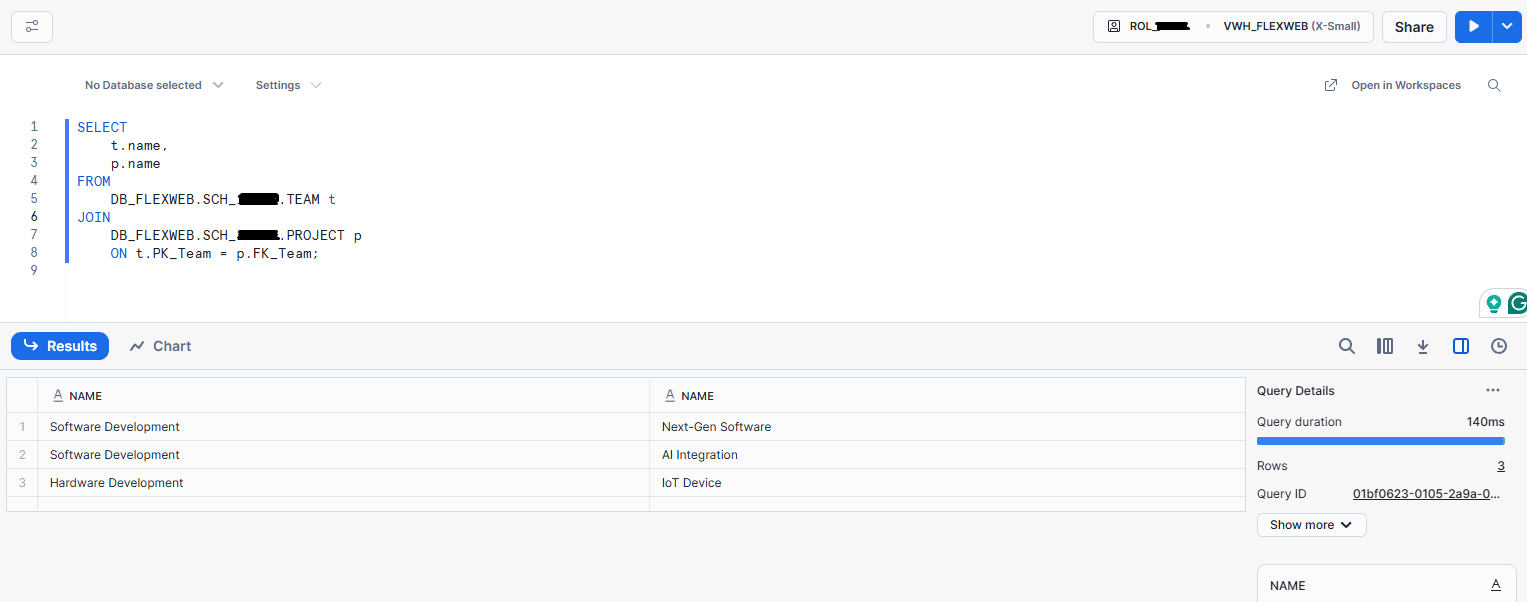
And there you have it: an SQL table that includes all the projects and responsible teams from your source JSON file.
Flexter Online vs. Flexter Enterprise: When’s the Right Time to Switch?
By now, you’ve probably figured out that this JSON to database converter isn’t a one-and-done tool; it’s a powerhouse built to last.
With cutting-edge algorithms under the hood, it enables fast, accurate, and effortless conversion of JSON to database.
So after reading this post, you might be asking: what’s next? Here’s my take:
Step 1: Bookmark Flexter JSON-to-SQL Converter Online
If you haven’t already, bookmark the Flexter Online JSON to Database Converter.
For quick, one-off conversions or the occasional data job, it’s a tool you’ll want within easy reach.
Step 2: Bookmark its siblings for efficient JSON and XML to CSV/TSV/SQL:
If you’re a data or software engineer or you find yourself needing to convert XML and JSON to CSV, TSV or to Snowflake, then I’d suggest you bookmark our other tools for:
- Online JSON to CSV/TSV Converter (with guide),
- Online XML to CSV/TSV Converter, including its handy guide,
- Online XML to Snowflake Converter, with its own separate guide.
Note: If you are dealing with large document repositories and wondering if you should migrate them to Snowflake or stick with a native engine, see our full breakdown of XML Databases: Types, Top Options and When to Migrate.
Step 3: Think Bigger with Flexter Enterprise
Flexter Online is powerful, but it’s not built for everything.
If you’re wrangling big volumes of XML, JSON or need frequent, automated conversions, browser uploads will slow you down.
That’s where Flexter Enterprise shines. Designed for scale, automation, and integration, it’s the go-to when your conversion needs move beyond one-offs.
Here’s how the two compare:
|
Feature Category |
Feature |
Flexter Online |
Flexter Enterprise |
|---|---|---|---|
|
Data |
Data volume |
Up to 1MB compressed |
Any |
|
Access |
Availability |
Online |
Local install |
|
WebUI |
✓ |
✓ | |
|
Command Line |
– |
✓ | |
|
API |
– |
✓ | |
|
Input Formats |
XML |
✓ |
✓ |
|
JSON |
✓ |
✓ | |
|
CSV, TSV, PSV |
– |
✓ | |
|
RDBMS |
– |
✓ | |
|
Output formats |
CSV, TSV |
✓ |
✓ |
|
Excel |
– |
✓ | |
|
ORC |
– |
✓ | |
|
Parquet |
– |
✓ | |
|
Avro |
– |
✓ | |
|
Delta Tables |
– |
✓ | |
|
Output databases |
Snowflake |
– |
✓ |
|
Oracle |
– |
✓ | |
|
MySQL |
– |
✓ | |
|
PostgreSQL |
– |
✓ | |
|
Teradata |
– |
✓ | |
|
Redshift |
– |
✓ | |
|
MS SQL Server |
– |
✓ | |
|
Azure SQL Data Warehouse |
– |
✓ | |
|
Yellowbrick |
– |
✓ | |
|
BigQuery |
– |
✓ | |
|
Databricks |
– |
✓ | |
|
AWS Athena |
– |
✓ | |
|
Documentation |
Data lineage |
✓ |
✓ |
|
ER diagram |
✓ |
✓ | |
|
Schema version diff |
– |
✓ | |
|
Schema evolution |
– |
✓ | |
|
Support |
|
✓ |
✓ |
|
Live chat |
✓ |
✓ | |
|
Phone |
– |
✓ |
This table is just a teaser of what Flexter Enterprise can do; for the full picture, check out the complete product specs.
Built for large-scale JSON conversion, Flexter Enterprise plugs right into platforms like Snowflake, Redshift, Databricks, Kubernetes, and Spark, while running smoothly across GCP, AWS, Azure, or even on-prem.
And it doesn’t stop at conversion. With advanced schema optimisation algorithms, it delivers highly efficient relational schemas, helping you cut down on Snowflake credit usage over time.
Curious to see it in action? Let’s talk.
We’ll happily set up a Proof of Concept and explore how Flexter Enterprise can fit your exact needs.
Flexter: The JSON Conversion Powerhouse They Don’t Want You to Know About
Flexter’s JSON conversion is so good that it outpaces many so-called top-tier data warehouses and leaves plenty of “premium” tools eating dust.
While others are still scrambling to catch up, Flexter is already miles ahead.
After plenty of testing (and a few run-ins with disappointing converters), I can confidently say Flexter is one of the rare tools that actually does what it promises.
Curious to dig deeper? Here are some resources worth checking out:
- Flexter FAQ & Guide – Automate XML & JSON Conversions
- Snowflake vs. Redshift – Support for Handling JSON
- Converting XML and JSON to a Data Lake
- Working with JSON in Redshift. Options, limitations, and alternatives
- Converting and analysing Rugby JSON data to Oracle Data Visualization Desktop
- CSV vs JSON vs XML – The Best Comparison Guide 2026
- Master Snowflake Data Lineage – Features, Tools & Tips
- XSD to Database Schema Guide – Create SQL Tables Easily
- How to Insert XML Data into SQL Table?
Uli Bethke
Uli has been rocking the data world since 2001. As the Co-founder of Sonra, the data liberation company, he’s on a mission to set data free. Uli doesn’t just talk the talk—he writes the books, leads the communities, and takes the stage as a conference speaker.
Any questions or comments for Uli? Connect with him on LinkedIn.
Follow Uli Bethke: