Using Apache Airflow to build reusable ETL on AWS Redshift

Building a data pipeline on Apache Airflow to populate AWS Redshift
In this post we will introduce you to the most popular workflow management tool – Apache Airflow. Using Python as our programming language we will utilize Airflow to develop re-usable and parameterizable ETL processes that ingest data from S3 into Redshift and perform an upsert from a source table into a target table. We will also show how to deploy and manage these processes using Airflow.
Use Flexter to turn XML and JSON into Valuable Insights
- 100% Automation
- 0% Coding
Overview of Apache Airflow
Apache Airflow in an open-source workflow manager written in Python. It was originally created by Maxime Beauchemin at Airbnb in 2014. The project joined the Apache Software Foundation’s incubation program in March 2016. Currently it has more than 350 contributors on Github with 4300+ commits.
The main services Airflow provides are:
- Framework to define and execute workflows
- Scalable executor and scheduler
- Rich Web UI for monitoring and administration
Airflow is not a data processing tool such as Apache Spark but rather a tool that helps you manage the execution of jobs you defined using data processing tools.
As a workflow management framework it is different from almost all the other frameworks because it does not require specification of exact parent-child relationships between data flows. Instead it requires that you only define direct dependencies (parents) between data flows and it will automatically slot them into a execution DAG (directed acyclic graph).
Apache Airflow concepts
Directed Acyclic Graph
A DAG or Directed Acyclic Graph – is a collection of all the tasks we want to run, organized in a way that reflects their relationships and dependencies. This is the workflow unit we will be using.
Operators
Operators describe a single task in a workflow (DAG). The DAG will make sure that operators run in the correct order; other than those dependencies, operators generally run independently. In fact, they may run on two completely different machines.
Examples of operators are:
- BashOperator – executes a bash command
- PythonOperator – calls an arbitrary Python function
- EmailOperator – sends an email
- SqlOperator – executes a SQL command
The operators are not actually executed by Airflow, rather the execution is pushed down to the relevant execution engine like RDBMS or a Python program.
In the following picture we can observe a DAG with multiple tasks (each task is an instantiated operator). Notice that DAGs allow us to specify the execution dependencies between tasks.
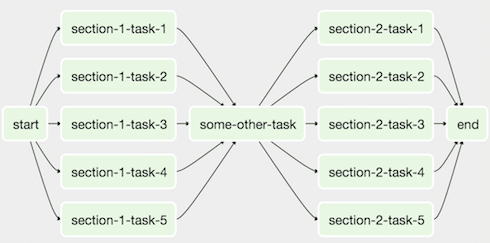
Source: https://airflow.apache.org/concepts.html
FlowForward.
All Things Data Engineering
Straight to Your Inbox!
Building the data pipeline
In this section we will cover:
- Installation of Airflow
- Defining a database connection using Airflow
- Developing the parameterizable S3 to Redshift operator
- Developing the re-usable Redshift Upsert operator
- Deployment operations
Installation
Before starting the installation we have to specify a home folder for Airflow. This is the place where Airflow will store its internal database and look for new DAG and operators that we define.
We can set a temporary home in our command line using a simple command:
export AIRFLOW_HOME=~/airflow
We can also set a permanent home on a UNIX machine by editing the bash profile file and adding into it the same line.
As Airflow is written in the Python programming language, it can be easily installed using pip:
pip install airflow
Lastly, we have to do the one-time initialization of the database Airflow uses to persist its state and information. By default it’s a SQLite file (database), but for concurrent workloads one should use backend databases such as PostgreSQL. The configuration to change the database can be easily done by just replacing the SQL Alchemy connection string value within the airflow.cfg file found in Airflow home.
For purposes of this tutorial we will be using the default SQLite database that we can initialize as following:
airflow initdb
Only once we have initialized the single database, can we start the webserver with the following command:
airflow webserver -p 8080
Now we can access the webserver at address localhost:8080 in the browser.
Pipeline architecture
Our data pipeline will have two operations:
- Exporting a CSV file (“customer.csv”) from Amazon S3 storage into a staging table (“stage_customer”) on Amazon Redshift
- Upserting data from staging table (“stage_customer”) into a production table (“customer”) on Amazon Redshift
The visual representation of the process is:

Accordingly we will build a single DAG to manage the workflow and two operators that define exact execution of tasks.
Using the Airflow GUI to define connections
Airflow allows us to define global connections within the webserver UI. Those global connections can then be easily accessed by all Airflow operators using a connection id that we specified. This is not only convenient for development but allows a more secure storage of sensitive credentials (especially compared to storing them in plain text).
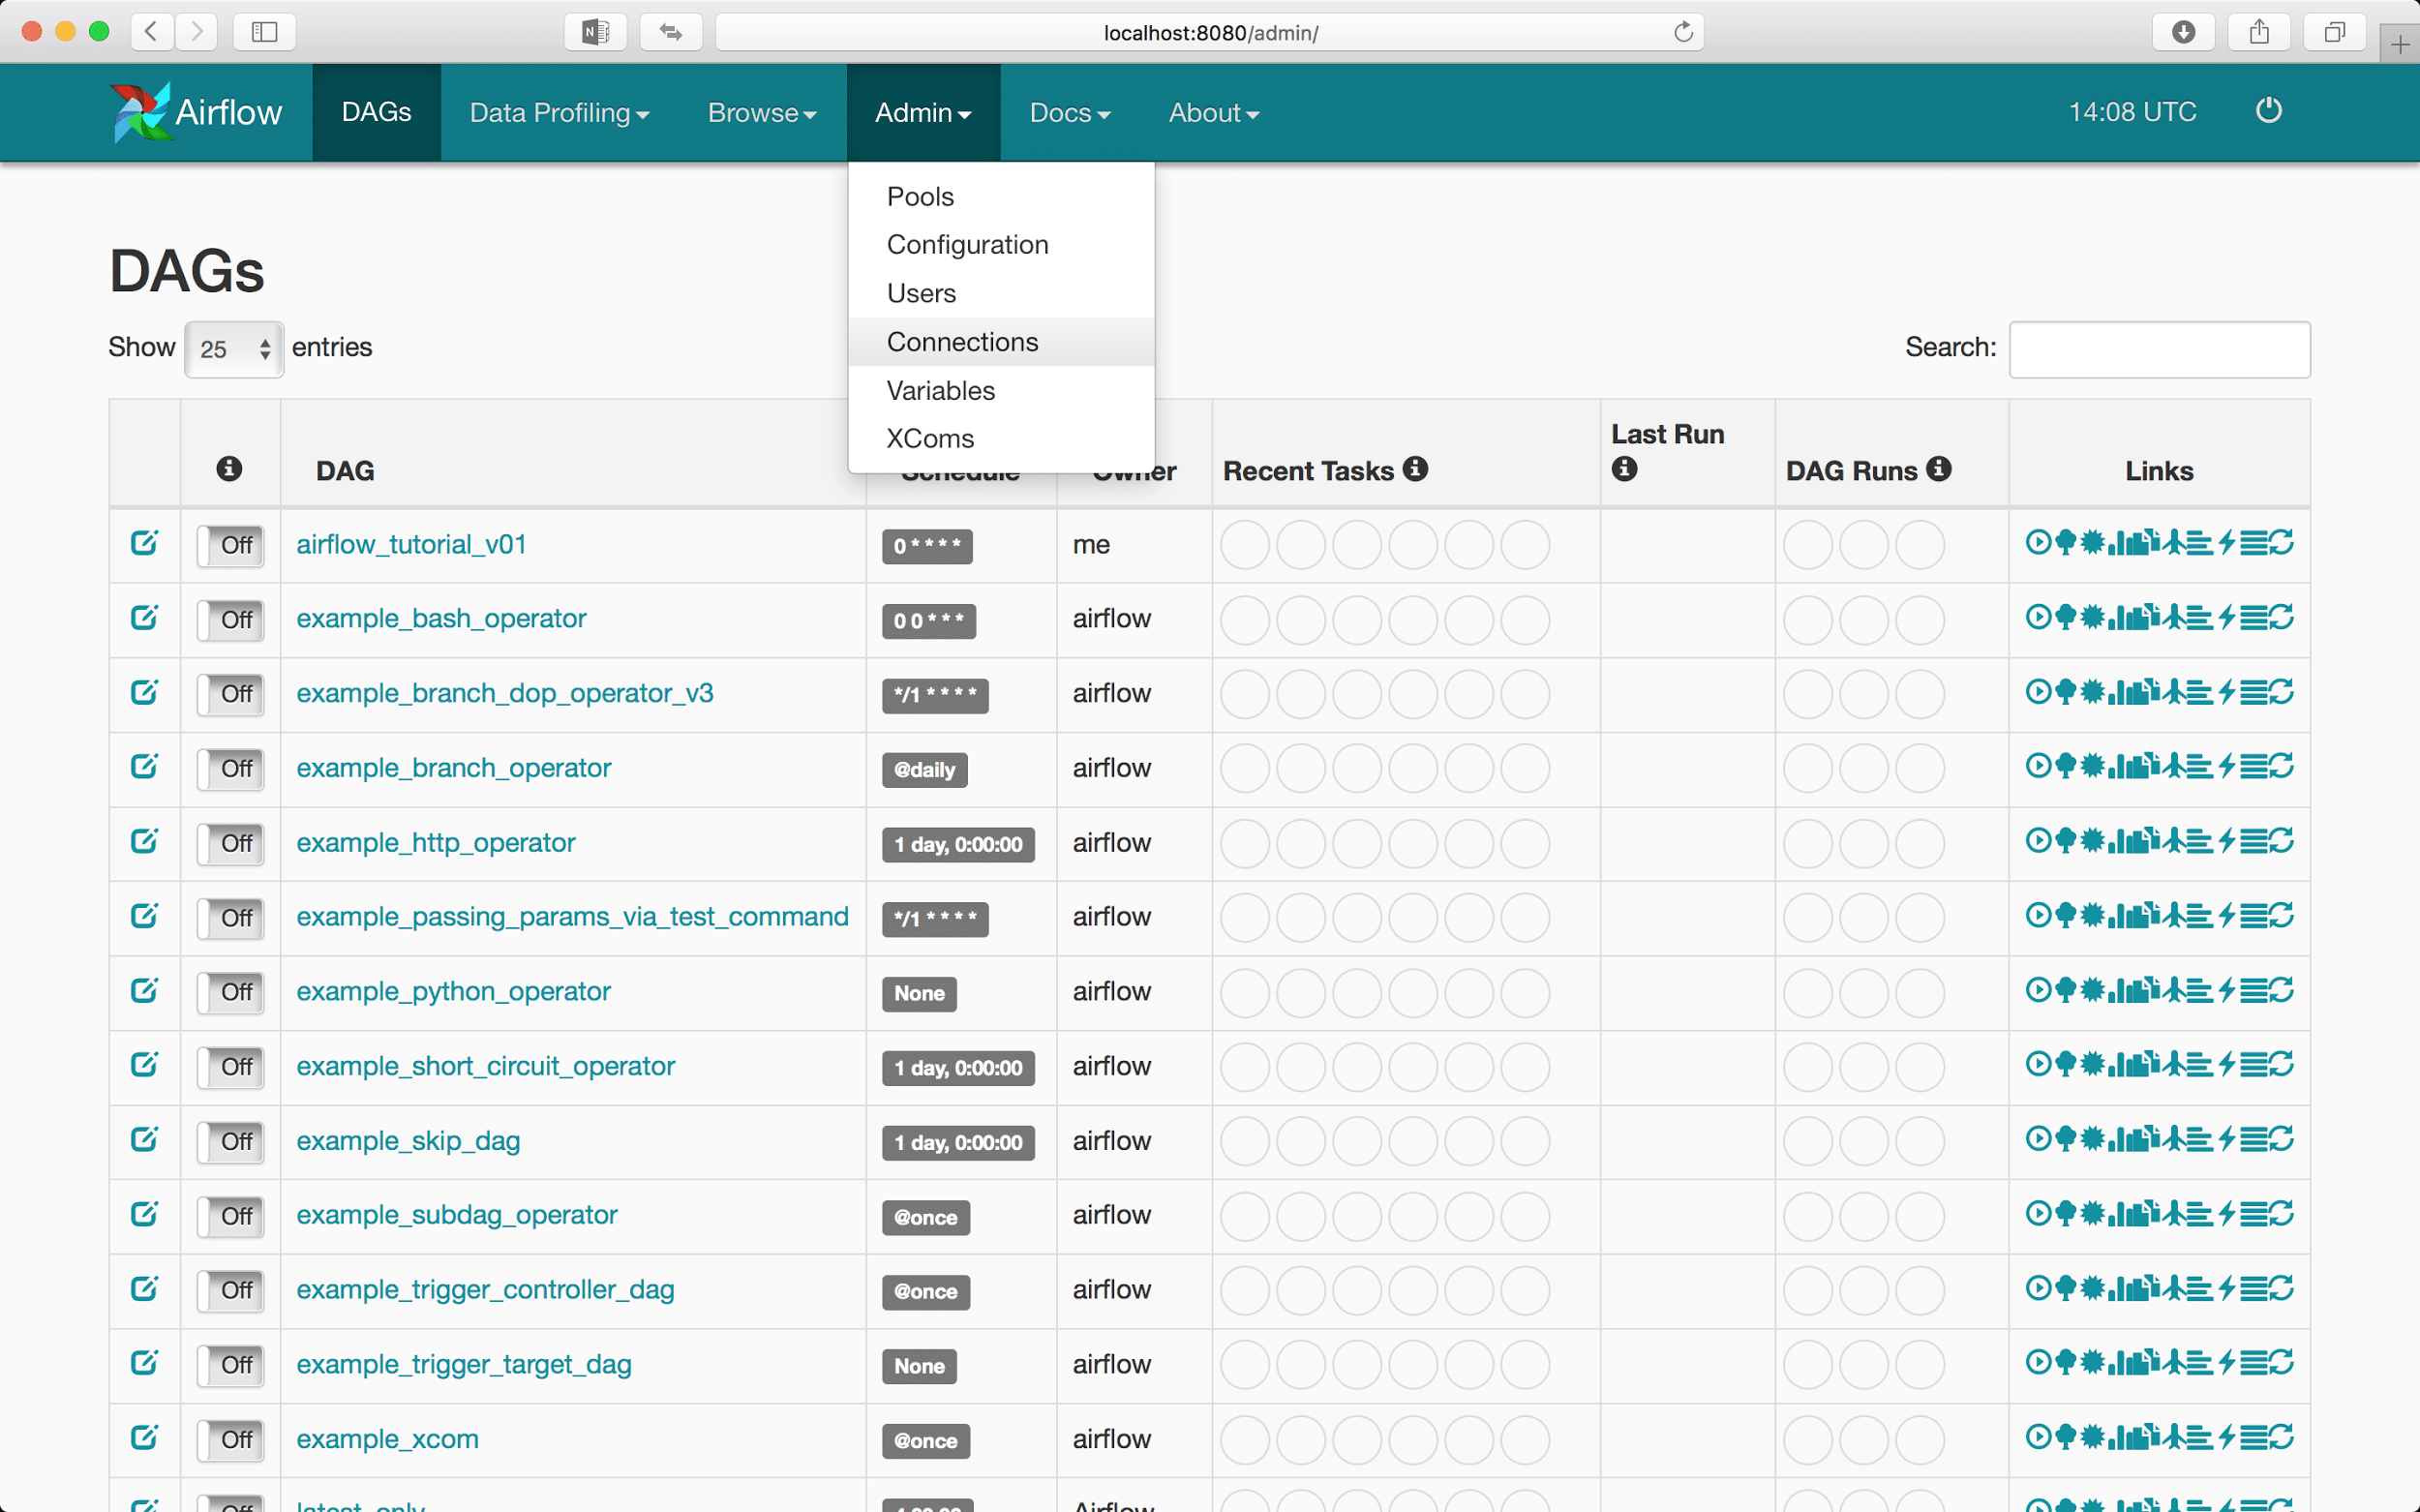
First we have to open the webserver at localhost:8080 address. Then in the Admin tab on the top of the page we can access the Connections subpage.
On the Connections page we can create new connections and edit the current connections:
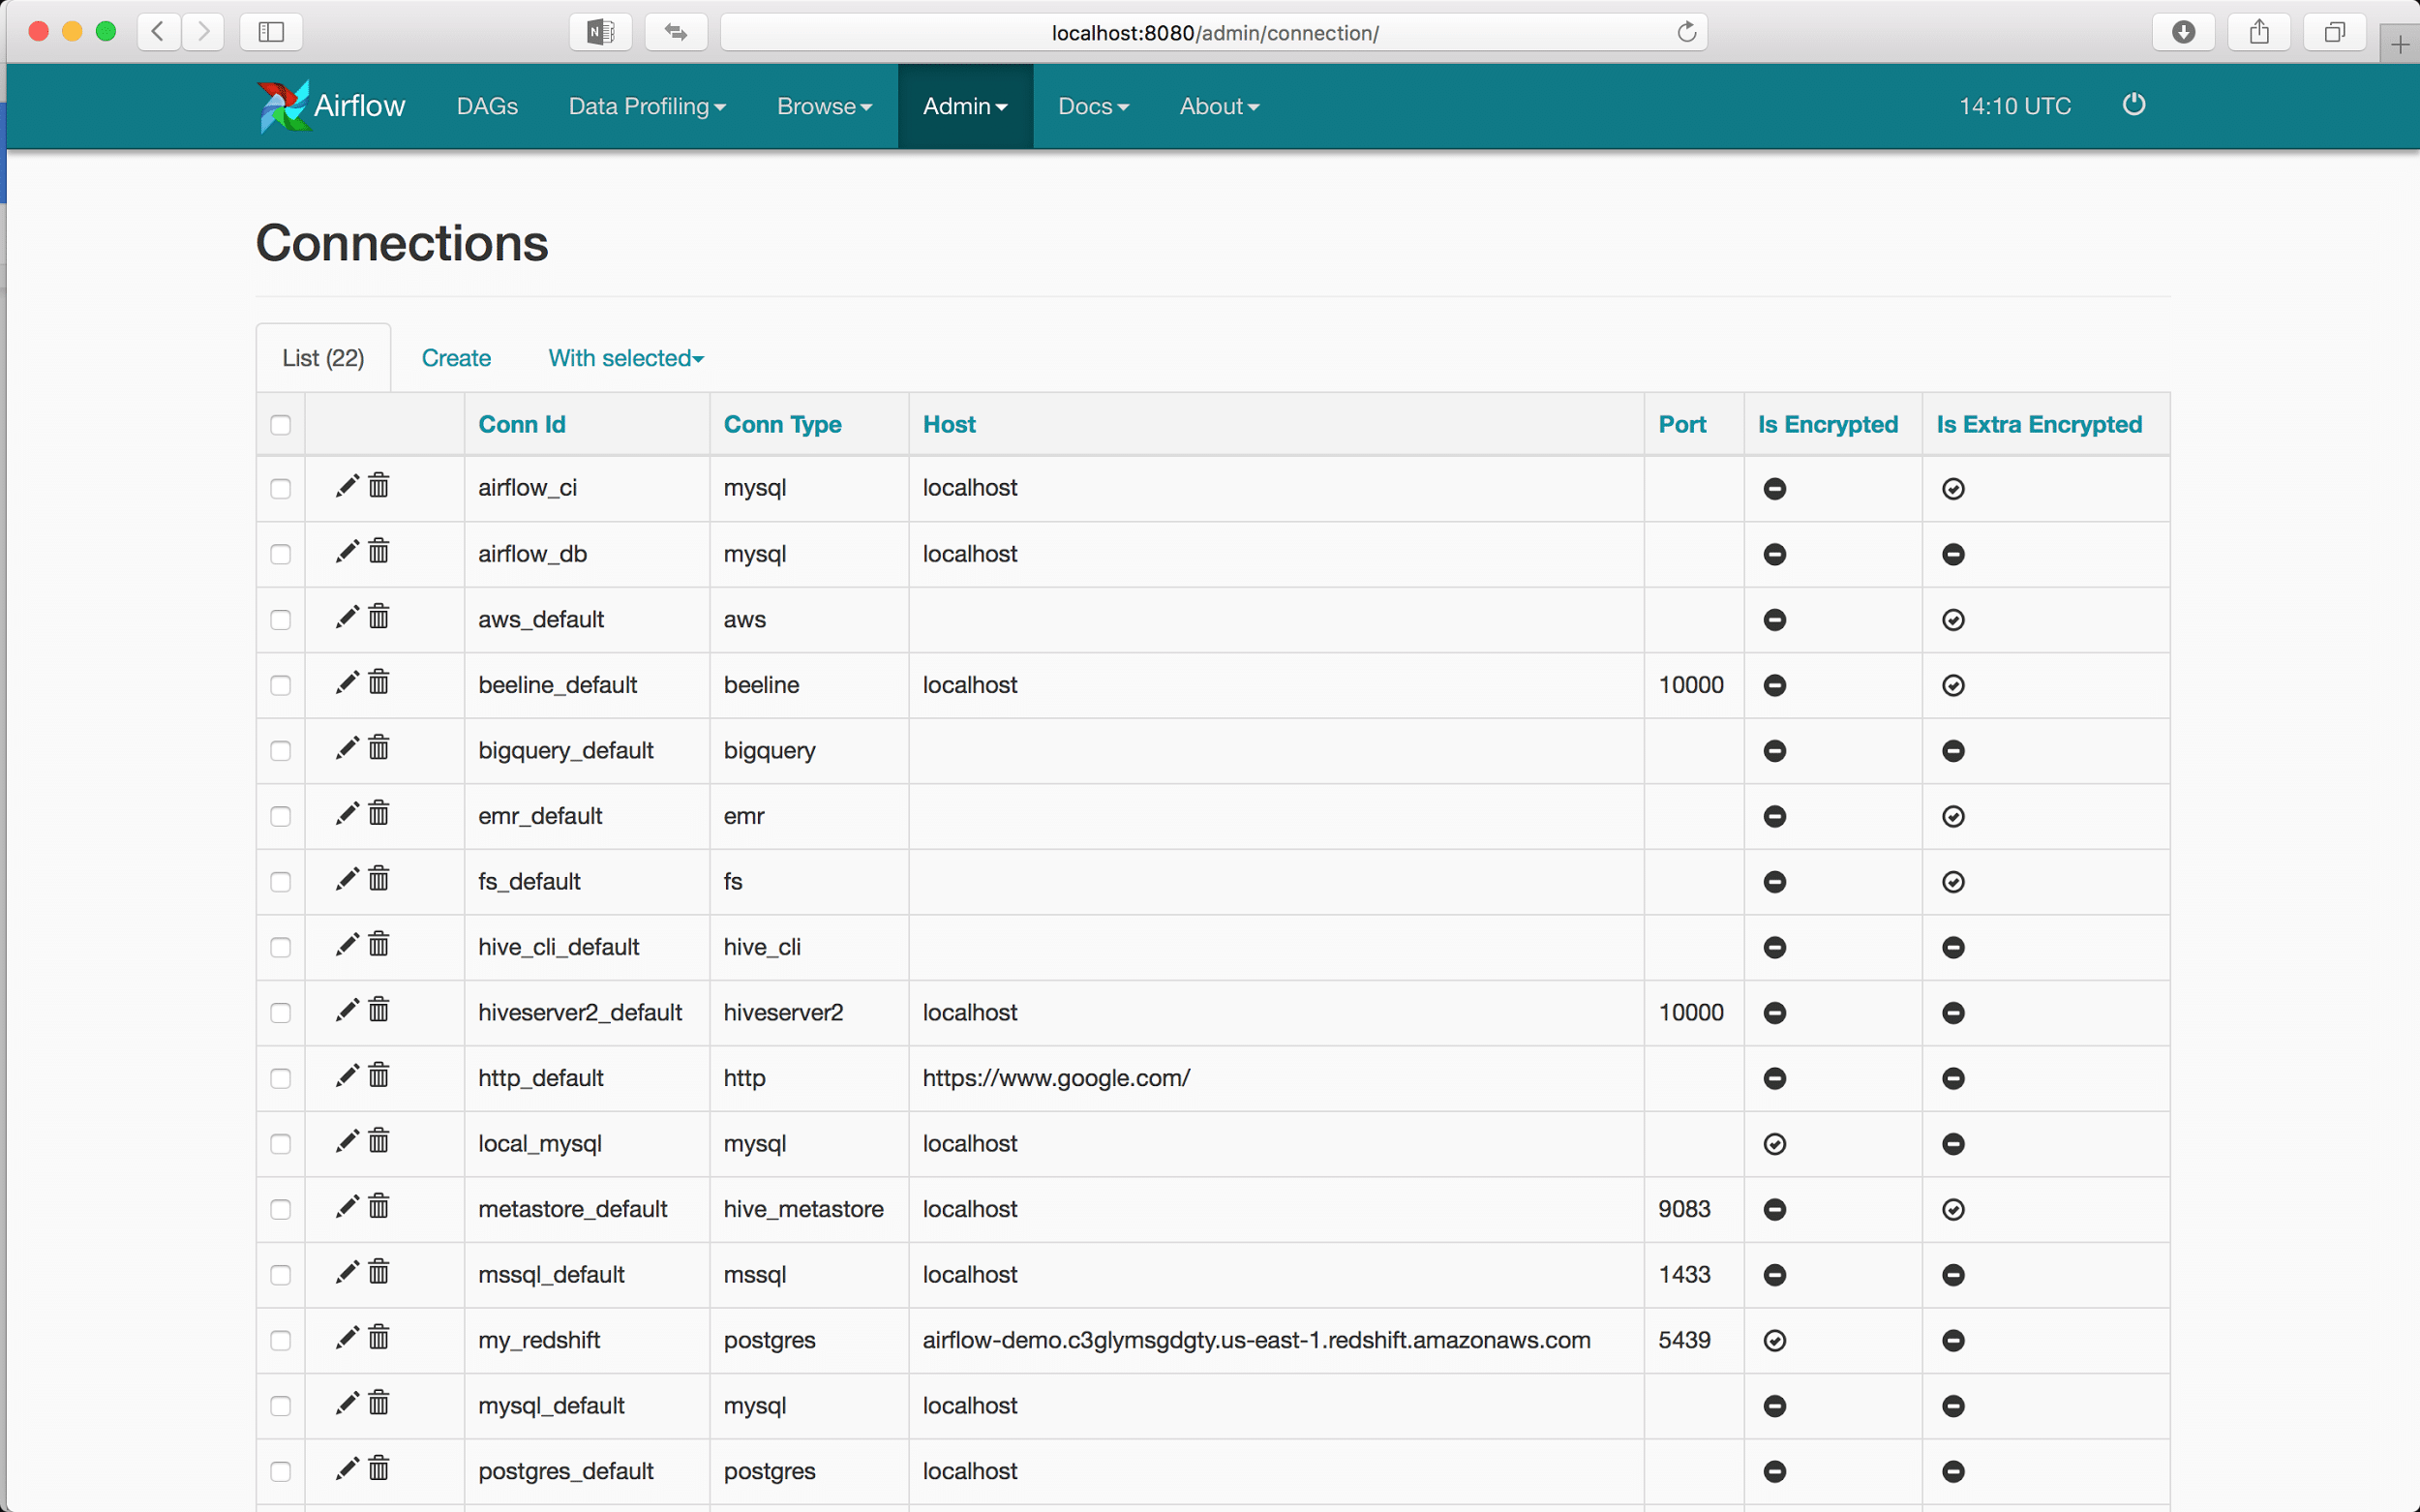
The process of creating a new connection to various data sources is very simple. Here we will use the PostgreSQL driver to connect to Amazon’s Redshift analytical database:
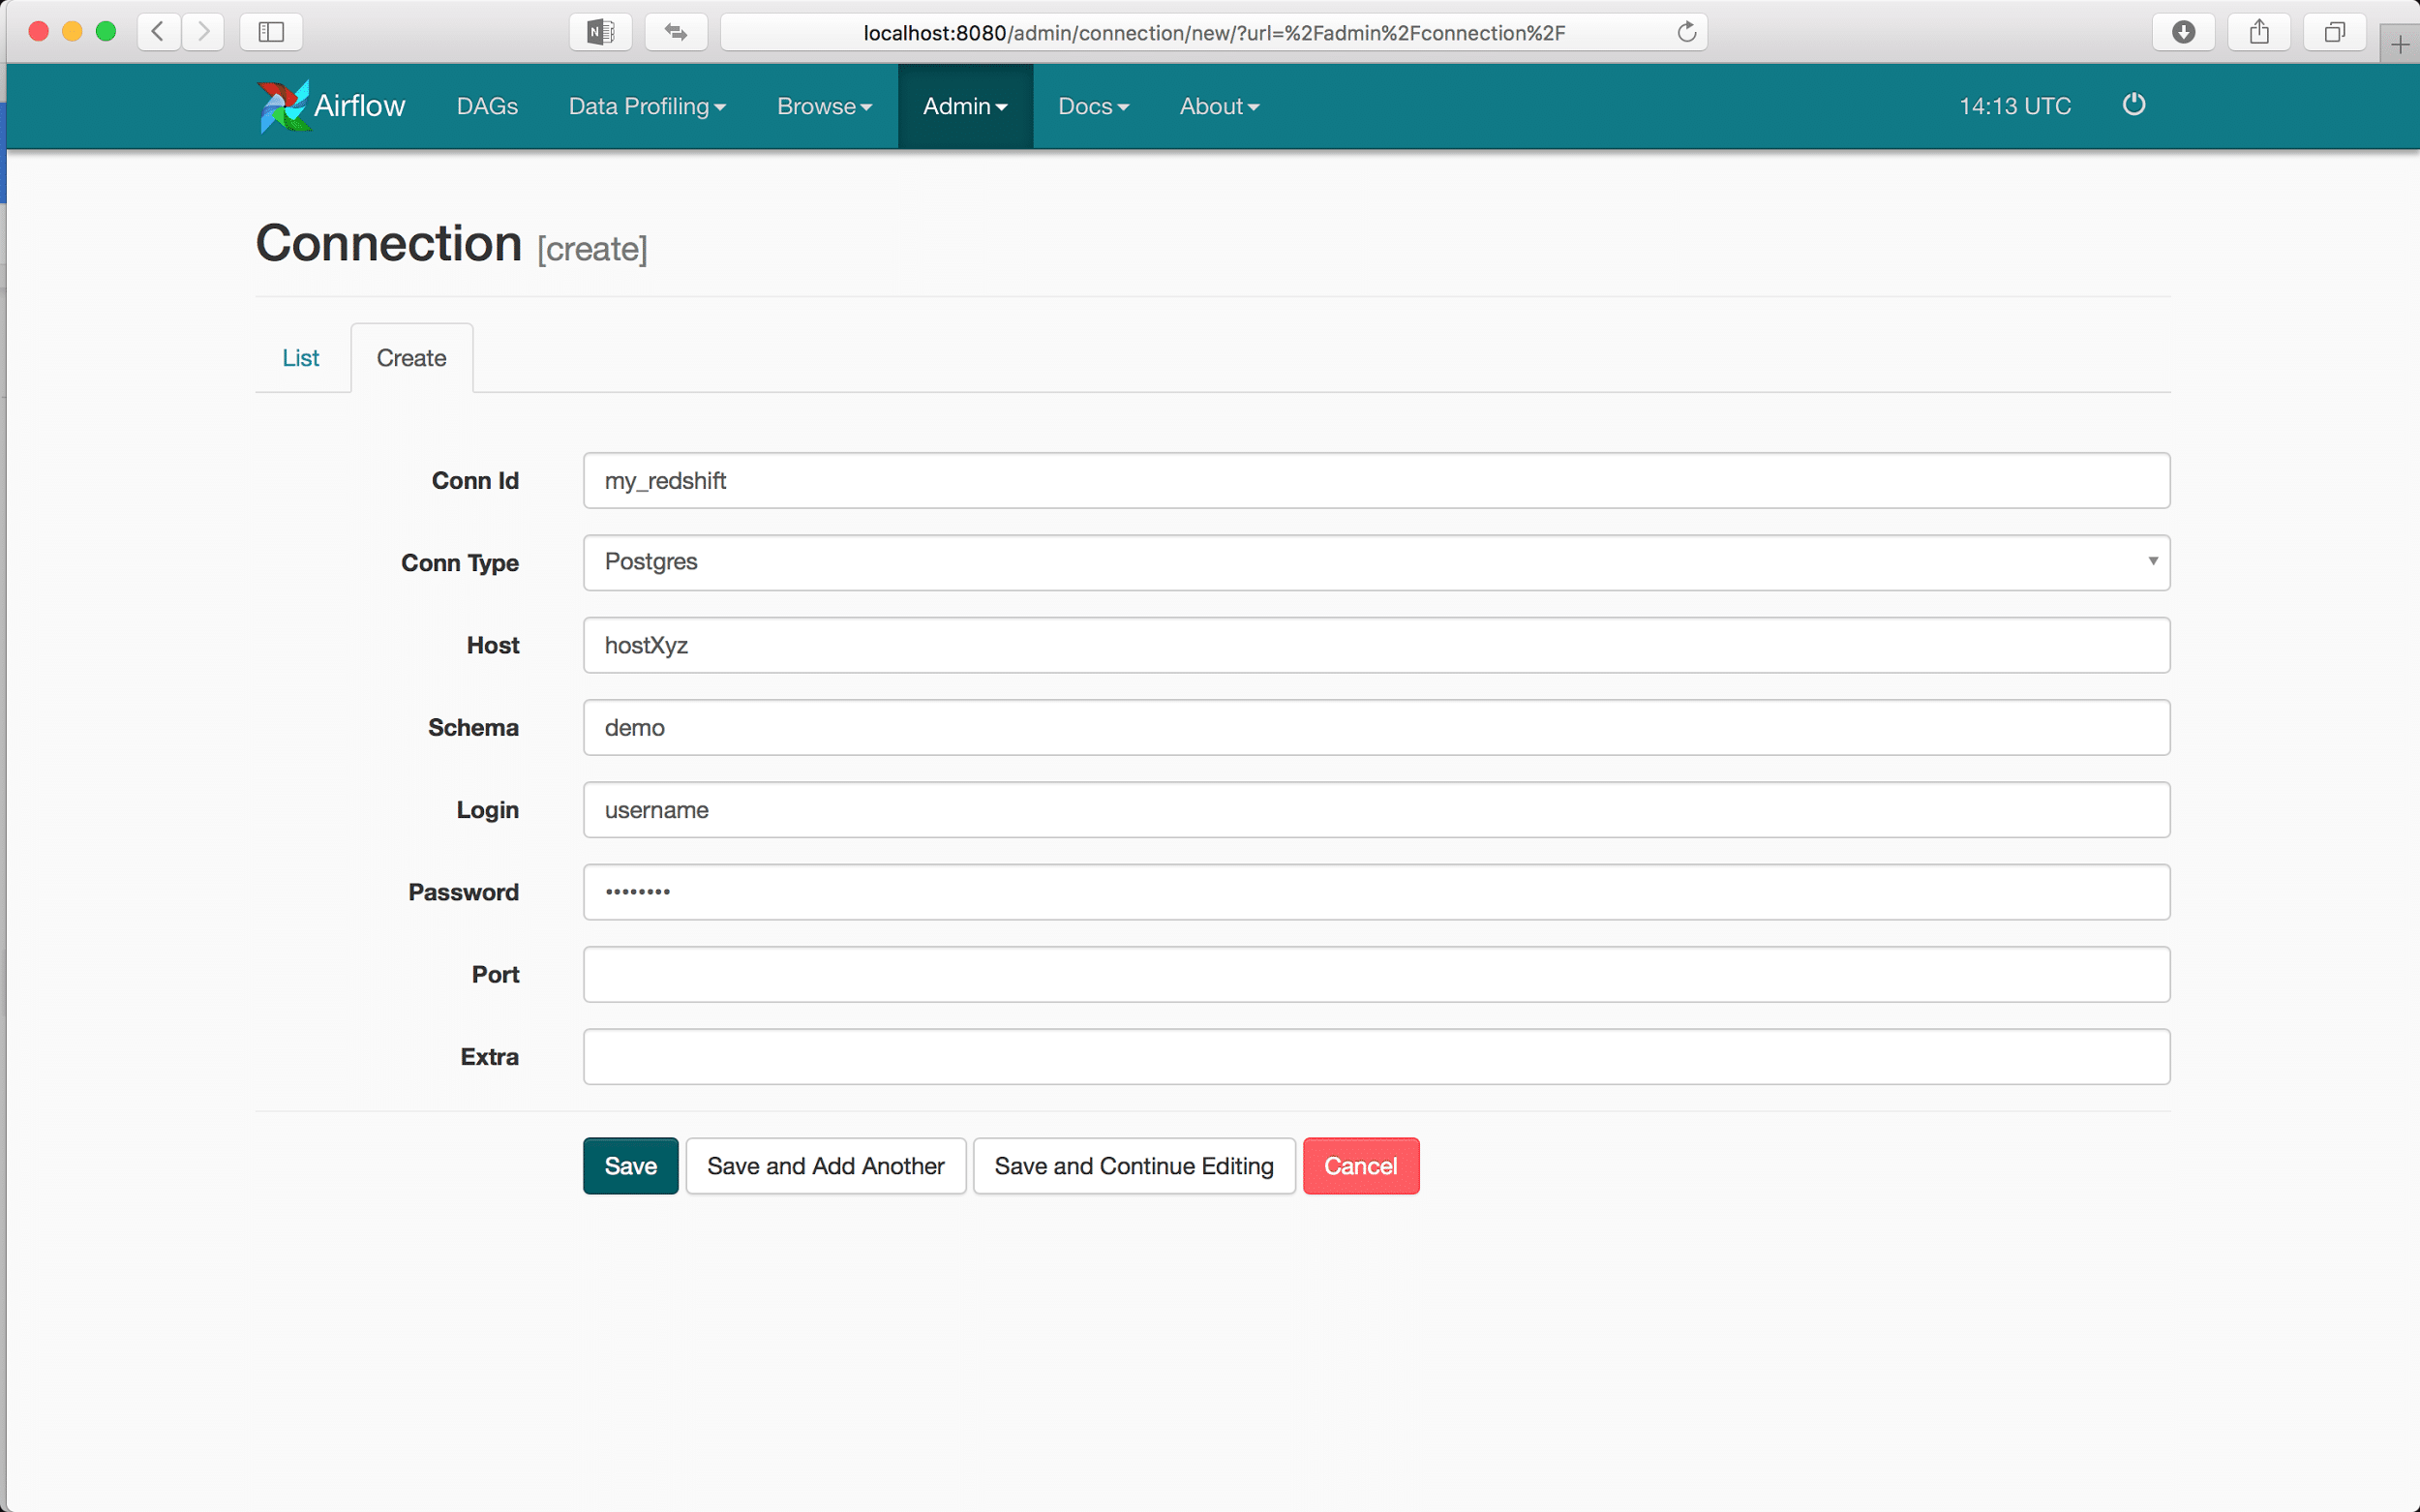
Now in any application that utilizes Airflow for workflow management, we will be able to connect to our Redshift database only using the Conn Id value that we just defined.
Developing the S3 to Redshift operator
Preparing the environment
We are going to develop an operator which transfers a CSV file stored in S3 into a database in Redshift. This operator will be re-usable because the execution only depends on the input parameters.
Our input CSV file has the following structure:
2, Customer 2, Address 22
5, Customer 5, Address 55
7, Customer 7, Address 7
8, Customer 8, Address 8
We are also going to define a simple staging table on our Redshift database using simple SQL statements:
create table stage_customer (
   id int,
   name varchar(100),
   address varchar(100)
)
Airflow development
Airflow API requires that all custom operators extend the BaseOperator and implement it’s simple interface consisting of two functions:
- __init__() – which is constructor that gets executed when the operator is instantiated
- execute() – which is the execution function that gets called by the workflow executor
A skeleton of our custom operator would look as follows:
class S3ToRedshiftOperator(BaseOperator):
  @apply_defaults
  def __init__(self,*args, **kwargs):
    return 1
  def execute(self, context):
    return 1
To accomplish our task of moving data from S3 to Redshift we need more input parameters such as the location of S3 bucket, access credentials for S3 data, name of the S3 file, name of the target table in Redshift… We also have to specify the logic for moving the data.
Defining the constructor function
Firstly we will define a proper constructor. The following is our constructor function rewritten to allow the input of more information. The variables that are passed into the operator will get stored as instance variables of the operator.
@apply_defaults
def __init__(self, redshift_conn_id, table, s3_bucket,
  s3_path, s3_access_key_id, s3_secret_access_key, delimiter, region,
  *args, **kwargs):
  self.redshift_conn_id = redshift_conn_id
  self.table = table
  self.s3_bucket = s3_bucket
  self.s3_path = s3_path
  self.s3_access_key_id = s3_access_key_id
  self.s3_secret_access_key = s3_secret_access_key
  self.delimiter = delimiter
  self.region = region
  super(S3ToRedshiftTransfer, self).__init__(*args, **kwargs)
Defining the execute function
Now we are going to implement the actual logic that connects to a Redshift database and uses the COPY function to load data from an S3 file. This is placed in the execute() function.
def execute(self, context):
  self.hook = PostgresHook(postgres_conn_id=self.redshift_conn_id)
  conn = self.hook.get_conn()
  cursor = conn.cursor()
  log.info("Connected with " + self.redshift_conn_id)
  load_statement = """
    delete from {0};
    copy
    {0}
    from 's3://{1}/{2}'
    access_key_id '{3}' secret_access_key '{4}'
    delimiter '{5}' region '{6}' """.format(
  self.table, self.s3_bucket, self.s3_path,
  self.s3_access_key_id, self.s3_secret_access_key,
  self.delimiter, self.region)
  cursor.execute(load_statement)
  cursor.close()
  conn.commit()
  log.info("Load command completed")
  return True
Lastly, we have to define a plugin according to this Airflow interface. The Plugin will inject our custom operator into Airflow’s context. This way our operator can be imported as an Airflow native operator when we start defining the DAG.
class S3ToRedshiftOperatorPlugin(AirflowPlugin):
  name = "redshift_load_plugin"
  operators = [S3ToRedshiftOperator]
To summarize everything we just did, I will copy the whole code that defines the S3ToRedshiftOperator operator.
import logging
from airflow.hooks.postgres_hook import PostgresHook
from airflow.plugins_manager import AirflowPlugin
from airflow.models import BaseOperator
from airflow.utils.decorators import apply_defaults
log = logging.getLogger(__name__)
class S3ToRedshiftOperator(BaseOperator):
"""
Executes a LOAD command on a s3 CSV file into a Redshift table
:param redshift_conn_id: reference to a specific redshift database
:type redshift_conn_id: string
:param table: reference to a specific table in redshift database
:type table: string
:param s3_bucket: reference to a specific S3 bucket
:type s3_bucket: string
:param s3_access_key_id: reference to a specific S3 key
:type s3_key: string
:param s3_secret_access_key: reference to a specific S3 key
:type s3_key: string
:param delimiter: delimiter for CSV data
:type s3_key: string
:param region: location of the s3 bucket (eg. 'eu-central-1' or 'us-east-1')
:type s3_key: string
"""
@apply_defaults
def __init__(self, redshift_conn_id,table,s3_bucket,s3_path,s3_access_key_id,
  s3_secret_access_key,delimiter,region,*args, **kwargs):
  self.redshift_conn_id = redshift_conn_id
  self.table = table
  self.s3_bucket = s3_bucket
  self.s3_path = s3_path
  self.s3_access_key_id = s3_access_key_id
  self.s3_secret_access_key = s3_secret_access_key
  self.delimiter = delimiter
  self.region = region
  super(S3ToRedshiftOperator, self).__init__(*args, **kwargs)
def execute(self, context):
  self.hook = PostgresHook(postgres_conn_id=self.redshift_conn_id)
  conn = self.hook.get_conn()
  cursor = conn.cursor()
  log.info("Connected with " + self.redshift_conn_id)
  load_statement = """
    delete from {0};
    copy
    {0}
    from 's3://{1}/{2}'
    access_key_id '{3}' secret_access_key '{4}'
    delimiter '{5}' region '{6}' """.format(
  self.table, self.s3_bucket, self.s3_path,
  self.s3_access_key_id, self.s3_secret_access_key,
  self.delimiter, self.region)
  cursor.execute(load_statement)
  cursor.close()
  conn.commit()
  log.info("Load command completed")
  return True
class S3ToRedshiftOperatorPlugin(AirflowPlugin):
  name = "redshift_load_plugin"
  operators = [S3ToRedshiftOperator]
Developing the Redshift Upsert operator
Preparing the environment
The upsert operator will take as input two tables: source table which contains the latest data and the target table. In the target table we want to update the whole row if there is a row with the same business key (primary key). If there isn’t a matching row with the same business key in the target table, we will just insert the key from the staging table. This operator will be re-usable because the execution is parametrized.
The source table is the stage_customer table we just defined while the destination table will be a table customer. We will define the table customer and load it with some data using the following script:
create table customer (
  id int,
  name varchar(100),
  address varchar(100)
)
insert into customer values
(1, 'Customer 1', 'Address 1'),
(2, 'Customer 2', 'Address 2'),
(3, 'Customer 3', 'Address 3'),
(4, 'Customer 4', 'Address 4'),
(5, 'Customer 5', 'Address 5'),
(6, 'Customer 6', 'Address 6')
Airflow development
Defining the operator for Upserts in Redshift will follow the same pattern as for Loading the data from S3. We will define the functionality of __init__ and execute functions.
class RedshiftUpsertOperator(BaseOperator):
"""
Executes an upsert from one to another table in the same Redshift database by completely replacing the rows of target table with the rows in staging table that contain the same business key
:param src_redshift_conn_id: reference to a specific redshift database
:type src_redshift_conn_id: string
:param dest_redshift_conn_id: reference to a specific redshift database
:type dest_redshift_conn_id: string
:param src_table: reference to a specific table in redshift database
:type table: string
:param dest_table: reference to a specific table in redshift database
:type table: string
:param src_keys business keys that are supposed to be matched with dest_keys business keys in the target table
:type table: string
:param dest_keys business keys that are supposed to be matched with src_keys business keys in the source table
:type table: string
"""
@apply_defaults
def __init__(self, src_redshift_conn_id, dest_redshift_conn_id,
  src_table, dest_table, src_keys, dest_keys, *args, **kwargs):
  self.src_redshift_conn_id = src_redshift_conn_id
  self.dest_redshift_conn_id = dest_redshift_conn_id
  self.src_table = src_table
  self.dest_table = dest_table
  self.src_keys = src_keys
  self.dest_keys = dest_keys
  super(RedshiftUpsertOperator , self).__init__(*args, **kwargs)
def execute(self, context):
  self.hook = PostgresHook(postgres_conn_id=self.src_redshift_conn_id)
  conn = self.hook.get_conn()
  cursor = conn.cursor()
  log.info("Connected with " + self.src_redshift_conn_id)
  # build the SQL statement
  sql_statement = "begin transaction; "
  sql_statement += "delete from " + self.dest_table + " using " + self.src_table + " where "
  for i in range (0,len(self.src_keys)):
    sql_statement += self.src_table + "." + self.src_keys[i] + " = " + self.dest_table + "." + self.dest_keys[i]
    if(i < len(self.src_keys)-1):
      sql_statement += " and "
  sql_statement += "; "
  sql_statement += " insert into " + self.dest_table + " select * from " + self.src_table + " ; "
  sql_statement += " end transaction; "
  print(sql_statement)
  cursor.execute(sql_statement)
  cursor.close()
  conn.commit()
  log.info("Upsert command completed")
class RedshiftUpsertPlugin(AirflowPlugin):
  name = "redshift_upsert_plugin"
  operators = [RedshiftUpsertOperator]
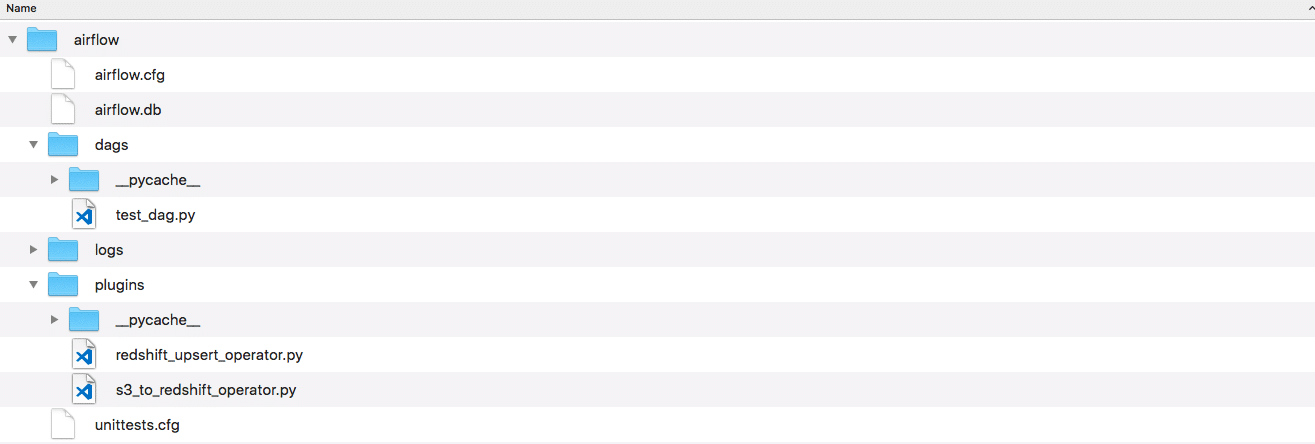
Storing the source code
The code for both operators ( the .py files) now have to be placed within a folder called plugin in our Airflow home folder. Only when placed in that folder can they be recognized by Airflow.
The folder should look as following:
Defining the workflow DAG
To define a DAG we will import the relevant classes and instantiate the DAG with a default parameters:
import datetime as dt
from airflow import DAG
default_args = {
  'owner': 'me',
  'start_date': dt.datetime(2017, 6, 1),
  'retries': 2,
  'retry_delay': dt.timedelta(minutes=5),
}
dag = DAG('redshift-demo',
  default_args=default_args,
  schedule_interval='@once'
)
Above we defined a new DAG that has an id redshift-demo and will be executed by the Scheduler just once on 1.6.2017. with two retries spaced five minutes apart.
Just defined as this, the DAG is not particularly useful. We want it to execute the operators we defined. For that we have to add tasks to the DAG that will be executed. A task is just an instantiated operator where we provide all the specific information required for execution.
We first have to import the operators we defined using plugins. Than can be done as following:
from airflow.operators.redshift_upsert_plugin import RedshiftUpsertOperator
from airflow.operators.redshift_load_plugin import S3ToRedshiftOperator
We can also observe that the import location is based on the name we gave each plugin ie. redshift_upsert_plugin.
We will now instantiate both the S3ToRedshiftOperator operator which transfers data from S3 to Redshift and the RedshiftUpsertOperator which performs the Upsert.
upsert = RedshiftUpsertOperator(
  task_id='upsert',
  src_redshift_conn_id="my_redshift",
  dest_redshift_conn_id="my_redshift",
  src_table="stage_customer",
  dest_table="customer",
  src_keys=["id"],
  dest_keys=["id"],
  dag = dag
)
load = S3ToRedshiftOperator(
  task_id="load",
  redshift_conn_id="my_redshift",
  table="stage_customer",
  s3_bucket="bucket_name",
  s3_path="new_data.csv",
  s3_access_key_id="key",
  s3_secret_access_key="key",
  delimiter=",",
  region="us-east-1",
  dag=dag
)
load >> upsert
The last statement load >> upsert defines the dependency between tasks in the DAG. Specifically that task load will be executed before the task upsert.
The code for defining the DAG has to be placed in the dags folder inside our Airflow home folder as shown in the example picture for plugins.
Testing
Airflow gives us the ability to test how a single task within the DAG context works. This way we can debug operators during development.
The general command for running tasks is:
airflow test <dag id> <task id> <date>
For example to test how the S3ToRedshiftOperator works, we would create a DAG with that task and then run just the task with the following command:
airflow test redshift-demo upsert 2017-09-15
Deploying the application
Airflow deployment model
To execute a DAG we must first start the Airflow scheduler. The scheduler is what actually looks at the Airflow home folder for new DAG’s and manages the scheduling of them.
We can start the Airflow scheduler using a simple command:
airflow scheduler
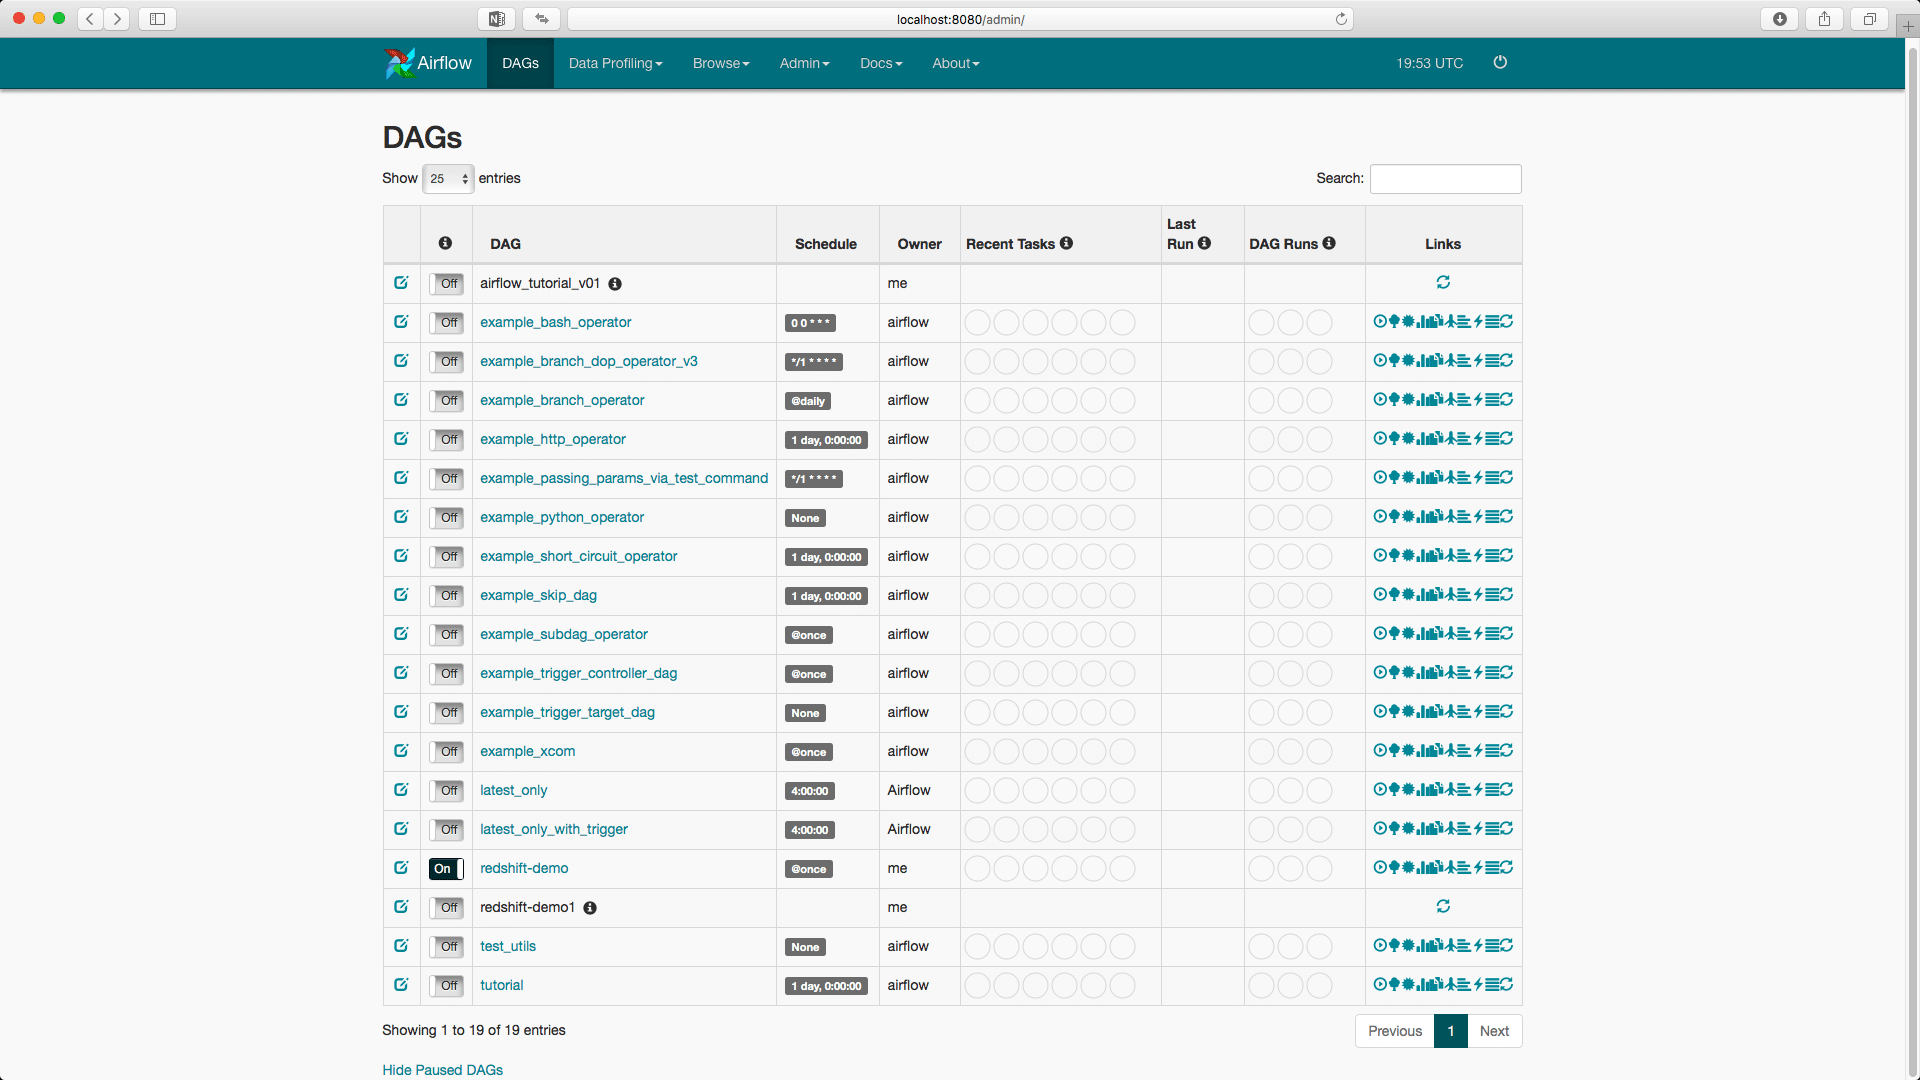
Then we have to unpause the DAG that we want to run. Because each DAG has a schedule associated with it when it will be executed, by default it’s paused and won’t execute until we resume it. I recommend using the Webserver UI for this task.
The process is very simple, we simply have to change the Off button to On:
Now we can run a DAG in two ways:
- Using the Webserver UI
- Using the command line
Using the Webserver UI we can just press the Play button (first button in the links tab) and that will run the DAG.
Using the command line we can run (in Airflow terminology trigger) a DAG as follows:
airflow trigger_dag redshift-demo
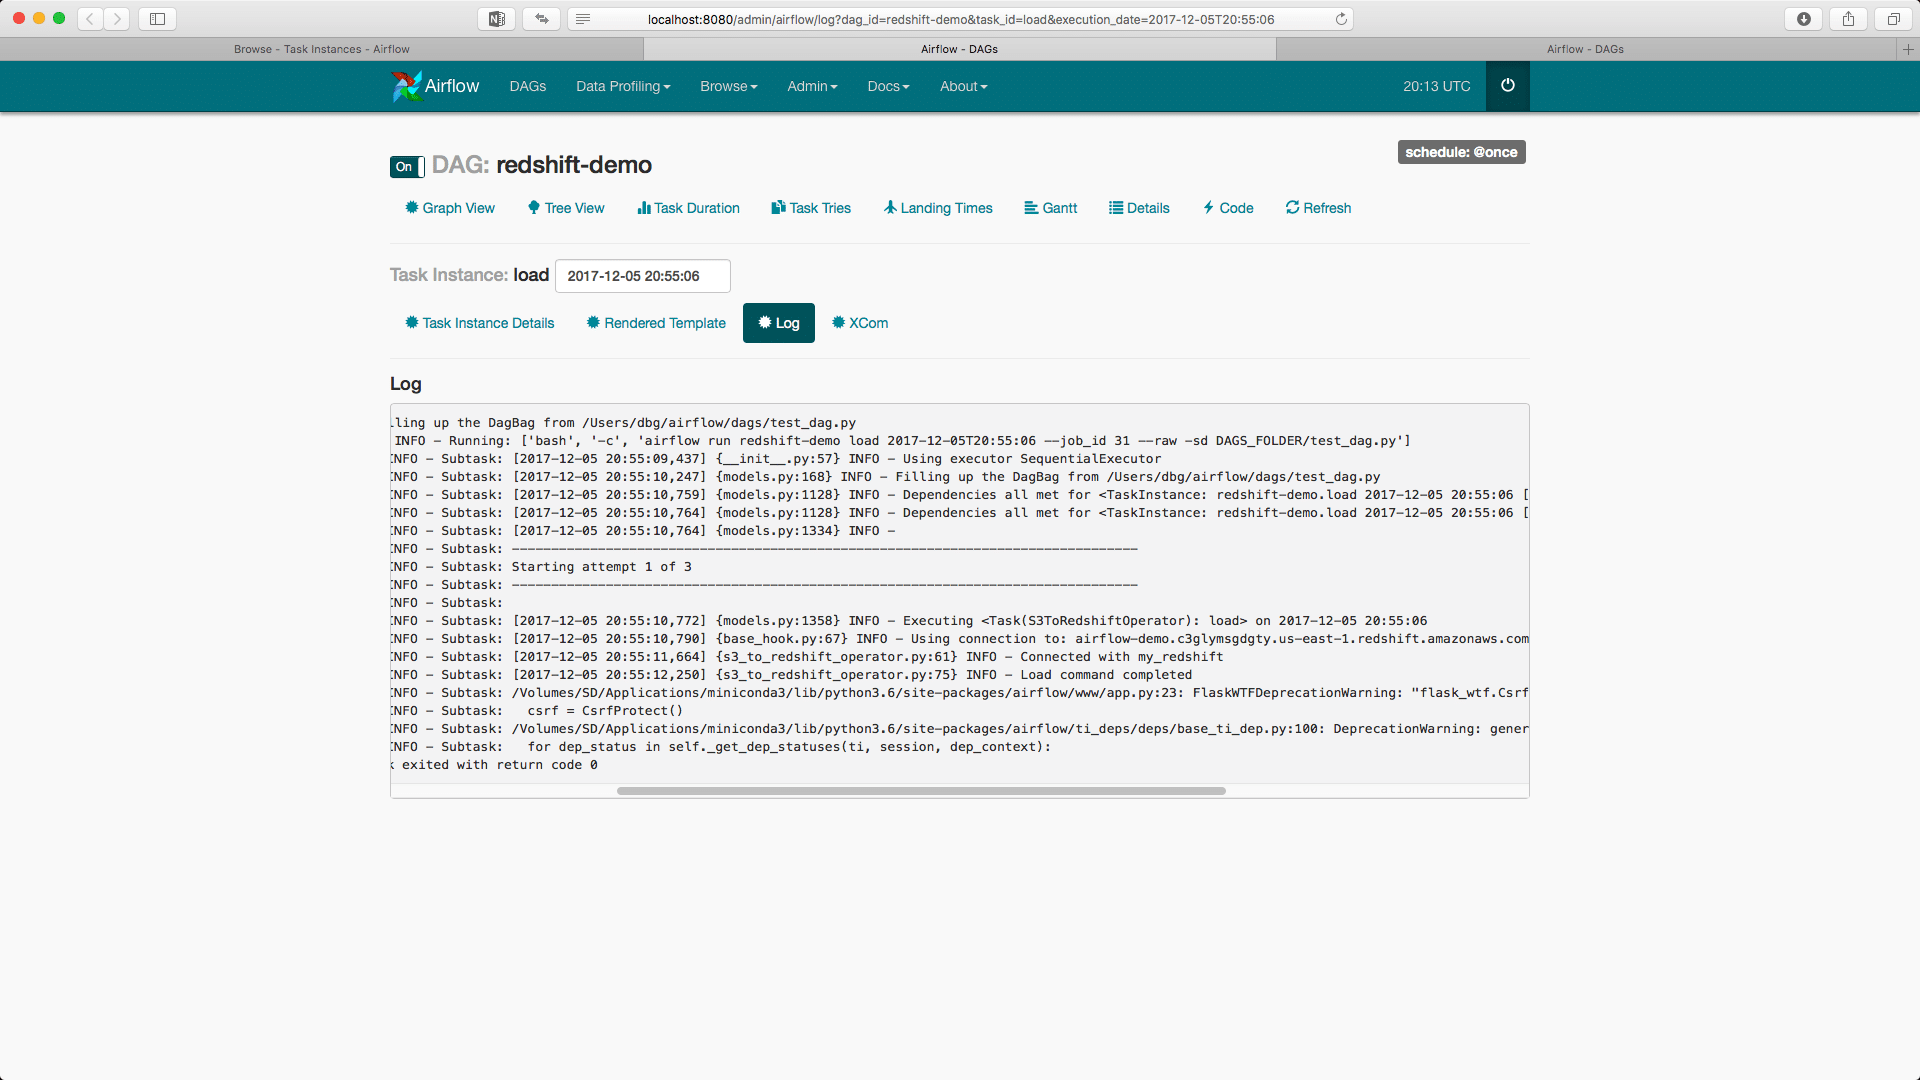
Tracking the logs of application
By going to the Browse -> Task Instances tab in the Webserver UI we can track the execution of each task.
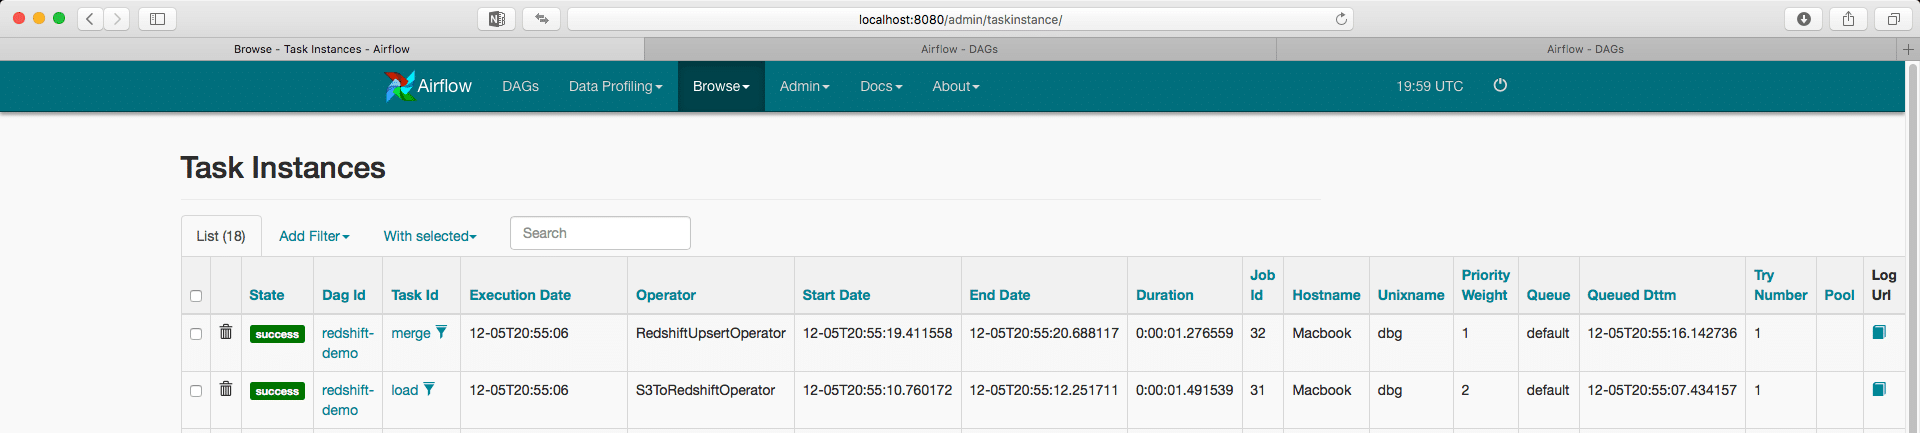
The rightmost column allows us to check the logs of a task:
Checking the result
We can check that Redshift SQL executed our commands by going to the AWS console:

Now after our DAG finished with execution, the resulting customer table will look as follows:
1, Customer 1, Address 1
3, Customer 3, Address 3
4, Customer 4, Address 4
6, Customer 6, Address 6
2, Customer 2, Address 22
5, Customer 5, Address 55
7, Customer 7, Address 7
8, Customer 8, Address 8
At Sonra we love Apache Airflow. What has your experience been. Contact us if you need help and/or support with your Airflow implementation. We can create customisations for you.
Uli Bethke
Uli has been rocking the data world since 2001. As the Co-founder of Sonra, the data liberation company, he’s on a mission to set data free. Uli doesn’t just talk the talk—he writes the books, leads the communities, and takes the stage as a conference speaker.
Any questions or comments for Uli? Connect with him on LinkedIn.
Follow Uli Bethke: