How to Parse & Flatten XML in Snowflake With Examples
In this post we cover every detail of parsing XML in Snowflake including storing, loading, querying, and parsing XML.
Very few cloud data platforms have native support for parsing XML. Unlike Redshift or BigQuery, Snowflake stands out and provides the user with various options around working with XML. We will look at these options but also at the limitations of working with XML on Snowflake.
These limitations also need to be looked at in the light of the general limitations and downsides of manually converting XML. Instead of writing code using the Snowflake XML functions to parse complex and deeply nested XML you can fully automate XML parsing with an XML conversion tool.
What can you expect from this blog post?
As a very first step we go through a quick XML tutorial and clarify some of the core concepts you need to be aware of when working with XML and converting it to tables in a relational format.
We then outline the native options of working with XML on Snowflake
- Options for storing XML in Snowflake
- Options for loading XML into Snowflake
- Options for querying XML via SQL (aka Schema on Read)
- Options for parsing XML to a relational format (aka Schema on Write)
- Options for flattening XML to a denormalised table
We then look at the various limitations of working with XML on Snowflake.
The Snowflake XML limitations also need to be looked at in the wider context of the limitations of writing code to query and convert XML. We will go through the downsides and give clear guidance under what circumstances it makes sense to use an automated approach using an XML conversion tool and when the manual coding approach is a better fit.
You will need to be aware of these limitations to make an informed decision on the best approach of working with XML on Snowflake.
Let’s dive in but before we start …
Here are the KEY TAKEAWAYS for those in a hurry
Key Takeaways
- Snowflake supports XML natively, unlike Redshift, Azure Synapse, or BigQuery.
- Traditional databases such as Oracle or SQL Server have much wider support for working with XML, e.g. features to work with XML schemas (XSDs) and support for standard XML tools such as XQuery.
- In comparison to other semi-structured data types such as JSON, support for XML in Snowflake is limited, e.g. the XML feature is currently in public preview and has been so for the last couple of years.
- Parsing and writing XML to Snowflake tables in a relational format is generally preferred over directly querying the XML as schema on read.
- When working with XML on Snowflake you will inevitably run into various limitations, in particular if you are working with complex and nested XML.
- The Snowflake XML feature is only in public preview, which means that in a worst case scenario you may not get support for it.
- You can only store XML documents up to a size of 16 MB (uncompressed).
- There are no features for working with XSDs. This is a significant downside as it adds to the manual workload of converting XML.
- No support to use the infer_schema function or schema evolution
- No support for loading zipped XMLs.
- No data lineage or source to target mapping for XML elements to target table columns
- When working with complex XML or many different types of XML the benefits of an automated XML conversion approach often outweigh the costs and risks associated with a manual conversion approach.
- The manual approach using code is fine for simple XML conversion projects but runs into limitations for complex and deeply nested XML based on industry data standards. Having many different types of XML in an organisation also makes the manual approach costly.
- Flexter is an enterprise XML converter that automatically converts XML to a Snowflake relational model. It addresses all of the Snowflake limitations and the wider limitations of manually converting XML by writing code.
Use Flexter to turn XML and JSON into Valuable Insights
- 100% Automation
- 0% Coding
Quick XML primer
Before we dive into the content let’s clarify some of the core concepts around XML.
If you are an XML pro you can jump straight to the section about working with XML on Snowflake.
XML element
An XML element is the primary building block of an XML document. It is used to structure the data into a hierarchy and can contain other elements, text, and attributes. An element consists of:
- A start tag, which opens the element, such as <name>.
- An end tag, which closes the element, such as </name>.
- The content between the start and end tags, which can be text, other elements, or both. The content is often referred to as the value.
- Optionally, attributes that provide additional information about the element.
- An empty element tag is used for elements that do not need to enclose any content. This type of tag combines the opening and closing into a single self-closing tag. The syntax for an empty element tag ends with a slash / just before the closing angle bracket >, e.g. </name>
XML attribute
An XML attribute provides additional information about an element, usually in the form of a name-value pair, and is always included within the start tag of an element. Attributes are used to store data that is not specifically part of the data content, such as identifiers, properties, or values that affect the behaviour of the element.
Example
|
1 |
<author id=”12345”> |
Difference between XML attribute and element
What are the differences between XML attribute and element? There is no fast and hard rule, just some rough guidelines.
- Function: Elements structure the main data of the document and can contain other elements or text. Attributes provide additional, ancillary information about an element.
- Multiplicity: An element can contain multiple other elements and text, whereas attributes are generally simple name-value pairs attached to elements.
- Nesting: Elements can be nested within other elements to create a document structure. Attributes cannot contain other attributes or elements; they only exist within the start tag of an element.
- Usage: Elements are used to represent the main components and complex data structures of the document. Attributes are best used for metadata or information that specifies properties of elements, such as identifiers, styles, or specific characteristics that do not constitute the primary data content.
XML Fragment
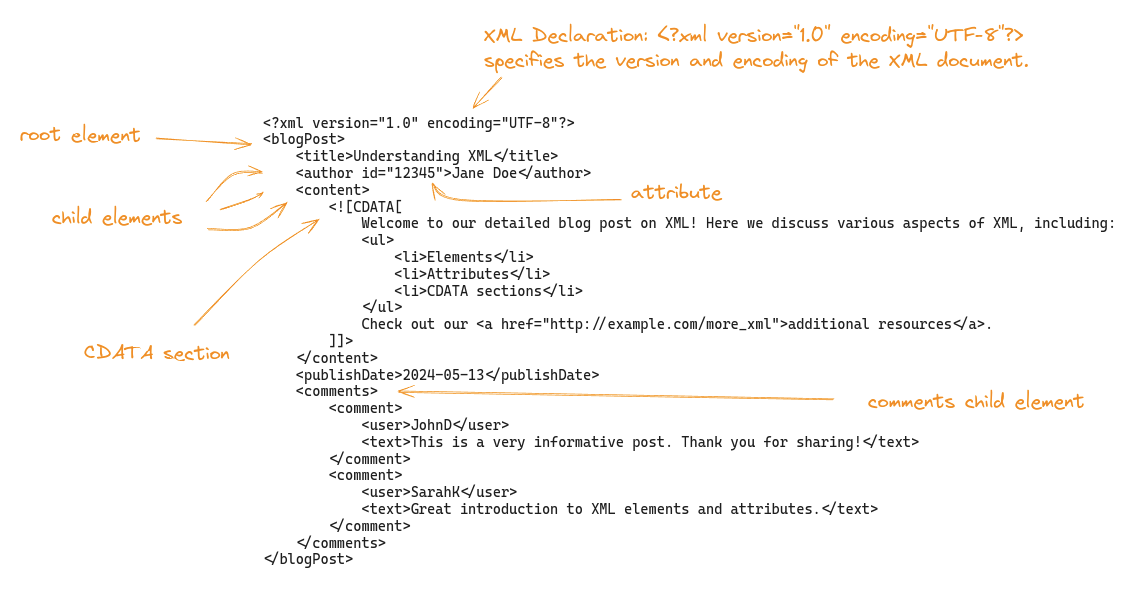
An XML fragment is a portion of an XML document that may consist of multiple elements and other content. Unlike a complete XML document, an XML fragment does not need to include the XML declaration (<?xml version=”1.0″?>) or a single root element. It can be a piece of the XML that is well-formed but not necessarily a complete document on its own.
Example of an XML Fragment
|
1 2 3 4 5 6 7 8 9 |
<Department id="ComputerScience"> <Course>Introduction to Programming</Course> <Course>Algorithms and Data Structures</Course> </Department> <Department id="ElectricalEngineering"> <Course>Circuit Analysis</Course> <Course>Electromagnetics</Course> <Course>Control Systems</Course> </Department> |
XML entity
XML has a small set of predefined entities, which are necessary for escaping special characters that have specific meanings in XML syntax. These include:
- & for the ampersand (&)
- < for the less-than sign (<)
- > for the greater-than sign (>)
- ' for the apostrophe (‘)
- " for the quotation mark (“)
CDATA
As an alternative to XML entity you can use a CDATA section
CDATA sections in XML are particularly useful in scenarios where you need to embed content that includes characters that would normally be interpreted as XML markup and would need to be escaped via predefined XML entities. You can use CDATA instead of XML entities.
A CDATA section is enclosed within <![CDATA[ and ]]> markers. Anything placed between these markers is ignored by the XML parser, which means it does not process any markup inside the CDATA section.
Here is an example. As you can see you don’t need to escape any elements via XML entities.
|
1 2 3 4 5 6 7 8 9 10 11 |
<content> <![CDATA[ Welcome to our detailed blog post on XML! Here we discuss various aspects of XML, including: <ul> <li>Elements</li> <li>Attributes</li> <li>CDATA sections</li> </ul> Check out our <a href="http://example.com/more_xml">additional resources</a>. ]]> </content> |
XML Namespace
Namespaces in XML are primarily used to avoid naming conflicts by distinguishing elements and attributes that may have the same name but different meanings, based on their context or domain. This is particularly useful when combining XML documents from different sources or when extending existing XML formats.
|
1 2 3 4 5 6 7 8 9 10 11 12 13 |
<?xml version="1.0" encoding="UTF-8"?> <lib:Library xmlns:lib="http://www.example.com/library"> <lib:Book> <lib:Title>Great Expectations</lib:Title> <lib:Author>Charles Dickens</lib:Author> <lib:ISBN>978-0141439563</lib:ISBN> </lib:Book> <lib:Book> <lib:Title>To Kill a Mockingbird</lib:Title> <lib:Author>Harper Lee</lib:Author> <lib:ISBN>978-0446310789</lib:ISBN> </lib:Book> </lib:Library> |
- Namespace Declaration: xmlns:lib=”http://www.example.com/library” declares a namespace identified by the URI http://www.example.com/library. This URI is a unique identifier and does not need to point to an actual web resource.
- Elements with Namespace Prefix: Each element within the library (like lib:Book, lib:Title, lib:Author, lib:ISBN) is prefixed with lib, associating it with the declared namespace.
XML conversions to relational format
When converting XML to a relational format you need to be aware of the following concepts and their pitfalls.
Denormalisation / Flattening
A common approach when converting XML to a relational format is to denormalise the data. Flattening is another word for denormalisation and refers to the same thing.
For each branch in the XML (more on branches in a minute), we create one fully flattened table.
Let’s go through an example.
We have the following XML document
|
1 2 3 4 5 6 7 8 9 10 11 12 13 14 15 16 17 18 19 20 21 22 23 24 25 |
<Company> <CompanyName>Tech Solutions</CompanyName> <Department> <DepartmentName>Engineering</DepartmentName> <Employee> <Name>John Doe</Name> <Position>Software Engineer</Position> </Employee> <Employee> <Name>Jane Smith</Name> <Position>DevOps Engineer</Position> </Employee> </Department> <Department> <DepartmentName>Marketing</DepartmentName> <Employee> <Name>Emily Johnson</Name> <Position>Marketing Manager</Position> </Employee> <Employee> <Name>Michael Brown</Name> <Position>Content Strategist</Position> </Employee> </Department> </Company> |
The denormalised version looks as follows. It’s fully flattened into a single table.
CompanyName | DepartmentName | Name | Position |
|---|---|---|---|
Tech Solutions | Engineering | John Doe | Software Engineer |
Tech Solutions | Engineering | Jane Smith | DevOps Engineer |
Tech Solutions | Marketing | Emily Johnson | Marketing Manager |
Tech Solutions | Marketing | Michael Brown | Content Strategist |
Normalisation
Having a normalised relational structure is typically preferred over a denormalised structure for the following reasons.
- Data Integrity and Consistency:
- Reduced Redundancy: Normalisation reduces data redundancy by ensuring that each piece of data is stored in only one place. This minimises the risk of having inconsistent data across the database.
- Update Anomalies: When data needs to be updated, it only has to be changed in one place, reducing the risk of update anomalies and ensuring consistency.
- Referential Integrity: Normalised databases enforce referential integrity, meaning that relationships between tables are maintained accurately. This ensures that references between tables remain consistent.
- Elimination of Anomalies: Normalisation eliminates insertion, update, and deletion anomalies, ensuring that the database remains accurate and reliable.
- Smaller Data Sets: By eliminating redundant data, normalised databases typically require less storage space.
- Faster Updates: Updates are faster because only one copy of the data needs to be modified.
- Scalability: Scalability: Normalised databases can be more easily scaled. Because data is stored in a structured way, adding new types of data or relationships typically involves adding new tables rather than modifying existing ones.
Multiple branches
Apart from simple scenarios, XML documents typically contain multiple branches. When denormalising XML documents you need to be aware that denormalising multiple branches may lead to cartesian products if not done properly. Later on we will look at an example on how to handle multiple branches in XML documents in Snowflake.
Have a look at the following XML document with two branches
|
1 2 3 4 5 6 7 8 9 10 11 |
<root> <BranchA> <ItemA>A1</ItemA> <ItemA>A2</ItemA> </BranchA> <BranchB> <ItemB>B1</ItemB> <ItemB>B2</ItemB> <ItemB>B3</ItemB> </BranchB> </root> |
If not done carefully the conversion to a denormalised tabular format may lead to a cartesian product as shown in the following example. It results in a multiplication of the resultset. It is definitely something you want to avoid as it will have a significant impact on performance and might even bring down your Snowflake Virtual Warehouse. More importantly it will give you the wrong results and bad data.
Cartesian table
|
ItemA |
ItemB |
|---|---|
|
A1 |
B1 |
|
A1 |
B2 |
|
A1 |
B3 |
|
A2 |
B1 |
|
A2 |
B2 |
|
A2 |
B3 |
You will need to create separate tables when you convert branches in an XML doc. One denormalised table for each branch.
The correct conversion of the previous examples has the following tables.
Table 1: BranchA
|
ItemA |
|---|
|
A1 |
|
A2 |
Table 2: BranchB
|
ItemB |
|---|
|
B1 |
|
B2 |
|
B3 |
Loading and storing XML in Snowflake
Before you can work with XML on Snowflake you first have to load and store the XML documents in the Snowflake database.
Storing XML in Snowflake
Storing XML in the Snowflake database is straightforward. While XML on Oracle and XML on MS SQL Server you have many more options of working with XML. However, understanding these options and choosing the right one can be time-consuming. Many of the options have been deprecated, e.g. Oracle EXTRACT and EXTRACTVALUE which adds to the confusion.
Snowflake keeps things simple. XML is stored in the VARIANT data type, which is also used to store other hierarchical data such as JSON.
Internally, Snowflake represents VARIANT data in an efficient, compressed format, which helps in optimising storage and query performance. Snowflake optimises queries on VARIANT data by leveraging its internal storage format and indexing mechanisms. This allows for efficient retrieval and manipulation of semi-structured data.
Important Tip
When working with XML and the VARIANT data type you will need to be knowledgeable around OBJECTs and ARRAYs. Before you start your XML journey on Snowflake make sure to read up on how OBJECTs and ARRAYs work and the various ways of working with these on Snowflake.
Loading XML
There are multiple options around loading XML into Snowflake
IIS (INSERT INTO … SELECT)
IIS can be used for ad-hoc loading of individual XML documents to a Snowflake table with a VARIANT column. It is great for quickly loading XMLs and running some test queries. For bulk loading in a production environment we recommend to use COPY INTO.
Here’s how you would structure this operation:
Create the table: First, create a table that includes a VARIANT column capable of storing semi-structured XML data.
|
1 2 3 4 |
CREATE OR REPLACE TABLE xml_data_table ( xml_content VARIANT ); |
Insert XML data: Use the INSERT INTO … SELECT method to load an XML document.
|
1 2 |
INSERT INTO xml_data_table (xml_content) SELECT PARSE_XML('<root><item id="1">Item 1</item><item id="2">Item 2</item></root>') AS xml_content; |
The PARSE_XML function is used to convert a string that contains XML into a VARIANT format that Snowflake can store in the xml_content column.
External Table
While it is possible to create an external table over JSON documents this is not possible for XML. As XML is not a widely used format, support for external tables was not added by Snowflake.
Copy INTO
Copy INTO is a command that is used to load files. Both tabular (e.g. CSV) and hierarchical data (JSON, XML, Parquet etc.) can be loaded into Snowflake with Copy INTO.
The command comes with a ton of options. For XML you have the following options
- COMPRESSION = AUTO | GZIP | BZ2 | BROTLI | ZSTD | DEFLATE | RAW_DEFLATE | NONE
- IGNORE_UTF8_ERRORS = TRUE | FALSE
- PRESERVE_SPACE = TRUE | FALSE
- STRIP_OUTER_ELEMENT = TRUE | FALSE
- DISABLE_SNOWFLAKE_DATA = TRUE | FALSE
- DISABLE_AUTO_CONVERT = TRUE | FALSE
- REPLACE_INVALID_CHARACTERS = TRUE | FALSE
- SKIP_BYTE_ORDER_MARK = TRUE | FALSE
We will look at COMPRESSION, CopyOptions, and STRIP_OUTER_ELEMENT as the more commonly used options.
COMPRESSION
If your XML comes compressed you can specify the type of compression.
From the options around COMPRESSION you can see that various algorithms are supported. We gzipped XML documents and successfully loaded our XML data into Snowflake.
As you can see, ZIP is not included in the list. ZIP is better described as an archive or file format that supports the compression and archiving of multiple files and directories. It uses various compression algorithms, e.g. DEFLATE.
When we tried to load XML in a ZIP we got an error.
|
1 2 3 |
COPY INTO employee_data FROM @my_internal_xml_stage/employees.zip FILE_FORMAT = (TYPE = 'XML'); |
Error Message:
|
1 |
100100 (22P02): Error parsing XML: not an XML element |
This is unfortunate as XML documents are often shipped as ZIP files and first need to unzipped and then compressed using one of the support compression algorithms before they can be loaded.
Copy options
You can specify one of the following copy options:
|
1 |
ON_ERROR = CONTINUE | SKIP_FILE | SKIP_FILE_num | 'SKIP_FILE_num%' | ABORT_STATEMENT |
You might be wondering about the difference between CONTINUE and SKIP_FILE
Let’s go through some test cases to show the difference in detail
Test Case: CONTINUE versus SKIP_FILE in COPY INTO Command
Objective
To evaluate the behaviour of the COPY INTO command in Snowflake when processing XML files with errors, using ON_ERROR options CONTINUE and SKIP_FILE. This test focuses on observing how Snowflake handles a file containing a malformed XML tag during data load operations.
Files Used
- customer.xml: Contains three customer records; the third record has a malformed XML tag (</email1> instead of </email>).
|
1 2 3 4 5 6 7 8 9 10 11 12 13 14 15 16 17 18 19 20 21 |
<customer> <id>001</id> <name>John Doe</name> <email>john.doe@example.com</email> <age>30</age> <city>New York</city> </customer> <customer> <id>002</id> <name>Jane Smith</name> <email>jane.smith@example.com</email> <age>25</age> <city>Los Angeles</city> </customer> <customer> <id>003</id> <name>Bob Johnson</name> <email>bob.johnson@example.com</email1>//wrong tag <age>40</age> <city>Chicago</city> </customer> |
- employee.xml: Contains two well-formed employee records.
|
1 2 3 4 5 6 7 8 9 10 11 12 13 14 15 |
<?xml version="1.0" encoding="UTF-8"?> <employees> <employee> <id>1</id> <name>John Doe</name> <department>Finance</department> <position>Manager</position> </employee> <employee> <id>2</id> <name>Jane Smith</name> <department>IT</department> <position>Developer</position> </employee> </employees> |
Test Execution
Loading with ON_ERROR = CONTINUE
|
1 2 3 4 |
COPY INTO customer_data FROM @my_internal_xml_stage FILE_FORMAT = (TYPE = 'XML') ON_ERROR = CONTINUE; |
Expected behaviour: Snowflake should load all valid XML entries and ignore the entry with the malformed XML tag. Specifically, it should load two valid customer records from customer.xml and two employee records as a single row from employee.xml.
Loading with ON_ERROR = SKIP_FILE
|
1 2 3 4 |
COPY INTO customer_data FROM @my_internal_xml_stage FILE_FORMAT = (TYPE = 'XML') ON_ERROR = SKIP_FILE; |
Expected Behaviour: Snowflake should skip the entire customer.xml file due to the malformed tag in the third record, resulting in no records from this file being loaded. It should successfully load the two employee records from employee.xml.
Observations
- With CONTINUE:
- Snowflake processed the customer.xml and employee.xml files. Two records from customer.xml (those without errors) and two records from employee.xml were successfully loaded into the customer_data table.
- The record with the malformed tag in customer.xml was ignored, and no error halted the process.

- With SKIP_FILE:
- Snowflake skipped the entire customer.xml file due to the error in one of the records. No data from this file was loaded into the customer_data table.
- Both records from employee.xml were successfully loaded, indicating that the error in customer.xml did not affect the processing of other files.

When you have an error in your XML file and you use CONTINUE, Snowflake will still process the file but just ignore the erroneous element / record. When using SKIP_FILE the whole document will be ignored.
STRIP_OUTER_ELEMENT
STRIP_OUTER_ELEMENT is used to strip away the outermost element in the document, which can simplify the data structure and make it easier to work with XML inside Snowflake.
- If your data has an unnecessary outer wrapper, you can strip it to work directly with the contained data.
- By removing the outer element, you can avoid additional querying steps or path navigation to access the core data elements.
In this simple example the outer wrapper of <customers> does not have much of a purpose and we can use STRIP_OUTER_ELEMENT to remove this element as part of the load to Snowflake.
|
1 2 3 4 5 6 7 8 9 10 11 12 13 14 15 16 17 18 19 20 21 22 23 |
<customers> <customer> <id>001</id> <name>John Doe</name> <email>john.doe@example.com</email> <age>30</age> <city>New York</city> </customer> <customer> <id>002</id> <name>Jane Smith</name> <email>jane.smith@example.com</email> <age>25</age> <city>Los Angeles</city> </customer> <customer> <id>003</id> <name>Bob Johnson</name> <email>bob.johnson@example.com</email> <age>40</age> <city>Chicago</city> </customer> </customers> |
We use COPY INTO to load the XML file into a Snowflake table.
|
1 2 3 4 |
COPY INTO customer_data FROM @my_internal_xml_stage/customers.xml FILE_FORMAT = (TYPE = 'XML' STRIP_OUTER_ELEMENT = TRUE)); |
Next we query the table to ensure that data has been loaded.
|
1 |
SELECT * FROM customer_data; |
Snowflake processed the XML fragment successfully, despite the absence of a root element. This indicates that Snowflake can parse and load XML data structures that are non-standard yet well formed.

While your XML needs to be well formed to be loaded into Snowflake it does not necessarily have to be valid, e.g. loading an XML fragment without a root element works.
Loading Metadata
When using COPY INTO you can also load metadata such as the filename into the target table. This is useful to trace back the XML data to the file it originated from.
Load the XML data from the staging area, capturing both the file name and the content.
|
1 2 3 4 5 6 |
COPY INTO customer_data FROM ( SELECT METADATA$FILENAME, t.$1 FROM @my_internal_xml_stage/customers.xml (file_format => my_xml_file_format) t ); |

The feature INCLUDE_METADATA is not supported. Using INCLUDE_METADATA as part of COPY INTO will result in an error: 003535 (0A000)
Performance considerations for loading XML
The general recommendations for loading files into Snowflake also apply to XML. Here is a quick summary of the most important points.
File Size: Aim for file sizes between 100 MB and 1 GB (compressed) for optimal performance. Smaller files can increase overhead, while larger files may lead to timeouts and increased load times.
Splitting Large Files: If you have very large files, consider splitting them into smaller chunks within the optimal size range.
Compress Files: Use compression formats like gzip to reduce file size. Compressed files consume less storage and can be loaded faster.
Multiple Files: Load data from multiple files concurrently to leverage Snowflake’s automatic parallelism. Snowflake can parallelize the loading process to improve performance.
Querying XML
In this section we cover the options around querying XML on Snowflake in depth. We start by introducing some useful Snowflake XML functions and then show you how to traverse and flatten the XML hierarchy. We provide tips and tricks as we go.
Snowflake XML functions
Snowflake offers various XML functions to check and cast XML.
PARSE_XML
The PARSE_XML function in Snowflake interprets an input string as an XML document, producing an OBJECT value. This allows you to work with XML data within Snowflake by converting it into a format that Snowflake can manipulate and query.
Inserting XML without the PARSE_XML function would just store the XML as VARCHAR and you would not be able to use the Snowflake SQL features to query and read XML.
Syntax
|
1 2 3 |
PARSE_XML( <string_containing_xml> [ , <disable_auto_convert> ] ) PARSE_XML( STR => <string_containing_xml> [ , DISABLE_AUTO_CONVERT => <disable_auto_convert> ] ) |
- string_containing_xml: The XML string to be parsed.
- disable_auto_convert: (Optional) With this parameter you can decide whether or not to convert string values that appear to be numbers into a numerical format.
Example
You can use PARSE_XML to store XML data in a Snowflake table as follows:
|
1 2 3 4 5 6 7 8 9 10 11 12 13 14 15 16 17 18 19 20 21 22 23 24 25 |
CREATE TABLE xml_data_table (xml_content OBJECT); INSERT INTO xml_data_table SELECT PARSE_XML('<org> <company id="1"> <employee id="1"> <name>John Doe</name> <position>Manager</position> </employee> <employee id="2"> <name>Jane Smith</name> <position>Developer</position> </employee> </company> <company id="2"> <employee id="1"> <name>Hans Wurscht</name> <position>Hansel</position> </employee> <employee id="2"> <name>Leo A</name> <position>Support</position> </employee> </company> </org>') AS xml_content; |
Now you can run SQL queries against the table to work on the XML data.
|
1 |
Select * from xml_data_table; |

CHECK_XML
The CHECK_XML function in Snowflake checks the validity of an XML document. If the input string is NULL or a valid XML document, the function returns NULL. If there is an XML parsing error, the function returns an error message describing the issue.
Use Cases:
- Validating XML Data: To ensure that XML data is correctly formatted before processing or storing it in the database.
- Error Diagnostics: To diagnose and locate specific issues in XML documents that fail to parse correctly.
Syntax:
|
1 2 3 |
CHECK_XML( <string_containing_xml> [ , <disable_auto_convert> ] ) CHECK_XML( STR => <string_containing_xml> [ , DISABLE_AUTO_CONVERT => <disable_auto_convert> ] ) |
- string_containing_xml: The XML string to be checked for validity.
- disable_auto_convert: (Optional) Boolean value to disable automatic conversion of numeric and boolean values, similar to the parameter in the PARSE_XML function.
Examples
Example 1: Checking Valid XML
|
1 |
SELECT CHECK_XML('<name> Valid </name>'); |

Example 2: Checking Invalid XML
|
1 |
SELECT CHECK_XML('<name> Invalid </WRONG_CLOSING_TAG>'); |

TO_XML
The TO_XML function in Snowflake converts a VARIANT to a VARCHAR containing an XML representation of the value. If the input is NULL, the result is also NULL. This function is useful for converting semi-structured data into an XML-formatted string.
Use Cases:
Generating XML Strings: To generate XML-formatted strings from VARIANT data, including JSON or other semi-structured formats.
Preserving Data Format: Ensuring that data originally formatted as XML can be converted back to its XML representation after manipulation.
Syntax:
|
1 |
TO_XML( <expression> ) |
Example:Converting JSON Data to XML
|
1 2 3 4 5 6 7 |
CREATE TABLE json_to_xml_table (json_col VARIANT); INSERT INTO json_to_xml_table SELECT PARSE_JSON('{"key1": ["val1", "val2"], "key2": {"subkey": "subval"}}') AS json_col; SELECT json_col, TO_XML(json_col) FROM json_to_xml_table; |

Walking the XML hierarchy with XMLGET
You can use XMLGET to traverse the hierarchy of the elements in your XML document.
The documentation states the purpose of XMLGET clearly
XMLGET extracts an XML element object (often referred to as simply a tag) from the content of the outer XML element based on the name and instance number of the specified tag.
XMLGET returns an OBJECT. It does not return tag values or attribute values but the whole element or fragment.
Tip
If you need to read up on XML elements check the XML primer in this blog post.
Let’s go through some examples.
First we load some nested XML into a table
|
1 2 3 4 5 6 7 8 9 10 11 12 13 14 15 16 17 18 19 20 21 22 |
CREATE TABLE xml_demo (ID INTEGER, object_col OBJECT); INSERT INTO xml_demo (id, object_col) SELECT 1, PARSE_XML(' <?xml version="1.0" encoding="UTF-8"?> <level1 level1attr="this is level 1"> #1 <level2 level2attr="this is level 2"> #2 <level3 level3attr="this is level 3" level3attr2="this is level 3. another one"> #3.1 <level4>#4.1<level5>5</level5></level4> <level4>#4.2</level4> </level3> <level3 level3attr="this is also level 3"> #3.2 </level3> </level2> </level1> '); |
Let’s run XMLGET to retrieve the level2 element
|
1 2 3 |
SELECT XMLGET(object_col, 'level2') FROM xml_demo; |
The result is the element level2 and its child elements.
|
1 2 3 4 5 6 7 8 9 10 11 12 |
<level2 level2attr="this is level 2"> #2 <level3 level3attr="this is level 3" level3attr2="this is level 3. another one"> #3.1 <level4> #4.1 <level5>5</level5> </level4> <level4>#4.2</level4> </level3> <level3 level3attr="this is also level 3">#3.2</level3> </level2> |
Important note
You can not use XMLGET to extract the outermost element, which is level1 in our XML doc.
|
1 2 3 |
SELECT XMLGET(object_col, 'level1') FROM xml_demo; |
Running this query for the level1 element will result in NULL being returned.
Using GET or a shorthand of XMLGET you can extract names of attributes and elements and their values. More on this topic in the next section.
We can walk the hierarchy of XML elements by using nested XMLGET calls.
Let’s move down one level in the hierarchy to element level3
|
1 2 3 |
SELECT XMLGET(XMLGET(object_col, 'level2'), 'level3',1) FROM xml_demo; |
There are multiple level3 elements and the positions of these elements will be represented as an array. If we don’t specify a position, XMLGET will default to position 0. In our example we specify position 1 in XMLGET and get the second child element inside the element level3
|
1 |
<level3 level1attr="this is also level 3">3.2</level3> |
Extracting attributes, tags and values with GET
This is all great, but how do we actually get to the data itself?
You can use Operators of the GET function to extract the following information
- @attrname: To extract attribute values, use GET(tag/element, ‘@attrname’)
- $: To extract the content, use GET(tag/element, ‘$’)
- @: To extract the tag name, use GET(tag/element, ‘@’)
Using our XML document from the previous section, let’s go through some examples.
Let’s first extract the values (content) of an element. In this case element level2
|
1 2 3 4 |
SELECT GET(XMLGET(object_col, 'level2'),' ) FROM xml_demo; |
GET returns an ARRAY if the XML element does have children

In this example, the level2 element contains multiple items (text and multiple nested elements). The nested tags are represented by OBJECTs (key-value pairs). The @ property contains the nested tag name and the $ property contains the nested tag contents.
Example with $
$ returns the value of the element if the element does not have any children of its own.
The second child of level 3, which is element <level3 level3attr=”this is also level 3″>#3.2</level3> does not have any children.
Let’s run GET with $ operator against this element.
|
1 2 3 4 5 |
SELECT XMLGET(XMLGET(object_col, 'level2'), 'level3',1), GET(XMLGET(XMLGET(object_col, 'level2'), 'level3',1),' ) FROM xml_demo; |
This returns text “#3.2”
Example with @
|
1 2 3 4 |
SELECT XMLGET(XMLGET(object_col, 'level2'), 'level3',1), GET(XMLGET(XMLGET(object_col, 'level2'), 'level3',1),'@') FROM xml_demo; |
This will return the tag name “level3”
Example with @attr
|
1 2 3 4 |
SELECT XMLGET(XMLGET(object_col, 'level2'), 'level3',1), GET(XMLGET(XMLGET(object_col, 'level2'), 'level3',1),'@level3attr') FROM xml_demo; |
With @level3attr you can get the value of the attribute level3attr. The query will return “this is also level 3”
Instead of GET you can use the following shorthand notation.
|
1 2 3 4 |
SELECT XMLGET(XMLGET(object_col, 'level2'), 'level3',1), XMLGET(XMLGET(object_col, 'level2'), 'level3',1):"$" FROM xml_demo; |
The same XMLGET() function is used but is followed by a single colon character, then followed by the argument.
It is the equivalent of
|
1 2 3 4 |
SELECT XMLGET(XMLGET(object_col, 'level2'), 'level3',1), GET(XMLGET(XMLGET(object_col, 'level2'), 'level3',1),'$’) FROM xml_demo; |
Both the queries will return “#3.2”.
Filtering XML with Higher Order Functions
Using higher-order functions in Snowflake, such as FILTER and TRANSFORM, you can apply Lambda expressions to arrays for filtering and transforming data. With these functions you can manipulate both structured and semi-structured data without the need for complex SQL operations or user-defined functions (UDFs).
Key Components of Higher-Order Functions:
- Lambda Expression: A block of code that takes an argument and returns a value. In the context of Snowflake higher-order functions, Lambda expressions are anonymous functions specified directly within the higher-order function call.
- Array: The data structure that contains the elements to be filtered or transformed. Arrays can be either structured or semi-structured.
Syntax of Higher-Order Functions:
The general syntax for higher-order functions like FILTER in Snowflake is as follows:
|
1 |
FILTER(<array>, <lambda_expression>) |
Higher Order Functions in action
The following example focuses on filtering products from a parsed XML content stored in a temporary SQL table based on their price attributes.
Data Preparation
First, we create a temporary table named xml_data. It contains XML content representing a list of products. Each product has an id and a price. We parse the XML into a structured format suitable for querying.
|
1 2 3 4 5 6 7 8 9 10 11 |
CREATE TEMP TABLE xml_data AS SELECT PARSE_XML('<products> <product> <id>1</id> <price>100</price> </product> <product> <id>2</id> <price>200</price> </product> </products>') AS xml_content; |
XML Structure and Conversion to Array
We access the XML data stored in xml_data using the xml_content:”$” expression. This notation converts the XML structure into an array format. This conversion is necessary because the FILTER function requires an array as input to apply the provided lambda function across each element of the array.
Output of xml_content:”$”
The xml_content:”$” notation translates the XML structure into a JSON-like array where each product in the XML becomes an object in this array. The structure of this array looks like this:
|
1 2 3 4 5 6 7 8 9 10 11 12 13 14 15 16 17 18 19 20 |
[ { "$": [ {"$": 1, "@": "id"}, {"$": 100, "@": "price"} ], "@": "product", "id": 0, "price": 1 }, { "$": [ {"$": 2, "@": "id"}, {"$": 200, "@": "price"} ], "@": "product", "id": 0, "price": 1 } ] |
In this structure, each product is an object with a $ array holding its attributes. The attributes are also objects, where the $ denotes the value and @ the name of the attribute.
Filtering Query
The main query uses the FILTER function to select only those products whose price is greater than 100.
|
1 2 3 4 5 6 |
SELECT to_xml(FILTER( a.xml_content:"$", p -> p:"$"[1]."$" >100 )) AS updated_products FROM xml_data a; |
Understanding the Lambda Function
The Lambda expression in Snowflake follows this structure:
|
1 |
<arg> [<datatype>] -> <expr> |
- <arg>: The argument representing each element in the array.
- <datatype>: Optional. Specifies the data type of the argument.
- <expr>: The expression that defines the operation to be performed on each element.
In the FILTER function, the lambda expression p -> p:”$”[1].”$” > 100 operates as follows:
- p:”$”: This accesses the array of attributes and values within the product object. It effectively retrieves the array stored under the $ key of each product.
- [1]: This is an array index that selects the second element of the attributes array (“$”). Given the consistent structure of each product, the second element in this array is always the price attribute.
- “$”: This further drills down to extract the value of the price attribute. It selects the value of the price from the object, which looks like {“$”: 100, “@”: “price”}.
- > 100: This part of the lambda function checks if the extracted price value is greater than 100.
Result
We can now convert the filtered XML back to XML to_xml(). This final XML output consists only of products that meet the filtering criteria.

Denormalising with Flatten and Lateral Flatten
We can use denormalisation and flattening techniques to transform complex, hierarchical data into simpler tabular forms. Hierarchical data, such as XML or JSON, often contains nested structures. Flattening involves combining and merging data related by parent – child relationships into a single table with rows and columns. This breaks down nested structures into flattened tables.
FLATTEN
The FLATTEN function in Snowflake converts hierarchical, semi-structured data into a tabular format by breaking down data types such as VARIANT, OBJECT, or ARRAY into multiple rows.
Input and Output:
- Input: The function takes an expression of data type VARIANT, OBJECT, or ARRAY as input. Optional parameters can specify the path within the data structure, whether to include empty expansions, recursive expansion, and the mode (OBJECT, ARRAY, or BOTH).
- Output: The output consists of a fixed set of columns (SEQ, KEY, PATH, INDEX, VALUE, THIS) that detail the flattened data elements.
Example of using FLATTEN for XML
|
1 2 3 4 5 6 7 8 9 10 11 12 13 14 15 16 17 18 19 20 21 22 23 24 25 |
SELECT GET(company.value, '@id') company_id, company.value FROM TABLE( FLATTEN( input => PARSE_XML('<org> <company id="1"> <employee id="1"> <name>John Doe</name> <position>Manager</position> </employee> <employee id="2"> <name>Jane Smith</name> <position>Developer</position> </employee> </company> <company id="2"> <employee id="1"> <name>Hans Wurscht</name> <position>Hansel</position> </employee> </company> </org>'):"$" ) ) company; |
Output
The output will look like this, with each of the two <company> elements being exploded into its own row:

LATERAL FLATTEN
LATERAL FLATTEN is a combination of the FLATTEN function with the LATERAL keyword. The LATERAL keyword allows the FLATTEN function to access columns from preceding tables in the FROM clause. This means that LATERAL FLATTEN can reference and operate on the data produced by the preceding FROM clause elements, making it more flexible and powerful for dealing with complex data transformations and correlations.
Example of using LATERAL FLATTEN
Step 1: Create a Table and Insert XML Data
|
1 2 3 4 5 6 7 8 9 10 11 12 13 14 15 16 17 18 19 20 21 22 23 24 25 26 27 28 29 |
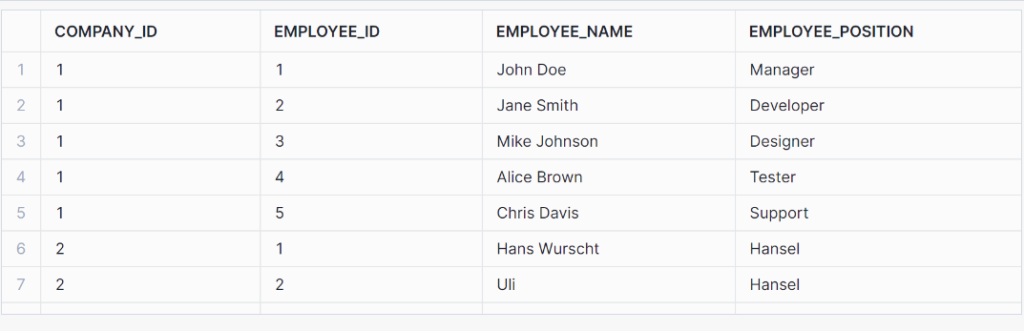
CREATE OR REPLACE TABLE xml_data_table ( id INTEGER AUTOINCREMENT, xml_content XML ); INSERT INTO xml_data_table (xml_content) SELECT PARSE_XML('<org> <company id="1"> <employee id="1"> <name>John Doe</name> <position>Manager</position> </employee> <employee id="2"> <name>Jane Smith</name> <position>Developer</position> </employee> </company> <company id="2"> <employee id="1"> <name>Hans Wurscht</name> <position>Hansel</position> </employee> <employee id="2"> <name>Leo A</name> <position>Support</position> </employee> </company> </org>'); |
Step 2: Use LATERAL FLATTEN to Extract Employee Data Along with Company ID
|
1 2 3 4 5 6 7 8 |
select GET(Company.value, '@id')::integer as Company_id, GET(employee.value, '@id')::integer as employee_id, XMLGET( employee.value, 'name' ):"$"::string as emp_id from XML_DATA_TABLE , lateral FLATTEN(XML_CONTENT:"$") Company, LATERAL FLATTEN(Company.value:"$") employee |
- LATERAL FLATTEN on xml_content: The first LATERAL FLATTEN function processes the company elements within the xml_content.
- LATERAL FLATTEN on Company.value: The second LATERAL FLATTEN function processes the employee elements nested within each company.
Output
The output will look like this, with each row representing an employee and their associated company ID and name:

For each level of nesting you will need to add a separate LATERAL FLATTEN function. If you have branches you will need to do this for each branch in your XML. This brings us to our next topic..
Issue flattering XML with single element arrays
When we used LATERAL FLATTEN with an XML structure where a company has only one employee we ran into an issue. You will come across the problem because Snowflake’s LATERAL FLATTEN treats single element arrays differently than multi element arrays, leading to improper flattening. So for an XML like the following example:
|
1 2 3 4 5 6 7 8 9 10 11 12 13 14 15 16 17 18 19 20 21 22 23 24 25 26 27 28 29 30 31 32 33 34 35 36 37 38 39 40 41 42 43 44 45 46 47 48 49 50 51 52 53 54 55 56 57 58 59 60 61 62 63 64 65 66 67 |
INSERT INTO xml_data_table (xml_content) SELECT PARSE_XML('<?xml version="1.0" encoding="UTF-8"?> <org> <company id="1"> <employee id="1"> <name>John Doe</name> <position>Manager</position> </employee> <employee id="2"> <name>Jane Smith</name> <position>Developer</position> </employee> <employee id="3"> <name>Mike Johnson</name> <position>Designer</position> </employee> <employee id="4"> <name>Alice Brown</name> <position>Tester</position> </employee> <employee id="5"> <name>Chris Davis</name> <position>Support</position> </employee> </company> <company id="2"> <employee id="1"> <name>Hans Wurscht</name> <position>Hansel</position> </employee> </company> </org> '); |
If you try to flatten the XML using the same query from the last section as follows:
|
1 2 3 4 5 6 7 8 9 10 |
SELECT typeof(emp.value) as emp_doc, emp.value, get(comp.value, '@id') as company_id, get(emp.value, '@id') as emp_id, xmlget(emp.value, 'name'):"$"::string as emp_name, xmlget(emp.value, 'position'):"$"::string as emp_position FROM xml_data_table, LATERAL FLATTEN(INPUT => xml_data_table.xml_content:"$") comp, LATERAL FLATTEN(INPUT => comp.value:"$") emp; |
The query will produce incorrect results, particularly for the company with only one employee:
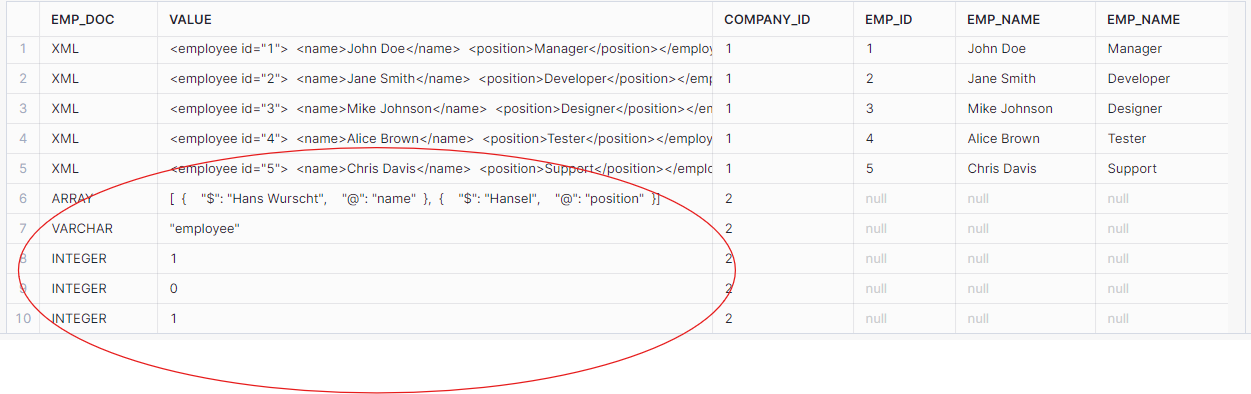
As seen, the data for the second company (with only one employee) was not flattened correctly. The employee data was returned as an array instead of individual XML elements.
Solution: Using Array Conversion
To address the issue with single-element arrays, we modified the query to convert the input to an array during the flattening process:
|
1 2 3 4 5 6 7 8 9 10 |
SELECT typeof(emp.value) as emp_doc, emp.value, get(comp.value, '@id') as company_id, get(emp.value, '@id') as emp_id, xmlget(emp.value, 'name'):"$"::string as emp_name, xmlget(emp.value, 'position'):"$"::string as emp_position FROM xml_data_table, LATERAL FLATTEN(INPUT => xml_data_table.xml_content:"$") comp, LATERAL FLATTEN(INPUT => comp.value:"$"::ARRAY) emp;//Converting the input to an array |
The corrected query produced the expected results, properly handling single-element arrays:

By converting the input to an array during the LATERAL FLATTEN process, we were able to handle single-element arrays correctly and ensure that the XML data is parsed and flattened properly in Snowflake.
Flattening XML with multiple branches
When flattening XML that contains multiple branches we need to be very careful to avoid a cartesian product.
Let’s have a look at an XML file with multiple branches.
|
1 2 3 4 5 6 7 8 9 10 11 12 13 14 15 16 17 18 19 20 21 22 23 24 25 26 27 28 29 30 |
<University id="TUD"> <Faculty id="Engineering"> <Department id="ComputerScience"> <Course>Introduction to Programming</Course> <Course>Algorithms and Data Structures</Course> </Department> <Department id="ElectricalEngineering"> <Course>Circuit Analysis</Course> <Course>Electromagnetics</Course> <Course>Control Systems</Course> </Department> <ResearchGroup id="ArtificialIntelligence"> <Project>Machine Learning Advances</Project> <Project>Neural Network Optimization</Project> <Project>AI Ethics and Society</Project> </ResearchGroup> <ResearchGroup id="Nanotechnology"> <Project>Nano-materials Engineering</Project> <Project>Quantum Computing</Project> </ResearchGroup> </Faculty> <AdministrativeUnit id="Library"> <Service>Book Lending</Service> <Service>Research Assistance</Service> </AdministrativeUnit> <AdministrativeUnit id="IT"> <Service>Campus Network</Service> <Service>Helpdesk</Service> </AdministrativeUnit> </University> |
We can represent this XML in a tree like structure
University
├── Faculty
│ ├── Department
│ │ └── Course
│ ├── ResearchGroup
│ │ └── Project
├── AdministrativeUnit
└── Service
As we can see there are three branches
University > Faculty > Department > Course
University > Faculty > ResearchGroup > Project
University > AdministrativeUnit > Service
Challenges of flattening multiple XML branches
Let’s consider the two arrays <FACULTY> and <AdministrativeUnit> from the above example. We could use Flatten and the Lateral function to flatten the arrays. However, if we try to build a single query that flattens both arrays, we’ll get the dreaded Cartesian Product! In other words a multiplication of our result.
In the example above, there are 10 rows (i.e., subnodes) in the <Faculty> array and two rows in the <AdministrativeUnit > array. So the following query returns a total of 20 rows. This is definitely wrong and not what we want.
|
1 2 3 4 5 6 7 8 9 |
select Unit.value:"@id"::string::string as AdministrativeUnit_id, COURSE_PROJECT.value:"$"::string as Project_Course from XML_DATA_TABLE ,LATERAL FLATTEN(XML_CONTENT:"$") Unit ,LATERAL FLATTEN(XMLGET(XML_CONTENT, 'Faculty'):"$") Department , LATERAL FLATTEN(Department.value:"$") AS COURSE_PROJECT where GET( Unit.value, '@') = 'AdministrativeUnit'; |

The best way to handle multiple branches is to create separate tables. One for each branch. As we have three branches we will end up with 3 tables.
Let’s do that in the following steps.
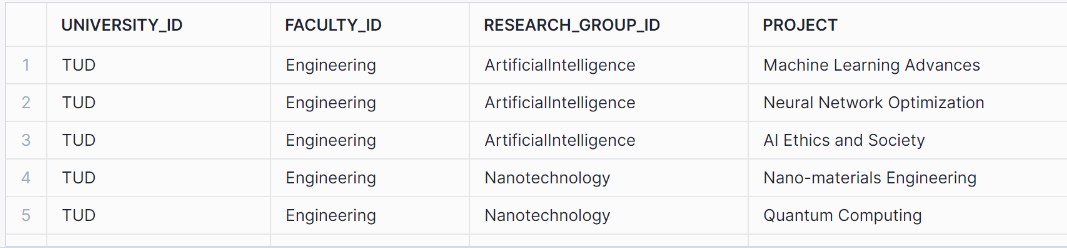
Project Branch
You can use the following code to flatten the project branches:
|
1 2 3 4 5 6 7 8 9 10 11 |
SELECT GET(XML_CONTENT, '@id')::string as university_id, XMLGET(XML_CONTENT, 'Faculty'):"@id"::string as Faculty_id, GET(Department_.value, '@id')::string as Research_group_id, COURSE_PROJECT.value:"$"::string as Project FROM XML_DATA_TABLE ,LATERAL FLATTEN(XMLGET(XML_CONTENT, 'Faculty'):"$") Department_ , LATERAL FLATTEN(Department_.value:"$") AS COURSE_PROJECT where GET( COURSE_PROJECT.value, '@') = 'Project' ; |
The flattened table looks like this:
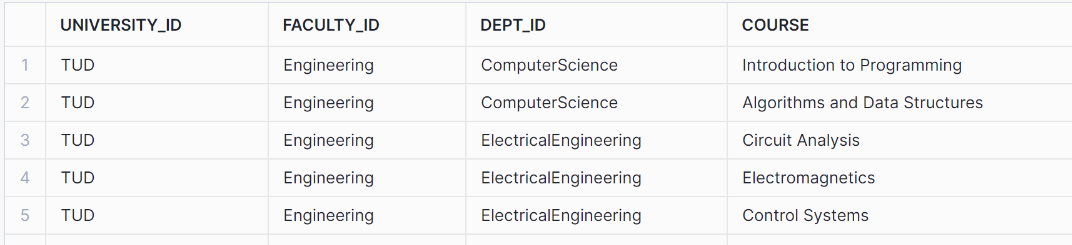
Course branch
|
1 2 3 4 5 6 7 8 9 10 11 |
SELECT GET(XML_CONTENT, '@id')::string as university_id, XMLGET(XML_CONTENT, 'Faculty'):"@id"::string as Faculty_id, GET(Department_.value, '@id')::string as dept_id, COURSE_PROJECT.value:"$"::string as Course FROM XML_DATA_TABLE ,LATERAL FLATTEN(XMLGET(XML_CONTENT, 'Faculty'):"$") Department_ , LATERAL FLATTEN(Department_.value:"$") AS COURSE_PROJECT where GET( COURSE_PROJECT.value, '@') = 'Course' ; |
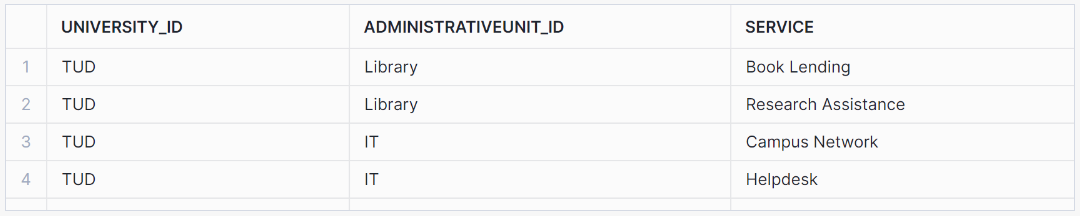
AdministrativeUnit Branch
|
1 2 3 4 5 6 7 8 9 10 |
select GET(XML_CONTENT, '@id')::string as university_id, Department_.value:"@id"::string::string as AdministrativeUnit_id, admin_unit.value:"$"::string as Service from XML_DATA_TABLE ,LATERAL FLATTEN(XML_CONTENT:"$") Department_ ,LATERAL FLATTEN(Department_.value:"$") AS admin_unit where GET( Department_.value, '@') = 'AdministrativeUnit' ; |
Query XML with schema on read
Now let’s create views on top of the flattened branches to create our reusable schema on read. Creating database views makes the XML queries reusable and easy to use with SQL.
|
1 2 3 4 5 6 7 8 9 10 11 12 13 14 15 16 17 18 19 20 21 22 23 24 25 26 27 28 29 30 31 32 33 34 35 36 37 38 39 40 |
-- View for Research Groups and Their Projects CREATE OR REPLACE VIEW view_research_groups AS SELECT GET(XML_CONTENT, '@id')::string as university_id, XMLGET(XML_CONTENT, 'Faculty'):"@id"::string as Faculty_id, GET(Department_.value, '@id')::string as Research_group_id, COURSE_PROJECT.value:"$"::string as Project FROM XML_DATA_TABLE, LATERAL FLATTEN(XMLGET(XML_CONTENT, 'Faculty'):"$") Department_, LATERAL FLATTEN(Department_.value:"$") AS COURSE_PROJECT WHERE GET(COURSE_PROJECT.value, '@') = 'Project'; -- View for Departments and Their Courses CREATE OR REPLACE VIEW view_departments_courses AS SELECT GET(XML_CONTENT, '@id')::string as university_id, XMLGET(XML_CONTENT, 'Faculty'):"@id"::string as Faculty_id, GET(Department_.value, '@id')::string as dept_id, COURSE_PROJECT.value:"$"::string as Course FROM XML_DATA_TABLE, LATERAL FLATTEN(XMLGET(XML_CONTENT, 'Faculty'):"$") Department_, LATERAL FLATTEN(Department_.value:"$") AS COURSE_PROJECT WHERE GET(COURSE_PROJECT.value, '@') = 'Course'; -- View for Administrative Units and Their Services CREATE OR REPLACE VIEW view_administrative_units AS SELECT GET(XML_CONTENT, '@id')::string as university_id, Department_.value:"@id"::string as AdministrativeUnit_id, admin_unit.value:"$"::string as Service FROM XML_DATA_TABLE, LATERAL FLATTEN(XML_CONTENT:"$") Department_, LATERAL FLATTEN(Department_.value:"$") AS admin_unit WHERE GET(Department_.value, '@') = 'AdministrativeUnit'; |
This gives us three database views
- view_research_groups
- view_departments_courses
- view_administrative_units
We can now give these database views to our data analysts for further querying.
Working with mixed content in XML
In XML, mixed content refers to an element that contains both text and other child elements. This means the content is a mix of text nodes and element nodes, as opposed to purely text or purely child elements.
Here is an example of mixed content.
|
1 2 3 4 5 6 7 8 9 10 11 12 13 14 15 16 17 18 19 20 21 22 23 24 25 26 27 28 29 30 31 32 33 34 35 |
<?xml version="1.0" encoding="UTF-8"?> <org> <company>1 <employee id="1"> <name>John Doe</name> <position>Manager</position> </employee> <employee id="2"> <name>Jane Smith</name> <position>Developer</position> </employee> <employee id="3"> <name>Mike Johnson</name> <position>Designer</position> </employee> <employee id="4"> <name>Alice Brown</name> <position>Tester</position> </employee> <employee id="5"> <name>Chris Davis</name> <position>Support</position> </employee> </company> <company>2 <employee id="1"> <name>Hans Wurscht</name> <position>Hansel</position> </employee> <employee id="2"> <name>Uli</name> <position>Hansel</position> </employee> </company> </org> |
The <company> element contains both text (in this case the number 1) and other child elements (<employee>)
|
1 2 3 4 |
<company>1 <employee id="1"> <name>John Doe</name> <position>Manager</position> |
Extracting data from XML with mixed content is not straightforward due to the mixing of text and elements. However, it’s possible to parse such content using Snowflake’s XML functions. The following query demonstrates how you can achieve this:
|
1 2 3 4 5 6 7 8 9 10 11 |
SELECT GET(COMPANY.value, ' )[0] AS company_id, GET(EMPLOYEE.value, '@id') AS employee_id, XMLGET( EMPLOYEE.value, 'name' ):"$"::string as employee_name, XMLGET( EMPLOYEE.value, 'position' ):"$"::string as employee_position FROM XML_DATA_TABLE, lateral FLATTEN(XML_CONTENT:"$") COMPANY, lateral FLATTEN(COMPANY.VALUE:"$") EMPLOYEE WHERE GET(EMPLOYEE.value, '@') = 'employee' ; |
Explanation
SELECT Clause:
- GET(COMPANY.value, ‘$’)[0] AS COMPANY_ID: Extracts the first text node from the <company> element, which contains the company ID.
- XMLGET(EMPLOYEE.value, ‘name’):”$”::string AS employee_name: Extracts the name element from each <employee> element and casts it to a string.
- XMLGET(EMPLOYEE.value, ‘position’):”$”::string AS employee_position: Extracts the position element from each <employee> element and casts it to a string.
FROM Clause:
- LATERAL FLATTEN(XML_CONTENT:”$”) COMPANY: Flattens the XML content at the root level to extract each <company> element.
- LATERAL FLATTEN(COMPANY.VALUE:”$”) EMPLOYEE: Further flattens each <company> element to extract nested <employee> elements.
WHERE Clause:
- GET(EMPLOYEE.value, ‘@’) = ’employee’: Ensures that only <employee> elements are processed. Otherwise the output will also have null rows because of text nodes present in the mixed content
The output of the query is as follows:
Parsing XML to Snowflake tables
In the previous section we covered in detail how we can query XML and create a schema on read on top of XML data stored inside Snowflake’s VARIANT data type.
We used XMLGET, GET, and LATERAL FLATTEN to walk the XML hierarchy. We then created database Views on top of these queries to make the queries reusable and expose them to data analysts.
Another approach is to parse the data to Snowflake tables and write the output to a relational format. We typically do this as part of ETL and a data pipeline. For example we can load data into Snowflake tables from the database views created previously as follows.
|
1 2 3 4 5 6 7 8 9 10 11 12 13 14 15 16 17 |
-- Step 1: Create the table CREATE TABLE research_groups ( university_id STRING, faculty_id STRING, research_group_id STRING, project STRING ); -- Step 2: Insert data into the table from the view INSERT INTO research_groups SELECT university_id, faculty_id, research_group_id, project FROM view_research_groups; |
While the VARIANT data type offers relatively good performance, querying Snowflake relational tables is always faster. This is particularly true for the following scenarios
- You have complex and deeply nested XML
- You require many joins across database views that you created as part of the schema on read.
The other significant advantage is that data analysts are very skilled using SQL and they prefer writing SQL against tables instead of semi-structured data.
Unless you have an ad hoc requirement or a very simple scenario and use case we recommend writing out your XML data to relational tables in Snowflake.
XML in data warehouse, data lake, or data lakehouse
When we convert XML to a relational format we typically do this as part of a wider data warehouse load where one of the data sources is XML.
You can check our guide on XML conversion in the context of data warehousing and data lakes for some reference architecture and what you need to take into account when building an XML conversion workflow.
You can use Flexter to automate the parsing of XML and conversion to Snowflake tables. Store your XML files on object storage, e.g. S3 or Azure Data Lake Storage (ADSL) and automatically convert the XML to Snowflake tables. No coding needed. As a bonus Flexter can also parse and convert JSON.
Parsing XML with Python or Java
Apart from the Snowflake XML functions you can also use Snowpark to parse and convert Snowflake in XML.
You can either use Python inside Snowpark to load the XML into a data frame and then use Python native features to parse the XML. A similar process applies to using Java. Both approaches require a lot of coding and are very time consuming.
Converting XML to JSON
Another option of parsing XML is to convert the XML to JSON using XSLT and then use Snowflake’s JSON functions to process the data.
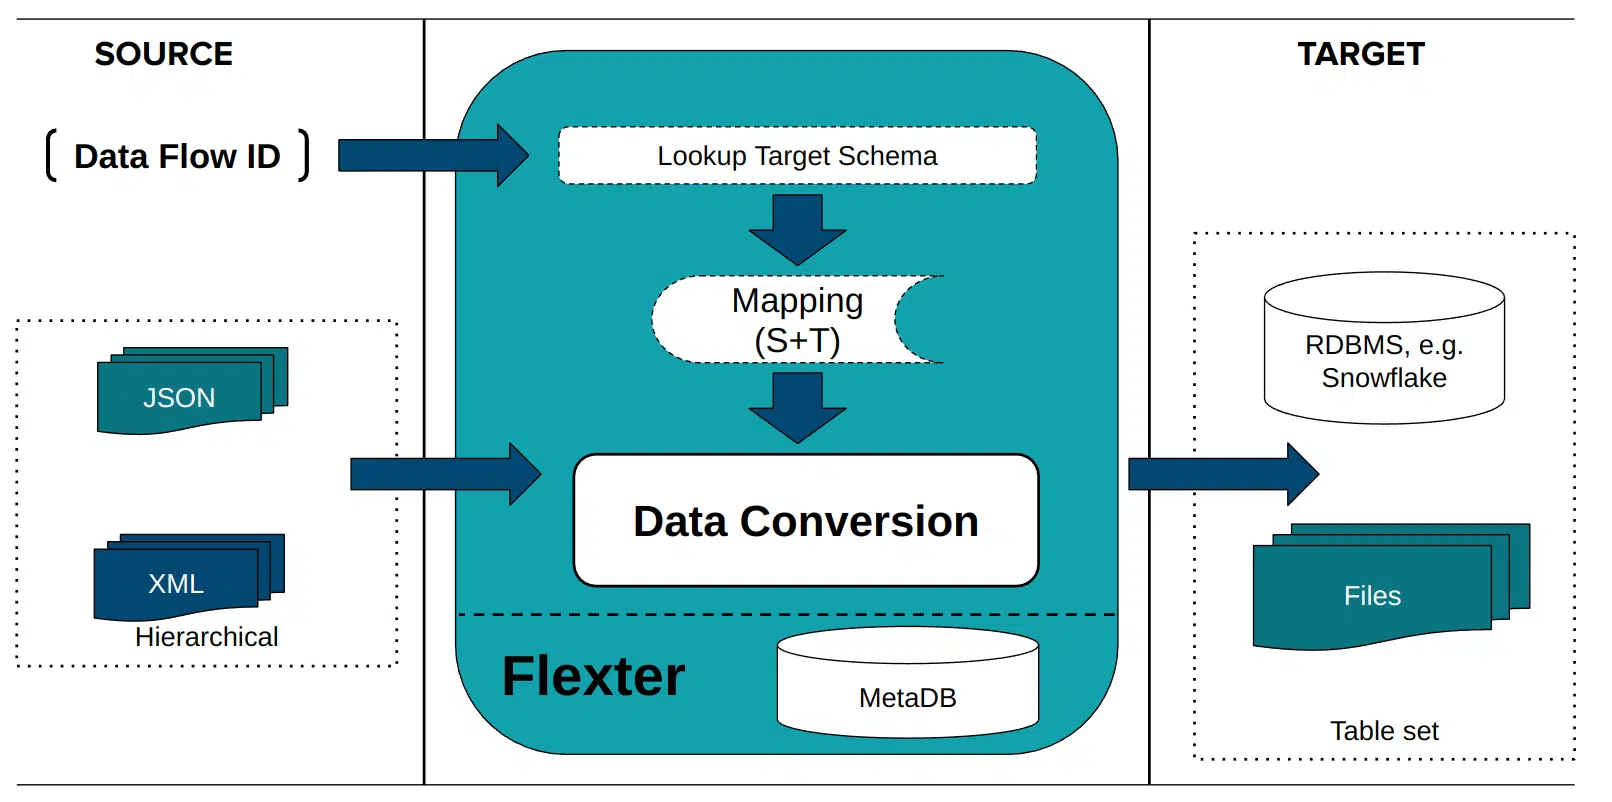
Converting XML to Snowflake tables with Flexter
Converting clinical trials XML to Snowflake tables
We downloaded clinical trials data with 299,015 studies in XML format from the ClinicalTrials.gov website with thousands of XML files
Each XML document contains information about a clinical trial, e.g. facilities or sites where the study is performed, names of doctors and other study personnel etc.
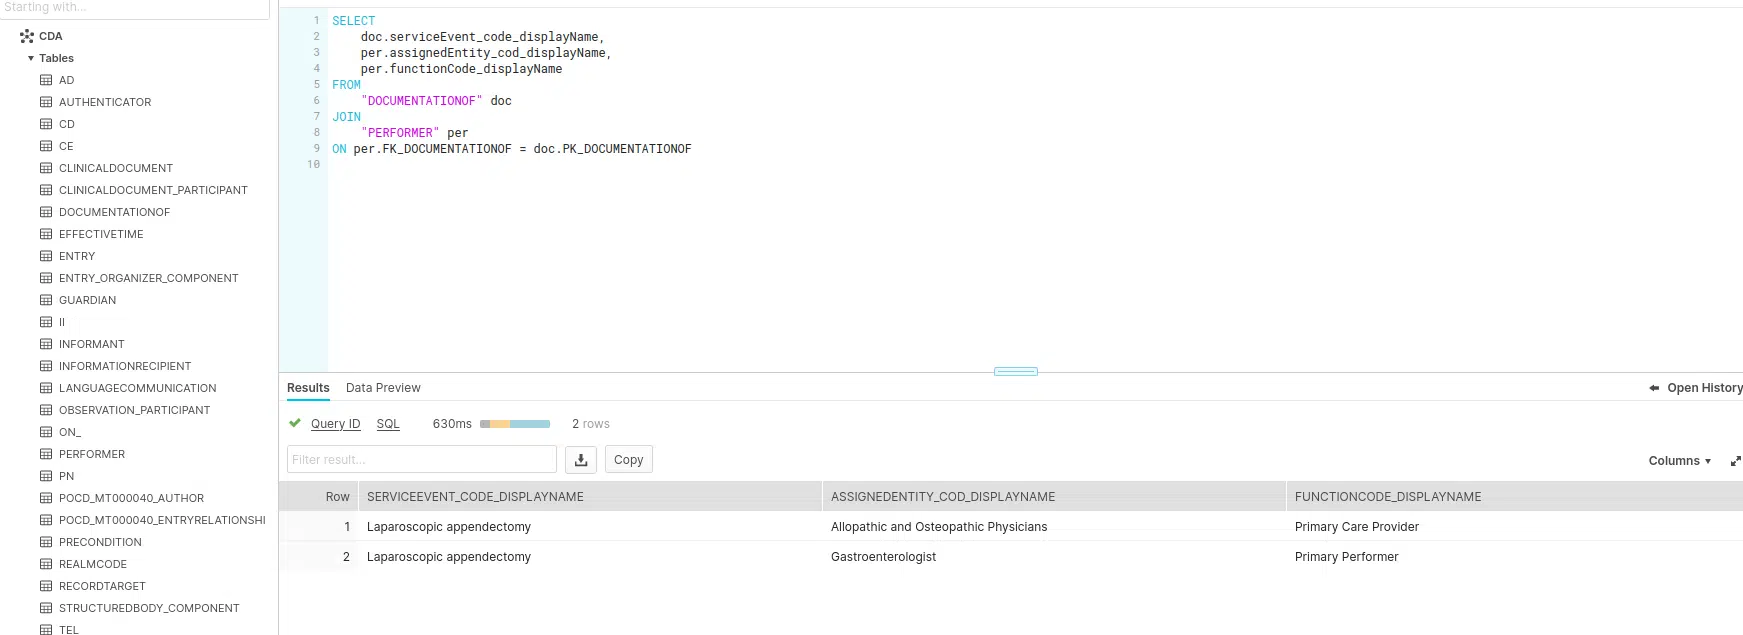
We will use Flexter to convert the clinical trials data locked away in the XML. In this example we will use Flexter’s command line utilities. Flexter also ships with an API.
We will use the XML data to infer a relational schema
Step 1: Create Data Flow and Target model
In a first step we create the target data model and the mappings from the XML elements to the table columns in the relational target schema. This information is stored in Flexter’s metadata repository. We will use the XML data only to infer a relational schema. In the next section we show you how you can use an XSD in combination with XML to derive a relational schema.
|
1 |
xml2er -g1 /ClinicalTrials.zip |
The -g switch tells Flexter which optimisation algorithm to use. Flexter ships with some algorithms that make it easier to work with the target schema by simplifying the structures.
We also point Flexter to the zipped up XML data. This is used to derive the relational target schema.
As output from this step we get a schema ID. In this case 2556. We will use this ID as input for the next step.
Step 2: Convert XML data to tables
We will now convert the XML to the relational schema we created in the previous step. We pass the schema ID 2556 into the -l switch and specify the connection details
|
1 |
xml2er -l2556 /ClinicalTrials.zip -S o “snowflake://https://<account>.snow flakecomputing.com/?warehouse=ware&db=db&schema=CLINICAL_TRIALS” -U <username> -P <pwd> |
That’s it. We can now query the data with SQL in Snowflake.
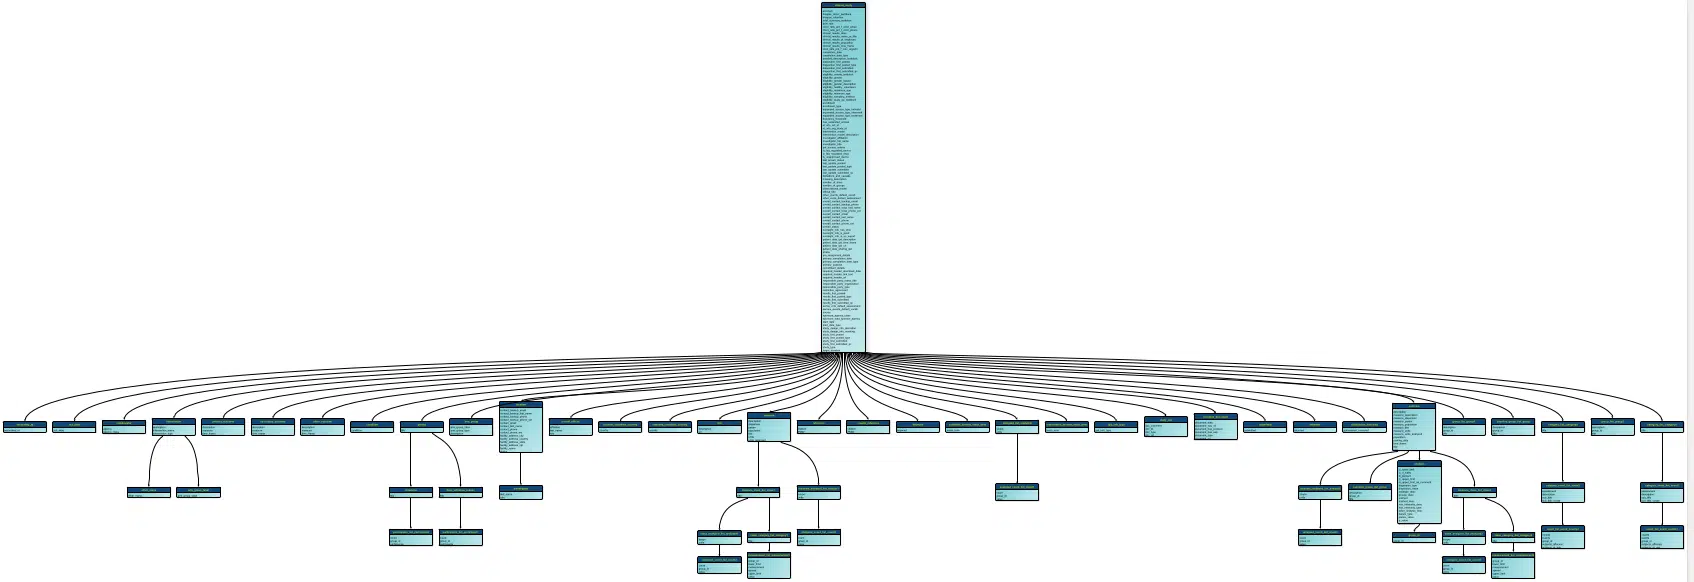
We mentioned earlier that Flexter ships with a metadata catalog. The metadata can be used to generate DDL scripts, compare different schema versions, evolve the schema, generate data lineage, generate an ER diagram, etc.
Here is the ER diagram that we generated from the Flexter UI and exported to a PDF. We have made the data model of the clinical trials data available for download.
Converting HL7 XML and XSD to Snowflake
In this example we show you how you can use an XSD to parse XML to Snowflake tables using Flexter. It is also a two step process but this time we use both the XSD and XML to generate the target schema.
For this example we will use HL7 CDA data. HL7 is a widespread standard in healthcare.
Step 1: Generate relational target schema.
You already know the first command from the previous section on processing clinical trials XML. It generates a schema ID. In this case the ID is 5964.
We use this ID to enrich and complement the created schema with additional information from the XSD, e.g. constraints, data types, relationships etc.
|
1 2 3 |
xml2er -g1 /CDA_XML.zip xsd2er -a5964 -g1 /CDA_XSD.zip |
The schema ID is passed to the -a switch of the xsd2er command line tool.
We also pass the CDA XSD as a zip to this Flexter command line utility.
The output is an updated schema ID 2406. This will be needed in the next step.
Step 2: Convert HL7 XML to Snowflake tables
We use the schema ID from step 1 to convert the data to Snowflake.
|
1 |
xml2er -l2406 /CDA_XML.zip -S o “snowflake://https://<snowflake account>.snow flakecomputing.com/?warehouse=ware&db=db&schema=CDA” -U <user> -P <pass> |
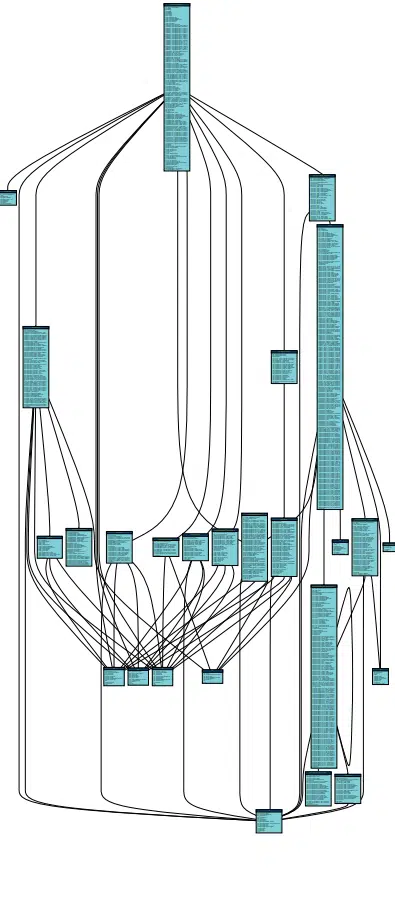
Now we can query the converted data with SQL on Snowflake.
Here is the documentation that Flexter generated as an ER diagram in PDF.
Limitations of working with XML in Snowflake
So far we have seen what you can do with XML in Snowflake. Now, let’s focus on what you can’t do with XML inside Snowflake.
The biggest limitation of working with XML on Snowflake is that the conversion to a readable and queryable format is a manual process that requires a lot of manual effort both in terms of analysis and coding. This is not a Snowflake specific issue but a challenge in general. We will cover this topic in more detail in a minute as a separate section about automating XML conversion.
Let’s first go through some of the more technical limitations of XML parsing on Snowflake
XML is public preview feature
The XML feature is only in public preview, which means that there is only limited support. In other words Snowflake does not guarantee that everything will work as expected. In a worst case scenario you may not get support or a fix for an issue you encounter.
16 MB limit for VARIANT
You can only store XML documents up to a size of 16 MB. This is the uncompressed size. In reality it will be slightly smaller than this as there is some internal overhead of storing the data.
ZIPped XML not working
Often you will get XML documents in a .zip file. Snowflake does not support loading zipped files directly. You will first need to unzip the file and then copy them into Snowflake.
XML Schema XSD not supported
A bigger limitation is that unlike other databases such as Oracle or MS SQL Server, Snowflake does not support XML schema. XSDs are not supported. This means that you need to manually infer the data types, relationships, and constraints from a sample of XML files. XSD No support for XSD. The data types, relationships and constraints need to be derived manually, which is very time consuming. If new information in the form of new XML becomes available, e.g. the data type is a Character rather than a NUMBER the solution needs to be refactored.
Schema evolution
We just noted that Snowflake does not have support for XSDs. Related to this is the issue that Snowflake does not have a feature to notify the user of unexpected / rogue XML elements or of changes to the XML in general. This means that the user can never be sure that they have full coverage for all possible XML elements as they have to rely on a sample of XMLs which is typically incomplete.
Let’s illustrate this with an example.
When the engineer first wrote the code to convert the XML to relational tables on Snowflake they relied on the following XML sample
|
1 2 3 4 5 6 7 8 9 |
<Company> <Name>Tech Solutions</Name> <Location>San Francisco</Location> <Employee> <FirstName>John</FirstName> <LastName>Doe</LastName> <Position>Software Engineer</Position> </Employee> </Company> |
The solution went into production and everything works seemingly fine.
However, as it turns out the sample that was used to infer the schema was too narrow and several elements were missed in the analysis.
|
1 2 3 4 5 6 7 8 9 10 11 |
<Company> <Name>Tech Solutions</Name> <Location>San Francisco</Location> <Employee> <FirstName>John</FirstName> <LastName>Doe</LastName> <Position>Software Engineer</Position> <Email>john.doe@techsolutions.com</Email> <Phone>555-1234</Phone> </Employee> </Company> |
Email and Phone will not be included in the conversion and there is no way to get notified about this issue.
A related issue is that information will go missing in case of the renaming of an element, e.g. Position to Role
|
1 2 3 4 5 6 7 8 9 |
<Company> <Name>Tech Solutions</Name> <Location>San Francisco</Location> <Employee> <FirstName>John</FirstName> <LastName>Doe</LastName> <Role>Software Engineer</Role> </Employee> </Company> |
The conversion code will ignore this change and populate the downstream Position column with NULL values.
INFER_SCHEMA not working for XML
While Snowflake does have a feature to derive a schema from a sample of semi-structured documents, infer_schema is only supported for JSON but not for XML.
XML versus JSON support
In general support for XML is a lot less mature than support for JSON. While support for JSON is super comprehensive, XML is treated as a second class citizen (also in the documentation). As XML is not widely used this is understandable but will not help you if you use XML extensively in your organisation.
XQuery not supported
XQuery is a widely used language and standard for querying XML. Oracle or MS SQL Server have comprehensive support for XQuery and integrated it with SQL. Snowflake does not have XQuery support but has implemented its own proprietary set of functions to work with XML. Engineers with XQuery skills will need to reskill on the proprietary features.
Snowflake does not support XML schema evolution, which is supported for other semi-structured file types. Schema evolution on Snowflake is a manual process. As a prerequisite you will need to have some code that monitors the incoming XML documents for changes or unidentified XML elements. For any changes that are detected you can send out a notification to the operations or engineering team. The latter will then need to refactor the code to cater for the changes. This is not a Snowflake specific limitation but a general limitation of manual XML conversion.
No data lineage for XML
Snowflake does not provide data lineage that maps the XML elements and their XPaths to target table columns.
No schema evolution
Refactoring and schema evolution are manual processes.
Automated XML conversion on Snowflake
We have created Flexter to address the limitations of working with XML on Snowflake. As a bonus it also eliminates the risks and headaches associated with manual XML conversion projects. Flexter is an XML conversion tool aka XML converter. It automates the conversion of XML to a relational format on Snowflake and other popular data platforms and databases such as BigQuery, Databricks, Azure, Oracle, SQL Server, Teradata etc.
Converting XML to Snowflake with Flexter is a two step process. We have provided step by step walkthroughs in an earlier section when we talked about the options of parsing XML on Snowflake.
Step 1: Based on an XSD, a sample of XML files, or a combination of both you generate a relational target schema and the mappings between XML elements and the target table columns in Snowflake
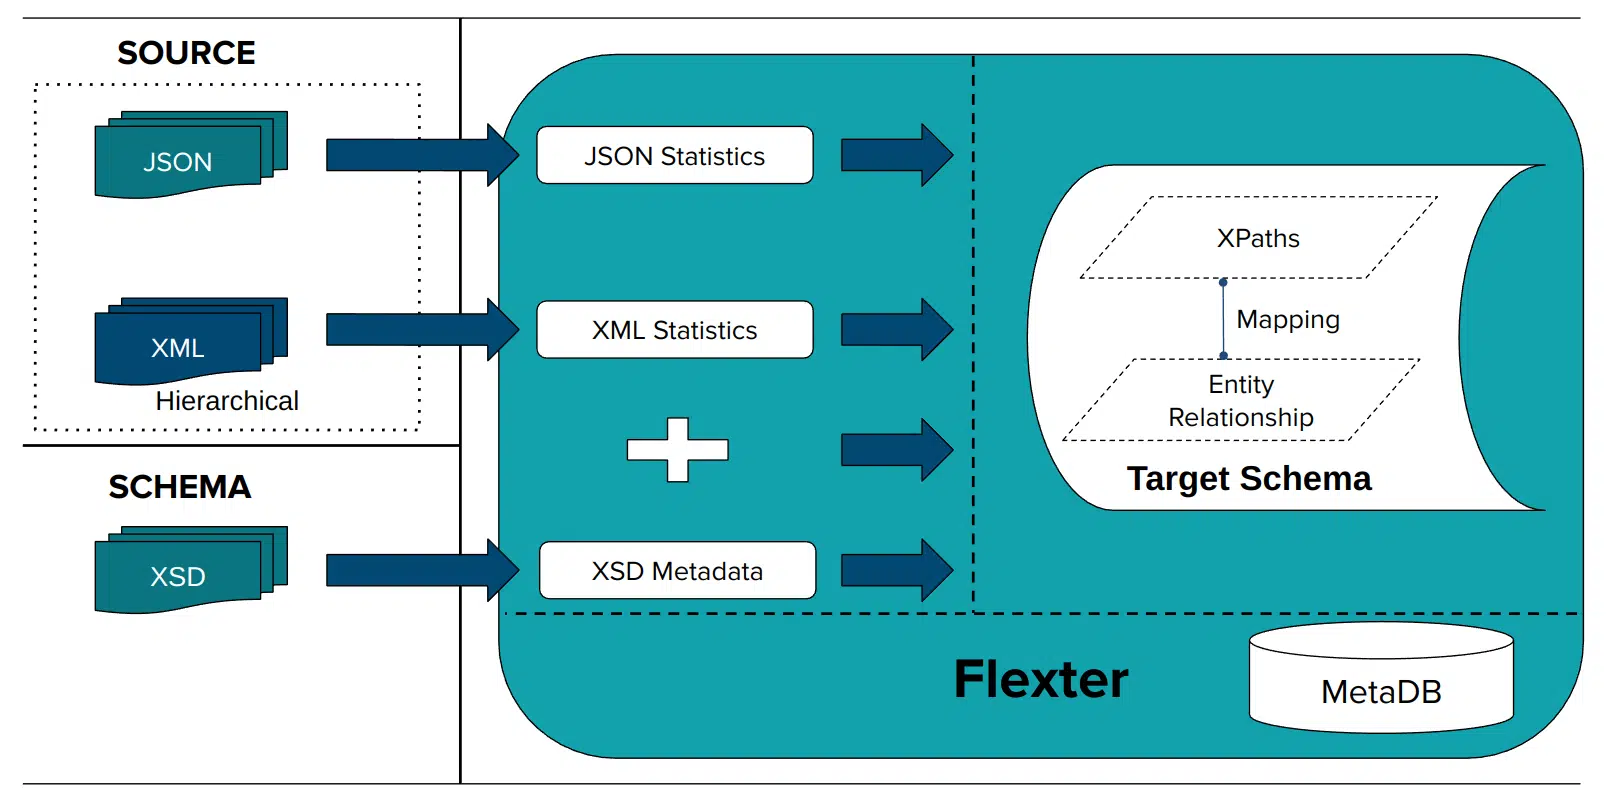
Step 2: Convert XML
Yes, it’s that simple.
We have put together a brief demo video where we convert XML based on the FpML industry data standard to Snowflake. It is one of the more complex standards with tens of thousands of elements. It would be quite challenging to convert this data manually using code.
Did you know?
You can also use Flexter to automate the conversion of JSON to a relational format on Snowflake. The same simple two step process as for XML applies.
Manual versus automated XML conversion
Let’s discuss when to use an automated approach and when to manually analyse and convert XML.
We have put together a PDF that compares a manual approach of converting XML to the automated conversion process. We make the comparison along the XML conversion project life cycle
| Manual approach using code | Automated approach with Flexter | |
|---|---|---|
| Analysis to understand structure of XML and XSD | For complex schemas this process can be super time consuming. The analysis can take more time than all the other steps combined. – Go through documentation of industry data standard if available. – Understanding XML Schema/Structure. – Pinpoint the main elements, attributes, and their hierarchies within the XML. – Understand how different elements and attributes relate to each other. – Identify any hierarchical structures, such as parent-child relationships, within the XML data. – Checking for Repeating and Optional Elements: – Identify elements that occur multiple times and understand their significance. – Note any optional elements that may or may not appear in the XML. – Understanding Namespaces – Evaluate the size of the XML files and the complexity of the structure, as this will impact the mapping process. – Evaluate XML for Anomalies or Irregularities | Running a single command covers steps 1-3 This creates a Flexter Data Flow, which analyses the XSD and/or XML, creates a relational target data model, and creates the mappings between XML source elements and target table columns Option 1: Generating a data flow from an XML. We apply the elevate and reuse optimisation algorithm (g3 switch) $ xml2er -g3 donut.xml Option 2: Generating a Data Flow from an XSD $ xsd2er -g3 donut.xsd Option 3: Generating a Data Flow from an XML and XSD to get the best of both worlds $ xml2er donut.xml $ xsd2er -a4 -g3 donut.xsd In this example we create the Data Flow from the command line. You can also use the Flexter API or Flexter UI to create a Data Flow. |
| Model and create target schema | Once you have completed the analysis you need to use your findings to create a relational schema for the target format. Translate between the hierarchical structure to the relational format Map data types Define and implement naming conventions Define and implement parent-child relationships Define and implement constraints | Already covered under Step 1 It is worthwhile mentioning that Flexter applies optimisation algorithms that significantly simplify the structure of the target schema |
| Create mapping | Manually map the XML elements to the target table columns | Already covered under Step 1 |
| XML Conversion | This is another very time consuming step. Developers write the code to load XML to the database and convert it with extensions to SQL such as XQuery to the relational databases tables and columns. Developers build a data pipeline and schedule a time to run it. The solution is tested | A single command is run to convert the data. The switch l3 references the ID of the Data Flow that was generated in the previous step. $ xml2er -l3 donut.zip In this example we create the XML Conversion from the command line. You can also use the Flexter API or Flexter UI to convert the XML. |
| Error handling, logging, and alerting | In XML mapping error handling, there are two crucial checks to perform. Firstly, ensure that the XML to be converted is valid. Secondly, verify that the XML adheres to the target schema. This means it should not have any additional XML elements and must comply with the specified data types. | This is automatically handled as part of Step 4 XML Conversion |
| Documentation | The most important documentation artefact is a Source to Target Map (STM). The STM acts as a blueprint that defines how each piece of data is transformed and transferred from the source to the target. It specifies how each field in the XML corresponds to the target including any data type conversions. | Already covered under Step 1 When creating the Data Flow Flexter stores all of the information in its metadata catalog. The metadata can then be used to auto generate Source to Target Maps, ER diagrams, and diffs and deltas between different versions of a schema. |
| Refactoring for changes | If changes are made to the XML or the XML schema you need to repeat steps 1-6 to cater for the change | Flexter ships with a metadata store that semi-automates the upgrade between different versions of an XML or XSD. |
When considering an automated XML conversion tool like Flexter, weigh the benefits against the additional licence costs.
For simple or occasional needs, an XML automation tool may not be necessary. However, XML conversion software is beneficial if any of the following apply:
- Your XML is very complex or uses an XSD.
- It is based on an industry standard like HL7 or FpML.
- You need to convert many types of XML.
- Your XML files are large.
- You handle vast volumes of XML data with tight SLAs.
- Your team lacks expertise in XML technologies (XQuery, XSLT, XPath).
- You have tight deadlines for your XML conversion project.
If you answered ‘Yes’ to any of these, try the free online version of our XML converter, Flexter, or set up a free consultation with one of our XML experts to discuss your needs.
Further reading
Snowflake data types
Snowflake XML functions
XML conversion
XML Converters & Conversion – Ultimate Guide (2024)
Converting XML and JSON to a Data Lake
How to Insert XML Data into SQL Table?
The Ultimate Guide to XML Mapping in 2024
Optimisation algorithms for converting XML and JSON to a relational format
Re-use algorithms for converting XML and JSON to a relational format
Flexter
Must have XML converter features
Flexter Converting XML to Snowflake tables
Converting 3GPP Configuration Management XML (3G, UMTS, 5G) to Snowflake
Masking Sabre XML and converting to a database (Snowflake)
Video: Converting FpML XML to Snowflake
Automatically converting ESMA MIFID II / MIFIR XML to Snowflake
Converting Workday XML to Snowflake
Converting OSCRE IDM to Snowflake
Converting CDISC XML data to a database (Snowflake)
Converting XML/XBRL from SEC EDGAR. Data sharing with Snowflake
Converting Slack JSON data to a database (Snowflake)
Converting clinical trials XML data to Snowflake and Quicksight with Flexter