Converting NETCONF XML to SQL Server tables
In this guide we will show you how to process NETCONF XML files with the enterprise version of Flexter and convert it to SQL Server.
NETCONF XML
The Network Configuration Protocol (NETCONF) is a network management protocol developed and standardized by the IETF.
NETCONF provides mechanisms to install, manipulate, and delete the configuration of network devices. Its operations are realized on top of a simple Remote Procedure Call (RPC) layer. The NETCONF protocol uses an Extensible Markup Language (XML) based data encoding for the configuration data as well as the protocol messages. The protocol messages are exchanged on top of a secure transport protocol.
SQL Server
Microsoft SQL Server is a relational database management system developed by Microsoft. As a database server, it is a software product with the primary function of storing and retrieving data as requested by other software applications—which may run either on the same computer or on another computer across a network (including the Internet).
Setting up SQL Server
- First we connect to the server through SQL Server Management Studio (SSMS)

- Then we create a new Database
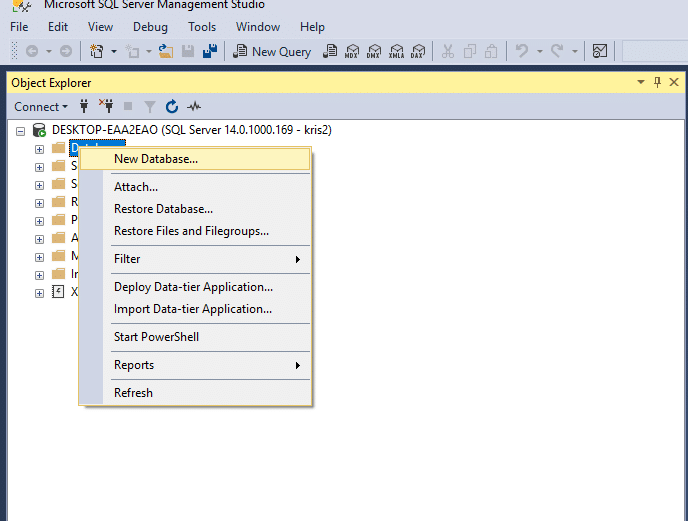
- We name our new DB ‘flexter’
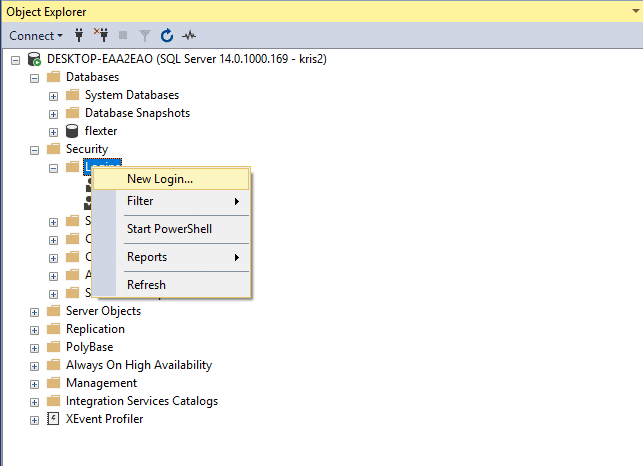
- Then we go to Security under Databases and create a New Login…
- We select SQL Server authentication and put our Login name and Password. Under ‘Default Database’ we select ‘flexter’
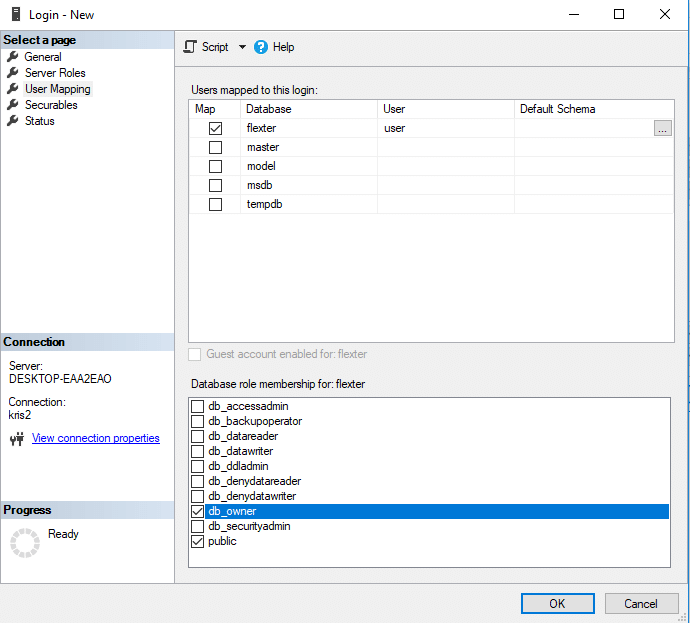
- Then under ‘User Mapping’ we mark ‘flexter’ and ‘db_owner’ and click OK
- And now we can start processing the file
Processing NETCONF XML file
We will use the Docker version of Enterprise Flexter on Localhost.
- We run docker with the below command and create a container that will be destroyed when we exit
|
1 |
docker run --rm -it -v %USERPROFILE%:/mnt/data/ d1.sonra.io:5000/flexter-local |
- Next we generate the Logical Schema ID
|
1 |
xml2er -g1 /mnt/data/Desktop/netconf.xml |
We get a result similliar to this:
|
1 2 3 4 5 6 7 8 9 10 11 12 13 14 15 16 17 18 19 20 21 22 23 |
11:35:07.261 INFO Initialized in 3604 milliseconds 11:35:07.279 INFO Parsing data 11:35:08.066 INFO skipping data calculation 11:35:08.066 INFO calculating statistics 11:35:10.568 INFO Input split: Paths:/mnt/data/Desktop/netconf.xml:0+308 11:35:13.912 INFO writing statistics 11:35:13.973 INFO table du_stat: writing 11:35:14.375 INFO updating schema origin 1 11:35:14.381 INFO Generating the mapping: elevate 11:35:14.508 INFO updating schema origin 2 11:35:14.508 INFO updating logical schema 1 11:35:14.512 INFO Registering success of job 1 11:35:14.534 INFO Finished successfully in 10874 milliseconds # schema origin: 2 logical: 1 job: 1 # statistics startup: 3604 ms parse: 6593 ms stats: 521 ms map: 134 ms xpaths: 10 |
- We now extract our data to SQL Server
|
1 |
xml2er -l1 -o jdbc:localhost://your_ip:1433; -u <user_name> -p <password> -S o /mnt/data/Desktop/netconf.xml |
We get a result similliar to this:
|
1 2 3 4 5 6 7 8 9 10 11 12 |
11:13:02.200 INFO Finished successfully in 12256 milliseconds # schema origin: 8 logical: 4 job: 12 # statistics startup: 3903 ms load: 90 ms parse: 2503 ms write: 3644 ms stats: 2077 ms xpaths: 10 |
- And now we can see our data

Input file
You can download the file we used here.
Conclusion
In this post, we have shown you how to convert complex XML and upload them to MS SQL Server.
If you are interested in a downloadable trial version of Flexter please reach out.
[faq_button]