Convert XML to AWS ATHENA
Convert XML to Text. Load to S3. Query with Athena
In this walk-through, we will demonstrate the process of loading XML data into Athena – a query engine on AWS. We download the XML files from Clinicaltrials.gov and then convert them into TSV files using Flexter, a powerful XML parser from Sonra. We then load the TSV files into Amazon S3 and use Athena for querying and joining the data

XML data from ClinicalTrials
We have sourced the data from Clinicaltrials.gov , which is a registry and results database of publicly and privately supported clinical studies conducted around the world. The website provides a collection of trends, charts and maps that can help the users in visualizing the outcome or progress of a study based on the location or type of users. The data is available in XML format with single record and multiple record XMLs. The study information can be downloaded from the Search Results list. The ‘search results’ is a feature that help the users in filtering the data to be analyzed based on the number of studies, the number of table rows per study and the file format. In addition to this, a full study record XML document can be downloaded.
Processing the XML file
We will be using Flexter to convert the XML data to Athena. Athena is an interactive query service provider available on the AWS platform. Athena cannot process XML files directly and hence we use Flexter to first convert our XML data to text (TSV). It will then be easy to load the data into Athena via S3 storage.
Convert ClinicalTrials XML to Text Using Flexter
Flexter is a tool that transforms complex XMLs into readable files that can be used for analysis. The step by step instructions for transforming XML files using Flexter are shown below.
- Access Flexter from https://xmlconverter.sonra.io/
- Click on the ‘Terms and Conditions’ checkbox and click ‘Try Flexter for Free’
- Upload the XML file that needs to be transformed and click ‘Continue’
- In the next page, we can upload the XSD file (if available). For this implementation, the XSD file is not available and hence we will click on ‘Skip ‘and proceed to the next page.
- Provide Email and click ‘Continue’
- The conclusion page is displayed and the output will be delivered to the subscribed email address.
- An email from Flexter with the link to the transformed data is obtained. The TSV files can be downloaded from this link which redirects to the Flexter page.
- For the XML files from ClinicalTrials, a total of 13 TSV files were generated and downloaded.
Loading ClinicalTrials data to AWS
In the next step, we will be loading the TSV output from Flexter into Amazon S3. In the following sections, we have explained the process of setting up S3 and loading data.
Setting up Amazon S3 Data Storage
Amazon S3 is a web service on the AWS platform that enables business users to load and store data. Amazon S3 offers object storage with a simple web service that enables users to store and retrieve any amount of data from anywhere on the web.
The following steps highlight the basic process to load data into Amazon S3.
- In the search box on the AWS console type S3 as shown below.
- Click on S3 – Scalable storage in the cloud. You will be redirected to the S3 web service as shown below.
- We create a data bucket in the next step. The bucket is a logical unit of storage on the AWS platform and provides the user with an option to store objects consisting of data and metadata which can be accessed from other utilities like Athena and QuickSight. The bucket offers users the option to create an unlimited number of objects. The create bucket page is shown below. The bucket name is specified as ‘flexteroutput’
- The properties can be setup as necessary in the next page.
- The permission/access levels can be set up in the next page as shown below.
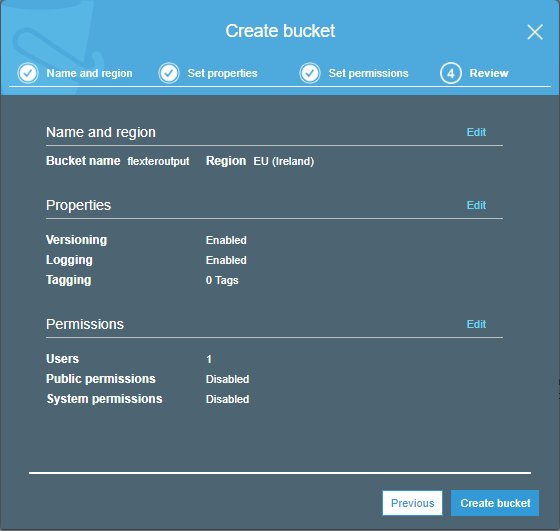
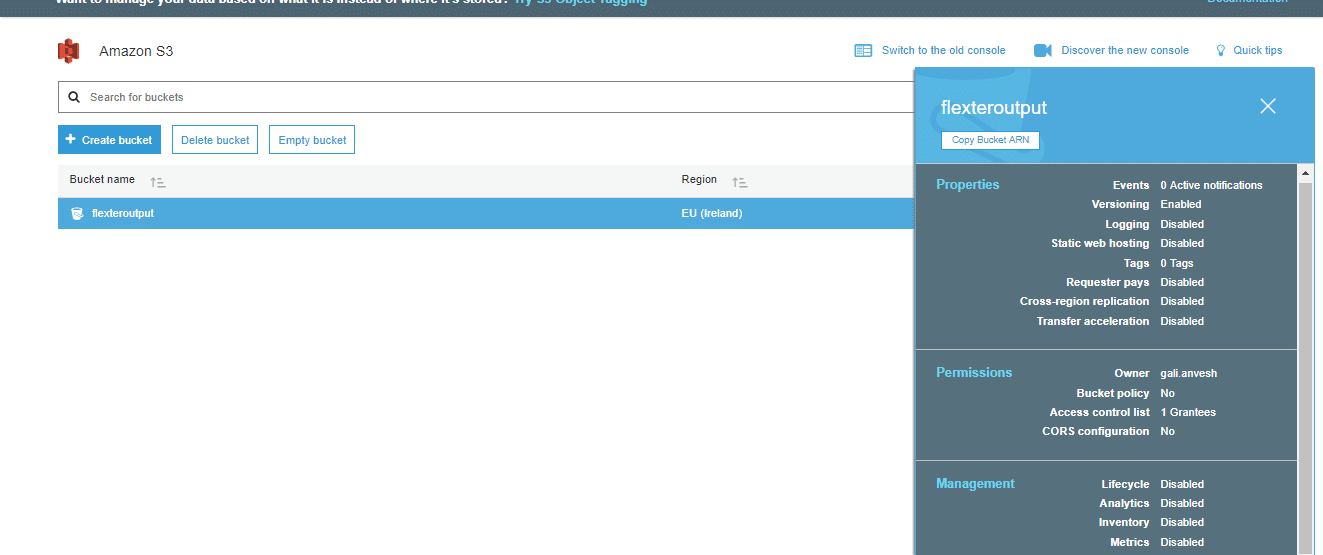
- Click on create bucket. We have created the S3 bucket which can be viewed on the S3 web service.
Loading XML output into S3 bucket
Amazon S3 provides a highly scalable and flexible data loading service which makes it possible for the user to load any type of data. The Flexter output obtained from the XML files contained a total of 13 TSV files that we load into the bucket. The following steps describe the data loading process into Amazon S3.
- Go to the AWS S3 console.

- Click on flexteroutput. You will be redirected to the below page.
- Create folders for each of the TSV files – one folder per table as shown below.
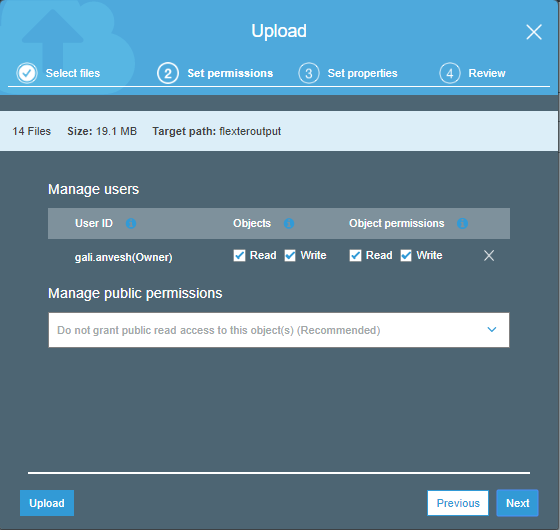
- Click on upload and select the file you want to upload into S3.
- The TSV files need to be loaded into each folder in the bucket. For instance, the TSV file age_group should be loaded into the first folder.
- Click on ‘Next’. In the next window, provide the user permissions as required.
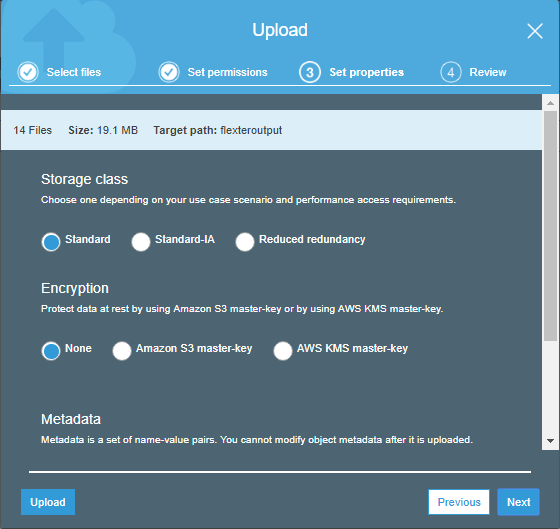
- Click next and specify the storage class and metadata (optional)
- Click next to review the files to be uploaded and proceed to ‘Upload’
- The files are loaded into Amazon S3 as shown above.
- Repeat the same method to load each TSV file into the folders.
Amazon Athena
In the next step, we will be loading the data stored in S3 into Athena and execute SQL queries.
Amazon Athena is an interactive query service provided on AWS that allows users to query and analyse data using standard SQL. Athena is server-less, hence the users have no infrastructure to manage which makes it easy to use. From this point of view it is similar to Google BigQuery. Simply point to your data in Amazon S3, define the schema, and start querying using standard SQL. Most results are delivered within seconds.
Under the hood, Athena uses Presto with ANSI SQL support – a distributed SQL engine for running interactive analytic queries against data sources of all sizes ranging from gigabytes to petabytes. The pair of Athena as the query engine and S3 as the storage engine is loosely coupled. This is comparable to the combination of Kudu and Impala from Cloudera.
Getting started with Athena – Data Loading
The step by step process of setting up Athena is listed below.
- Sign in using your Amazon credentials
- You will be redirected to the page shown below.
- Click on Get Started. The below page is shown.
- Click on Add table. The below page is displayed. Before adding any table, a database should be created.
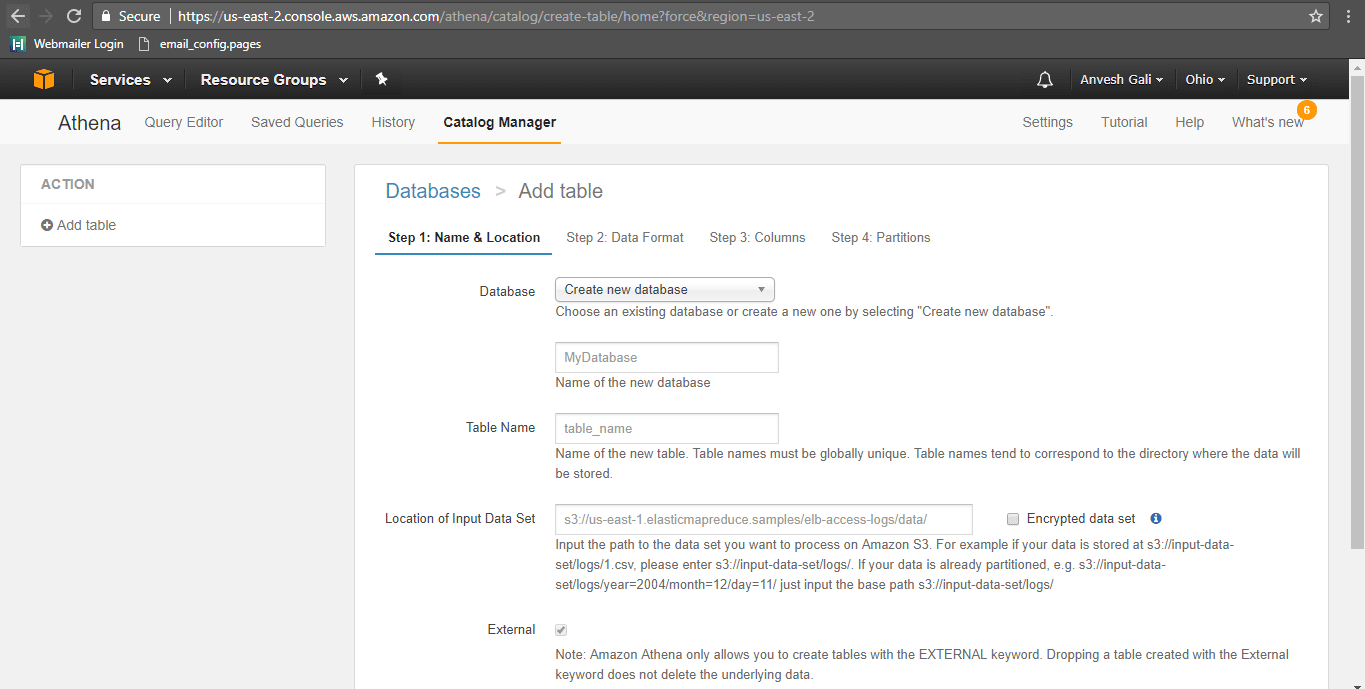
- Specify the database name as Flexter_Output and provide the table name as age_group. The location of the input data set in the S3 bucket should be specified as s3://flexteroutput/age_group/
- Click next. In the following page, specify the data format. Since we have the file format as TSV, click on the TSV checkbox.
- The next page is to define the table schema. Enter the column names and the data types as required.
- Specify data partitions (if any) and click on create table. Partitions are primarily used when there is a large amount of data that can be split based on time for example. In such a scenario, we can split/partition the data by the month/year or any specified key for faster querying and cost efficiency. In our particular example, partitions are not necessary as the data to be queried is minimal and within the cost parameters. Click here for more regarding data partitioning.

- The table is created as shown below.
|
1 2 3 4 5 6 7 8 9 10 |
CREATE EXTERNAL TABLE IF NOT EXISTS flexteroutput.age_group ( `FK_study` bigint, `age_group` string ) ROW FORMAT SERDE 'org.apache.hadoop.hive.serde2.lazy.LazySimpleSerDe' WITH SERDEPROPERTIES ( 'serialization.format' = ' ', 'field.delim' = ' ' ) LOCATION 's3://flexteroutput/age_group/' TBLPROPERTIES ('has_encrypted_data'='false'); |
The preview of this table is shown below:
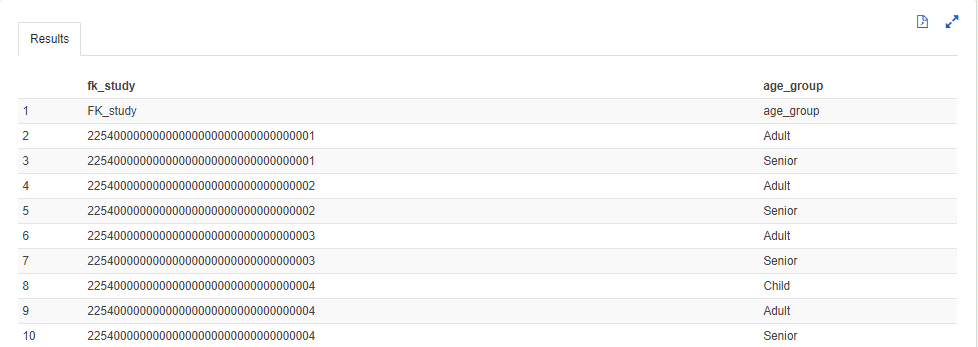
From the preview, we can see that the first row in the data columns contains the header value. This is an unexpected outcome and can be considered as a shortfall in Athena. This can be avoided by manually removing the header from the TSV file prior to data loading. This seems to be the only way to handle this shortcoming as of time of writing.
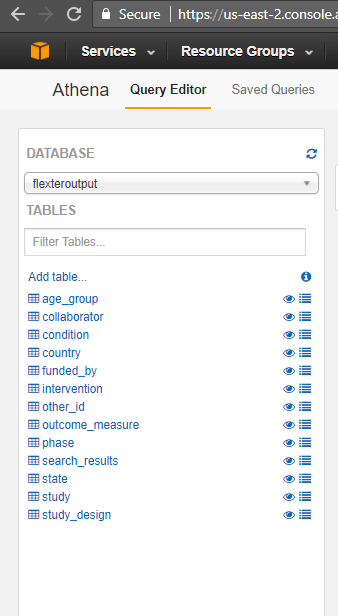
The other TSV files are loaded into Athena in a similar manner. The final view of the database in Athena after data loading is shown below.
Data Schema
The schema of the data tables for this analysis is shown below.
Based on the above schema we can run complex queries that require joining multiple tables.
Sample queries in Athena
Athena follows standard SQL. Queries can be executed from the query editor in the console.
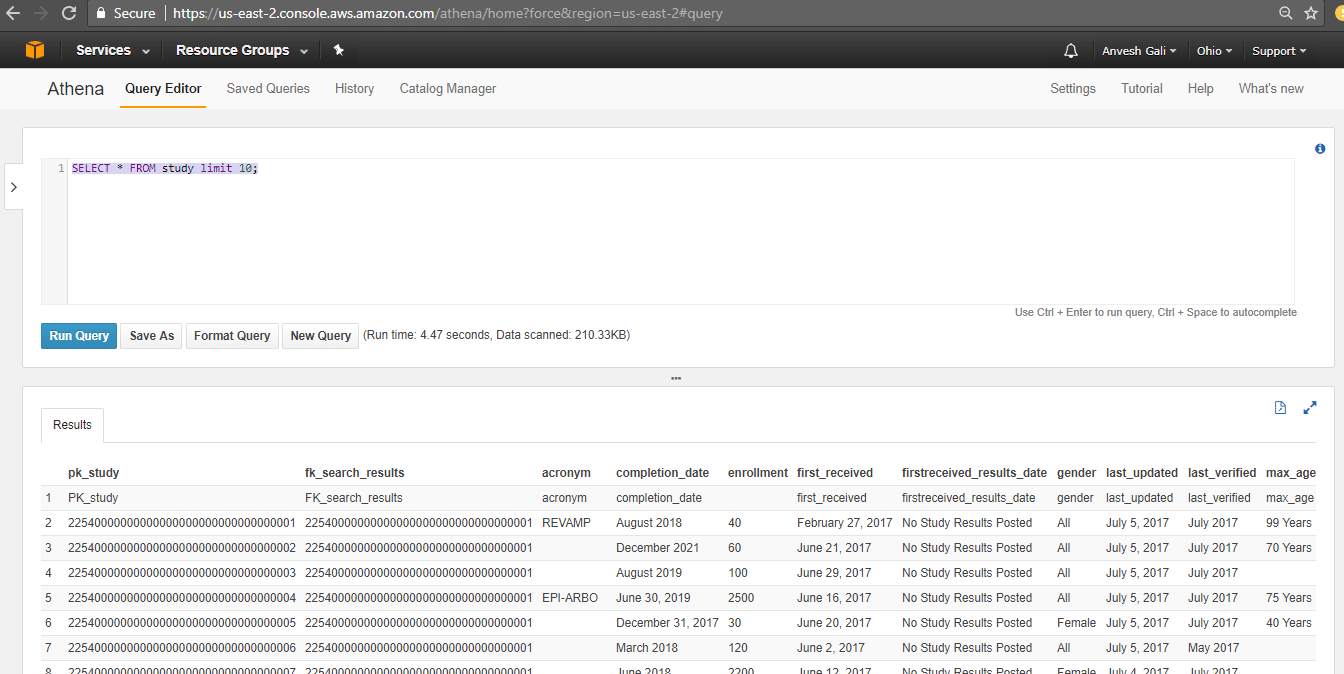
Query 1
|
1 |
SELECT * FROM study limit 10; |
OUTPUT:
Query 2:
|
1 2 3 4 |
SELECT Gender, COUNT(Gender) FROM Study GROUP BY Gender ; |
OUTPUT:

A single value called ‘Gender’ is displayed in the output as AWS considers the header as a data row.
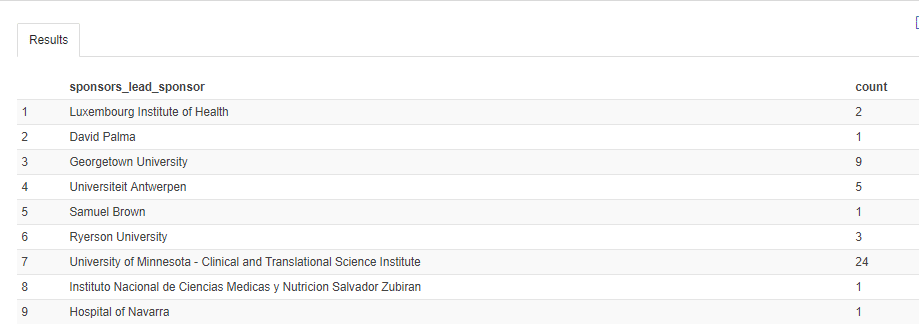
Query 3:
|
1 2 3 4 |
SELECT sponsors_lead_sponsor, COUNT(Gender) AS count FROM Study GROUP BY sponsors_lead_sponsor; |
OUTPUT:
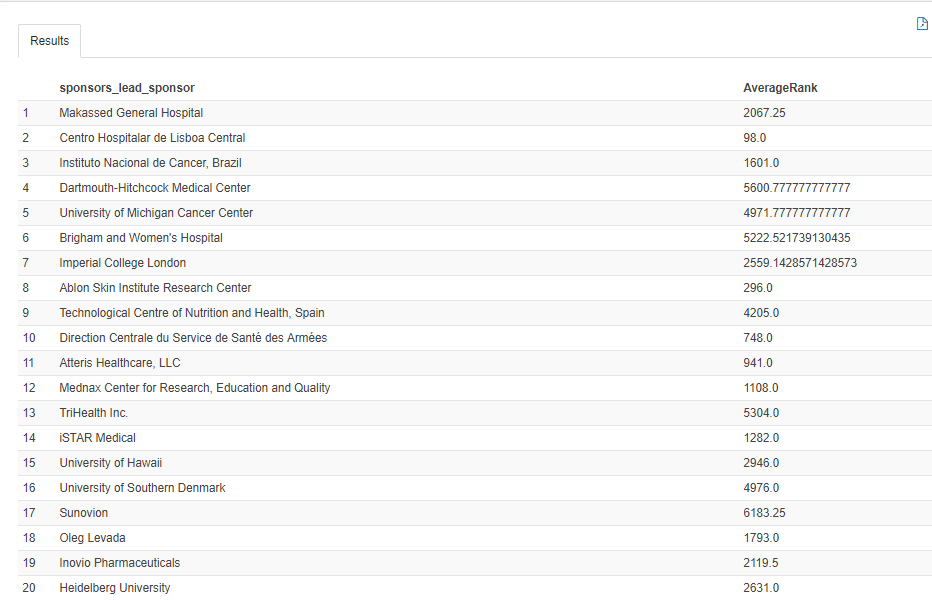
Query 4:
|
1 2 3 4 |
SELECT sponsors_lead_sponsor, AVG(RANK) AS AverageRank FROM Study GROUP BY sponsors_lead_sponsor; |
OUTPUT:
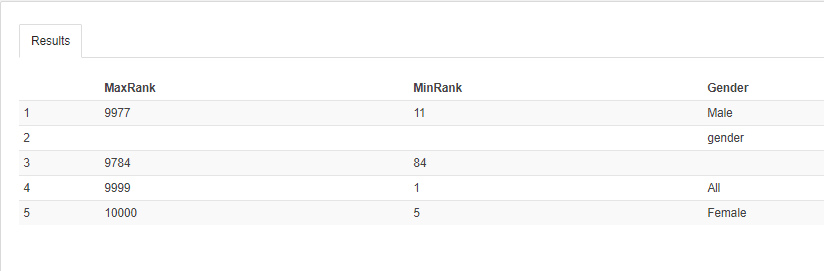
Query 5:
|
1 2 3 4 5 |
SELECT MAX(RANK) AS MaxRank, MIN(RANK) AS MinRank, Gender FROM Study GROUP BY Gender; |
OUTPUT:
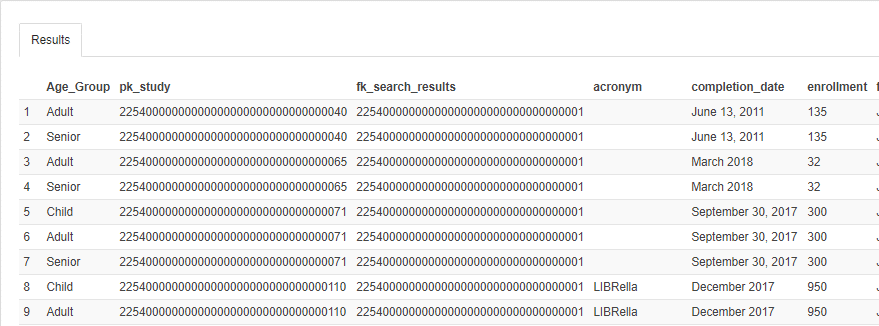
Query 6:
|
1 2 3 4 5 |
SELECT t1.age_group AS Age_Group, t2.* FROM age_group t1 JOIN Study t2 ON t1.FK_study = t2.PK_study; |
OUTPUT:
Which data formats apart from XML also give you the heebie jeebies and need to be liberated? Please leave a comment below or reach out to us.